环境配置
在你的 pom.xml 文件中添加如下配置&#xff1a; <profiles>
<profile>
<id>PRODid>
<properties>
<env>PRODenv>
properties>
<activation>
<activeByDefault>trueactiveByDefault>
activation>
profile>
<profile>
<id>TESTid>
<properties>
<env>TESTenv>
properties>
profile>
profiles>
上面定义了两套环境的配置&#xff0c;一套是用于生产环境的 PROD&#xff0c;另外一套是用于测试环境的 TEST。profile 可以通过 -P 参数来激活&#xff0c;如 -PTEST &#xff08;或 -P TEST&#xff09;即可激活 TEST 配置。TEST 配置激活之后&#xff0c;通过 ${env} 表达式即可获得 TEST 配置的 TEST 字符串值。 assembly 插件
maven-assembly-plugin 插件可以实现自定义打包。在你的 pom.xml 文件中添加如下配置&#xff1a; <build>
<plugins>
<plugin>
<artifactId>maven-assembly-pluginartifactId>
<version>2.4version>
<executions>
<execution>
<id>make-assemblyid>
<phase>packagephase>
<goals>
<goal>singlegoal>
goals>
execution>
executions>
<configuration>
<descriptors>
<descriptor>assembly.xmldescriptor>
descriptors>
<appendAssemblyId>falseappendAssemblyId>
configuration>
plugin>
plugins>
build>
在项目的根目录下创建一个 assembly.xml 文件&#xff08;与 pom.xml 文件在同一个目录&#xff09;。示例项目的结构如下&#xff1a; 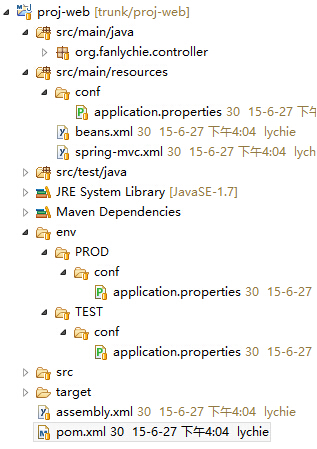 不管是开发环境、测试环境还是生产环境等&#xff0c;它们通常只是配置文件不一样&#xff0c;下面实现根据不同的参数打包出适应各个不同环境的 WAR 包。
 assembly.xml 配置
assembly.xml 文件的配置如下&#xff1a; <assembly xmlns&#61;"http://maven.apache.org/plugins/maven-assembly-plugin/assembly/1.1.3"
xmlns:xsi&#61;"http://www.w3.org/2001/XMLSchema-instance"
xsi:schemaLocation&#61;"http://maven.apache.org/plugins/maven-assembly-plugin/assembly/1.1.3
http://maven.apache.org/xsd/assembly-1.1.3.xsd">
<id>${project.artifactId}-assembly-${project.version}id>
<includeBaseDirectory>falseincludeBaseDirectory>
<formats>
<format>warformat>
formats>
<fileSets>
<fileSet>
<directory>${project.build.outputDirectory}directory>
<outputDirectory>WEB-INF/classesoutputDirectory>
<excludes>
<exclude>**/conf/*.propertiesexclude>
excludes>
fileSet>
<fileSet>
<directory>${project.basedir}/env/${env}/confdirectory>
<outputDirectory>WEB-INF/classes/confoutputDirectory>
fileSet>
<fileSet>
<directory>${project.basedir}/src/main/webappdirectory>
<outputDirectory>/outputDirectory>
fileSet>
fileSets>
<dependencySets>
<dependencySet>
<outputDirectory>WEB-INF/liboutputDirectory>
dependencySet>
dependencySets>
assembly>
打包出适应各个环境的 WAR 包
选中项目右键 --> Run As --> Maven build... --> Goals 栏输入 -PTEST clean package 。  执行完成即可打包出测试环境的 WAR 包&#xff08;示例源码下载&#xff1a;
proj-web.zip
&#xff09;。 你可以将打包出来的 WAR 包重命名为 ROOT.war&#xff0c;然后把它丢到 Tomcat 的 webapps 目录下&#xff0c;备份删除 ROOT 文件夹&#xff0c;启动/重启 Tomcat 即可。


 京公网安备 11010802041100号