1、为了在进程间通信,linux推出了信号量、共享内存、消息队列、管道、信号等IPC的方式;为了提高IPC效率,android又进一步优化共享内存,推处了binder机制(本质就是把不同进程的虚拟内存映射到同一块物理内存)。进程间通信的问题解决了,线程间也需要通信,android是怎么解决的了?回顾一下进程间通信的方式:本质就是找一块物理内存,生产者进程写入数据,消费者进程读取数据。不同的IPC方式区别就在于对这块公用物理内存怎么用!比如管道pipe传输的是无格式的字节流,通信双方要事先约定好每个字节的业务含义(本质上就是通信协议)!相比之下,消息独队列显得“规范”多了:数据按照一定的格式组成消息,允许同时存在不同格式或类型的消息;消费者进程可以按需读取消息。这两者对比,前者好比散装,后者好比精装,用起来高大上多了!android在java层面为了便于线程间通信,借鉴了消息队列的形式,推出了handler线程间的通信机制——MessageQueue!整体框架如下:
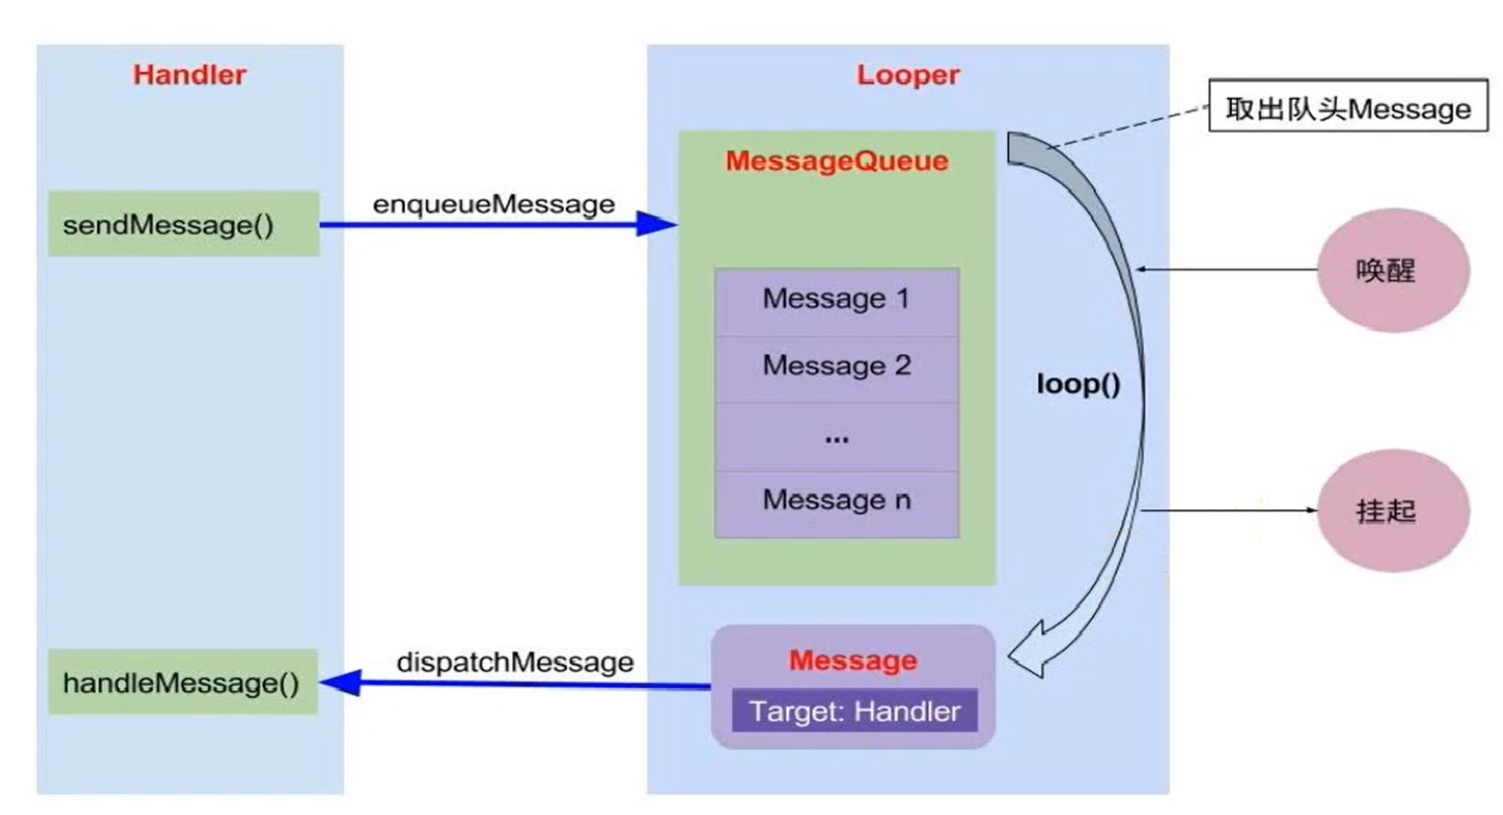
用户的代码只需要新建handler对象,然后不同的线程调用sendMessage和handlerMessage就能实现线程间通信了。具体代码是怎么实现的了?
2、(1)发送消息
由于是多线程之间通信,所以同时可以有多个线程发消息,也可以有多个线程读消息!用什么来存message了?这个消息队列又该怎么实现了?
综上所述,android实现入队列的函数如下:
boolean enqueueMessage(Message msg, long when) {
if (msg.target == null) {
throw new IllegalArgumentException("Message must have a target.");
}
if (msg.isInUse()) {
throw new IllegalStateException(msg + " This message is already in use.");
}
synchronized (this) {
if (mQuitting) {
IllegalStateException e = new IllegalStateException(
msg.target + " sending message to a Handler on a dead thread");
Log.w(TAG, e.getMessage(), e);
msg.recycle();
return false;
}
msg.markInUse();
msg.when = when;
Message p = mMessages;
boolean needWake;
if (p == null || when == 0 || when < p.when) {
// New head, wake up the event queue if blocked.
msg.next = p;
mMessages = msg;
needWake = mBlocked;
} else {
// Inserted within the middle of the queue. Usually we don't have to wake
// up the event queue unless there is a barrier at the head of the queue
// and the message is the earliest asynchronous message in the queue.
needWake = mBlocked && p.target == null && msg.isAsynchronous();
Message prev;
for (;;) {
prev = p;
p = p.next;
/*这不是普通的队列,这是优先级队列,根据message的时间排序*/
if (p == null || when < p.when) {
break;
}
if (needWake && p.isAsynchronous()) {
needWake = false;
}
}
msg.next = p; // invariant: p == prev.next
prev.next = msg;
}
// We can assume mPtr != 0 because mQuitting is false.
if (needWake) {
nativeWake(mPtr);
}
}
return true;
}
消息被封装成了Message类,里面有很多字段和方法;when是消息需要被处理的事件,根据这个找到新消息在队列中的位置然后插入!
(2)既然队列是以时间作为优先级排序,那么超时的消息必须排在队列最前面才能优先被消费者线程取出来处理,所以需要有封装好的方法把这些超时的消息都捻出来!大家还记得红黑树么?linux内核定时器用的就是红黑树,最左边的节点就是距离超时最近的节点。不过android这里并没有用红黑树,用的还是链表遍历,估计是觉得消息数量不会多到几十万、甚至上百万级别吧,没必要非得建树。这个方法叫next,不需要参数,源码如下:
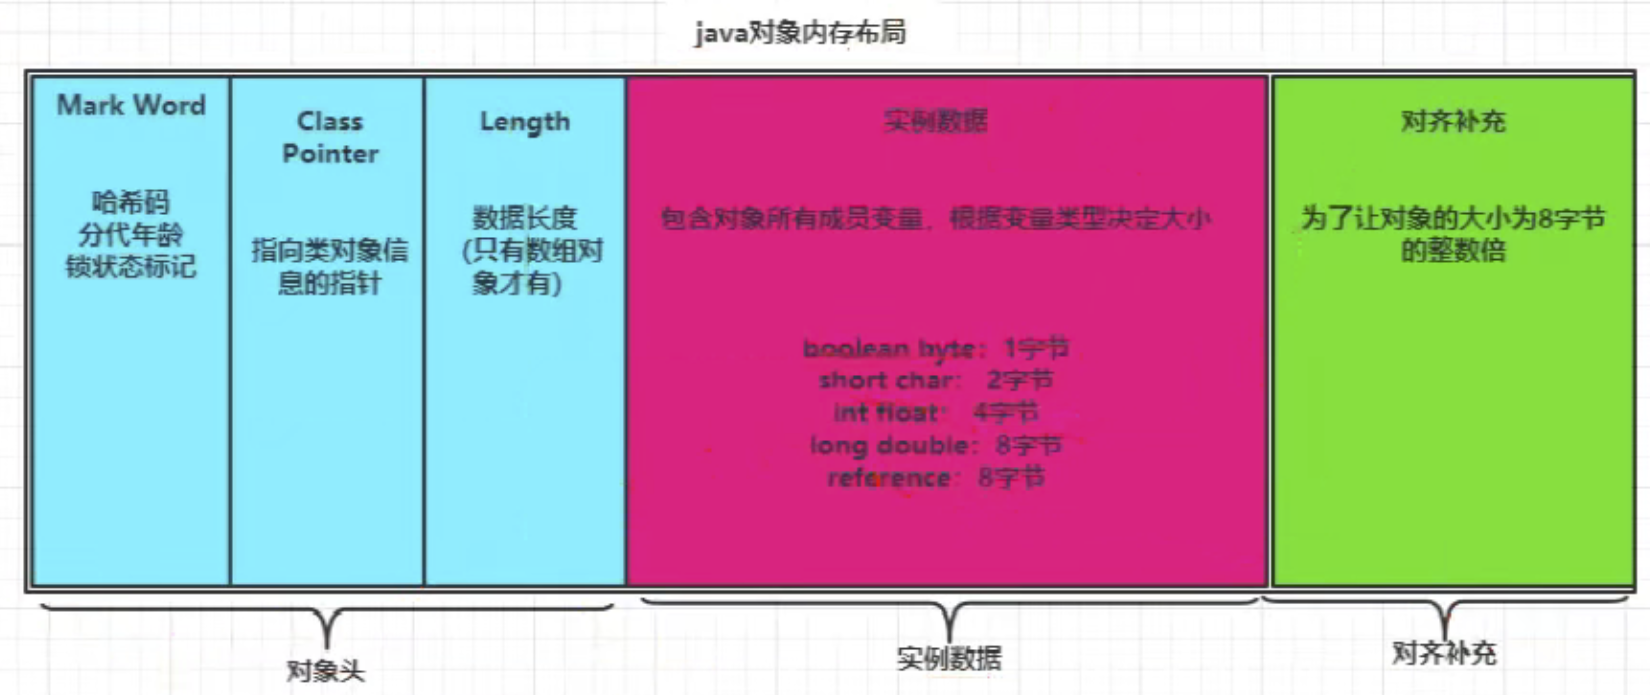
/* (3)通过next找到超时的消息处理,需要把消息发送给消费者线程,这个工作是looper.loop方法做的!原理很简单:在死循环里面调用next方法,不停的筛选出超时的消息,然后调用dispathMessage发送给消费者线程处理,代码如下: /** (4)最后就是消费者线程处理消息了;由于不同的业务需求不同,处理消息的逻辑肯定也不相同,所以肯定要给开发人员预留处理消息的数据接口,这个接口就是handleMessage,函数具体的实现由开发人员根据业务需求完成,接口的调用就是在dispatchMessage方法了,如下: /** 整个handler过程最核心的代码和思路就这样了,一点也不复杂! 3、其他重要点: (1)发送消息前需要得到一个message;如果直接new,jvm底层肯定会调用操作系统系统的malloc分配堆内存,效率不高;所以这里并没有直接new,而是复用现成的message实例,避免了频繁jvm频繁调用malloc带来的低效;这里本质上就是app一次性申请较多内存,然后反复使用这些内存,避免频繁“折腾”操作系统不停的分配和回收内存! /** (2)由于是多线程读写同样的内存区域,避免不了互斥/同步;java层面采用的是synchronize关键字,需要传入某个对象实例;还记得之前的总结的同步/互斥方法么?以x86为例,汇编层面还是lock一块内存,在这块内存上加减。如果这块内存的值是0,所以有线程进入临界区了,当前线程就不能继续执行。synchronize(对象)这块内存区域在哪了?既然传入了对象的实例,那么100%肯定这块内存就在这个对象实例内部或附近! java对象实例布局如下: 对象头的Mark Word区域存储对象的hashCode、锁信息或分代年龄或GC标志等信息,Class Metadata Address是类型指针指向对象的类元数据,JVM通过该指针确定该对象是哪个类的实例。锁的类型和状态在对象头Mark Word中都有记录,在申请锁、锁升级等过程中JVM都需要读取对象的Mark Word数据! 参考: 1、https://www.cnblogs.com/jimuzz/p/14187408.html handler内存泄漏原理 2、https://www.bilibili.com/video/BV1Wv411b7YM?from=search&seid=18202251044637176644&spm_id_from=333.337.0.0 handler原理 3、https://blog.csdn.net/a78270528/article/details/48246735 handler使用实例
1、首先判断当前时间与链表头部的Message.when字段的大小,
如果该Message可以处理,那么直接返回链表头部的Message,否则继续等待
2、当设置了同步屏障之后,next函数将会忽略所有的同步消息,返回异步消息。
换句话说就是,设置了同步屏障之后,Handler只会处理异步消息。再换句话说,
同步屏障为Handler消息机制增加了一种简单的优先级机制,
异步消息的优先级要高于同步消息2、
*/
Message next() {
// Return here if the message loop has already quit and been disposed.
// This can happen if the application tries to restart a looper after quit
// which is not supported.
final long ptr = mPtr;
if (ptr == 0) {
return null;
}
int pendingIdleHandlerCount = -1; // -1 only during first iteration
int nextPollTimeoutMillis = 0;
for (;;) {
if (nextPollTimeoutMillis != 0) {
Binder.flushPendingCommands();
}
nativePollOnce(ptr, nextPollTimeoutMillis);
synchronized (this) {
// Try to retrieve the next message. Return if found.
final long now = SystemClock.uptimeMillis();
Message prevMsg = null;
Message msg = mMessages;
if (msg != null && msg.target == null) {//碰到同步屏障
// Stalled by a barrier. Find the next asynchronous message in the queue.
do {
//跳出循环时,msg指向离表头最近的一个异步消息
prevMsg = msg;
msg = msg.next;
} while (msg != null && !msg.isAsynchronous());
}
if (msg != null) {
if (now < msg.when) {
// Next message is not ready. Set a timeout to wake up when it is ready.
// 如果下一个消息的处理时间还没到,那么设置一个等待超时时间
nextPollTimeoutMillis = (int) Math.min(msg.when - now, Integer.MAX_VALUE);
} else {
//拿到可用的msg,返回
// Got a message.
mBlocked = false;
if (prevMsg != null) {
prevMsg.next = msg.next;
} else {
//链表头部移动到链表第二个元素上
mMessages = msg.next;
}
msg.next = null;
if (DEBUG) Log.v(TAG, "Returning message: " + msg);
msg.markInUse();
//返回链表中的第一个元素
return msg;
}
} else {
// No more messages.
nextPollTimeoutMillis = -1;
}
// Process the quit message now that all pending messages have been handled.
if (mQuitting) {
dispose();
return null;
}
// If first time idle, then get the number of idlers to run.
// Idle handles only run if the queue is empty or if the first message
// in the queue (possibly a barrier) is due to be handled in the future.
if (pendingIdleHandlerCount <0
&& (mMessages == null || now < mMessages.when)) {
pendingIdleHandlerCount = mIdleHandlers.size();
}
if (pendingIdleHandlerCount <= 0) {
// No idle handlers to run. Loop and wait some more.
mBlocked = true;
continue;
}
if (mPendingIdleHandlers == null) {
mPendingIdleHandlers = new IdleHandler[Math.max(pendingIdleHandlerCount, 4)];
}
mPendingIdleHandlers = mIdleHandlers.toArray(mPendingIdleHandlers);
}
// Run the idle handlers.
// We only ever reach this code block during the first iteration.
for (int i = 0; i
final IdleHandler idler = mPendingIdleHandlers[i];
mPendingIdleHandlers[i] = null; // release the reference to the handler
boolean keep = false;
try {
keep = idler.queueIdle();
} catch (Throwable t) {
Log.wtf(TAG, "IdleHandler threw exception", t);
}
if (!keep) {
synchronized (this) {
mIdleHandlers.remove(idler);
}
}
}
// Reset the idle handler count to 0 so we do not run them again.
pendingIdleHandlerCount = 0;
// While calling an idle handler, a new message could have been delivered
// so go back and look again for a pending message without waiting.
nextPollTimeoutMillis = 0;
}
}
* Run the message queue in this thread. Be sure to call
* {@link #quit()} to end the loop.
让MessageQueue循环动起来:通过next筛选出超时的消息,然后通过dispatchMessage让消费者线程处理
*/
public static void loop() {
final Looper me = myLooper();
if (me == null) {
throw new RuntimeException("No Looper; Looper.prepare() wasn't called on this thread.");
}
final MessageQueue queue = me.mQueue;
// Make sure the identity of this thread is that of the local process,
// and keep track of what that identity token actually is.
Binder.clearCallingIdentity();
final long ident = Binder.clearCallingIdentity();
// Allow overriding a threshold with a system prop. e.g.
// adb shell 'setprop log.looper.1000.main.slow 1 && stop && start'
final int thresholdOverride =
SystemProperties.getInt("log.looper."
+ Process.myUid() + "."
+ Thread.currentThread().getName()
+ ".slow", 0);
boolean slowDeliveryDetected = false;
for (;;) {
//获取消息队列超时的消息
Message msg = queue.next(); // might block
if (msg == null) {//没有超时的消息先返回了
// No message indicates that the message queue is quitting.
return;
}
// This must be in a local variable, in case a UI event sets the logger
final Printer logging = me.mLogging;
if (logging != null) {
logging.println(">>>>> Dispatching to " + msg.target + " " +
msg.callback + ": " + msg.what);
}
// Make sure the observer won't change while processing a transaction.
final Observer observer = sObserver;
final long traceTag = me.mTraceTag;
long slowDispatchThresholdMs = me.mSlowDispatchThresholdMs;
long slowDeliveryThresholdMs = me.mSlowDeliveryThresholdMs;
if (thresholdOverride > 0) {
slowDispatchThresholdMs = thresholdOverride;
slowDeliveryThresholdMs = thresholdOverride;
}
final boolean logSlowDelivery = (slowDeliveryThresholdMs > 0) && (msg.when > 0);
final boolean logSlowDispatch = (slowDispatchThresholdMs > 0);
final boolean needStartTime = logSlowDelivery || logSlowDispatch;
final boolean needEndTime = logSlowDispatch;
if (traceTag != 0 && Trace.isTagEnabled(traceTag)) {
Trace.traceBegin(traceTag, msg.target.getTraceName(msg));
}
final long dispatchStart = needStartTime ? SystemClock.uptimeMillis() : 0;
final long dispatchEnd;
Object token = null;
if (observer != null) {
token = observer.messageDispatchStarting();
}
long origWorkSource = ThreadLocalWorkSource.setUid(msg.workSourceUid);
try {
/*
msg.target是一个Handler,让该Message关联的Handler通过dispatchMessage()处理Message。
*/
msg.target.dispatchMessage(msg);
if (observer != null) {
observer.messageDispatched(token, msg);
}
dispatchEnd = needEndTime ? SystemClock.uptimeMillis() : 0;
} catch (Exception exception) {
if (observer != null) {
observer.dispatchingThrewException(token, msg, exception);
}
throw exception;
} finally {
ThreadLocalWorkSource.restore(origWorkSource);
if (traceTag != 0) {
Trace.traceEnd(traceTag);
}
}
if (logSlowDelivery) {
if (slowDeliveryDetected) {
if ((dispatchStart - msg.when) <= 10) {
Slog.w(TAG, "Drained");
slowDeliveryDetected = false;
}
} else {
if (showSlowLog(slowDeliveryThresholdMs, msg.when, dispatchStart, "delivery",
msg)) {
// Once we write a slow delivery log, suppress until the queue drains.
slowDeliveryDetected = true;
}
}
}
if (logSlowDispatch) {
showSlowLog(slowDispatchThresholdMs, dispatchStart, dispatchEnd, "dispatch", msg);
}
if (logging != null) {
logging.println("<<<<
}
// Make sure that during the course of dispatching the
// identity of the thread wasn't corrupted.
final long newIdent = Binder.clearCallingIdentity();
if (ident != newIdent) {
Log.wtf(TAG, "Thread identity changed from 0x"
+ Long.toHexString(ident) + " to 0x"
+ Long.toHexString(newIdent) + " while dispatching to "
+ msg.target.getClass().getName() + " "
+ msg.callback + " what=" + msg.what);
}
msg.recycleUnchecked();
}
}
* Handle system messages here.
*/
public void dispatchMessage(@NonNull Message msg) {
//消息的回调函数不会空就执行回调函数
if (msg.callback != null) {
handleCallback(msg);
} else {
if (mCallback != null) {
if (mCallback.handleMessage(msg)) {
return;
}
}
//用户实现的接口方法
handleMessage(msg);
}
}
* Return a new Message instance from the global pool. Allows us to
* avoid allocating new objects in many cases.
*/
public static Message obtain() {
synchronized (sPoolSync) {
if (sPool != null) {
Message m = sPool;
sPool = m.next;
m.next = null;
m.flags = 0; // clear in-use flag
sPoolSize--;
return m;
}
}
return new Message();
}


 京公网安备 11010802041100号 | 京ICP备19059560号-4 | PHP1.CN 第一PHP社区 版权所有