freehand8
In this second article of our vector graphics series, we’ll take the basics that were covered in part one and make use of them in a fun application of vector graphics programs: Faux 3D Graphics.
在矢量图形系列的第二篇文章中,我们将采用第一部分中介绍的基础知识,并在矢量图形程序(Faux 3D Graphics)的有趣应用中使用它们。
There are plenty of powerful programs that create "true" 3D graphics — graphics that can have lighting and textures applied to their surfaces, and can be rotated in space. In fact, later versions of Adobe Illustrator and Macromedia Freehand have 3D capabilities that allow you to "extrude" shapes (e.g. take a 2D rectangle and turn it into a 3D box), rotate them, and apply different lighting. For more information on Illustrator and Freehand’s 3D functions, see the links at the end of this article.
有许多强大的程序可以创建“真实的” 3D图形,这些图形可以在其表面上应用照明和纹理,并且可以在空间中旋转。 实际上,更高版本的Adobe Illustrator和Macromedia Freehand具有3D功能,可让您“拉伸”形状(例如,将2D矩形变成3D框),旋转形状并应用不同的照明。 有关Illustrator和Freehand的3D功能的更多信息,请参见本文结尾处的链接。
So, if even Illustrator and Freehand have 3D graphics capabilities, why would anyone try to make vector graphics that "look" 3D, but aren’t truly 3D?
因此,即使Illustrator和Freehand都具有3D图形功能,为什么有人会尝试制作“看起来”为3D但不是真正的3D的矢量图形呢?


Are you convinced? Let’s get started! As you follow this tutorial, you’ll hone your skills with the use of gradients, and you might even pick up a few other skills, too.
你说服了吗? 让我们开始吧! 在学习本教程时,您将通过使用渐变来磨练自己的技能,甚至可能还会学到其他一些技能。
Note: I’ll be making my diagrams and commands using Adobe Illustrator 8. I’ll also add a few comments for people who use Macromedia Fireworks to make it easy for you to follow along.
注意:我将使用Adobe Illustrator 8制作图表和命令。我还将为使用Macromedia Fireworks的人员添加一些注释,以使您轻松进行后续操作。
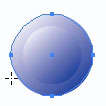
Creating imitation 3D round shapes is quite easy.
创建仿制3D圆形非常容易。
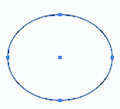
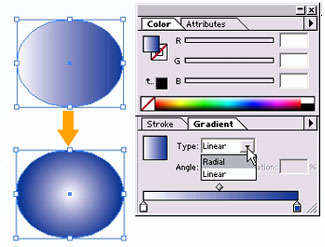
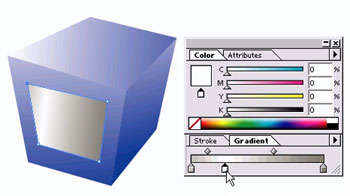
This fills the shape with a gradient:
这会用渐变填充形状:
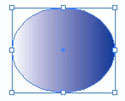

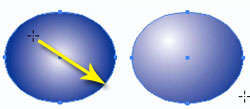
Easy! Now, remember that these are imitation 3D shapes. The shading and highlights won’t be perfect for round shapes that aren’t perfect circles.
简单! 现在,请记住,这些是仿3D形状。 阴影和高光不适用于不是完美圆形的圆形。
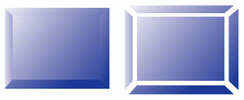
Beveled shapes can be used to make buttons. Here, I’ll demonstrate how to make a round beveled button and a rectangular beveled button.
斜面形状可用于制作按钮。 在这里,我将演示如何制作圆形斜角按钮和矩形斜角按钮。
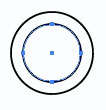
Start with two circles (see Create Vector Graphics in Illustrator and Freehand for tips on how to make two circles inside one another).
从两个圆圈开始(有关如何使两个圆圈彼此重叠的提示,请参见在Illustrator和Freehand中创建矢量图形 )。
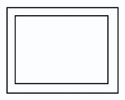
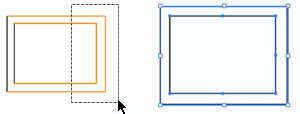
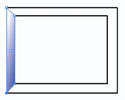
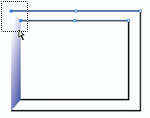
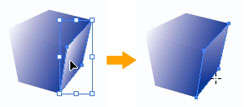
OK, a round beveled button was pretty easy. But the creation of beveled shapes with "hard"-edged objects will take a few extra steps. In this demonstration, I’ll create a basic rectangular beveled shape.
好的,倒圆角的按钮非常简单。 但是使用“硬”边缘物体创建斜角形状将需要一些额外的步骤。 在此演示中,我将创建一个基本的矩形斜面形状。
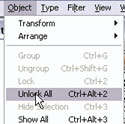
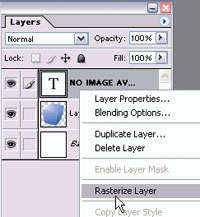
Freehand side note: If you’re using Freehand, you’ll want to put the duplicate inner rectangle on its own layer, then hide the layer from view.
徒手画旁注:如果使用的是徒手画,则需要将重复的内部矩形放在其自己的图层上,然后从视图中隐藏该图层。

Freehand side note: You’ll want to select the Knife tool.
徒手注意:您需要选择“刀”工具。
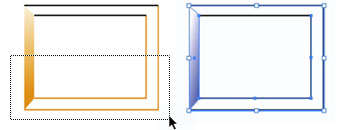
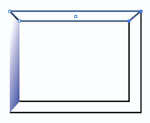
This cuts the shapes into eight individual line segments. It will still look like you have two rectangles until you try to use the black arrow tool; the individual line segments are now independent of each other.
这会将形状切成八个单独的线段。 除非您尝试使用黑色箭头工具,否则看起来仍然有两个矩形。 现在,各个线段彼此独立。
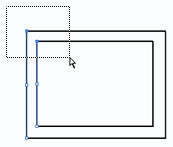
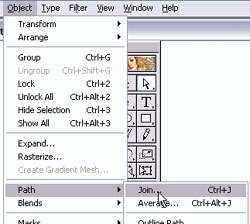
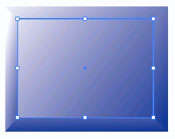
This takes the two open endpoints and connects them with a line segment.
这将使用两个开放的端点,并将它们与线段连接。

Freehand note: Sometimes, using the Join command in Freehand doesn’t work as expected. If you’re having more trouble than you think it’s worth, use the Pen tool to connect the line segments together instead!
写意笔记:有时,在Freehand中使用Join命令无法正常工作。 如果遇到的麻烦超出了您的想象,那么请使用钢笔工具将线段连接在一起!

Feeling good about your imitation 3D shapes so far? Let’s move on to something more complex…
到目前为止,您对仿制3D形状感觉良好吗? 让我们继续进行更复杂的事情……
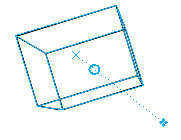
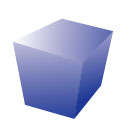
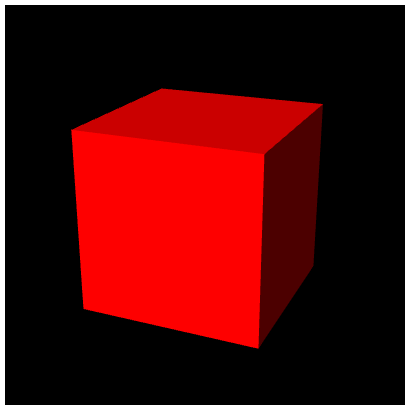
Let’s try to create a "funky box shape" that you can use as a base for lots of other types of imitation 3D objects.
让我们尝试创建一个“ funky box shape”,您可以将其用作许多其他类型的仿制3D对象的基础。
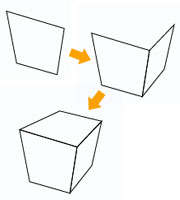
Here are the individual shapes, in case you’re wondering what they look like separately:
以下是各个形状,以防您想知道它们分别是什么样子:
Here’s the result:
结果如下:
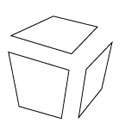
Is this box too boring for you? Let’s look at a couple ways that you can use this "funky box" for other purposes…
这个盒子对您来说太无聊了吗? 让我们看一下可以使用此“笨重的盒子”作其他用途的几种方法……

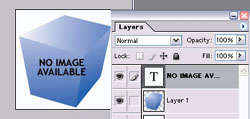
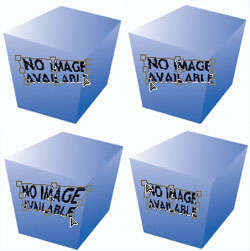
In the next example, we’ll take the funky box and lay text over it to use in a retro-style Website catalog as a "no product image available" placeholder.
在下一个示例中,我们将使用时髦的框并在其上方放置文本,以将其用作复古风格的网站目录中的“无可用产品图片”占位符。

Side Note: If you have Illustrator 10+, you may use the Envelope Distort command to fit the text to the object. This tutorial shows you how to use the Envelope Distort command.
旁注:如果使用Illustrator 10+,则可以使用“信封扭曲”命令使文本适合对象。 本教程向您展示如何使用“信封扭曲”命令 。
Congratulations!
恭喜你!
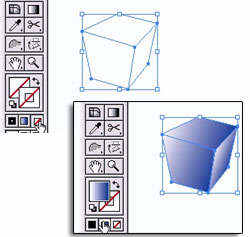
You now know how to create common imitation 3D shapes:
现在,您知道如何创建常见的仿制3D形状:
And you’ve also realized that creating these 3D-looking 2D shapes really comes down to fancy use of the gradient tool. So, to use the gradient tool well, you’ll want to spend some time looking at photographs or real-life objects to see how lighting affects the shadows and shading of the object. Below are a few links to resources that might be helpful in understanding light and shadow.
您还已经意识到,创建这些看起来像3D的2D形状确实归因于渐变工具的花哨使用。 因此,要很好地使用渐变工具,您将需要花费一些时间查看照片或真实对象,以了解光照如何影响对象的阴影和阴影。 以下是一些资源链接,可能有助于理解光影。
a nice basic overview of lighting, shapes, and shadows
照明,形状和阴影的基本概述
shows how placing a light source at different positions affects shadows
展示了将光源放置在不同位置如何影响阴影
scrolling down a little bit gives some helpful basic 3D renderings of objects
向下滚动可提供一些有用的对象基本3D渲染
Furthermore, because these imitation 3D graphics simply combine shapes and gradients, you can use the same gradient tool techniques to create quick 3D-like graphics in Photoshop or Fireworks as well (using vector tools or selections!). Just remember that you’ll want to use vector graphics if there’s a chance that you’ll want to be able easily to resize and reuse the graphic later.
此外,由于这些仿制3D图形仅将形状和渐变组合在一起,因此您也可以使用相同的渐变工具技术在Photoshop或Fireworks中创建类似3D的快速图形(使用矢量工具或选择!)。 请记住,如果您希望以后可以轻松地调整大小和重新使用图形,则可能要使用矢量图形。
Finally, I mentioned earlier that later versions of Illustrator and Freehand have some 3D rendering capabilities. If you wanted to learn more about that, these links might be helpful:
最后,我之前提到过,Illustrator和Freehand的更高版本具有某些3D渲染功能。 如果您想了解更多有关这些的信息,这些链接可能会有所帮助:
a nice overview of the "2D Drawing Applications’ 3D Capabilities"
“ 2D绘图应用程序的3D功能”的概述
Part 1: Extrusion and Bevel Basics
第1部分:挤压和倒角基础知识
Part 2: Custom Bevel Creation
第2部分:自定义斜角创建
Part 3: Creating Symmetrical 3D Objects Using Revolve
第3部分:使用旋转创建对称3D对象
Part 4: Creating a Glass Effect
第4部分:创建玻璃效果
翻译自: https://www.sitepoint.com/basic-imitation-3d-graphics/
freehand8


 京公网安备 11010802041100号 | 京ICP备19059560号-4 | PHP1.CN 第一PHP社区 版权所有