Snowball snowball 是一个一站式前端开发框架,你可以使用snowball轻松构建出一套web app/hybrid app。snowball内置了view层,但同时也支持React。它比React全家桶轻量又支持更多功能,如下:- 路由系统:拥有多工程跨工程加载、页面切换前进后退动画效果、手势返回、动态管理DOM等功能。
- 状态管理:immutable、响应式,和
redux不同,snowball的状态管理更符合OOP思想。 - 视图:fiber模式渲染,高性能,双向绑定。 采用运行时模版编译,在需要从服务端拉取模版渲染的场景优于
React、Vue和Angular等框架。 - 路由系统和状态管理都完全适配
React。 - 业务项目采用分层架构,主要分为
Controller、Service、View层,Controller层用来组织Service层,并通过injectable注解将数据注入到View层。 - 项目地址:github.com/sorrymeika/…
路由
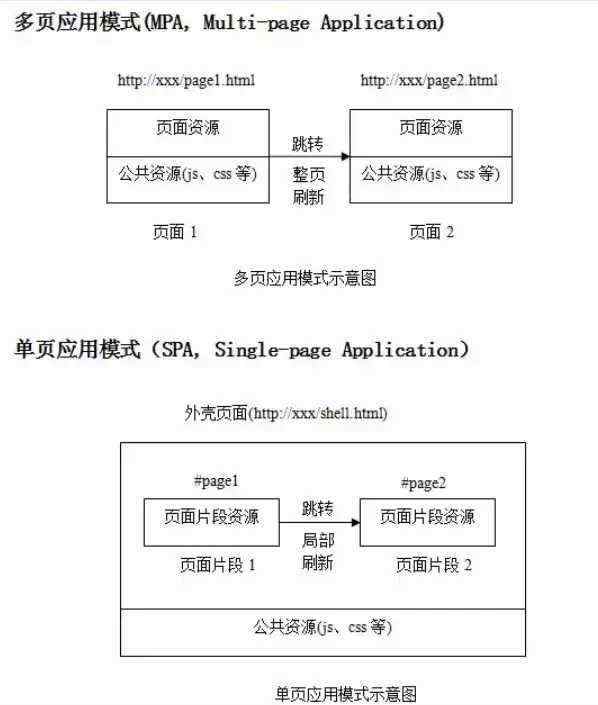
snowball 是一个一站式前端开发框架,你可以使用snowball轻松构建出一套web app/hybrid app。snowball内置了view层,但同时也支持React。它比React全家桶轻量又支持更多功能,如下:redux不同,snowball的状态管理更符合OOP思想。React、Vue和Angular等框架。React。Controller、Service、View层,Controller层用来组织Service层,并通过injectable注解将数据注入到View层。该路由方案专为多团队协作开发设计,将多个库整合成一个单页应用,让所有业务都使用相同的跳转动画、手势返回、页面缓存。
发布后到业务库共用一份核心库的js/css/image/iconfont,减少下载资源的大小。
一个核心框架库+多个业务库。业务库之间不依赖,可单独发布。
多工程跨工程加载
- 核心框架
snowball统一控制路由,需要在snowball中注册需要加载的业务 - 业务库打包后会生成
asset-manifest.json文件,snowball通过路由匹配到业务,并加载manifest中的js和css。 - 业务js加载时调用
registerRoutes({...})方法注册子路由 snowball在业务js/css加载完成后,根据业务注册的子路由跳至对应页面。
跳转动画和手势返回
- 应用启动后,可使用
navigation.forward和navigation.back方法来控制页面跳转的动画效果。使用navigation.forward跳转页面后,点击浏览器返回上一页会自带返回动画。若无需跳转动画可使用navigation.transitionTo方法。 - 应用默认开启
手势返回功能,navigation.forward跳转到新页面之后,左滑页面可返回上一页。 - 页面
render时会监听dom数量,若dom数量超过指定数量(默认20k),会自动umount老页面的dom。
视图和状态管理
snowball的视图层采用专有的模版语言、实时模版编译和fiber模式渲染。视图层接收string类型模版,组件实例化后,snowball会对模版进行实时编译,生成虚拟dom。渲染阶段会对实体dom的生成和变更进行分片渲染,避免界面卡顿。
// 这是一个简单的 `component` 示例
@component({tagName: 'Order',template: `
`
})
class Order extends Model {handleOrder(item, i) {console.log(item, i);}
}new Order({user: {name: 'UserName'},orderList: [{tradeCode: '1234'}]
}).appendTo(document.body)
优点
- 在需要从服务端拉取模版渲染的场景优于
React和Angular等框架。 - 状态管理优于
React等框架。 - 使用脏数据检查和
fiber模式进行异步渲染,性能好。
状态管理
- 内置多种数据类型,如
Model和Collection,Collection类中包含多种常用数组操作方法 immutable,数据变更后对比非常方便- 使用观察者模式并且提供多种操作函数,轻松监听数据的变化
开发
Use Snowball
- run
git clone git@github.com:sorrymeika/snowball.git - run
cd snowball && npm install - run
npm run project yourProjectNameto create your own project import { env, Model } from "snowball"- see
https://github.com/sorrymeika/juicyto get the full example!
Getting Start
- run
cd yourProject && npm startto start development server, it'll open the project url in browser automatically! - run
npm run testto run test cases! - run
npm run buildto build the production bundle. - run
npm run sprityto build sprity images. - to see the built project, please visit
http://localhost:3000/dist/#/
if you get some error about canvas
- run
brew install pkgconfigif show "pkg-config: command not found" - run
brew install cairoif show "No package 'cairo' found" - if you don't have brew command in your computer, see the brew installation
- install the XQuartz
or
- see the Installation OSX to install without brew command
or
- just remove the
canvasmodule frompackage.json
打包
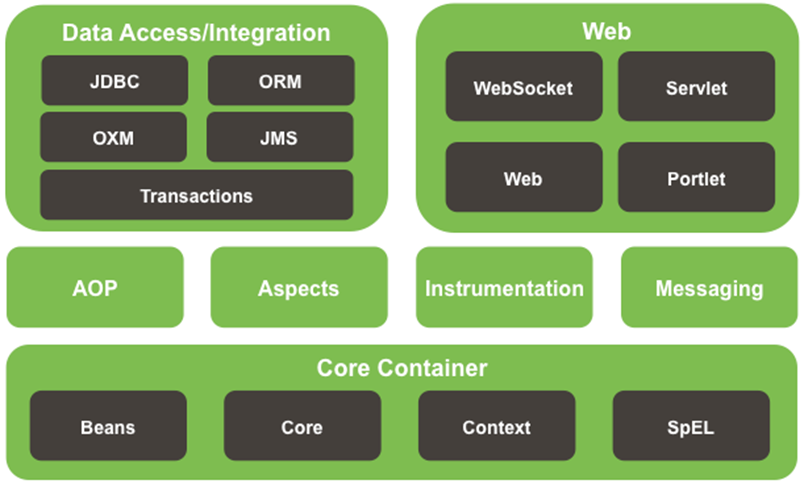
业务项目打包后会剔除掉`react`,`react-dom`,`polyfill`等框架和框架中的公共组件/公共样式
snowball会将React等框架注册到window.Snowball上- 使用
snowball-loader, 该loader会将import React from "react"替换成const React = window.Snowball.React
框架版本管理
snowball会分大版本(1.x和2.x)和小版本(1.x.x和1.x.x),小版本升级(自动化测试)业务不感知。大版本升级业务需处理。snowball会尽量保证兼容性。让大版本升级尽量平滑。
项目结构
- 项目主要分为
Controller、Service、View层 Controller层用来组织Service层,并通过injectable注解将数据注入到View层
项目代码示例
- 看完上面的文档再看例子
import { Model, Collection, Reaction, attributes } from 'snowball';
import { controller, injectable, service, observer } from 'snowball/app';// Model 的接口必须定义
interface IUser {userId: number;userName: string;
}// Model
class UserModel extends Model {static defaultAttributes = {}attributes: IUser
};const user = new UserModel({userName: 'aaa'
});console.log(user.get(''));// 可用 Reactive Object 替换 Model
class User implements IUser {@attributes.numberuserId;@attributes.stringuserName;constructor(user: IUser) {User.init(this, user);}
}// Reaction 需和 Reactive Object 配合使用
// observer 基于 Reaction 实现
const user = new User();
const reaction = new Reaction(() => {console.log('it works!');
});
reaction.track(() => {console.log(user.userId);
});setTimeout(() => {user.userId = Date.now();reaction.destroy();
}, 1000);// Service 的接口必须定义
interface IUserService {user: IUser;setUserName(): void;loadUser(): Promise
}// Service
@service
class UserService implements IUserService {constructor() {this._user = new User();}get user() {return this._user}loadUser() {}setUserName(userName) {this.user.userName = userName;}
}// observer 组件
@observer(['userService', 'buttonStatus'])
class App extends Component<{ userService: IUserService }, never> {&#64;attributes.stringohNo &#61; &#39;oh, no!!&#39;;ohYes &#61; () &#61;> {this.ohNo &#61; &#39;oh, yeah!!&#39;;}render() {const { userService } &#61; this.props;return (<divonClick&#61;{userService.setUserName.bind(null)}>{userService.user.userName}<p onClick&#61;{this.ohYes}>{this.ohNo}p>div>)}
}// Controller
&#64;controller(App)
class AppController {&#64;injectable userService: IUserService;&#64;injectable buttonStatus;constructor({ location }) {this.userService &#61; new UserService();this.buttonStatus &#61; observable(1);}pgOnInit() {this.userService.loadUser();}&#64;injectablebuttonClick() {this.buttonStatus.set(0);}
}
api文档
vm
- vm是一个MVVM框架&#xff0c;内置模版引擎和多种数据类型
模版引擎
- 这是一个简单的
template - 使用
{expression}和sn-属性来绑定数据
<header class&#61;"header {titleClass}">这是标题{title}{title?&#39;aaa&#39;:encodeURIComponent(title)}header>
<div class&#61;"main"><h1>{title}h1><ul><li>时间:{util.formateDate(date,&#39;yyyy-MM-dd&#39;)}li><li>user:{user.userName}li><li>friend:{friend.friendName}li><li sn-repeat&#61;"msg in messages">msg:{msg.content}li><li sn-repeat&#61;"item in collection">item:{item.name}li>ul><sn-template id&#61;"item"><li>{name}li>sn-template><ul><li sn-repeat&#61;"item in list">{item.name}li><sn-item props&#61;"{{ name: item.name }}" sn-repeat&#61;"item in list">sn-item>ul>
div>
sn-属性 sn-[events] dom事件
sn-[events] dom事件
model.onButtonClick &#61; function(userName) {alert(userName);
}// 设置 &#96;model&#96; 的事件代理
model.delegate &#61; {onButtonClick: function(user) {alert(user.userName);}
}
<div><button sn-tap&#61;"this.onButtonClick(user.userName)">Click 0button><button sn-tap&#61;"delegate.onButtonClick(user)">Click 1button>
div>
sn-repeat循环
var model &#61; new ViewModel(this.$el, {title: &#39;标题&#39;,list: [{name: 1,children: [{name: &#39;子&#39;}]}, {name: 2}]
});
<div class&#61;"item" sn-repeat&#61;"item,i in list|filter:like(item.name,&#39;2&#39;)|orderBy:name asc,id desc,{orderByWhat} {ascOrDesc}"><p>这是标题{title}&#xff0c;加上{item.name}p><ul><li sn-repeat&#61;"child in item.children|orderBy:this.orderByFunction">{i}/{child.name&#43;child.age}li>ul>
div>
[sn-if][sn-else-if][sn-else]条件控制
<div class&#61;"item" sn-if&#61;"{!title}">当title不为空时插入该elementdiv>
<div class&#61;"item" sn-else-if&#61;"{title&#61;&#61;3}">当title不为空时插入该elementdiv>
<div class&#61;"item" sn-else>当title不为空时插入该elementdiv>
sn-display控件是否显示&#xff08;有淡入淡出效果&#xff0c;若不需要动画效果可使用sn-visible或sn-if&#xff09;
<div class&#61;"item" sn-display&#61;"{title}">当title不为空时显示div>
sn-html设置innerHTML
<div class&#61;"item" sn-html&#61;"{title}">div>
sn-component引入其他组建
var model &#61; new ViewModel({components: {tab: require(&#39;widget/tab&#39;)},el: template,delegate: this,attributes: {title: &#39;标题&#39;,list: [{name: 1,children: [{name: &#39;子&#39;}]}, {name: 2}]}
});
<div class&#61;"tab" sn-component&#61;"tab" sn-props&#61;"{{items:[&#39;生活服务&#39;,&#39;通信服务&#39;]}}">div>
或
<sn-tab class&#61;"tab" props&#61;"{{items:[&#39;生活服务&#39;,&#39;通信服务&#39;]}}">sn-tab>
vm.Observer 类
- 可观察对象&#xff0c;类的数据变化可被监听
ViewModel,Model,Collection,List,Dictionary,DictionaryList,Emitter,State都是Observer的子类&#xff0c;分别有不同的作用
import { Observer, ViewModel, Model, Collection, List, Emitter, State } from &#39;snowball&#39;;var viewModel &#61; new ViewModel({el: &#96;{title}
});var model &#61; new Model({id: 1,name: &#39;名称&#39;
});var collection &#61; new Collection([{id: 2,name: &#39;名称2&#39;
}]);collection.add(model);
collection.add([{ id: 3, name: &#39;名称3&#39; }]);viewModel.set({data: model,list: collection
})
vm.Model|vm.Dictionary 类
Observer的属性变化不能被监听&#xff0c;Model|Dictionary的属性变化可被监听Model是深拷贝&#xff0c;且是immutable的&#xff0c;Dictionary浅拷贝对象&#xff0c;Observer不拷贝对象可接收值类型
vm.List|vm.Collection|vm.DictionaryList 类
List的子项是Observer&#xff0c;Collection的子项是Model&#xff0c;DictionaryList的子项是DictionaryList性能优于Dictionary优于Collection
var collection &#61; new Collection([{id: 2,name: &#39;名称2&#39;
}]);collection.add(model);
collection.add([{ id: 3, name: &#39;名称3&#39; }]);// 原数据中ID存在相同的则更新&#xff0c;否则添加
collection.update([{ id: 2, name: &#39;新名称2&#39; },{ id: 3, name: &#39;新名称3&#39; }], &#39;id&#39;);// 根据ID更新
collection.updateBy(&#39;id&#39;, { id: 3, name: &#39;新名称&#39; });// 更换数组
collection.updateTo([{ id: 3, name: &#39;新名称&#39; }], &#39;id&#39;);
(Observer|...).prototype.get 方法
Model.prototype.attributes|Collection.prototype.array 属性(只读)
var data &#61; new Model({id: 1,name: &#39;immutable data&#39;
})
// 同等于 data.get()
var oldAttributes &#61; data.attributes;// 数据无变化
data.set({id: 1
});
console.log(oldAttributes &#61;&#61; data.attributes);
// truedata.set({name: &#39;数据变化了&#39;
});
console.log(oldAttributes &#61;&#61; data.attributes);
// falseconsole.log(data.get(&#39;id&#39;))
// 1
(Observer|...).prototype.set 方法
- 设置
Model、Collection
// 通过 &#96;set&#96; 方法来改变数据
// 此时关联了 &#96;user&#96; 的 &#96;home&#96; 的数据也会改变
// 若原先的 &#96;userName&#96; 已是&#39;asdf&#39;&#xff0c;则不会触发view更新
user.set({userName: &#39;asdf&#39;
});home.set({title: 1,user: {age: 10}
});// 通过 &#96;collection.set&#96; 方法覆盖数据
// 更新数据使用 &#96;collection.update|updateBy&#96; 等方法性能会更好
collection.set([{id: 1,name: &#39;A&#39;
}]);
(Observer|...).prototype.observe 方法
- 监听 Model变化
// 监听所有数据变动
model.observe(function(e) {});// Model|Dictionary 可监听 &#96;user&#96; 属性的数据变动
model.observe(&#39;user&#39;, function(e) {});// Model 监听 &#96;user.userName&#96; 属性变动
model.observe(&#39;user.userName&#39;, function(e) {
});
(Observer|...).prototype.unobserve 方法
- 移除监听
(Observer|...).prototype.compute 方法
- 计算
// 计算
var computed &#61; model.compute(({ user, id, homePageId }) &#61;> {return user &#43; id &#43; homePageId;
});
computed.observe((value) &#61;> {
});
computed.get();
Model.prototype.collection(key) 方法
- 获取属性名为key的collection&#xff0c;不存在即创建
model.collection(&#39;productList&#39;).add([{ id: 1 }]);
Model.prototype.model(key) 方法
- 获取属性名为key的model&#xff0c;不存在即创建
home.model(&#39;settings&#39;).attributes;
(Collection|Model).prototype._ 方法
- Model/Collection 查询
/*** 搜索子Model/Collection&#xff0c;* 支持多种搜索条件* * 搜索子Model:* model._(&#39;user&#39;) 或 model._(&#39;user.address&#39;)* * 根据查询条件查找子Collection下的Model:* model._(&#39;collection[id&#61;222][0].options[text~&#61;"aa"&value&#61;"1"][0]&#39;)* model._(&#39;collection[id&#61;222][0].options[text~&#61;"aa"&value&#61;"1",attr^&#61;&#39;somevalue&#39;|attr&#61;1][0]&#39;)* * 且条件:* model._("collection[attr&#61;&#39;somevalue&#39;&att2&#61;2][1].aaa[333]")* * 或条件:* model._("collection[attr^&#61;&#39;somevalue&#39;|attr&#61;1]")* * 不存在时添加&#xff0c;不可用模糊搜索:* model._("collection[attr&#61;&#39;somevalue&#39;,attr2&#61;1][&#43;]")* * &#64;param {string} search 搜索条件* &#64;param {any} [def] collection[attr&#61;&#39;val&#39;][&#43;]时的默认值*/
home._(&#39;collection[name~&#61;"aa"|id&#61;1,type!&#61;2]&#39;).toJSON();/*** 查询Collection的子Model/Collection* * 第n个:* collection._(1)* * 查询所有符合的:* collection._("[attr&#61;&#39;val&#39;]")* 数据类型也相同:[attr&#61;&#61;&#39;val&#39;]* 以val开头:[attr^&#61;&#39;val&#39;]* 以val结尾:[attr$&#61;&#39;val&#39;]* 包含val&#xff0c;区分大小写:[attr*&#61;&#39;val&#39;]* 包含val&#xff0c;不区分大小写:[attr~&#61;&#39;val&#39;]* 或:[attr&#61;&#39;val&#39;|attr&#61;1,attr&#61;&#39;val&#39;|attr&#61;1]* 且:[attr&#61;&#39;val&#39;&attr&#61;1,attr&#61;&#39;val&#39;|attr&#61;1]* * 查询并返回第n个:* collection._("[attr&#61;&#39;val&#39;][n]")* * 一个都不存在则添加:* collection._("[attr&#61;&#39;val&#39;][&#43;]")* * 结果小于n个时则添加:* collection._("[attr&#61;&#39;val&#39;][&#43;n]")* * 删除全部搜索到的&#xff0c;并返回被删除的:* collection._("[attr&#61;&#39;val&#39;][-]")* * 删除搜索结果中第n个&#xff0c;并返回被删除的:* collection._("[attr&#61;&#39;val&#39;][-n]")* * &#64;param {string} search 查询条件* &#64;param {object} [def] 数据不存在时默认添加的数据* * &#64;return {array|Model|Collection}*/
collection._(&#39;[name&#61;"aa"]&#39;).toJSON();
Collection.prototype.add 方法
// 通过 &#96;collection.add&#96; 方法添加数据
collection.add({ id: 2, name: &#39;B&#39; })
collection.add([{ id: 3, name: &#39;C&#39; }, { id: 4, name: &#39;D&#39; }])
Collection.prototype.update 方法
// 通过 &#96;collection.update&#96; 方法更新数据
collection.update([{ id: 3, name: &#39;C1&#39; }, { id: 4, name: &#39;D1&#39; }], &#39;id&#39;);
collection.update([{ id: 3, name: &#39;C1&#39; }, { id: 4, name: &#39;D1&#39; }], function(a, b) {return a.id &#61;&#61;&#61; b.id;
});
Collection.prototype.updateTo 方法
- 更新成传入的数组
var arr &#61; [{ id: 3, name: &#39;C1&#39; }, { id: 4, name: &#39;D1&#39; }];// 通过 &#96;collection.updateTo&#96; 方法更新数据
collection.updateTo(arr, &#39;id&#39;);
Collection.prototype.updateBy 方法
- 根据 comparator 更新 collection
var data &#61; [{ id: 3, name: &#39;C1&#39; }, { id: 4, name: &#39;D1&#39; }];/*** 根据 comparator 更新Model* collection.updateBy(&#39;id&#39;, { id: 123 name: &#39;更新掉name&#39; })* collection.updateBy(&#39;id&#39;, [{ id: 123 name: &#39;更新掉name&#39; }])** &#64;param {String} comparator 属性名/比较方法* &#64;param {Object} data* &#64;param {boolean} renewItem 是否覆盖匹配项** &#64;return {Collection} self*/
collection.updateBy(id, data, true|false);
Collection.prototype.unshift 方法
- 首部插入数据
collection.unshift({ id: 1 });
Collection.prototype.splice 方法
- 移除或插入数据
collection.splice(0,1,[{ id: 1 }]);
Collection.prototype.size 方法 | Collection.prototype.length 属性
- Collection 长度
Collection.prototype.map 方法
- 同
Array.prototype.map
Collection.prototype.find 方法
- 查找某条子Model
collection.find(&#39;id&#39;, 1);
Collection.prototype.filter 方法
- 同
Array.prototype.filter
Collection.prototype.remove 方法
- 从 collection 中移除
collection.remove(&#39;id&#39;, 1);collection.remove(model);collection.remove(function(item) {return true|false;
});
Collection.prototype.clear 方法
- 清除 collection
Collection.prototype.each 方法
- 遍历 collection
Collection.prototype.toArray | Collection.prototype.toJSON 方法
- 将 collection 转为数组
(Observer|Model|Collection).prototype.destroy
- 销毁 Model | Collection
observable
- 可观察对象
observable()
// 自动根据数据类型生成 observable object
// plainObject对应Model, array对应Collection, 其他对应Observer
const observer &#61; observable(0|{}|[]|&#39;&#39;);// 设置数据
observer.set(1);// 数据无变化不会触发事件
observer.observe((val) &#61;> {console.log(val);
});// 移除监听
observer.unobserve((val) &#61;> {console.log(val);
});// 传入function生成 observable object&#xff0c;它是只读的&#xff0c;不能set
const observer &#61; observable((fn)&#61;>{document.body.addEventListener(&#39;click&#39;, fn);return () &#61;> {document.body.removeEventListener(&#39;click&#39;, fn);}
});
vm.State 类
const state &#61; new State();// 异步设置触发事件&#xff0c;并且会触发3次
state.set(1);
state.set(2);
state.set(3);console.log(state.get());
// undefined
vm.Emitter 类
const emitter &#61; new Emitter();// 同步触发事件&#xff0c;并且会触发3次
emitter.set(1);
emitter.set(2);
emitter.set(3);console.log(emitter.get());
// 3
vm.attributes
class User {&#64;attributes.numberuserId &#61; 0;&#64;attributes.stringuserName;&#64;attributes.objectauth;constructor(data) {User.init(this, data);}
}const user &#61; new User();
user.userId &#61; 1;
user.userName &#61; &#39;张三&#39;;// 监听user
User.observe(user, ()&#61;>{
});
// 监听user.userId
User.observe(user, &#39;userId&#39;, ()&#61;>{
});
// 计算user.userId
User.compute(user, &#39;userId&#39;, (userId)&#61;>{return &#39;userId:&#39; &#43; userId;
});
// user to plainObject
User.get(user);User.set(user, {userId: 1
});User.set(user, (userModel) &#61;> {userModel.set({userId: 10})
});for (var key in user) {console.log(key);
}
// userId
// userName


 京公网安备 11010802041100号