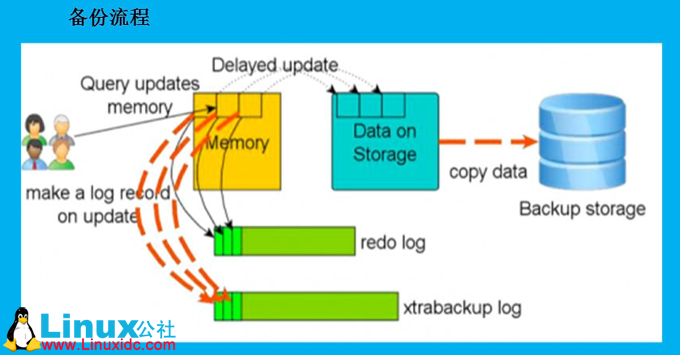
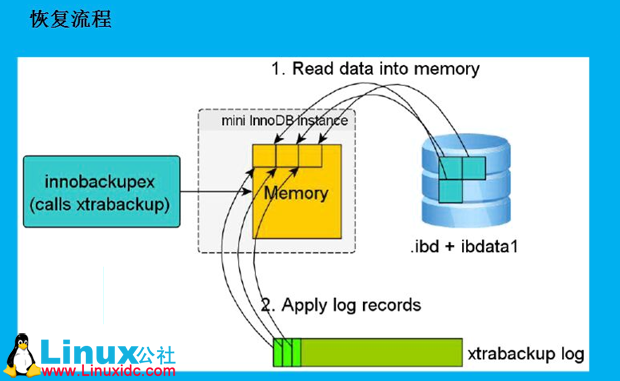
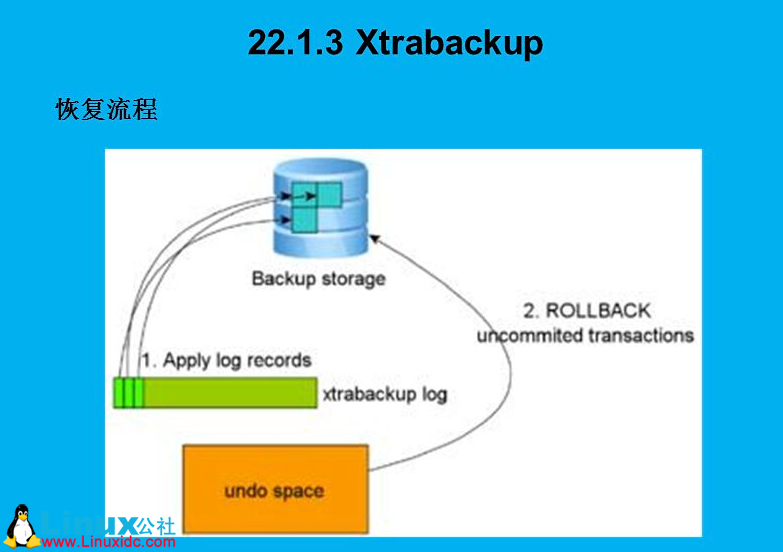
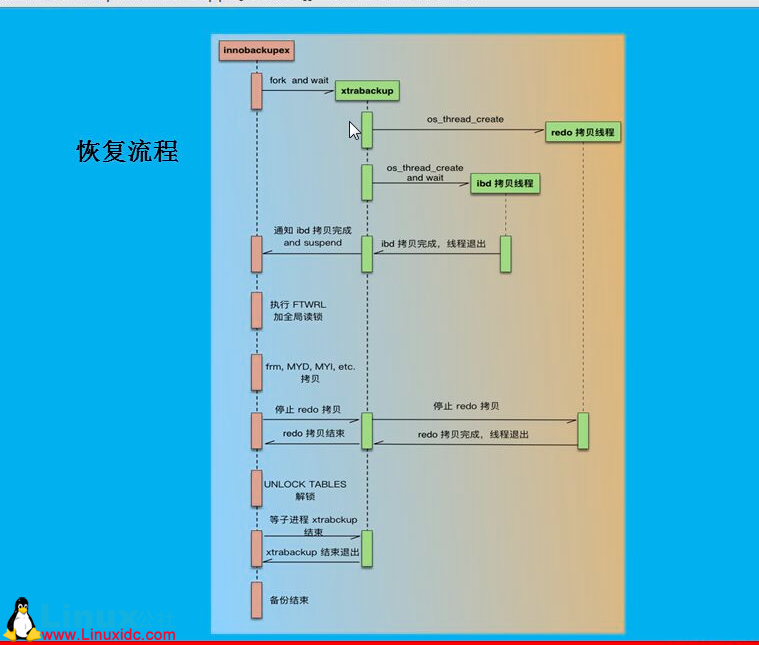
InnoDB 有个商业的InnoDB Hotbackup,可以对InnoDB引擎的表实现在线热备。而 percona出品的Xtrabackup,是InnoDB Hotbackup的一个开源替代品,可以在线对InnoDB/XtraDB引擎的表进行物理备份。mysqldump支持在线备份,不过是逻辑备份,效率比较差。xtrabackup是开源的MySQL备份工具,物理备份,效率很不错。
Xtrabackup有两个主要的工具:xtrabackup、innobackupex,其中xtrabackup只能备份InnoDB和XtraDB两种数据表,innobackupex则封装了xtrabackup,同时可以备份MyISAM数据表。Xtrabackup做备份的时候不能备份表结构、触发器等等,智能纷纷.idb数据文件。另外innobackupex还不能完全支持增量备份,需要和xtrabackup结合起来实现全备的功能。
C语言编写,可以备份Innodb、XtraD,不拷贝*.frm文件
支持的引擎有:
InnoDB、Xtradb:hotbackup
MyISAM: with read lock
具有的特点有如下几点:
§ 1)备份过程快速、可靠;
§ (2)备份过程不会打断正在执行的事务;
§ (3)能够基于压缩等功能节约磁盘空间和流量;
§ (4)自动实现备份检验;
§ (5)还原速度快;
Xtrabackup工具由Percona公司开发的开源热备工具,可以到官网下载到最新的版本文件。
https://www.percona.com/downloads/下载各种版本,也可以在系统中使用wget下载。
方法一:
wget https://www.percona.com/downloads/XtraBackup/Percona-XtraBackup-2.4.4/binary/RedHat/6/x86_64/percona-xtrabackup-24-2.4.4-1.el6.x86_64.rpm
安装依赖的包
yum install perl-DBI perl-DBD-MySQL perl-Time-HiRes perl-IO-Socket-SSL installperl perl-devel libaio libaio-devel perl-Time-HiRes perl-DBD-MySQL
方法二:
下载好的rpm包,直接使用yum 安装,自动安装依赖包,但是需要有epel源的支持,所以要下载配置好epe'源
wget -O /etc/yum.repos.d/epel.repo http://mirrors.aliyun.com/repo/epel-6.repo
yum install -y percona-xtrabackup-24-2.4.4-1.el6.x86_64.rpm
RELOAD 和 LOCKTABLES 权限为了执行 FLUSHTABLES WITH READ LOCK
REPLICATION CLIENT 为了获取binary log位置
CREATE TABLESPACE 权限为了导入表,用户表级别的恢复
SUPER权限在slave环境下备份用来启动和关闭slave线程
InnoDB 和非InnoDB文件的备份都是通过拷贝文件,但是实现的方式是不同的。
InnoDB是以page为粒度做的的(Xtrabackup),Xtrabackup在读取每个page时会校验checksum值,保证数据块是一致的
非InnoDB是cp或者tar 命令,innobackupex在cp MyISAM文件时已经做了flush(FTWRL),磁盘上的文件也是完整的,所以最终备份集里的数据文件都是写入完整的
1.5.1备份流程


规范操作,我们先建好全备和增量备份的路径
[root@db01 backups]# pwd
/data/backups
[root@db01 backups]# ll
总用量 12
drwxr-xr-x 4 root root 4096 9月 4 17:28 full
drwxr-xr-x 4 root root 4096 9月 4 17:26 inc
操作过程:
mkdir/data/backups/{full,inc} -p
*****生产环境中为了数据一致性最好是ROW模式,因为其他的模式数据会丢失*****
命令语法格式:
innobackupex --user=User--password=PWD/data/backup/full --slave-info --safe-slave-backup --parallel=4--safe-slave-backup-timeout=7200 --rsync--rsync 这个参数一般用作分布式数据库集群的时候
全备步骤:
1、准备一个xtr_test数据库,并在xtr_test数据库中插入testbackup表,字段包含id,step两个字段
mysql -uroot -p789 -S /data/3306/mysql.sock show databases; create database xtr_test; use xtr_test; select database(); create table testbackup(id int not nullauto_increment primary key,step varchar(50))engine=innodb; show tables; desc testbackup; show create table testbackup\G结果样子:
mysql> desc testbackup; +-------+-------------+------+-----+---------+----------------+ | Field | Type | Null | Key | Default | Extra | +-------+-------------+------+-----+---------+----------------+ | id |int(11) | NO | PRI | NULL | auto_increment | | step |varchar(50) | YES | | NULL | | +-------+-------------+------+-----+---------+----------------+ 2 rows in set (0.02 sec) mysql> show create table testbackup\G *************************** 1. row*************************** Table:testbackup Create Table: CREATE TABLE `testbackup` ( `id`int(11) NOT NULL AUTO_INCREMENT, `step`varchar(50) DEFAULT NULL, PRIMARY KEY(`id`) ) ENGINE=InnoDB DEFAULT CHARSET=utf8 1 row in set (0.00 sec)2、插入字段“firstfull backup”到testbackup表中
insert into testbackup(step) values('first fullbackup');操作结果:
mysql> select * from testbackup; +----+-------------------+ | id | step | +----+-------------------+ | 1 | firstfull backup | +----+-------------------+ 1 row in set (0.02 sec)3、执行全备
此时,我们创建的xtr_test数据库中的testbackup表中有数据,而且我们创建的/data/backups/full文件下面没有任何内容。下面执行全备,操作命令上面已经给出,此次操作使用的多实例所以用到了--socket参数。
innobackupex --user=root --password=789/data/backups/full --slave-info --safe-slave-backup --parallel=4--safe-slave-backup-timeout=7200 --socket=/data/3306/mysql.sock执行结果一定要看到“160905 20:01:38 completedOK!" OK的字样,才表示成功,从打出的日志我们也能看到备份的过程和上面给出的全备流程图对比起来。
正确输出以后会在/data/backups/full 指定的目录中生成一个有时间和序号的目录,这个目录就是全备文件存放地方如:
[root@db01 ~]# ls -lrt /data/backups/full/ 总用量 4 drwxr-x--- 8 root root 4096 9月 5 20:012016-09-05_20-01-32 增量备份的前提是一定要有一个全备 ,只有有了全备才能进行所谓的增量备份!!!
增量备份的方式有两种,分别为:
第一种:通过全备的文件
innobackupex --user=root --password=789 --incremental --incremental-lsn=1783249/data/backups/inc --slave-info--safe-slave-backup --parallel=4 --safe-slave-backup-timeout=7200--socket=/data/3306/mysql.sock第二种方法:通过LSN
innobackupex --user=root --password=789 --incremental --incremental-lsn=1783249/data/backups/inc --slave-info--safe-slave-backup --parallel=4 --safe-slave-backup-timeout=7200--socket=/data/3306/mysql.sock1、准备好全备最新一次的全备文件,这里只做了一次,所以只有一个目录
[root@db01 ~]# ls -lrt /data/backups/full/ 总用量 4 drwxr-x--- 8 root root 4096 9月 5 20:01 2016-09-05_20-01-32 2、对xtr_test数据库中的testbackup表,进行数据的插入,插入内容为“fist increment backup”
mysql> insert into testbackup(step)values('first increment backup'); Query OK, 1 row affected (0.02 sec) mysql> select * from testbackup; +----+------------------------+ | id | step | +----+------------------------+ | 1 | firstfull backup | | 2 | firstincrement backup | +----+------------------------+ 2 rows in set (0.01 sec)3、执行增量备份
这里我们要确定好最新一次的全备(强调)!!!
innobackupex --user=root --password=789--incremental --incremental-basedir=/data/backups/full/2016-09-05_20-01-32 /data/backups/inc --slave-info--safe-slave-backup --parallel=4 --safe-slave-backup-timeout=7200 --socket=/data/3306/mysql.sock这里执行结果一定要看到“completed OK!" OK的字样,才表示成功如果是分布式也可以用--rsync,我们会在创建的inc目录下发现创建了一个以时间和序号命名的目录,这个目录就是Xtrabackup备份的增量。
执行结果:
[root@db01 ~]# ll /data/backups/inc 总用量 4 drwxr-x--- 8 root root 4096 9月 5 20:19 2016-09-05_20-19-48 TIP:innodb默认是使用的系统表空间,我们可以通过配置参数来使idb文件到独立空间中innodb_file_per_table = 1 这个是修改idb到独立空间,如果数据库是线上的,我们可以在配置文件my.cnf配置以上参数后,再使用set globalinnodb_file_per_table= 1 临时生效。
alter table backupstep engine=innodb; 修改表的引擎,这个操作很费时间,需要在业务低点的时候操作
在创建的xtr_test数据库中的testbackup表中再次插入内容“secondincrement backup”
mysql> insert into testbackup(step) values('secondincrement backup'); Query OK, 1 row affected (0.01 sec) mysql> select * from testbackup; +----+-------------------------+ | id | step | +----+-------------------------+ | 1 | firstfull backup | | 2 | first incrementbackup | | 3 | secondincrement backup | +----+-------------------------+ 3 rows in set (0.00 sec)1、确定最新的全备文件
[root@db01 full]# pwd /data/backups/full[root@db01 full]# ls -lrt 总用量 4 drwxr-x--- 8 root root 4096 9月 5 20:01 2016-09-05_20-01-322、确定上一次增量备份的LSN值
[root@db01 inc]# ls -lrt 总用量 4 drwxr-x--- 8 root root 4096 9月 5 20:19 2016-09-05_20-19-48 [root@db01 inc]# cd 2016-09-05_20-19-48/ [root@db01 2016-09-05_20-19-48]# ls backup-my.cnf krik performance_schema xtrabackup_checkpoints xtr_test ibdata1.delta mysql test xtrabackup_info ibdata1.meta oldboy xtrabackup_binlog_info xtrabackup_logfile [root@db01 2016-09-05_20-19-48]# cat xtrabackup_checkpoints backup_type = incremental from_lsn = 1793716 #这个值一定是和上一次全备的last_lsn一样,否则就是数据不全 to_lsn = 1794019 last_lsn = 1794019 compact = 0 recover_binlog_info = 04、
执行增量备份命令
innobackupex --user=root --password=789 --incremental--incremental-lsn=1794019 /data/backups/inc --slave-info --safe-slave-backup --parallel=4 --safe-slave-backup-timeout=7200--socket=/data/3306/mysql.sock这个值是通过查看最近一次增量备份的xtrabackup_checkpoints得到
这里执行结果一定要看到“completed OK!" OK的字样,才表示成功
执行结果会在指定的目录/data/backups/inc下生成一个新的文件
[root@db01 2016-09-05_20-19-48]# cd .. [root@db01 inc]# pwd /data/backups/inc[root@db01 inc]# ls -lrt 总用量 8 drwxr-x--- 8 root root 4096 9月 5 20:19 2016-09-05_20-19-48 drwxr-x--- 8 root root 4096 9月 5 21:18 2016-09-05_21-18-30到此我们对数据进行了完整的备份,下面会再创建一条语句,但是不会做增量备份,为了是下面测试二进制日志恢复数据。接下来要玩大的了,删库,后面看看能恢复回来不
生产环境中为了数据一致性最好是ROW模式,因为其他的模式数据会丢失
mysql> show variables like "log_bin"; +---------------+-------+ | Variable_name | Value | +---------------+-------+ | log_bin | ON | +---------------+-------+ 1 row in set (0.00 sec) mysql> show variables like"%binlog_format%"; +---------------+-------+ | Variable_name | Value | +---------------+-------+ | binlog_format | ROW | +---------------+-------+ 1 row in set (0.00 sec) ot root 418 9月 4 15:34backup-my.cnf更多详情见请继续阅读下一页的精彩内容: 2017-04/142477p2.htm

 京公网安备 11010802041100号 | 京ICP备19059560号-4 | PHP1.CN 第一PHP社区 版权所有