目录
Config 分布式配置中心
Config 概述
Config 快速入门
config server:
config client:
Config 客户端刷新
Config 集成Eureka
实验十
Bus 消息总线
Bus 概述
RabbitMQ 回顾
RabbitMQ的结构
RabbitMQ的工作模式
RabbitMQ Windows安装
Bus 快速入门
实验十一
Stream 消息驱动
Stream 概述
Stream 组件
Stream 消息生产者
Stream 消息消费者
实验十二
Sleuth+Zipkin 链路追踪
概述
Sleuth+Zipkin 快速入门
实验十三
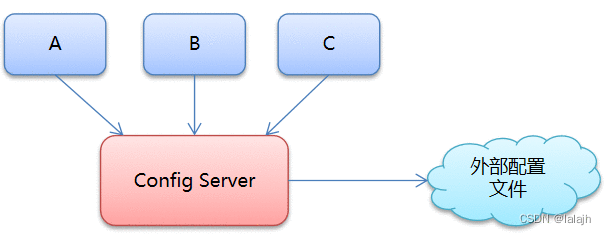
外部配置文件,放着A、B、C等服务的配置文件,其放的位置,可能是在本地目录或者云端(如gitee)
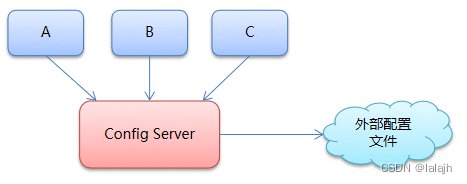
外部配置文件发生了变更,Config Server不需要更改,可以直接访问获取,但A、B和C等服务客服端想获取最新的配置信息,必须要配置。
management:
endpoints:
web:
exposure:
include: refresh
curl -X POST http://localhost:8001/actuator/refresh
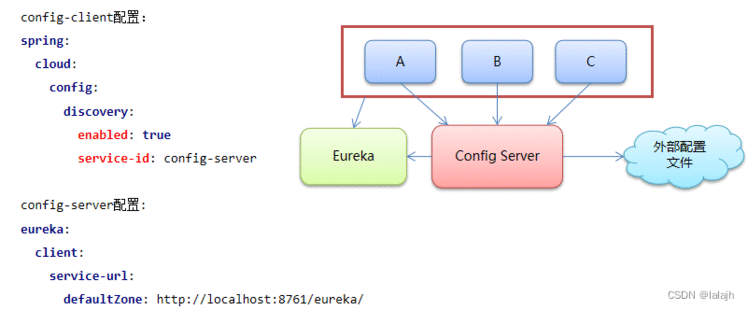
之前 A、B和C获取Config Server地址静态的,若Config Server地址发生变更,那么就要一个一个修改访问Config Server地址,麻烦!可以有一个简单的方法,就是把Config Server注册到Eureka上,如上所示。
项目结构
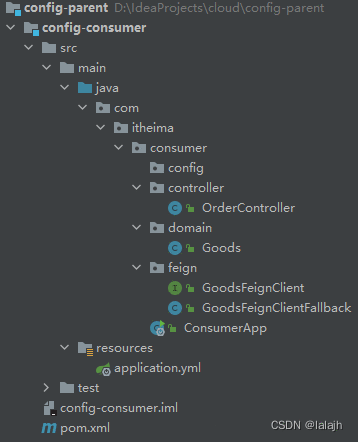
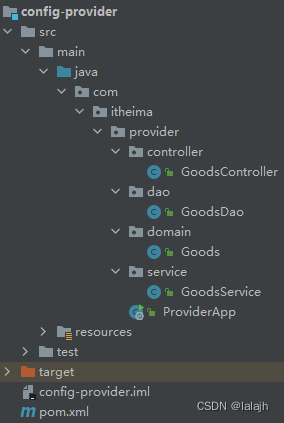
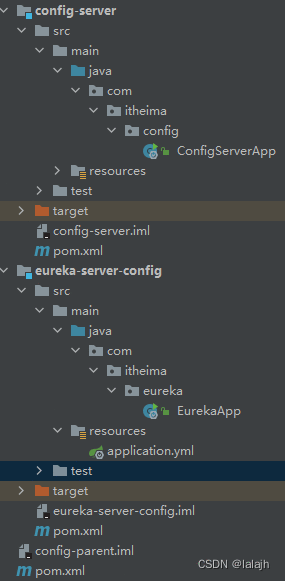
config-server模块
1、pom.xml引入config-server依赖
2、application.yml 文件
server:port: 9527spring:application:name: config-server# spring cloud configcloud:config:server:# git 的 远程仓库地址git:uri: https://gitee.com/itheima_cch/itheima-configs.gitlabel: master # 分支配置# 将自己注册到ureka中
ureka:client:service-url:defaultZone: http://localhost:8761/eureka
2、启动ConfigServerApp
@SpringBootApplication
@EnableConfigServer // 启用config server功能
@EnableEurekaClient
public class ConfigServerApp {public static void main(String[] args) {SpringApplication.run(ConfigServerApp.class,args);}
}
eureka-server-config模块
和实验九eureka-server-gateway模块一样
config-provider模块
1.pom.xml引入依赖
2、application.yml和bootstrap.yml文件
server:port: 8002eureka:client:service-url:defaultZone: http://localhost:8761/eureka
spring:application:name: config-provider
# 配置config-server地址
# 配置获得配置文件的名称等信息
spring:cloud:config:#####下列两种方法获取config-server地址###### 配置config-server地址uri: http://localhost:9527# 配置获得配置文件的名称等信息name: config # 文件名profile: dev # profile指定,  config-dev.ymllabel: master # 分支#从注册中心去寻找config-server地址discovery:enabled: trueservice-id: config-servermanagement:endpoints:web:exposure:include: '*'
3、GoodsController类 @RefreshScope
@RestController
@RequestMapping("/goods")
@RefreshScope // 开启刷新功能
public class GoodsController {@Autowiredprivate GoodsService goodsService;@Value("${server.port}")private int port;@Value("${itheima}")private String itheima;/*** 降级:*  1. 出现异常*  2. 服务调用超时*      * 默认1s超时**  @HystrixCommand(fallbackMethod = "findOne_fallback")*      fallbackMethod:指定降级后调用的方法名称*/@GetMapping("/findOne/{id}")@HystrixCommand(fallbackMethod = "findOne_fallback",commandProperties = {//设置Hystrix的超时时间,默认1s@HystrixProperty(name="execution.isolation.thread.timeoutInMilliseconds",value = "3000"),//监控时间 默认5000 毫秒@HystrixProperty(name="circuitBreaker.sleepWindowInMilliseconds",value = "5000"),//失败次数。默认20次@HystrixProperty(name="circuitBreaker.requestVolumeThreshold",value = "20"),//失败率 默认50%@HystrixProperty(name="circuitBreaker.errorThresholdPercentage",value = "50")})public Goods findOne(@PathVariable("id") int id){//如果id == 1 ,则出现异常,id != 1 则正常访问if(id == 1){//1.造个异常int i = 3/0;}/*try {//2. 休眠2秒Thread.sleep(2000);} catch (InterruptedException e) {e.printStackTrace();}*/Goods goods = goodsService.findOne(id);goods.setTitle(goods.getTitle() + ":" + port+":"+itheima);//将端口号,设置到了 商品标题上return goods;}/*** 定义降级方法:*  1. 方法的返回值需要和原方法一样*  2. 方法的参数需要和原方法一样*/public Goods findOne_fallback(int id){Goods goods = new Goods();goods.setTitle("降级了~~~");return goods;}}
4、Goods、GoodsService和GoodsDao
和实验一 一样
5、ProviderApp启动类
@EnableEurekaClient //该注解 在新版本中可以省略
@SpringBootApplication
@EnableCircuitBreaker // 开启Hystrix功能
public class ProviderApp {public static void main(String[] args) {SpringApplication.run(ProviderApp.class,args);}
}
config-consumer 模块
1、pom.xml文件
2、application.yml 文件
server:port: 9000eureka:instance:hostname: localhost # 主机名client:service-url:defaultZone: http://localhost:8761/eureka
spring:application:name: config-consumer# 开启feign对hystrix的支持
feign:hystrix:enabled: true
3、GoodsFeignClient类
@FeignClient(value = "CONFIG-PROVIDER",fallback = GoodsFeignClientFallback.class)
public interface GoodsFeignClient {@GetMapping("/goods/findOne/{id}")public Goods findGoodsById(@PathVariable("id") int id);}
其他和实验七 hystrix-consumer 模块 一样
运行结果:
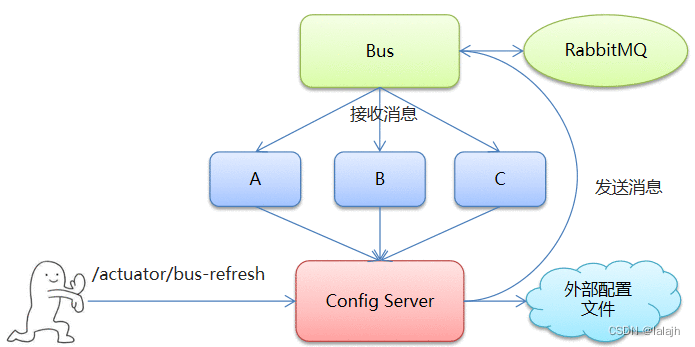
运维人员输入:/actuator/bus-refresh命令,Config Server会发出消息给Bus,接着Bus会广播配置文件的更改。
curl -X POST http://localhost:9527/actuator/refresh
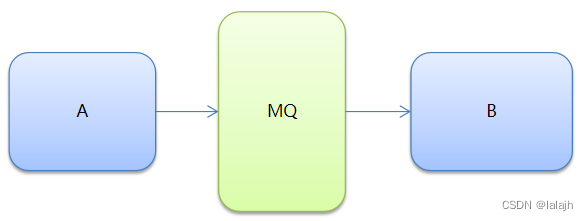
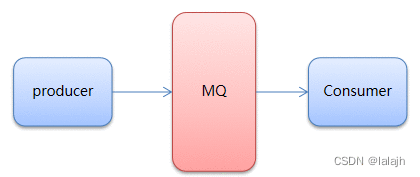
A服务将消息给消息队列,B服务从消息队列中拿消息。

RabbitMQ 提供了 6 种工作模式:简单模式、work queues、Publish/Subscribe 发布与订阅模式、Routing 路由模式、Topics 主题模式、RPC 远程调用模式(远程调用,不太算 MQ;暂不作介绍)。
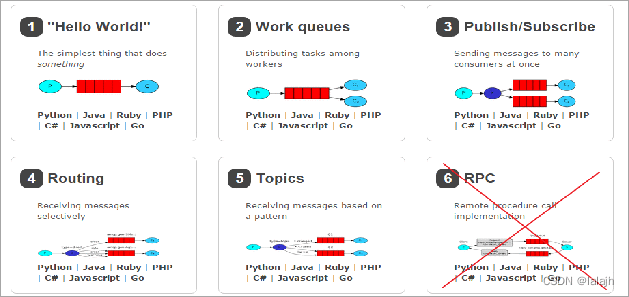
详细看资料
bus组件不需要你创建任何模块,它就是RabbitMQ代码的封装。config-server要发消息,config-client要收消息。
项目结构
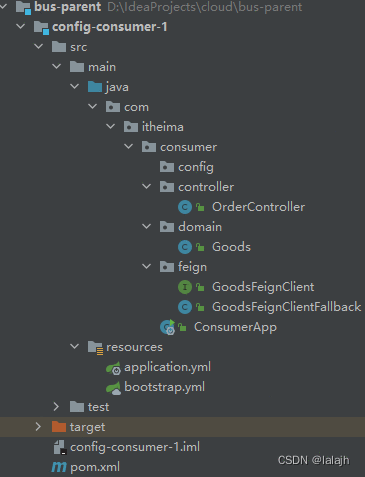
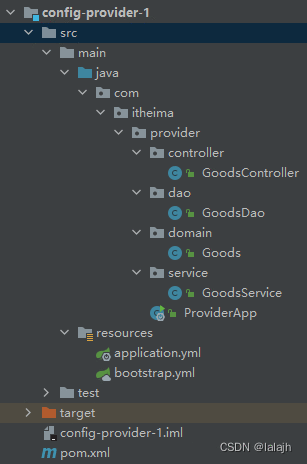
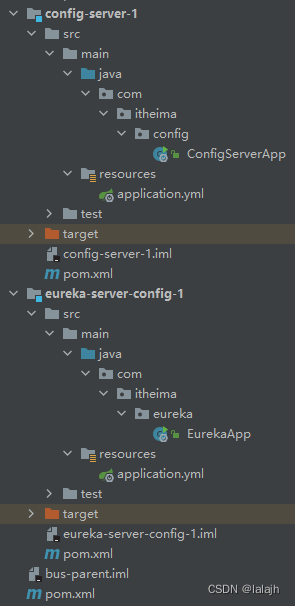
config-server-1模块
1、pom.xml 引入相关依赖
2、application.yml文件
server:port: 9527spring:application:name: config-server# spring cloud configcloud:config:server:# git 的 远程仓库地址git:uri: https://gitee.com/itheima_cch/itheima-configs.gitlabel: master # 分支配置#配置rabbitmq信息rabbitmq:host: localhostport: 5672username: guestpassword: guestvirtual-host: /# 将自己注册到eureka中
eureka:client:service-url:defaultZone: http://localhost:8761/eureka# 暴露bus的刷新端点
management:endpoints:web:exposure:include: 'bus-refresh'
3、ConfigServerApp启动类
@SpringBootApplication
@EnableConfigServer // 启用config server功能
@EnableEurekaClient
public class ConfigServerApp {public static void main(String[] args) {SpringApplication.run(ConfigServerApp.class,args);}
}
eureka-server-config-1模块
和实验九 eureka-server-gateway模块 一样
config-provider-1模块
1、pom.xml模块
2、application.yml和bootstrap.yml文件
server:port: 8002eureka:client:service-url:defaultZone: http://localhost:8761/eureka
spring:application:name: config-provider
# 配置config-server地址
# 配置获得配置文件的名称等信息
spring:cloud:config:# 配置config-server地址# uri: http://localhost:9527# 配置获得配置文件的名称等信息name: config # 文件名profile: dev # profile指定,  config-dev.ymllabel: master # 分支# 从注册中心去寻找config-server地址discovery:enabled: trueservice-id: CONFIG-SERVER#配置rabbitmq信息rabbitmq:host: localhostport: 5672username: guestpassword: guestvirtual-host: /management:endpoints:web:exposure:include: '*'
3、GoodsDao、GoodsService、Goods、GoodsController和ProviderApp
看实验十模块
config-consumer-1模块
1、pom.xml文件依赖
2.application.yml 文件、bootstrap.yml文件
server:port: 9001eureka:instance:hostname: localhost # 主机名client:service-url:defaultZone: http://localhost:8761/eureka
spring:application:name: config-consumer# 开启feign对hystrix的支持
feign:hystrix:enabled: true
# 配置config-server地址
# 配置获得配置文件的名称等信息
spring:cloud:config:# 配置config-server地址# uri: http://localhost:9527# 配置获得配置文件的名称等信息name: config # 文件名profile: dev # profile指定,  config-dev.ymllabel: master # 分支# 从注册中心去寻找config-server地址discovery:enabled: trueservice-id: CONFIG-SERVER#配置rabbitmq信息rabbitmq:host: localhostport: 5672username: guestpassword: guestvirtual-host: /management:endpoints:web:exposure:include: '*'
3、其余模块看实验十
运行结果
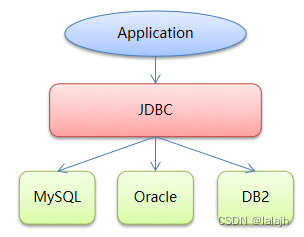
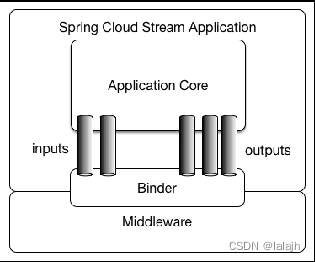
项目结构
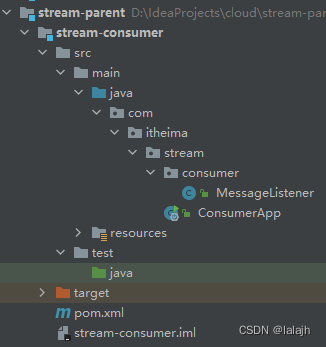
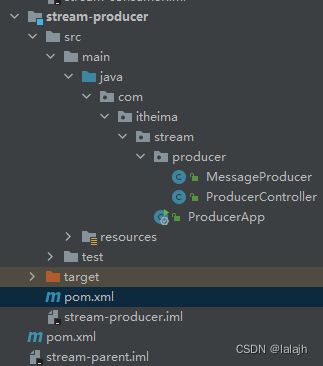
stream-producer模块
1、pom.xml 文件引入依赖
2、application.yml文件
server:port: 8000spring:cloud:stream:# 定义绑定器,绑定到哪个消息中间件上binders:itheima_binder: # 自定义的绑定器名称type: rabbit # 绑定器类型environment: # 指定mq的环境spring:rabbitmq:host: localhostport: 5672username: guestpassword: guestvirtual-host: /bindings:output: # channel名称binder: itheima_binder #指定使用哪一个binderdestination: itheima_exchange # 消息目的地
3、MessageProducer类、ProducerController类
@Component
@EnableBinding(Source.class)
public class MessageProducer {@Autowiredprivate MessageChannel output;public void send(){String msessage = "hello stream~~~";//发送消息output.send(MessageBuilder.withPayload(msessage).build());System.out.println("消息发送成功~~~");}
}
@RestController
public class ProducerController {@Autowiredprivate MessageProducer producer;@RequestMapping("/send")public String sendMsg(){producer.send();return "success";}
}
4、启动类ProducerApp
@SpringBootApplication
public class ProducerApp {public static void main(String[] args) {SpringApplication.run(ProducerApp.class,args);}
}
stream-consumer 模块
1、pom.xml 文件
2.application.yml文件
server:port: 9001spring:cloud:stream:# 定义绑定器,绑定到哪个消息中间件上binders:itheima_binder: # 自定义的绑定器名称type: rabbit # 绑定器类型environment: # 指定mq的环境spring:rabbitmq:host: localhostport: 5672username: guestpassword: guestvirtual-host: /bindings:input: # channel名称binder: itheima_binder #指定使用哪一个binderdestination: itheima_exchange # 消息目的地
3.MessageListener类
*** 消息接收类*/
@EnableBinding({Sink.class})
@Component
public class MessageListener {@StreamListener(Sink.INPUT)public void receive(Message message){System.out.println(message);System.out.println(message.getPayload());}
}
4.启动类ConsumerApp
@SpringBootApplication
public class ConsumerApp {public static void main(String[] args) {SpringApplication.run(ConsumerApp.class,args);}
}
运行结果:
Spring Cloud Sleuth 其实是一个工具,它在整个分布式系统中能跟踪一个用户请求的过程,捕获这些跟踪数据,就能构建微服务的整个调用链的视图,这是调试和监控微服务的关键工具。

启动zipkin,就是有该jar包的目录下,运行命令:java -jar .\zipkin-server-2.12.9-exec.jar
略

 京公网安备 11010802041100号 | 京ICP备19059560号-4 | PHP1.CN 第一PHP社区 版权所有