作者:辉 | 来源:互联网 | 2023-09-11 14:04
使用工具:idea
详细步骤:
file->new -> project
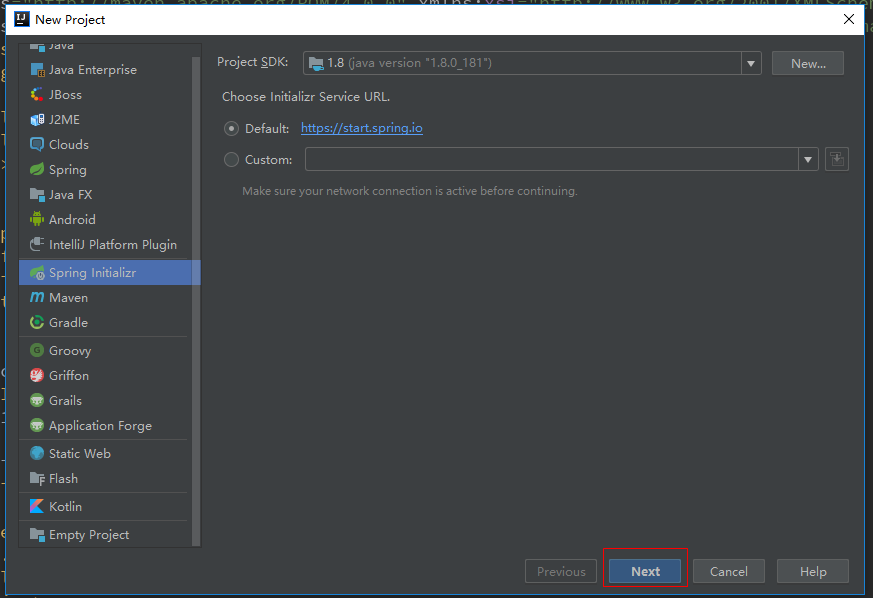
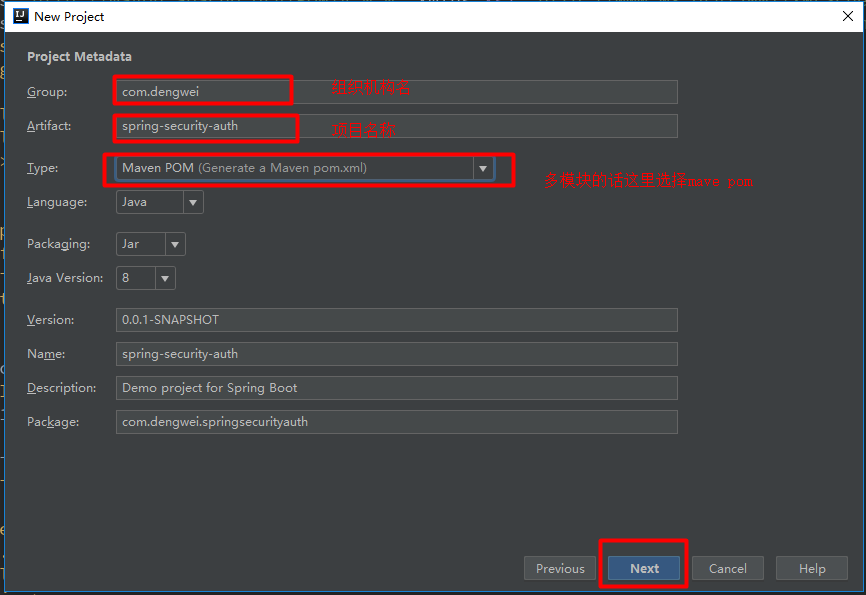
然后一路next即可,最后finish
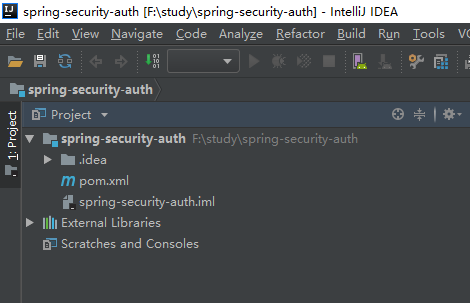
最后我们看到创建后的项目只有项目名称和pom.xml就对了:
二:接下来创建我们的多模块mave子项目:
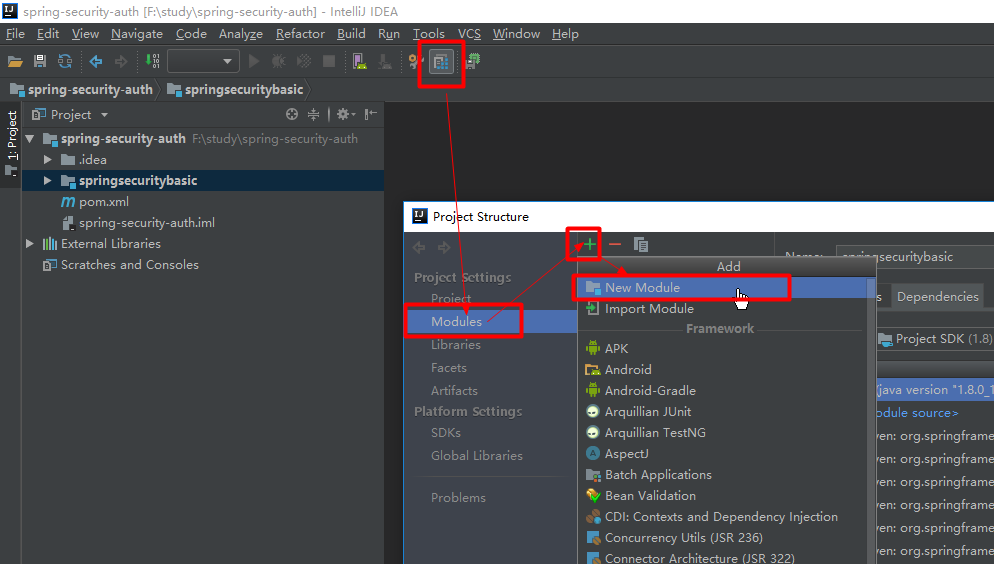
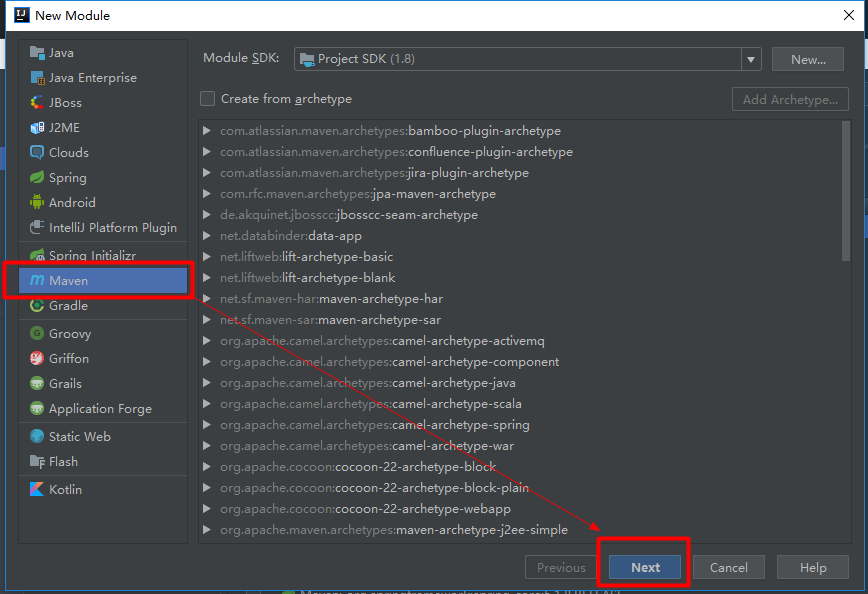
next -> finish
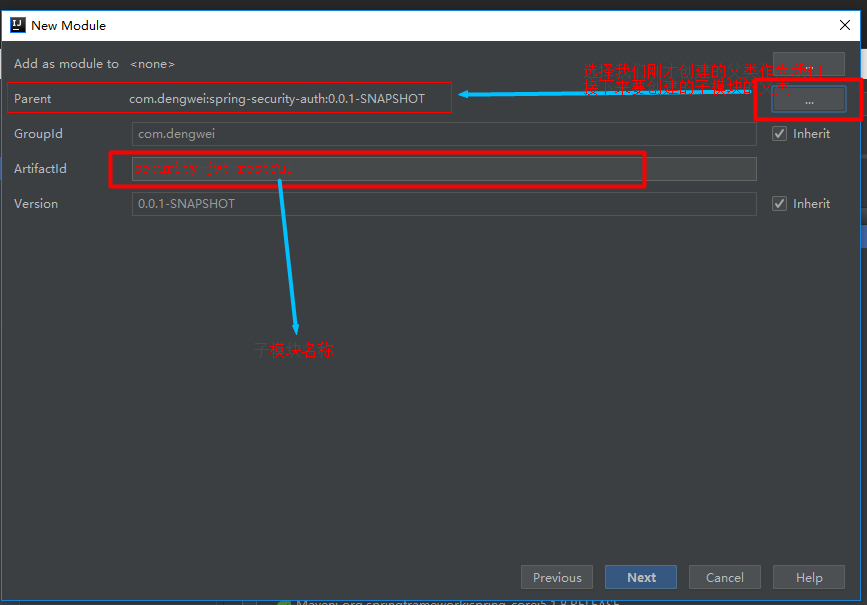
接下来可以看到我们的两个子模块就创建好了,并且这两个子模块的parent都是spring-security-auth
但是的话还差一点点,我们是通过springboot创建多模块的,是不是感觉还少了点啥??哈哈。。
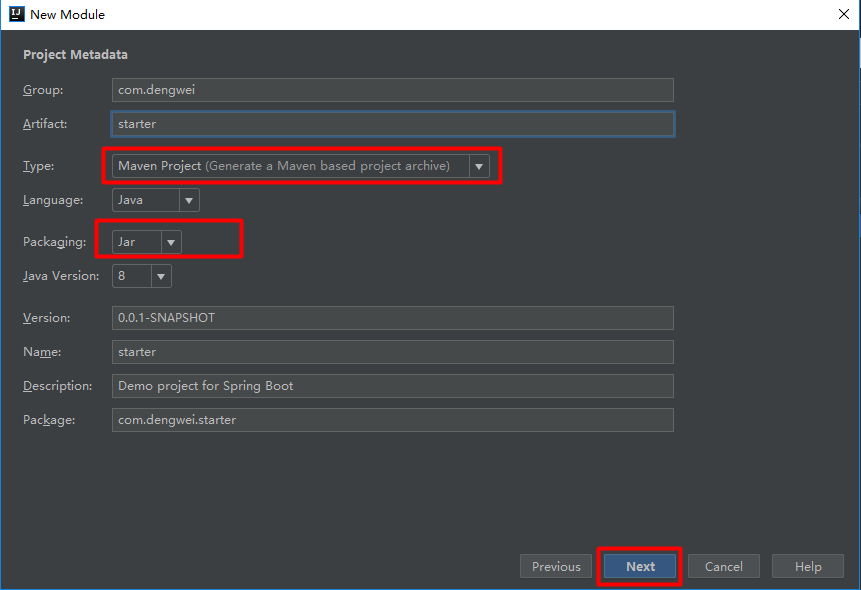
对的,我们还需要一个子模块作为我们springboot项目的启动模块,对于springboot项目的一些配置和启动类是需要的
像上面添加子模块的步骤一样来到这个界面:

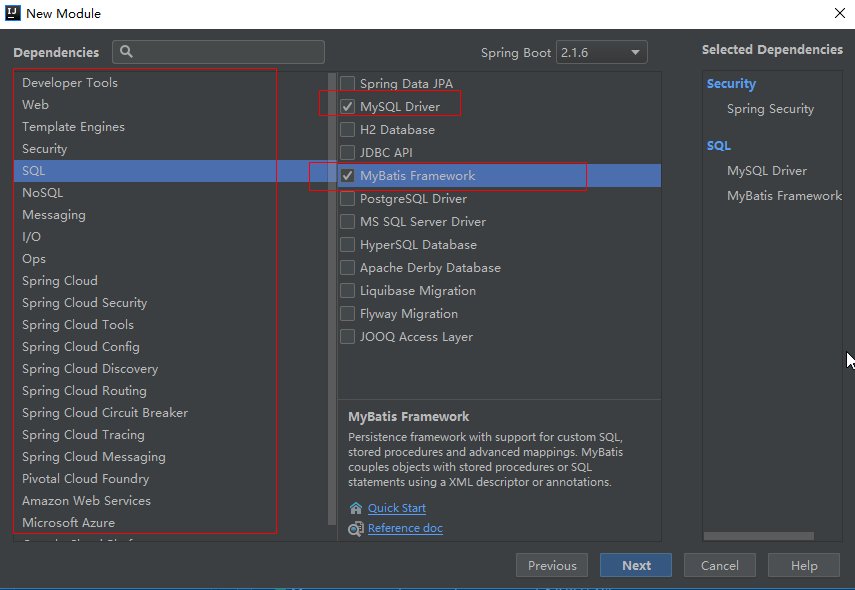
选择我们需要的一些依赖:
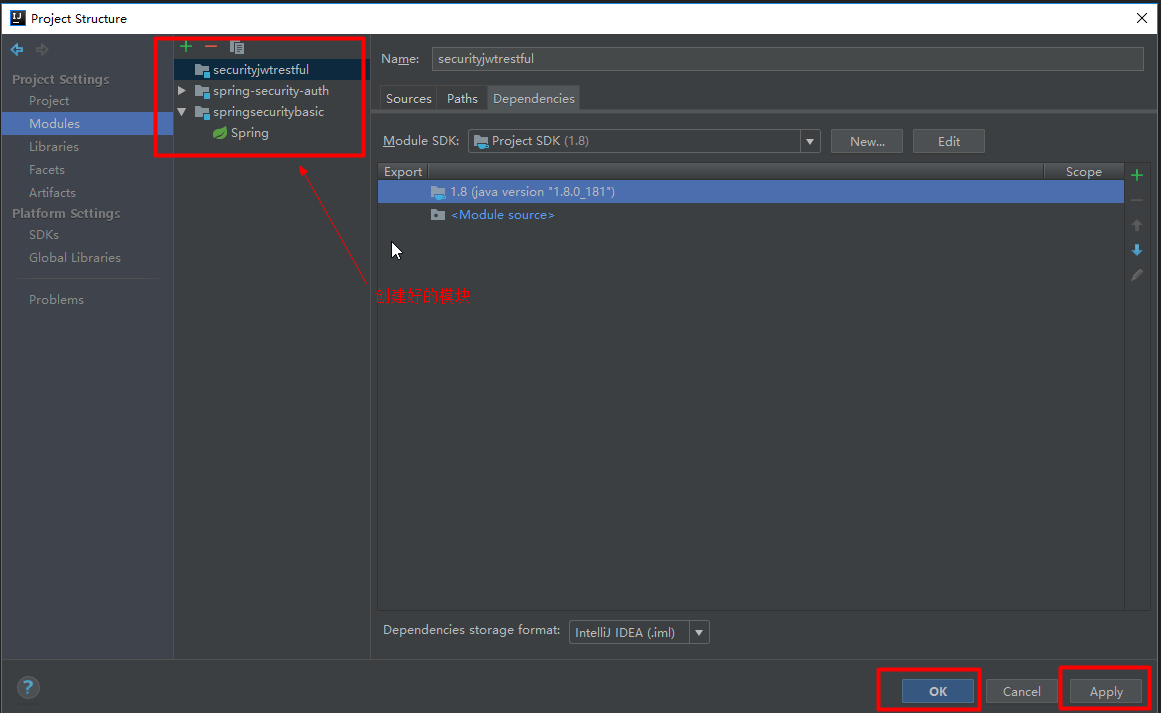
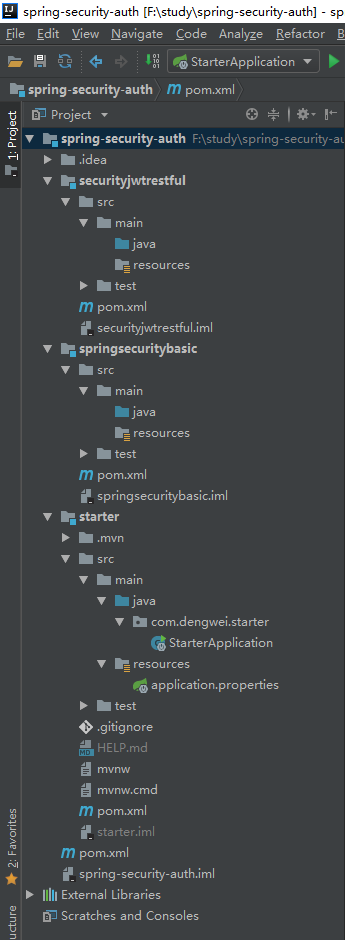
最后看到我们的项目结构:
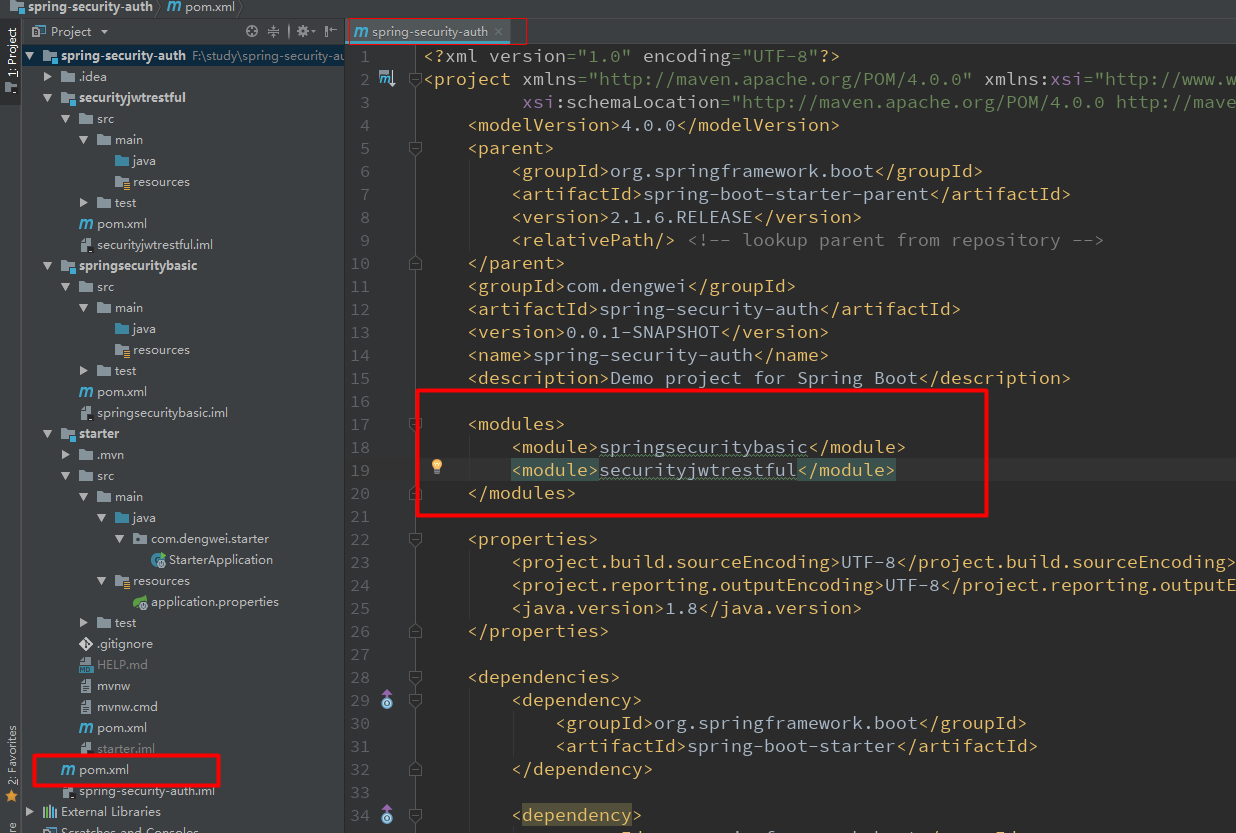
最后还需要配置模块之间的依赖关系:
在我们的父pom中添加模块
父pom常用配置以及依赖

4.0.0
org.springframework.bootspring-boot-starter-parent1.5.4.RELEASE com.dengweispring-security-auth0.0.1-SNAPSHOTspring-security-authDemo project for Spring Bootspringsecuritybasicsecurityjwtrestful
1.81.81.81.8org.springframework.bootspring-boot-starter-jdbccom.alibabadruid-spring-boot-starter1.1.5mysqlmysql-connector-javaorg.mybatis.spring.bootmybatis-spring-boot-starter1.3.1com.github.pagehelperpagehelper-spring-boot-starter1.2.10org.springframework.bootspring-boot-starter-web org.springframework.boot spring-boot-configuration-processor trueorg.springframework.bootspring-boot-starterorg.springframework.bootspring-boot-starter-testtestorg.springframework.bootspring-boot-starter-securityorg.springframework.securityspring-security-testtestorg.springframework.bootspring-boot-maven-plugin
接下来我们看一下关于启动类的依赖以及配置:
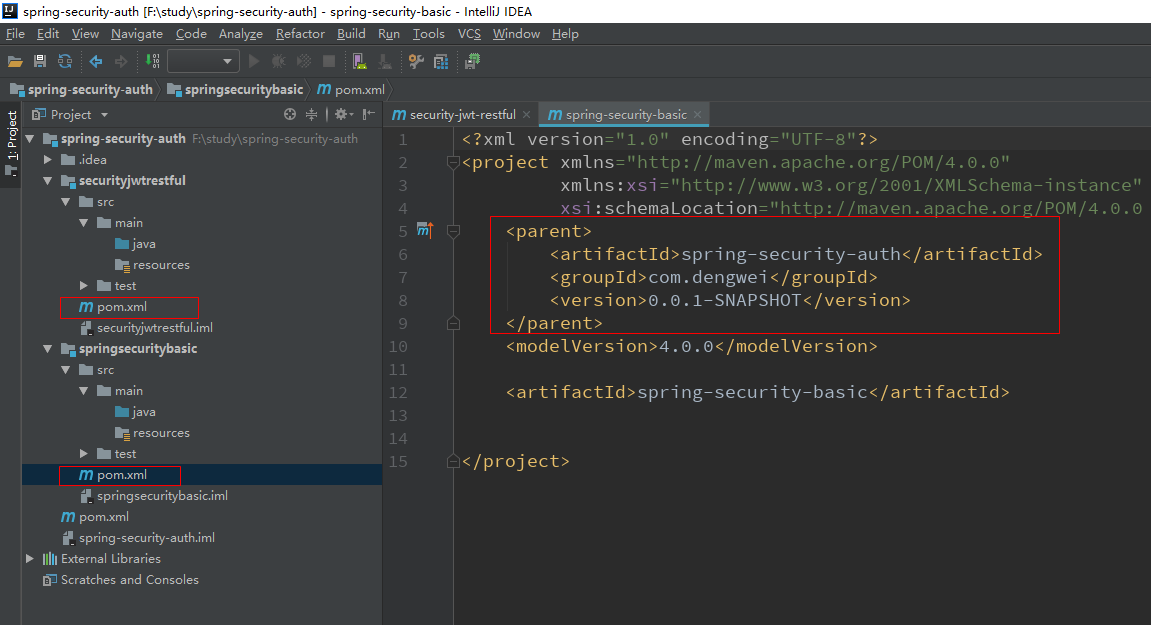
因为刚才我们创建starter模块并没有把spring-security-auth作为我们的父类,所以需要改一下,即把parent更改成
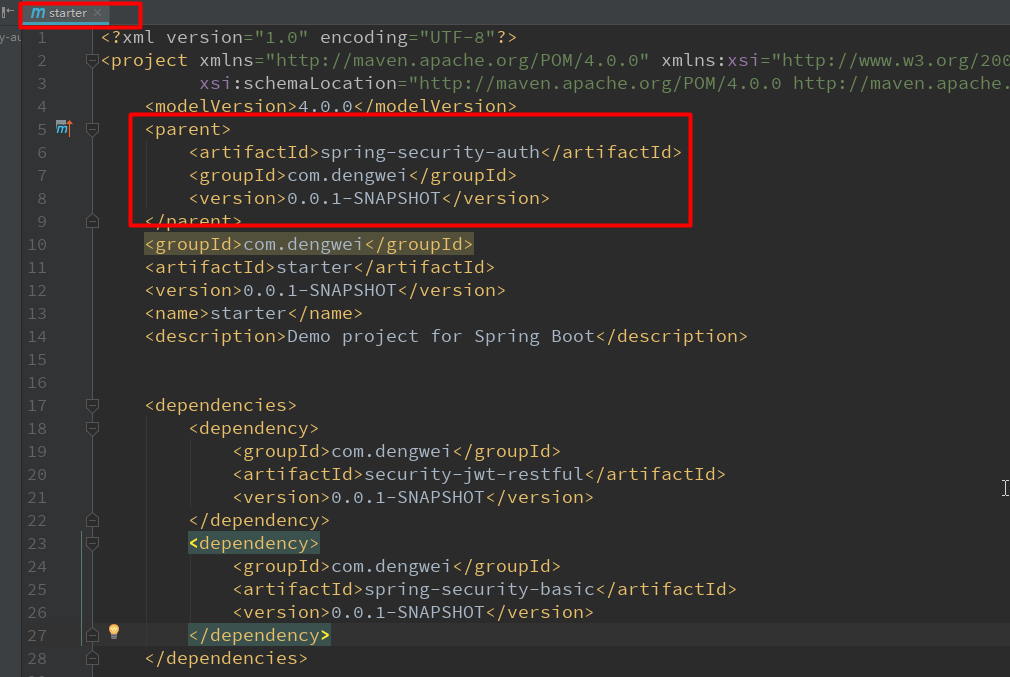
作为一个启动子模块那么肯定需要依赖于所有的其他子模块,即上面截图的依赖信息。
starter模块的pom依赖:
xsi:schemaLocation="http://maven.apache.org/POM/4.0.0 http://maven.apache.org/xsd/maven-4.0.0.xsd">
4.0.0
spring-security-auth
com.dengwei
0.0.1-SNAPSHOT
com.dengwei
starter
0.0.1-SNAPSHOT
starter
Demo project for Spring Boot
com.dengwei
security-jwt-restful
0.0.1-SNAPSHOT
com.dengwei
spring-security-basic
0.0.1-SNAPSHOT
org.springframework.boot
spring-boot-maven-plugin
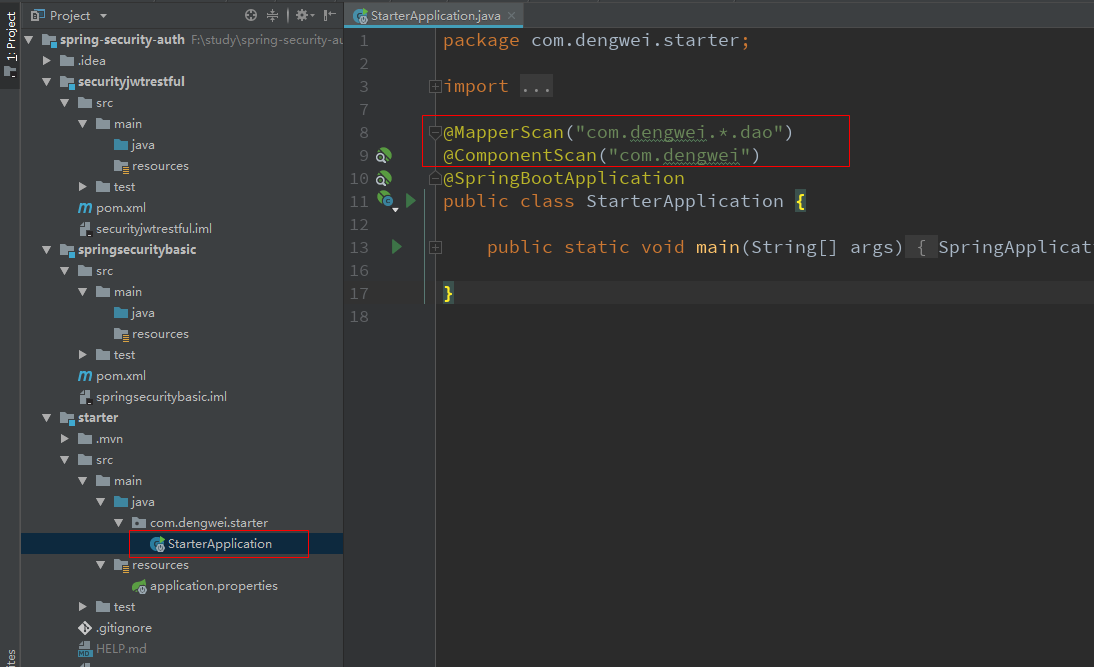
最后在我们的启动类加上扫描包的注解即可:
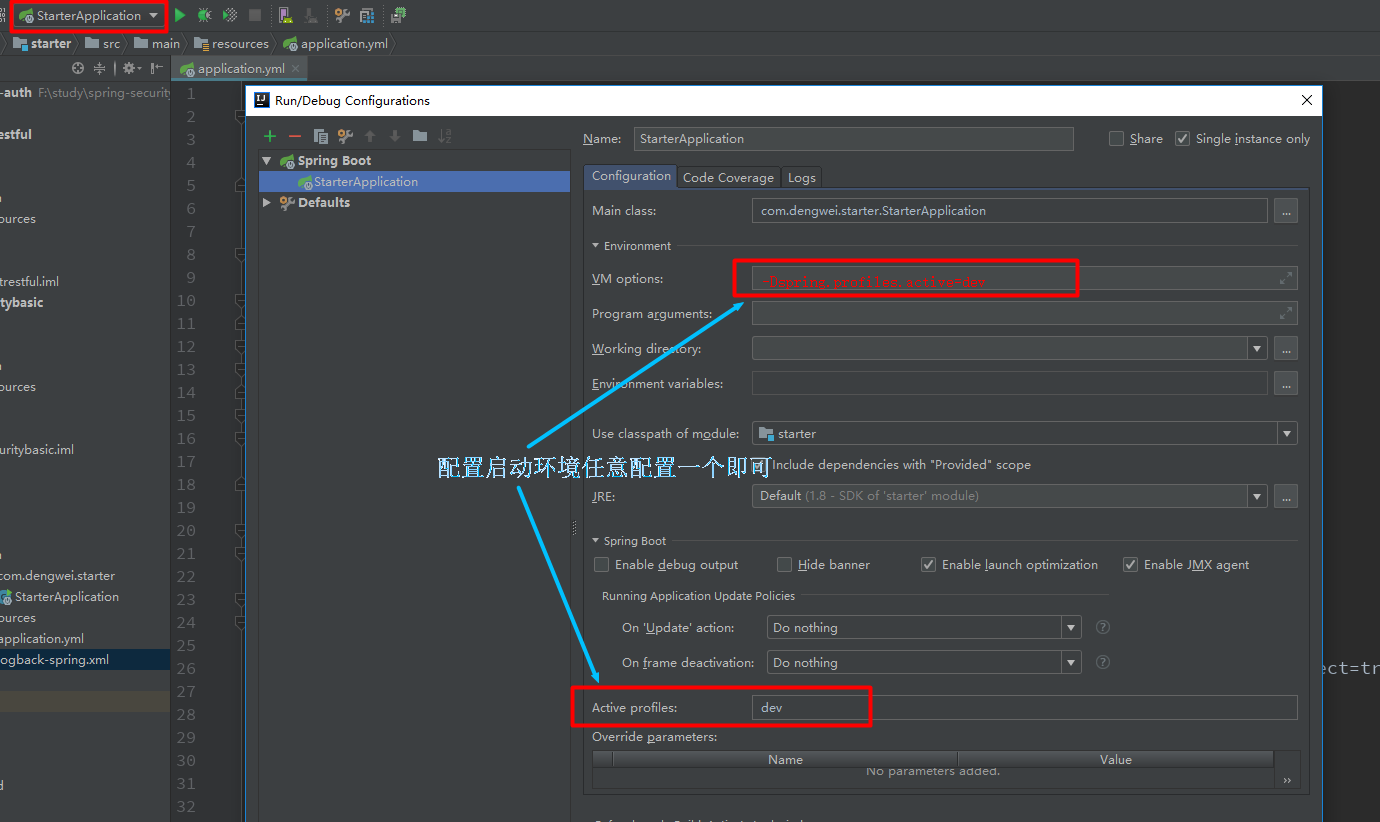
接下来我们看一下关于yml的配置(此配置是基于springboot1.5)
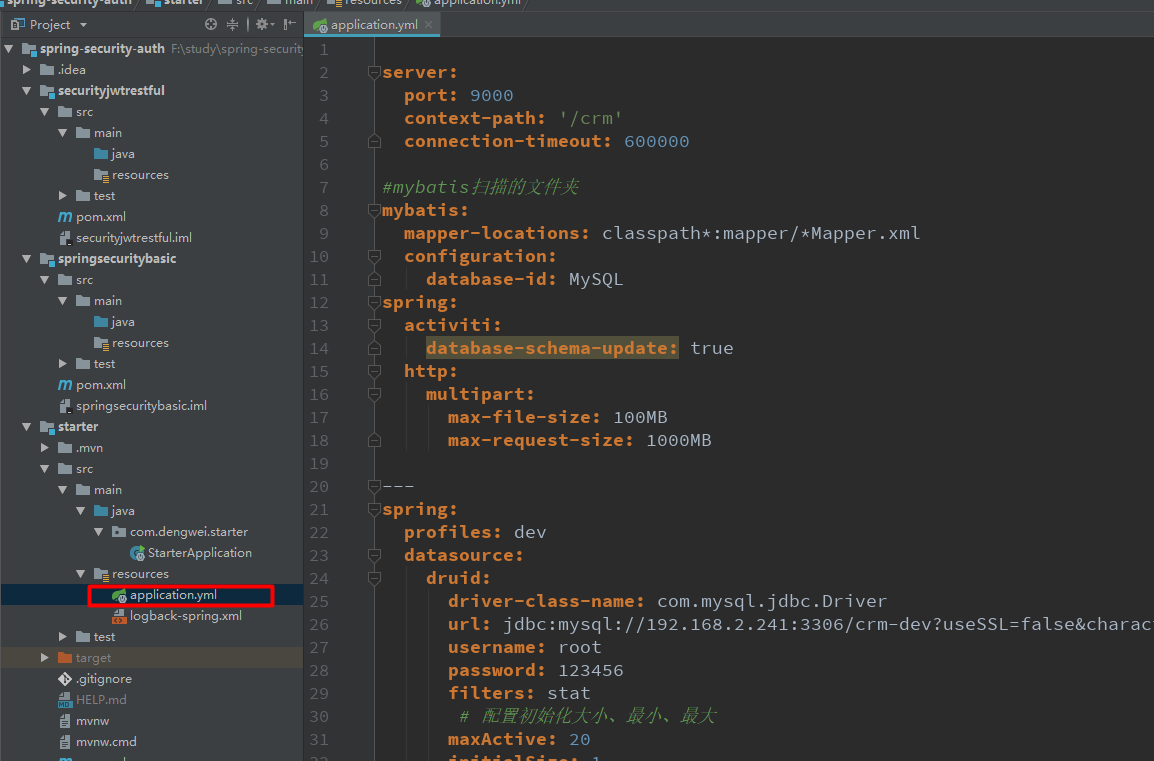
详细配置:
server:port: 9000context-path: '/crm'connection-timeout: 600000#mybatis扫描的文件夹
mybatis:mapper-locations: classpath*:mapper/*Mapper.xmlconfiguration:database-id: MySQL
spring:activiti:database-schema-update: truehttp:multipart:max-file-size: 100MBmax-request-size: 1000MB---
spring:profiles: devdatasource:druid:driver-class-name: com.mysql.jdbc.Driverurl: jdbc:mysql://192.168.2.241:3306/crm-dev?useSSL=false&characterEncoding=utf8&autoRecOnnect=true&failOverReadOnly=falseusername: rootpassword: **filters: stat# 配置初始化大小、最小、最大maxActive: 20initialSize: 1#配置获取连接等待超时的时间maxWait: 60000minIdle: 1#配置间隔多久才进行一次检测,检测需要关闭的空闲连接,单位是毫秒timeBetweenEvictionRunsMillis: 6000#配置一个连接在池中最小生存的时间,单位是毫秒minEvictableIdleTimeMillis: 30000#测试连接validationQuery: select 'x'#申请连接的时候检测,建议配置为true,不影响性能,并且保证安全性testWhileIdle: true#获取连接时执行检测,建议关闭,影响性能testOnBorrow: false#归还连接时执行检测,建议关闭,影响性能testOnReturn: false#是否开启PSCache,PSCache对支持游标的数据库性能提升巨大,oracle建议开启,mysql下建议关闭poolPreparedStatements: true#开启poolPreparedStatements后生效maxOpenPreparedStatements: 20#配置扩展插件,常用的插件有=>stat:监控统计 log4j:日志 wall:防御sql注入filter:stat:log-slow-sql: trueslow-sql-millis: 2000
---
spring:profiles: testdatasource:druid:driver-class-name: com.mysql.jdbc.Driverurl: jdbc:mysql://192.168.2.241:3306/crm-test?useSSL=false&characterEncoding=utf8&autoRecOnnect=true&failOverReadOnly=falseusername: rootpassword: **filters: statmaxActive: 20initialSize: 1maxWait: 60000minIdle: 1timeBetweenEvictionRunsMillis: 6000minEvictableIdleTimeMillis: 30000validationQuery: select 'x'testWhileIdle: truetestOnBorrow: falsetestOnReturn: falsepoolPreparedStatements: truemaxOpenPreparedStatements: 20
上面用到了Druid 数据库连接池,你们可以根据自己的需要换成其他的。
最后关于日志的配置:
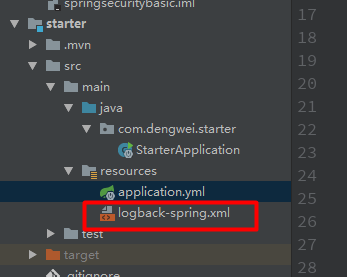
logback-spring.xml
value="%clr(%d{${LOG_DATEFORMAT_PATTERN:-yyyy-MM-dd HH:mm:ss.SSS}}){faint} %clr(${LOG_LEVEL_PATTERN:-%5p}) %clr(${PID:- }){magenta} %clr(---){faint} %clr([%15.15t]){faint} %clr(%c){cyan} %clr(:){faint} %m%n${LOG_EXCEPTION_CONVERSION_WORD:-%wEx}"/>
value="%d{${LOG_DATEFORMAT_PATTERN:-yyyy-MM-dd HH:mm:ss.SSS}} ${LOG_LEVEL_PATTERN:-%5p} ${PID:- } --- [%t] %c : %m%n${LOG_EXCEPTION_CONVERSION_WORD:-%wEx}"/>
${CONSOLE_LOG_PATTERN}
${LOG_FILE_NAME_PATTERN}
366
2GB
class="ch.qos.logback.core.rolling.SizeAndTimeBasedFNATP">
10MB
${FILE_LOG_PATTERN}
结束!是不是很简单,如果你是第一次搭建,一定要细心,慢慢来。
上述参考:https://www.cnblogs.com/dw3306/p/11058514.html
总起来说:
1.先创建一个父项目
2.再根据需要创建不同的启动子项目(springboot项目)(注意:我这里的springboot是创建的jar,你们也可以根据自己的需要创建成war项目)
3.最后根据需要创建不同的普通maven jar项目
4.项目之间的依赖关系一定要理清楚
这里我只是讲解如何springboot 父子级项目,后面我会讲到如何在springboot框架的基础上集成dubbo服务,敬请期待!!


![python有什么应用领域[python常见问题]](https://img1.php1.cn/3cd4a/24c6f/78c/659dcb4c0e67b0fe.jpeg)

 京公网安备 11010802041100号