开发工具:IntelliJ IDEA
数据库:MySql
Spring + Spring MVC + Mybatis 项目搭建和登录注册例子
Spring Boot + Mybatis 项目搭建和登录注册例子
Spring + Spring MVC + Hibernate 项目搭建和登录注册例子
Spring Boot + Hibernate 项目搭建和登录注册例子
Spring Boot 使用 JWT
本篇将记录创建一个 Spring + Spring MVC + Mybatis 项目,并且编写一个注册登录的例子,毕竟Java的东西配置起来真有点麻烦
就随便一点吧,使用MySql,数据库就用 test ,新建一个 users 表,随便设置几个字段
注意
IDEA 添加数据库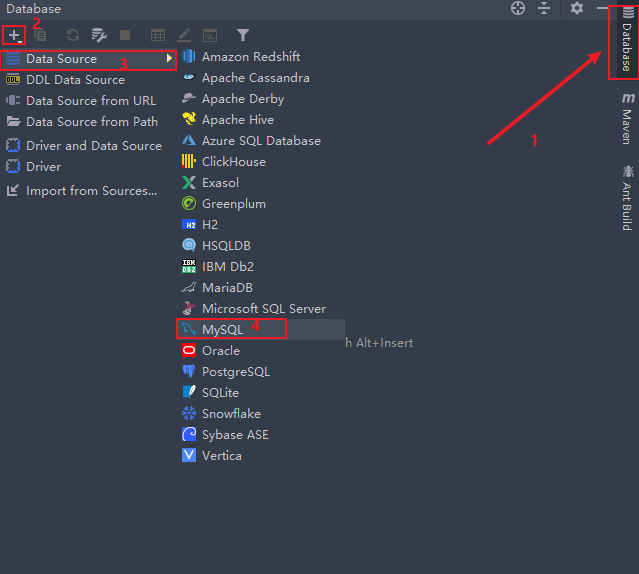
输入用户名和密码,填写连接字符串,然后点击 Test Connection,Schema 可以选择连接的数据库
连接字符串参考:jdbc:mysql://localhost:3306?useUnicode=true&characterEncoding=utf8&serverTimezOne=GMT%2B8&useSSL=false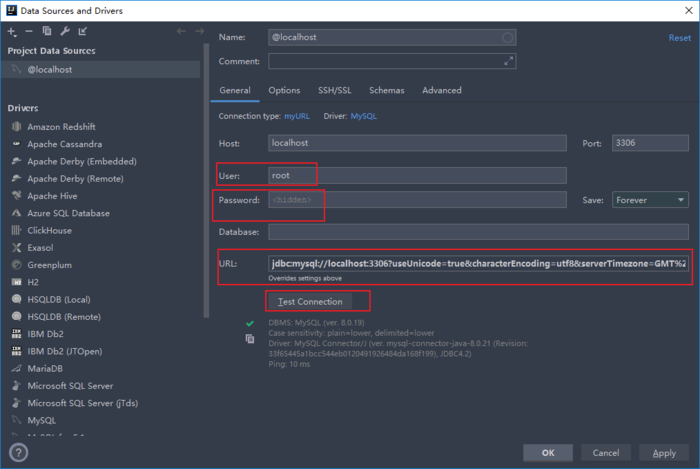
使用 Maven 创建 Java Web 项目,选择 maven-archetype-webapp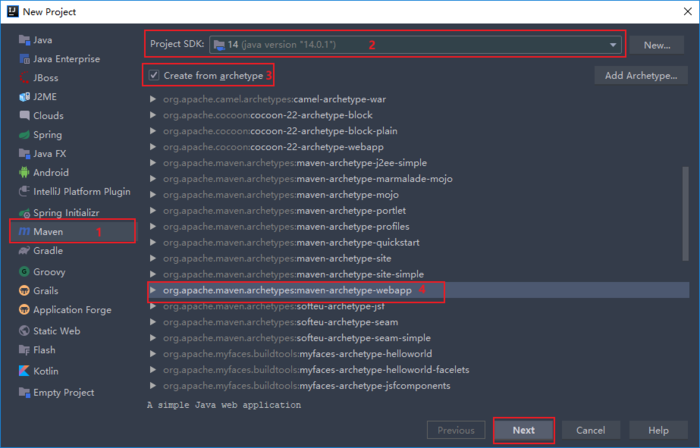
GroupId:一般是公司域名
ArtifactId:项目名称
毕竟只是个例子,所以就随便写了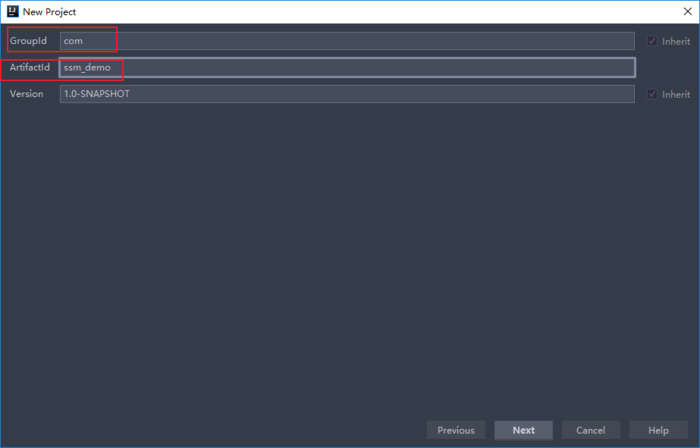
配置 maven 路径,这里就不详细展开讲了,Maven 的配置 baidu bing 之类的搜索引擎随便查都有答案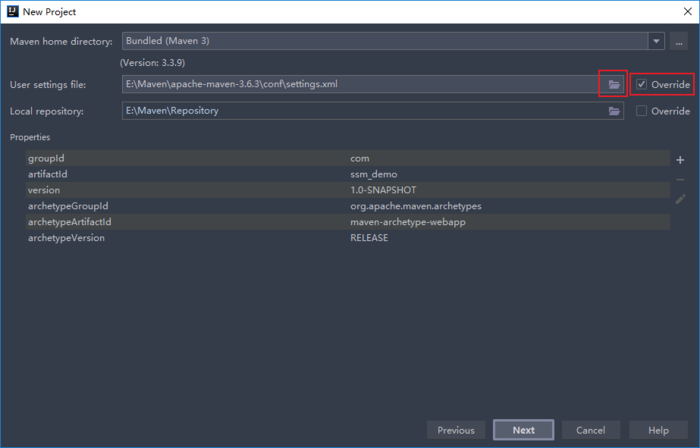
项目路径的最后文件夹与项目名称一致
右键 src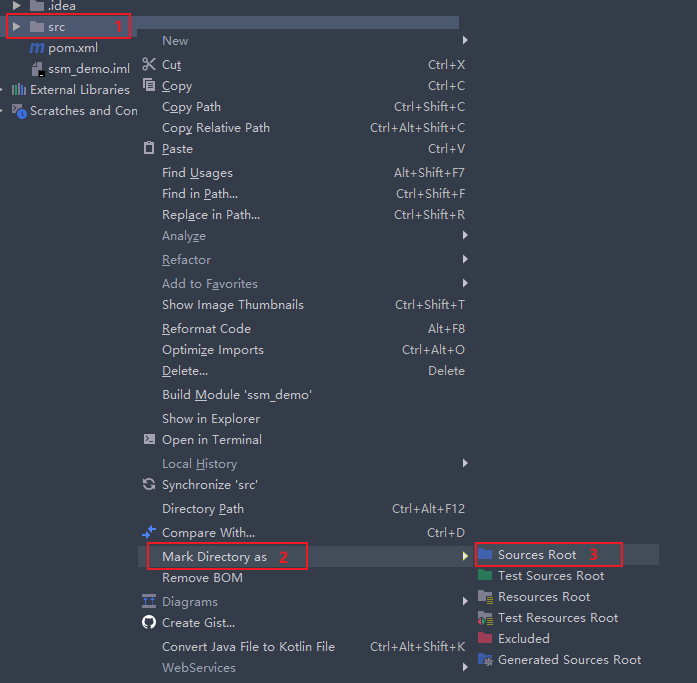
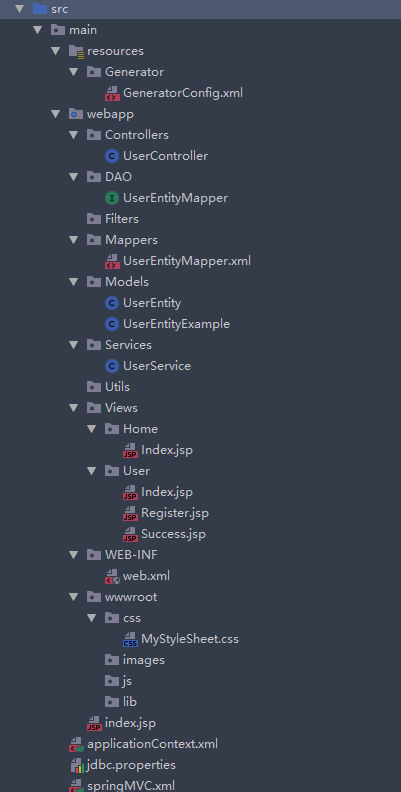
新建几个文件夹
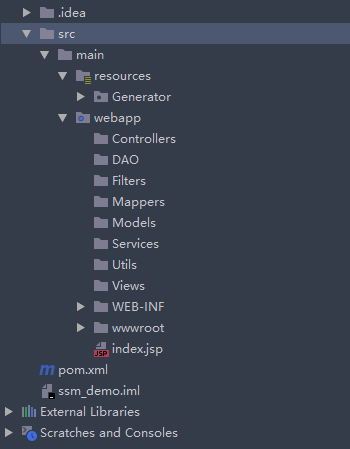
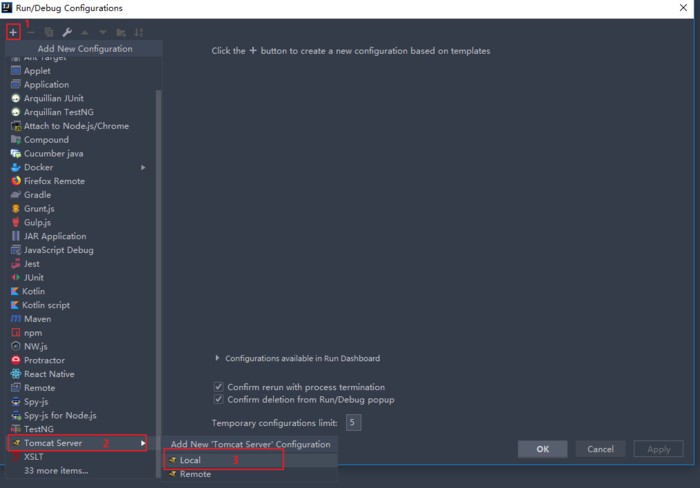
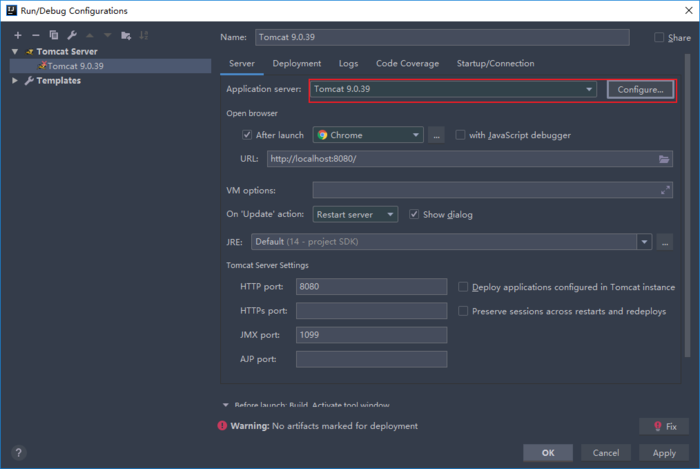
部署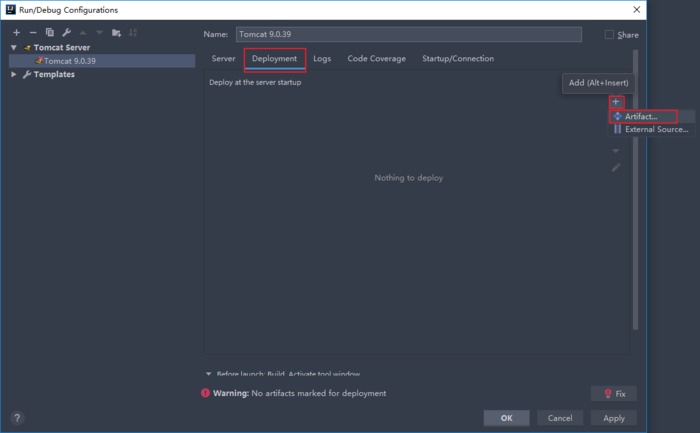
选哪个都可以
最基本的大致就这些,想要什么都可以自己添加
    4.0.0

    com
    ssm_demo
    1.0-SNAPSHOT
    war

    ssm_demo Maven Webapp

    http://www.example.com


        UTF-8
        1.7
        1.7
        4.3.18.RELEASE


            junit
            junit
            4.11
            test


            mysql
            mysql-connector-java
            8.0.18


            commons-dbcp
            commons-dbcp
            1.4


            commons-lang
            commons-lang
            2.2


            org.springframework
            spring-beans
            ${spring.Version}


            org.springframework
            spring-core
            ${spring.Version}


            org.springframework
            spring-context
            ${spring.Version}


            org.springframework
            spring-orm
            ${spring.Version}


            org.springframework
            spring-web
            ${spring.Version}


            org.springframework
            spring-webmvc
            ${spring.Version}


            org.mybatis
            mybatis
            3.4.5


            org.mybatis
            mybatis-spring
            1.3.0


            org.mybatis.generator
            mybatis-generator-core
            1.3.7


            aopalliance
            aopalliance
            1.0


            org.springframework
            spring-aop
            4.3.20.RELEASE


            cglib
            cglib
            3.2.0


            org.aspectj
            aspectjweaver
            1.8.14


        ssm_demo


                    maven-clean-plugin
                    3.1.0


                    maven-resources-plugin
                    3.0.2


                    maven-compiler-plugin
                    3.8.0


                    maven-surefire-plugin
                    2.22.1


                    maven-war-plugin
                    3.2.2


                    maven-install-plugin
                    2.5.2


                    maven-deploy-plugin
                    2.8.2


                    org.mybatis.generator
                    mybatis-generator-maven-plugin
                    1.3.7

                        src/main/resources/Generator/GeneratorConfig.xml
                        true
                        true
进入项目结构,Project Structure
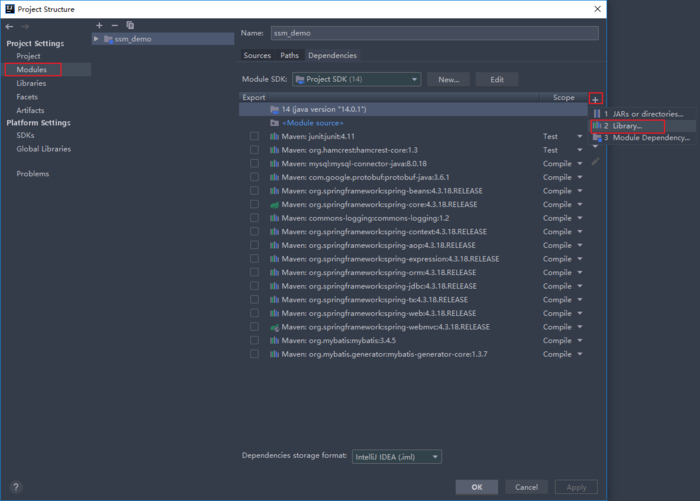
因为我偷懒,所以用 tomcat 自带的库,也可以手动在 Maven 添加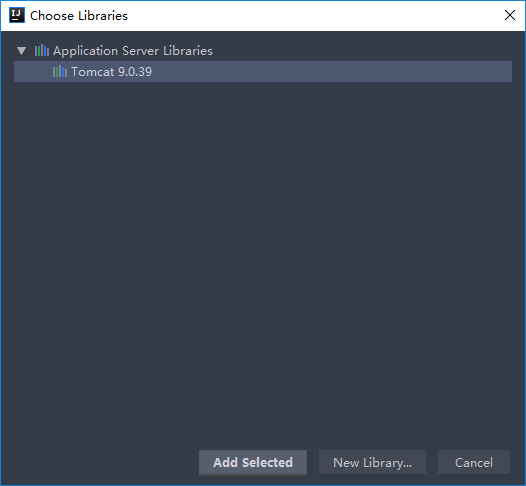
Index.jsp,开头的代码主要是获取端口和url的,方便访问静态文件,应该写在过滤器里,这里我就偷懒了
<%@ page cOntentType="text/html;charset=UTF-8" language="java" %>
<%
    String basePath = request.getScheme() + "://" + request.getServerName() + ":" + request.getServerPort();
    String path = basePath + request.getContextPath();
    String filePath = path + "/wwwroot";
    session.setAttribute("basePath",basePath);
    session.setAttribute("path",path);
    session.setAttribute("filePath",filePath);
%>


    This is Home Index Page
WEB-INF/web.xml 添加
/Views/Home/Index.jsp
还蛮成功
jdbc.properties ,根据实际情况修改
jdbc.username=root
jdbc.password=123456
jdbc.driverClassName=com.mysql.jdbc.Driver
jdbc.url=jdbc:mysql://localhost:3306/test?useUnicode=true&characterEncoding=utf8&serverTimezOne=GMT%2B8&useSSL=false
applicationContext.xml 和 springMVC.xml 都是这样创建,这三个文件都在main目录下
其实有很多配置我也不知道是做什么的,毕竟只是个项目搭建,我水平也没那么高啦,自己捣鼓着玩吧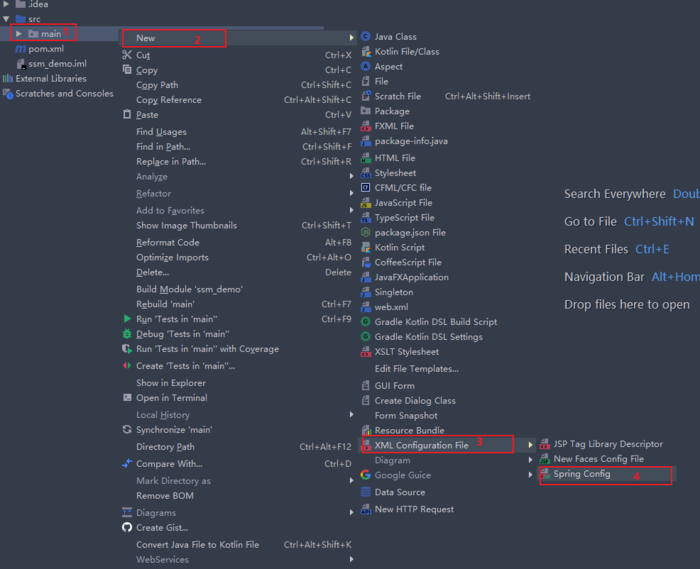
applicationContext.xml ,路径部分根据情况修改
springMVC.xml
最后打开项目结构 Project Structure ,如果配置文件不在这里,可以手动添加,或者用 IDEA 的智能提示,进入xml文件时的最上方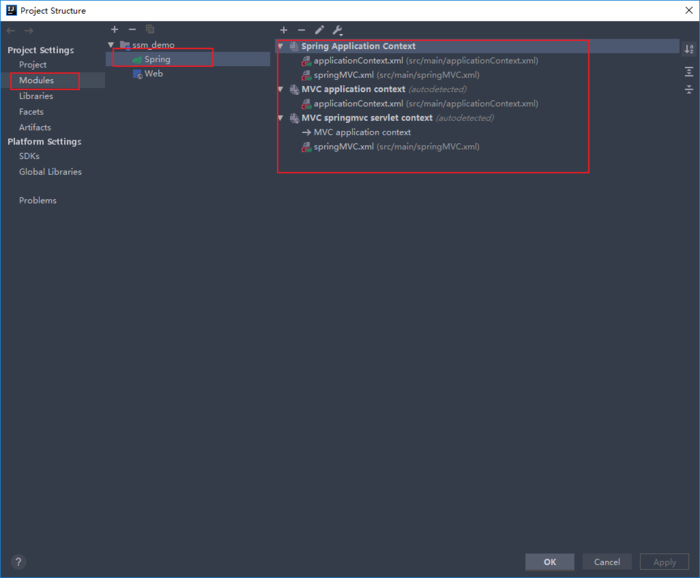
pom.xml 添加依赖项和插件,其实上面的 pom.xml 已经包含了
    org.mybatis.generator
    mybatis-generator-core
    1.3.7
    org.mybatis.generator
    mybatis-generator-maven-plugin
    1.3.7

        src/main/resources/Generator/GeneratorConfig.xml
        true
        true
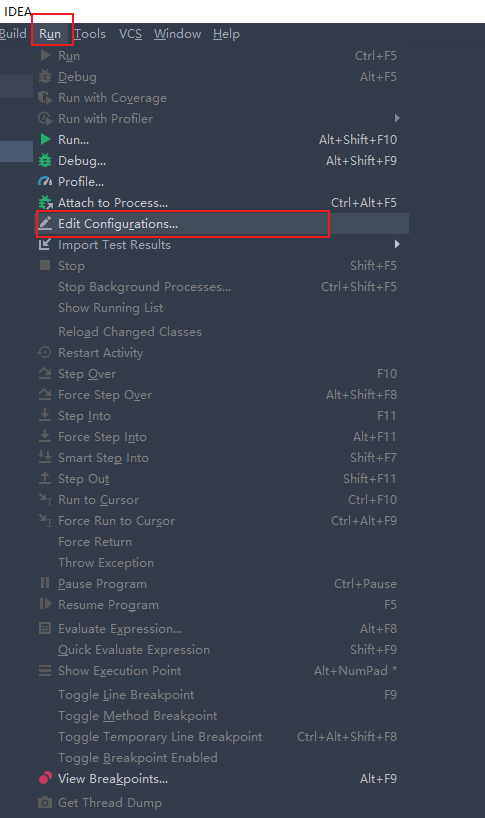
添加 Mybatis Generator 插件启动项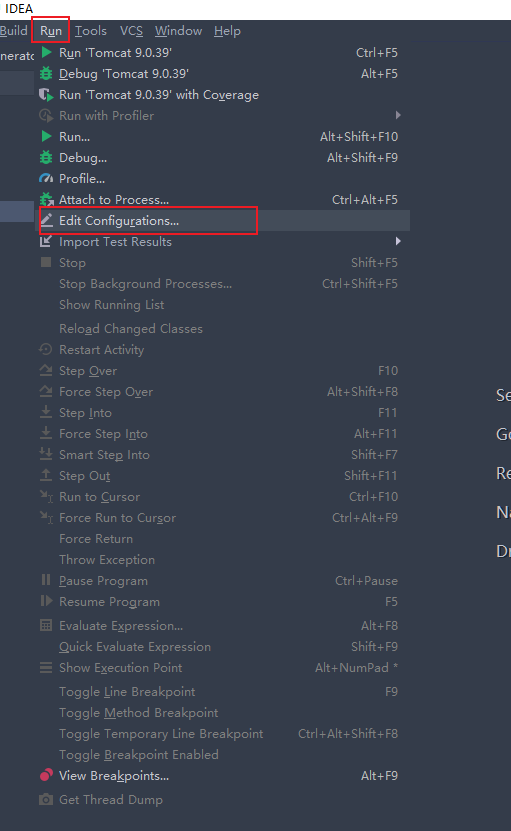
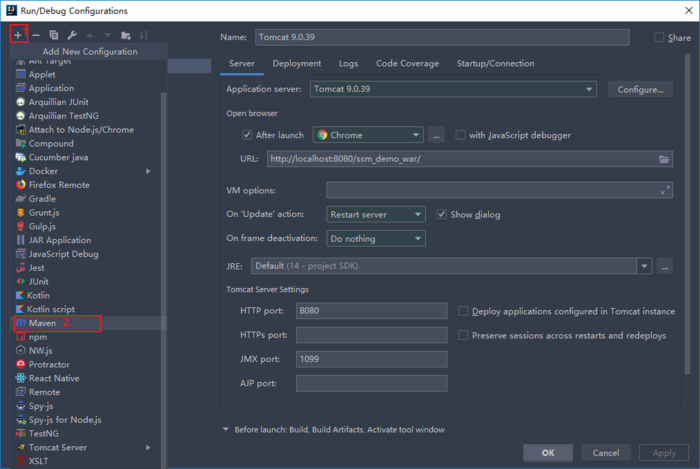
添加启动参数 mybatis-generator:generate -e,这里加了“-e ”选项是为了让该插件输出详细信息,帮助我们定位问题。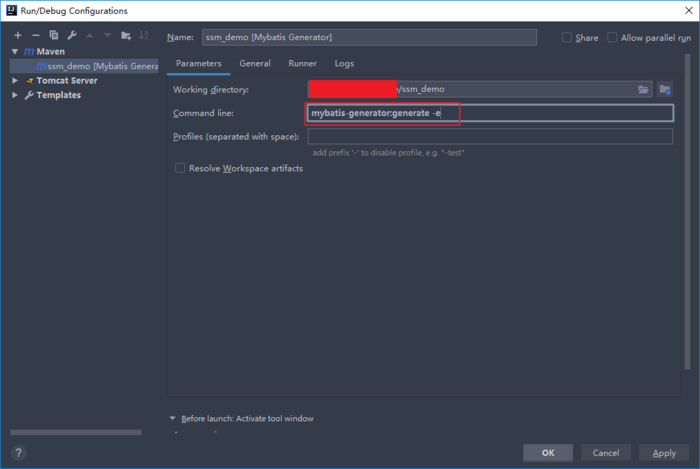
resources/Generator 目录下新建 GeneratorConfig.xml 文件
这个配置文件中涉及到路径的节点都可以改
还有一个坑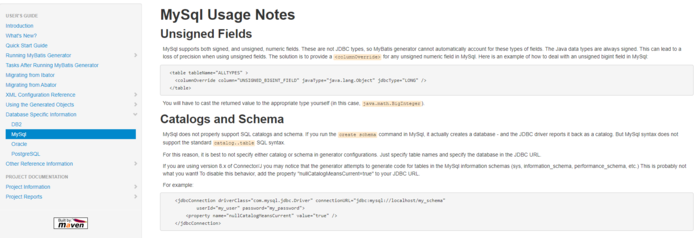
机翻:
MySql不支持SQL目录和模式。如果在MySql中运行createschema命令,它实际上会创建一个数据库,而JDBC驱动程序会将其报告为一个目录。但是MySql语法不支持标准的catalog..table SQL语法。
因此,最好不要在生成器配置中指定目录或模式。只需在JDBC URL中指定表名和数据库。
如果您使用的是8.x版的Connector/J,您可能会注意到生成器试图为MySql信息模式(sys、information_schema、performance_schema等)中的表生成代码,这可能不是您想要的!要禁用此行为,请将属性“nullCatalogMeansCurrent=true”添加到JDBC URL。
运行 Mybatis Generator 插件启动项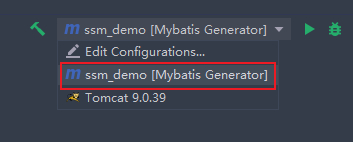
生成的实体类,UserEneity
package main.webapp.Models;

public class UserEntity
{
    private Integer id;

    private String username;

    private String password;

    public Integer getId()
    {
        return id;
    }

    public void setId(Integer id)
    {
        this.id = id;
    }

    public String getUsername()
    {
        return username;
    }

    public void setUsername(String username)
    {
        this.username = username == null ? null : username.trim();
    }

    public String getPassword()
    {
        return password;
    }

    public void setPassword(String password)
    {
        this.password = password == null ? null : password.trim();
    }
}
MyBatis支持2种类型的映射器:XML映射器和接口映射器,在这里以定义并使用接口映射器为例
自动生成的 Mapper 可能不会加 @Mapper 注解 ,要注意,其实不加也可以
@Mapper
public interface UserEntityMapper
{
    long countByExample(UserEntityExample example);

    int deleteByExample(UserEntityExample example);

    int deleteByPrimaryKey(Integer id);

    int insert(UserEntity record);

    int insertSelective(UserEntity record);

    List selectByExample(UserEntityExample example);

    UserEntity selectByPrimaryKey(Integer id);

    int updateByExampleSelective(@Param("record") UserEntity record, @Param("example") UserEntityExample example);

    int updateByExample(@Param("record") UserEntity record, @Param("example") UserEntityExample example);

    int updateByPrimaryKeySelective(UserEntity record);

    int updateByPrimaryKey(UserEntity record);

    @Insert("insert into users(username, password) values(#{username,jdbcType=VARCHAR},#{password,jdbcType=VARCHAR})")
    void Save(@Param("username") String username, @Param("password") String password);

    @Select("select * from users where username=#{username}")
    UserEntity GetUserByUsername(@Param("username") String username);

    @Select("select * from users where username=#{username} and password=#{password}")
    UserEntity GetUserByUsernameAndPassowrd(@Param("username") String username, @Param("password") String password);

}
@Service
public class UserService
{
    @Autowired
    private UserEntityMapper _userEntityMapper;

    public UserEntity GetUserByUsername(String username)
    {
        return this._userEntityMapper.GetUserByUsername(username);
    }

    public UserEntity GetUserByUsernameAndPassword(String username, String password)
    {
        return this._userEntityMapper.GetUserByUsernameAndPassowrd(username, password);
    }

    public void Save(UserEntity userEntity)
    {
        this._userEntityMapper.Save(userEntity.getUsername(), userEntity.getPassword());
    }
}
控制器这里我返回值使用的是 ModelAndView 主要是懒得写前端代码,其实可以返回任何你想返回的值
@Controller
@RequestMapping("/UserController")
public class UserController
{
    @Autowired
    private UserService _userService;

    @RequestMapping("/Index")
    public ModelAndView Index()
    {
        ModelAndView view = new ModelAndView();
        view.setViewName("User/Index");

        return view;
    }

    @RequestMapping(value = "/Login/DoLogin", method = RequestMethod.POST)
    public ModelAndView DoLogin(HttpServletRequest request)
    {
        ModelAndView mav = new ModelAndView();

        String username = request.getParameter("username");
        String password = request.getParameter("password");
        mav.addObject("username", username);
        mav.addObject("password", password);

        if (request.getParameter("btn").equals("Register"))//可以前确定点击的按钮
        {
            mav.setViewName("User/Register");
        }
        else if (request.getParameter("btn").equals("Login"))
        {
            if (username.equals("") || password.equals(""))
            {
                mav.addObject("LoginMessage", "用户名或密码不能为空");
                mav.setViewName("User/Index");
            }
            else
            {
                UserEntity userEntity = this._userService.GetUserByUsernameAndPassword(username, password);
                if (userEntity != null)
                {
                    mav.setViewName("User/Success");
                }
                else
                {
                    mav.addObject("LoginMessage", "用户名或密码错误");
                    mav.setViewName("User/Index");
                }
            }
        }

        return mav;
    }

    @RequestMapping(value = "/Register/DoRegister", method = RequestMethod.POST)
    public ModelAndView DoRegister(HttpServletRequest request)
    {
        ModelAndView mav = new ModelAndView();

        String username = request.getParameter("username");
        String password = request.getParameter("password");
        String repeatPassword = request.getParameter("repeatPassword");
        mav.addObject("username", username);
        mav.addObject("password", password);
        mav.addObject("repeatPassword", repeatPassword);

        if (username.equals("") || password.equals("") || repeatPassword.equals(""))
        {
            mav.addObject("RegisterMessage", "输入框内容不能为空");
            mav.setViewName("User/Register");
        }
        else if (password.equals(repeatPassword) == false)
        {
            mav.addObject("RegisterMessage", "密码不一致");
            mav.setViewName("User/Register");
        }
        else
        {
            UserEntity userEntity = new UserEntity();
            if (this._userService.GetUserByUsername(username) == null)
            {
                userEntity.setUsername(username);
                userEntity.setPassword(password);
                this._userService.Save(userEntity);
                mav.setViewName("User/Index");
            }
            else
            {
                mav.addObject("RegisterMessage", "用户名已存在");
                mav.setViewName("User/Register");
            }
        }

        return mav;
    }

}
Index.jsp,requestScope 只是用来显示信息
<%@ page cOntentType="text/html;charset=UTF-8" language="java" %>
<%
String cOntext= request.getContextPath();
request.setAttribute("context", context);
%>
This is Login Index Page
注册
Success.jsp
<%@ page cOntentType="text/html;charset=UTF-8" language="java" %>


    Login Success
Register.jsp
<%@ page cOntentType="text/html;charset=UTF-8" language="java" %>
<%
String cOntext= request.getContextPath();
request.setAttribute("context", context);
%>
This is Register Page
因为控制器的返回值是视图,所以要这样访问,根据控制器的标注修改 url ,如果只是 html + js 的话,可以直接 Views/ 访问视图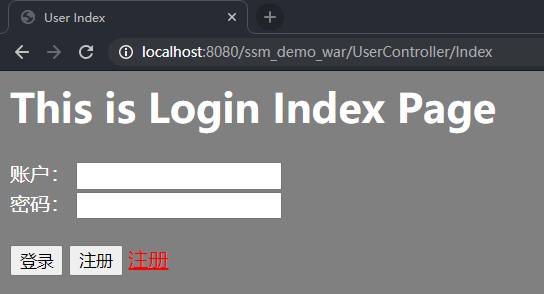

 京公网安备 11010802041100号 | 京ICP备19059560号-4 | PHP1.CN 第一PHP社区 版权所有