3
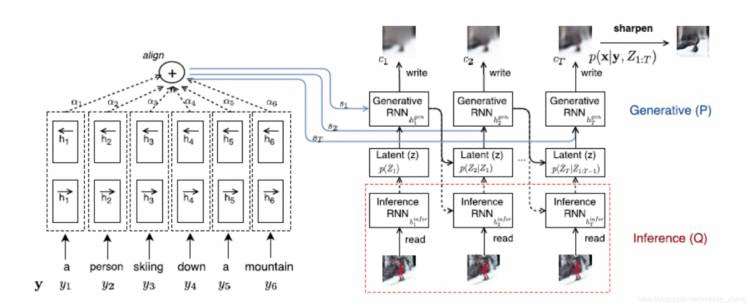
1) ggplot2 Try converting df to long form first (see ## line). We create an annotation data frame ann which defines the text and where it goes for use with geom_text. Note that since the plot is faceted by trt, geom_text will use the trt column in each row of ann to associate that row with the appropriate facet.
1)ggplot2首先尝试将df转换为长格式(参见## line)。我们创建了一个注释数据框ann,它定义了文本以及它与geom_text一起使用的位置。请注意,由于绘图是由trt分割的,因此geom_text将使用ann的每一行中的trt列将该行与相应的facet相关联。
library(ggplot2)
library(reshape2)

long <- melt(df, measure.vars = 2:3) ##

trts <- unique(long$trt)
ann <- data.frame(x = c(0, 100),
                  y = c(250, 100),
                  label = c(lm_eqn(lm(y1 ~ x, df, subset = trt == trts[1])),
                            lm_eqn(lm(y2 ~ x, df, subset = trt == trts[1])),
                            lm_eqn(lm(y1 ~ x, df, subset = trt == trts[2])),
                            lm_eqn(lm(y2 ~ x, df, subset = trt == trts[2]))),
                  trt = rep(trts, each = 2),
                  variable = c("y1", "y2"))

ggplot(long, aes(x, value)) +
       geom_point() +
       geom_smooth(aes(col = variable), method = "lm", se = FALSE,
              full_range = TRUE) +
       geom_text(aes(x, y, label = label, col = variable), data = ann,
             parse = TRUE, hjust = -0.1, size = 2) +
       facet_wrap(~ trt)
ann could equivalently be defined like this:
ann可以等效地定义如下:
f <- function(v) lm_eqn(lm(value ~ x, long, subset = variable==v[[1]] & trt==v[[2]]))
Grid <- expand.grid(variable = c("y1", "y2"), trt = trts)
ann <- data.frame(x = c(0, 100), y = c(250, 100), label = apply(Grid, 1, f), Grid)
(continued after image)
(图片后继续)

2) lattice Its possibly easier in this case with lattice:
2)格子在这种情况下格子可能更容易:
library(lattice)

xyplot(y1 + y2 ~ x | factor(trt), df,
       key = simpleKey(text = c("y1", "y2"), col = c("blue", "red")),
       panel = panel.superpose,
       panel.groups = function(x, y, group.value, ...) {
          if (group.value == "y1") {
              X <- 150; Y <- 300; col <- "blue"
          } else {
              X <- 250; Y <- 100; col <- "red"
          }
          panel.points(x, y, col = col)
          panel.abline(lm(y ~ x), col = col)
          panel.text(X, Y, parse(text = lm_eqn(lm(y ~ x))), col = col, cex = 0.7)
       }
)
(continued after image)
(图片后继续)

3) latticeExtra or we could make the lattice plot more ggplot2-like:
3)latticeExtra或者我们可以使格子图更像ggplot2:
library(latticeExtra)

xyplot(y1 + y2 ~ x | factor(trt), df, par.settings = ggplot2like(),
       key = simpleKey(text = c("y1", "y2"), col = c("blue", "red")),
       panel = panel.superpose,
       panel.groups = function(x, y, group.value, ...) {
          if (group.value == "y1") {
              X <- 150; Y <- 300; col <- "blue"
          } else {
              X <- 250; Y <- 100; col <- "red"
          }
          panel.points(x, y, col = col)
          panel.grid()
          panel.abline(lm(y ~ x), col = col)
          panel.text(X, Y, parse(text = lm_eqn(lm(y ~ x))), col = col, cex = 0.7)
       }
)
(continued after image)
(图片后继续)

Note: We used this as df:
注意:我们将其用作df:
df <-
structure(list(x = c(22.48349, 93.52976, 163.00984, 205.62072,
265.46812, 23.79859, 99.97307, 189.91814, 268.1006, 325.65609,
357.59726), y1 = c(34.2, 98.5, 164.2, 216.7, 271.8, 35.8, 119.4,
200.8, 279.5, 325.7, 353.6), y2 = c(31, 96, 169.8, 210, 258.5,
24.2, 90.6, 189.3, 264.6, 325.4, 353.8), trt = c(6030L, 6030L,
6030L, 6030L, 6030L, 6060L, 6060L, 6060L, 6060L, 6060L, 6060L
)), .Names = c("x", "y1", "y2", "trt"), class = "data.frame", row.names = c(NA,
-11L))
Update


 京公网安备 11010802041100号