文章目录
- 简介
- 安装
- 读取 EXIF
- 保存 EXIF
- 插入 EXIF
- 删除 EXIF
- 复制 EXIF
- 将 PIL 读取的信息存入 EXIF
- 标签内容
- 根据旋转信息旋转图片
- 生成一套方向图片
- ExifToolGUI
- 前端处理
- 参考文献
简介
EXIF,Exchangeable image file format,可交换图像文件格式,用于记录数码照片的属性信息和拍摄数据
EXIF 中有一个字段 Orientation,存放方向信息,前端上传图片到后端再获取,可能会发生方向改变的 BUG,只要后端接收到图片后按旋转信息旋转并删除该信息便可以解决(这步前端解决也可以)
test.jpg

安装
pip install piexif
pip install pillow
该库只有五个函数:
load(filename_or_bytes):获取 EXIF 数据(字典)dump(exif_dict):以字节形式返回 EXIF 数据insert(exif_bytes, filename):插入 EXIF 数据到图片中remove(filename):删除图片的 EXIF 数据transplant(filename1, filename2):将 EXIF 数据从 filename1 复制到 filename2
读取 EXIF
随意拍一张照片并命名为 1.jpg
import piexifexif_dict = piexif.load('1.jpg')
for k, v in exif_dict.items():print(k, v)
thumbnail = exif_dict.pop('thumbnail')
if thumbnail:with open('thumbnail.jpg', 'wb+') as f:f.write(thumbnail)
保存 EXIF
import io
import piexif
from PIL import Image
bytesIO = io.BytesIO()
thumb_im = Image.open('test.jpg')
thumb_im.thumbnail((50, 50), Image.ANTIALIAS)
thumb_im.save(bytesIO, 'jpeg')
thumbnail = bytesIO.getvalue()
zeroth_ifd = {piexif.ImageIFD.Make: 'Canon',piexif.ImageIFD.XResolution: (96, 1),piexif.ImageIFD.YResolution: (96, 1),piexif.ImageIFD.Software: 'piexif'
}
exif_ifd = {piexif.ExifIFD.DateTimeOriginal: '2099:09:29 10:10:10',piexif.ExifIFD.LensMake: 'LensMake',piexif.ExifIFD.Sharpness: 65535,piexif.ExifIFD.LensSpecification: ((1, 1), (1, 1), (1, 1), (1, 1)),
}
gps_ifd = {piexif.GPSIFD.GPSVersionID: (2, 0, 0, 0),piexif.GPSIFD.GPSAltitudeRef: 1,piexif.GPSIFD.GPSDateStamp: '1999:99:99 99:99:99',
}
first_ifd = {piexif.ImageIFD.Make: 'Canon',piexif.ImageIFD.XResolution: (40, 1),piexif.ImageIFD.YResolution: (40, 1),piexif.ImageIFD.Software: 'piexif'
}
exif_dict = {'0th': zeroth_ifd, 'Exif': exif_ifd, 'GPS': gps_ifd, '1st': first_ifd, 'thumbnail': thumbnail}
exif_bytes = piexif.dump(exif_dict)
im = Image.open('test.jpg')
im.save('result.jpg', exif=exif_bytes)
exif_dict = piexif.load('result.jpg')
for k, v in exif_dict.items():print(k, v)
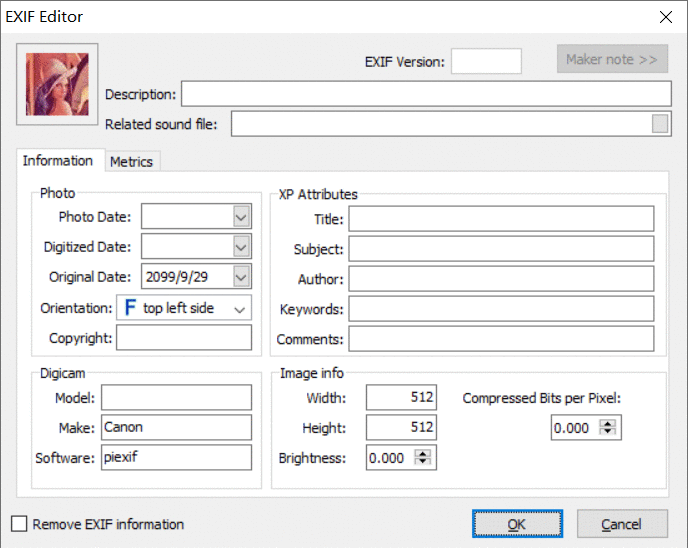
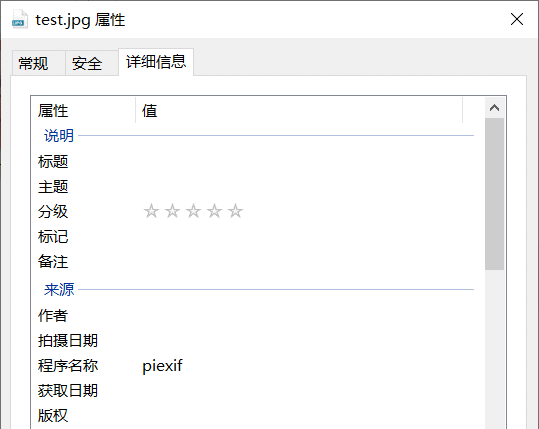
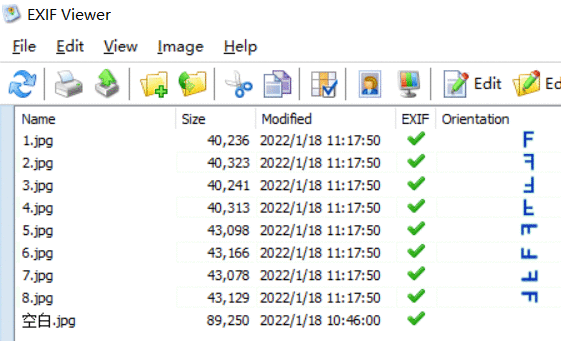
Windows 属性

使用 EXIF Viewer(k8ym) 查看
插入 EXIF
import piexifexif_dict = piexif.load('test.jpg')
exif_dict['0th'] = {piexif.ImageIFD.Software: 'piexif'}
exif_bytes = piexif.dump(exif_dict)
piexif.insert(exif_bytes, 'test.jpg')
删除 EXIF
import piexifpiexif.remove('test.jpg')
for k, v in piexif.load('test.jpg').items():print(k, v)
复制 EXIF
import piexifpiexif.transplant('result.jpg', 'test.jpg')
for k, v in piexif.load('test.jpg').items():print(k, v)
将 PIL 读取的信息存入 EXIF
import piexif
from PIL import Imageim = Image.open('test.jpg')
exif_dict = piexif.load(im.info['exif'])
width, height = im.size
exif_dict['0th'][piexif.ImageIFD.XResolution] = (width, 1)
exif_dict['0th'][piexif.ImageIFD.YResolution] = (height, 1)
exif_bytes = piexif.dump(exif_dict)
im.save('result.jpg', exif=exif_bytes)
标签内容
如旋转信息 Orientation
import piexifexif_dict = piexif.load('1.jpg')
if piexif.ImageIFD.Orientation in exif_dict['0th']:print(exif_dict['0th'][piexif.ImageIFD.Orientation])
详细查阅:EXIF 文件格式描述
根据旋转信息旋转图片
用于修复图片上传后方向改变的BUG,按旋转信息 Orientation 旋转并删除该信息
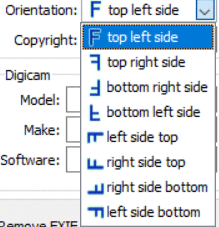
| Orientation(274) | 0th Row | 0th Column |
|---|
| 1 | top | left side |
| 2 | top | right side |
| 3 | bottom | right side |
| 4 | bottom | left side |
| 5 | left side | top |
| 6 | right side | top |
| 7 | right side | bottom |
| 8 | left side | bottom |
import piexif
from PIL import Imagedef rotate_by_orientation(filename):img = Image.open(filename)if 'exif' in img.info:exif_dict = piexif.load(img.info['exif'])if piexif.ImageIFD.Orientation in exif_dict['0th']:orientation = exif_dict['0th'].pop(piexif.ImageIFD.Orientation)exif_bytes = piexif.dump(exif_dict)if orientation == 2:img = img.transpose(Image.FLIP_LEFT_RIGHT)elif orientation == 3:img = img.rotate(180)elif orientation == 4:img = img.rotate(180).transpose(Image.FLIP_LEFT_RIGHT)elif orientation == 5:img = img.rotate(-90, expand=True).transpose(Image.FLIP_LEFT_RIGHT)elif orientation == 6:img = img.rotate(-90, expand=True)elif orientation == 7:img = img.rotate(90, expand=True).transpose(Image.FLIP_LEFT_RIGHT)elif orientation == 8:img = img.rotate(90, expand=True)img.save(filename, exif=exif_bytes)print('保存成功')if __name__ == '__main__':rotate_by_orientation('1.jpg')
生成一套方向图片
import piexif
from PIL import Imageimg = Image.open('test.jpg')
exif_dict = piexif.load(img.info['exif'])exif_dict['0th'][piexif.ImageIFD.Orientation] = 1
exif_bytes = piexif.dump(exif_dict)
img.copy().save('1.jpg', exif=exif_bytes)exif_dict['0th'][piexif.ImageIFD.Orientation] = 2
exif_bytes = piexif.dump(exif_dict)
img.copy().transpose(Image.FLIP_LEFT_RIGHT).save('2.jpg', exif=exif_bytes)exif_dict['0th'][piexif.ImageIFD.Orientation] = 3
exif_bytes = piexif.dump(exif_dict)
img.copy().rotate(180).save('3.jpg', exif=exif_bytes)exif_dict['0th'][piexif.ImageIFD.Orientation] = 4
exif_bytes = piexif.dump(exif_dict)
img.copy().rotate(180).transpose(Image.FLIP_LEFT_RIGHT).save('4.jpg', exif=exif_bytes)exif_dict['0th'][piexif.ImageIFD.Orientation] = 5
exif_bytes = piexif.dump(exif_dict)
img.copy().rotate(-90, expand=True).transpose(Image.FLIP_LEFT_RIGHT).save('5.jpg', exif=exif_bytes)exif_dict['0th'][piexif.ImageIFD.Orientation] = 6
exif_bytes = piexif.dump(exif_dict)
img.copy().rotate(90, expand=True).save('6.jpg', exif=exif_bytes)exif_dict['0th'][piexif.ImageIFD.Orientation] = 7
exif_bytes = piexif.dump(exif_dict)
img.copy().rotate(90, expand=True).transpose(Image.FLIP_LEFT_RIGHT).save('7.jpg', exif=exif_bytes)exif_dict['0th'][piexif.ImageIFD.Orientation] = 8
exif_bytes = piexif.dump(exif_dict)
img.copy().rotate(-90, expand=True).save('8.jpg', exif=exif_bytes)
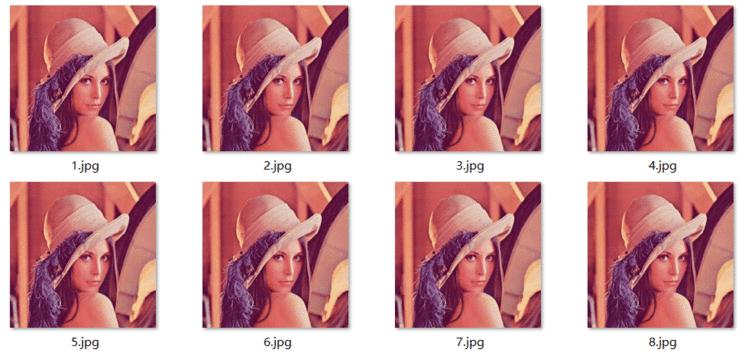
| Orientation(274) | 0th Row | 0th Column | 效果(保存后就能看到正常方向) |
|---|
| 1 | top | left side |  |
| 2 | top | right side |  |
| 3 | bottom | right side |  |
| 4 | bottom | left side |  |
| 5 | left side | top |  |
| 6 | right side | top |  |
| 7 | right side | bottom |  |
| 8 | left side | bottom |  |
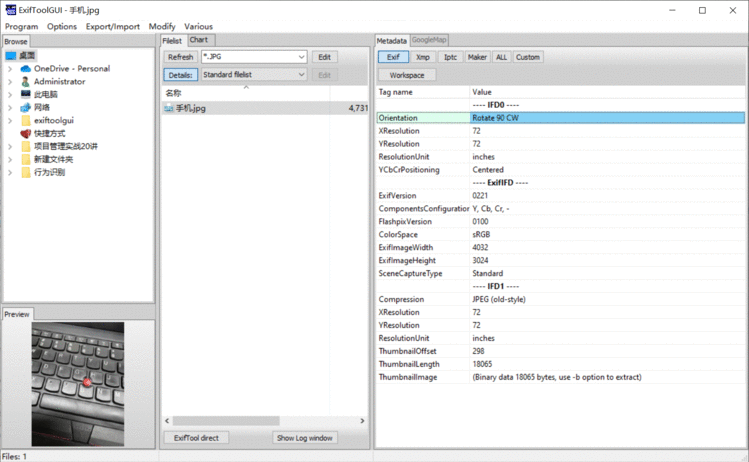
ExifToolGUI
还可以使用 ExifToolGUI(9qo8)(该链接已封装好):
- 下载 Windows Executable 后解压并改名为
exiftool - 下载 ExifToolGUI 后解压
- 将
exiftool 放入 GUI 同一文件夹
前端处理
参考文献
- Piexif Documentation
- 如何解决上传图片倒转的问题?
- Exif文件格式描述
- Python图像库Pillow (PIL) 入门
- JS Client-Side Exif Orientation: Rotate and Mirror JPEG Images
- FileReader:读取本地图片文件并显示


 京公网安备 11010802041100号