目录
一、简介
二、Gateway三大概念
三、Spring Cloud Gateway整体流程图
四、Gateway入门配置
五、Gateway路由配置方式
六、Gateway动态路由
七、总结
在SpringCloud旧版本中,我们使用的微服务网关是Zuul网关,笔者之前也做了有关Zuul网关的详解,有兴趣的小伙伴可以通过下面的链接进行学习:https://blog.csdn.net/Weixiaohuai/article/details/82717679。在SpringCloud新版本中,新推出了Spring Cloud Gateway新一代网关,它取代了Zuul,所以我们有必要花一点时间去学习Gateway。
Spring Cloud Gateway官网地址为:
https://spring.io/projects/spring-cloud-gateway
https://docs.spring.io/spring-cloud-gateway/docs/2.2.4.RELEASE/reference/html/
Spring Cloud全家桶中,有个很重要的组件就是网关,在1.x版本中都是采用的Zuul网关,但是在2.x版本中,zuul的升级一直跳票,SpringCloud最后自己研发了一个网关替换Zuul,那就是SpringCloud Gateway,一句话,gateway是原zuul1.x版本的替代。
SpringCloud Gateway项目提供了一个在Spring生态系统之上构建的API网关,包括:Spring 5,Spring Boot 2和Project Reactor。Spring Cloud Gateway旨在提供一种简单而有效的方法来路由到API,例如:安全性,监视/指标和限流。
SpringCloud Gateway作为Spring Cloud生态系统中的网关,目标是替代Zuul,在Spring Cloud2.0以上版本中,没有对新版本的Zuul 2.0以上最新高性能版本进行集成,仍然还是使用的Zuul 1.x非Reactor模式的老版本。为了提升网关的性能,SpringCloud Gateway是基于WebFlux框架实现的,而WebFlux框架底层则使用了高性能的Reactor模式通信框架Netty。
路由:网关的基本构建块。它由ID,目标URI、断言和过滤器集合定义。如果断言为true,则匹配路由。
断言:输入类型是Spring Framework ServerWebExchange。开发人员可以匹配HTTP请求中的所有内容,例如请求头或请求参数,如果请求与断言相匹配则进行路由。
Filter:指的是使用特定工厂构造的Spring Framework GatewayFilter实例。可以在请求被路由之前或者之后对请求进行修改。

客户端向Spring Cloud Gateway发出请求,如果网关处理程序映射确定请求与路由匹配,则将其发送到网关Web处理程序。该处理程序通过特定于请求的过滤器链运行请求。筛选器由虚线分隔的原因是,筛选器可以在发送代理请求之前("pre")和之后("post")运行逻辑。所有“前置”过滤器逻辑均被执行,然后发出代理请求。发出代理请求后,将运行“后”过滤器逻辑。
下面我们新建一个module【springcloud-apigateway-gateway9527】,这里面去集成Gateway新一代网关。
【a】pom.xml,注意添加spring-cloud-starter-gateway依赖
注意:【spring-cloud-starter-gateway不需要spring-cloud-starter-web,需要将 web 模块移除,否则启动会报错】
【b】application.yml配置文件:最主要的就是网关URL映射的配置,由上可知,gateway网关三要素: 路由ID、断言Predicate、过滤器(可有可无),所以我们作出如下配置:
server:port: 9527
spring:application:name: springcloud-gatewaycloud:gateway:routes:#如下配置表示,当浏览器URL访问localhost:9527/gatewaySimple/**的时候,gateway网关会帮忙转发到http://localhost:8001/gatewaySimple/**去.- id: payment8001_gatewaySimple  #路由的ID,没有固定规则但要求唯一,建议配合服务名uri: http://localhost:8001   #指定payment8001的访问地址,即匹配后提供服务的路由地址predicates:- Path=/gatewaySimple/**         # 断言,路径相匹配的进行路由
eureka:instance:hostname: springcloud-gateway-serviceclient:service-url:register-with-eureka: truefetch-registry: truedefaultZone: http://springcloud-eureka7001.com:7001/eureka/,http://springcloud-eureka7002.com:7002/eureka/   #集群版Eureka注册中心
如上路由转发配置说明:
当浏览器URL访问 localhost:9527/gatewaySimple/** 的时候,gateway网关会帮忙转发到http://localhost:8001/gatewaySimple/**去。
【c】主启动类
package com.wsh.springcloud;import org.springframework.boot.SpringApplication;
import org.springframework.boot.autoconfigure.SpringBootApplication;
import org.springframework.cloud.netflix.eureka.EnableEurekaClient;@SpringBootApplication
@EnableEurekaClient
public class GateWayServiceApplication9527 {public static void main(String[] args) {SpringApplication.run(GateWayServiceApplication9527.class, args);}
}
【d】服务提供方【springcloud-provider-payment8001】增加如下接口,很简单,这里就不过多叙述。
/*** 测试gateway网关转发请求简单示例*/@GetMapping("/gatewaySimple/{name}")public String testGateway(@PathVariable("name") String name) {return "hello, the name is :" + name;}
【e】测试
启动项目,我们首先访问http://localhost:8001/gatewaySimple/weixiaohuai,运行结果如下图:

可见,服务提供方的gatewaySimple接口是通的,下面,我们使用网关地址来访问:http://localhost:9527/gatewaySimple/weixiaohuai

可以看到,gateway成功转发请求。
Gateway网关路由配置方式主要有两种:
上面我们已经学习了如何在yml配置文件中配置的方法,接下来我们使用第二种方式进行配置。
官网案例:https://cloud.spring.io/spring-cloud-static/spring-cloud-gateway/2.2.1.RELEASE/reference/html/#configuration

【a】服务提供方增加如下方法
/*** 测试gateway网关转发请求简单示例 - RouteLocator方式*/@GetMapping("/gatewaySimpleRouteLocator/{name}")public String gatewaySimpleRouteLocator(@PathVariable("name") String name) {return "hello, [RouteLocator] the name is :" + name;}
【b】定义RouteLocator的配置类
package com.wsh.springcloud.config;import org.springframework.cloud.gateway.route.RouteLocator;
import org.springframework.cloud.gateway.route.builder.RouteLocatorBuilder;
import org.springframework.context.annotation.Bean;
import org.springframework.context.annotation.Configuration;/*** @version V1.0* @ClassName: com.wsh.springcloud.config.CustomRouteLocatorConfig.java* @Description: 自定义路由定位器配置* @author: weishihuai* @date: 2020/8/19 13:40*/
@Configuration
public class CustomRouteLocatorConfig {@Beanpublic RouteLocator routes(RouteLocatorBuilder routeLocatorBuilder) {RouteLocatorBuilder.Builder routes = routeLocatorBuilder.routes();routes.route("payment8001_gatewaySimpleRouteLocator",  //路由IDr -> r.path("/gatewaySimpleRouteLocator/**") //路由路径正则表达式.uri("http://localhost:8001") //跳转目标服务地址).build();return routes.build();}}
参照application.yml配置文件的方式,如上路由转发配置说明:
当浏览器URL访问 localhost:9527/gatewaySimpleRouteLocator/** 的时候,gateway网关会帮忙转发到http://localhost:8001/gatewaySimpleRouteLocator/**去。
【c】测试
启动项目,浏览器访问:http://localhost:8001/gatewaySimpleRouteLocator/weixiaohuai

确保服务提供方的接口gatewaySimpleRouteLocator是通的,然后我们使用网关路径去访问:http://localhost:9527/gatewaySimpleRouteLocator/weixiaohuai

可见,网关也成功了完成了路由转发,以上就是用编码的方式实现gateway网关进行路由映射配置的方法。
我们注意到,上面访问的路由地址我们是写死的【uri: http://localhost:8001 #指定payment8001的访问地址,即匹配后提供服务的路由地址】,在微服务架构中,微服务提供者不可能是单机部署,如果在集群环境下,如果写死某个服务的话,写死路由那肯定就不行了,所以就需要使用动态路由。
下面,我们以一个简单的示例说明如何实现动态路由,需要修改的地方如下:
【a】修改Gateway网关服务的pom.xml,将网关服务注册进Eureka中
【b】服务提供方增加如下方法
/*** 测试gateway网关转发负载均衡转发*/@GetMapping("/gatewayLoadBalance/{name}")public String gatewayLoadBalance(@PathVariable("name") String name) {return "hello, [gatewayLoadBalance] the name is :" + name + ", the server port is " + serverPort;}
注意:由于需要测试网关的负载均衡调用,所以两个服务提供者payment8001、8002都需要加上此方法。
【c】修改application.yml,需要注意的是uri的协议为lb,表示启用Gateway的负载均衡功能。
具体修改的地方:
- spring.cloud.gateway.discovery.locator.enabled=true #开启从注册中心动态创建路由的功能,利用微服务名进行路由
- lb://serviceName负载均衡配置
server:port: 9527
spring:application:name: springcloud-gatewaycloud:gateway:routes:#如下配置表示,当浏览器URL访问localhost:9527/gatewaySimple/**的时候,gateway网关会帮忙转发到http://localhost:8001/gatewaySimple/**去.- id: payment8001_gatewaySimple  #路由的ID,没有固定规则但要求唯一,建议配合服务名uri: http://localhost:8001   #指定payment8001的访问地址,即匹配后提供服务的路由地址predicates:- Path=/gatewaySimple/**         # 断言,路径相匹配的进行路由#如下配置表示,当浏览器URL访问localhost:9527/gatewayLoadBalance/**的时候,gateway网关负载均衡地将请求分发到springcloud-payment-service服务中去.- id: payment_service_loadbalance  #路由IDuri: lb://springcloud-payment-service  #springcloud-payment-service为服务提供者注册到Eureka的应用名称(application name)predicates:- Path=/gatewayLoadBalance/**         # 断言,路径相匹配的进行路由discovery:locator:enabled: true   #开启从注册中心动态创建路由的功能,利用微服务名进行路由
eureka:instance:hostname: springcloud-gateway-serviceclient:service-url:register-with-eureka: truefetch-registry: truedefaultZone: http://springcloud-eureka7001.com:7001/eureka/,http://springcloud-eureka7002.com:7002/eureka/   #集群版Eureka注册中心
【d】测试
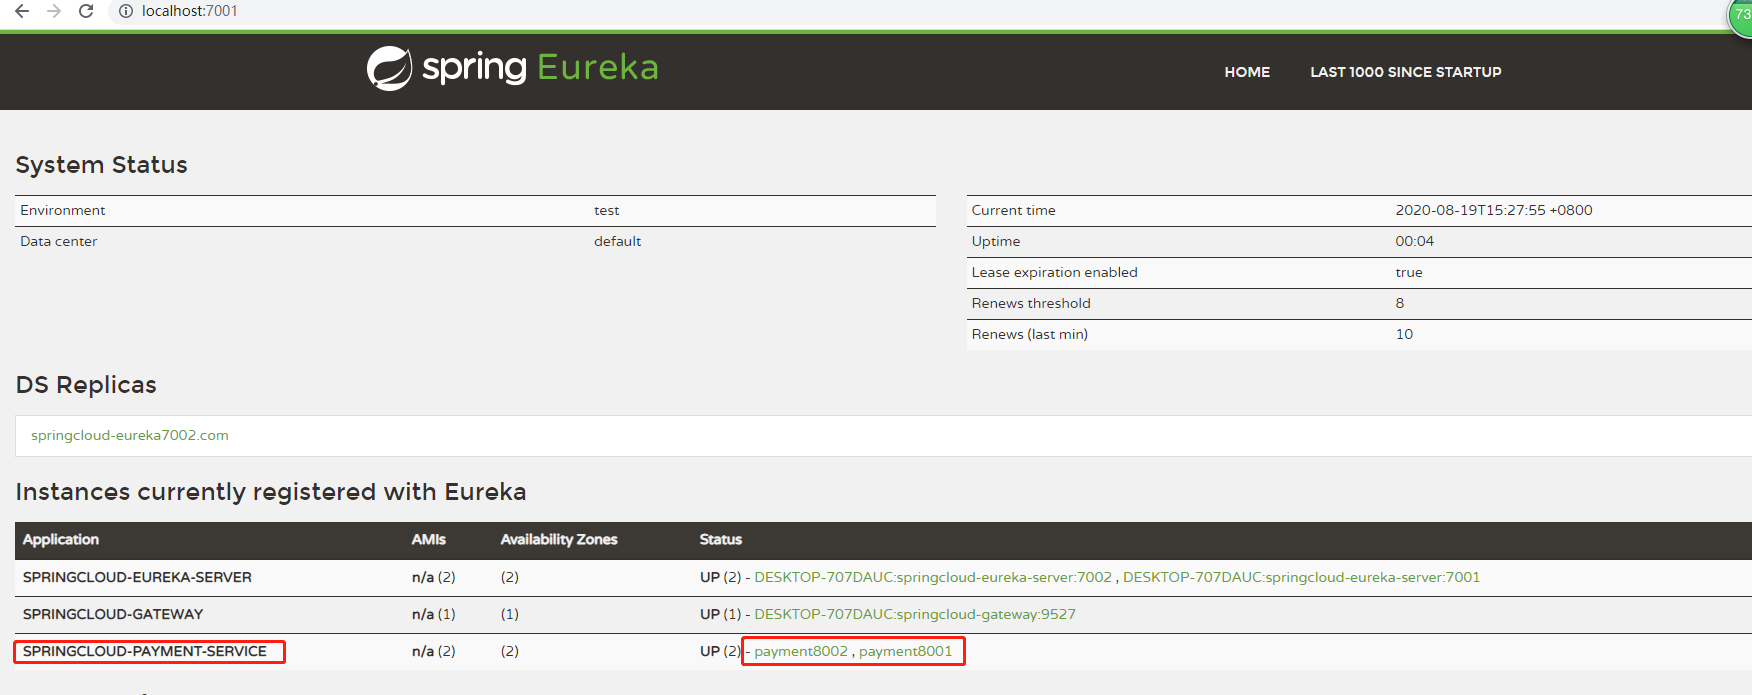
启动两个服务提供者payment8001和payment8002、网关服务9527,查看服务是否都正常注册进Eureka:

,浏览器访问:http://localhost:9527/gatewayLoadBalance/weixiaohuai,访问多几次,观察运行结果:


可见,运行结果请求后端服务的端口号是8001、8002交替出现,网关gateway成功帮我们完成了负载均衡转发请求到【springcloud-payment-service】 的功能,以上就是关于gateway中动态路由的配置方法。
本篇文章主要介绍了新一代网关Spring Cloud Gateway的概念,优点以及与Zuul的比较,并简单总结了一下gateway中路由配置的两种方式,还通过一个简答的示例说明了如何配置动态路由,当然gateway的内容远远不止这些,还有一些Predicate断言、Filters过滤器等等,我们在下篇文章进行介绍。
以上相关项目的代码我已经放在Gitee上,有需要的小伙伴可以去拉取进行学习:https://gitee.com/weixiaohuai/springcloud_Hoxton,由于笔者水平有限,如有不对之处,还请小伙伴们指正,相互学习,一起进步。

 京公网安备 11010802041100号 | 京ICP备19059560号-4 | PHP1.CN 第一PHP社区 版权所有