本篇文章主要讲解Flink下载、安装和启动的步骤。
关于下载的更多信息可参考Flink官网
如果是用的MacOS X,可以直接用Homebrew安装:
brew install apache-flink
当前最新稳定的版本是v1.6.1。Flink可以不依赖Hadoop,但我们环境中要把Flink跑在Yarn上,所以需要下载Flink With Hadoop的版本的tgz包:
只需直接解压即可
 $ tar -zxvf flink-1.6.1-bin-hadoop27-scala_2.11.tgz
 $ cd flink-1.6.1
 $ bin/flink --version
 Version: 1.6.1, Commit ID: 23e2636
懒人可以设置一个PATH,以便以后在任意路径可以直接使用flink命令:
$ vim ~/.bash_profile
# 增加以下内容
PATH="/Users/chengc/cc/apps/flink-1.6.1/bin:${PATH}"
export PATH
保存后可以试试看:
$ flink -v
Version: 1.6.1, Commit ID: 23e2636
通过简单命令就能在本地启动一个Flink集群
$ ./bin/start-cluster.sh
Starting cluster.
Starting standalonesession daemon on host chengcdeMacBook-Pro.local.
Starting taskexecutor daemon on host chengcdeMacBook-Pro.local.
看到以上信息代表Flink启动成功,我们可以通过jps来看看启动了哪些进程:
$ jps
70673 TaskManagerRunner
70261 StandaloneSessionClusterEntrypoint
70678 Jps
69647 Launcher
69646 NailgunRunner
可以看到分别启动了好几个Flink的重要组件,如果你看了第一章应该了解他们的作用。
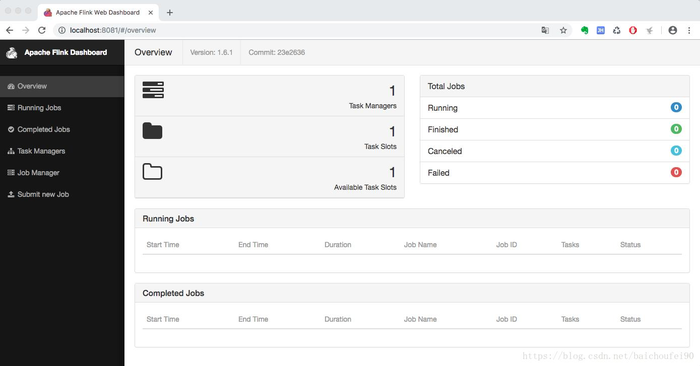
我们可以通过访问http://localhost:8081看看效果:
可以从flink的web界面上看到现在运行了一个Task Manager实例。
还可以通过查看日志看到flink服务器正常启动:
tail -100f log/flink-*-standalonesession-*.log
通过简单命令就能停止Flink集群:
$ ./bin/stop-cluster.sh
以下的依赖分为Java版和Scala版。这些依赖包括Flink本地运行环境所以可以在本地运行调试我们的Flink代码。
<dependency>
  <groupId>org.apache.flinkgroupId>
  <artifactId>flink-javaartifactId>
  <version>1.6.1version>
dependency>
<dependency>
  <groupId>org.apache.flinkgroupId>
  <artifactId>flink-streaming-java_2.11artifactId>
  <version>1.6.1version>
dependency>
<dependency>
  <groupId>org.apache.flinkgroupId>
  <artifactId>flink-clients_2.11artifactId>
  <version>1.6.1version>
dependency>
<dependency>
  <groupId>org.apache.flinkgroupId>
  <artifactId>flink-scala_2.11artifactId>
  <version>1.6.1version>
dependency>
<dependency>
  <groupId>org.apache.flinkgroupId>
  <artifactId>flink-streaming-scala_2.11artifactId>
  <version>1.6.1version>
dependency>
<dependency>
  <groupId>org.apache.flinkgroupId>
  <artifactId>flink-clients_2.11artifactId>
  <version>1.6.1version>
dependency>
import org.apache.flink.api.common.functions.FlatMapFunction;
import org.apache.flink.api.common.functions.ReduceFunction;
import org.apache.flink.api.java.utils.ParameterTool;
import org.apache.flink.streaming.api.datastream.DataStream;
import org.apache.flink.streaming.api.environment.StreamExecutionEnvironment;
import org.apache.flink.streaming.api.windowing.time.Time;
import org.apache.flink.util.Collector;

/**
 * Implements a streaming windowed version of the "WordCount" program.
 *
 * This program connects to a server socket and reads strings from the socket.
 * The easiest way to try this out is to open a text server (at port 12345)
 * using the netcat tool via
 *
 * nc -l 12345
 *
 * and run this example with the hostname and the port as arguments.
 */
@SuppressWarnings("serial")
public class SocketWindowWordCount {

	public static void main(String[] args) throws Exception {

		// the host and the port to connect to
		final String hostname;
		final int port;
		try {
			final ParameterTool params = ParameterTool.fromArgs(args);
			hostname = params.has("hostname") ? params.get("hostname") : "localhost";
			port = params.getInt("port");
		} catch (Exception e) {
			System.err.println("No port specified. Please run 'SocketWindowWordCount " +
				"--hostname  --port ', where hostname (localhost by default) " +
				"and port is the address of the text server");
			System.err.println("To start a simple text server, run 'netcat -l ' and " +
				"type the input text into the command line");
			return;
		}

		// get the execution environment
		final StreamExecutionEnvironment env = StreamExecutionEnvironment.getExecutionEnvironment();

		// get input data by connecting to the socket
		DataStream<String> text = env.socketTextStream(hostname, port, "\n");

		// parse the data, group it, window it, and aggregate the counts
		DataStream<WordWithCount> windowCounts = text

				.flatMap(new FlatMapFunction<String, WordWithCount>() {
					@Override
					public void flatMap(String value, Collector<WordWithCount> out) {
						for (String word : value.split("\\s")) {
							out.collect(new WordWithCount(word, 1L));
						}
					}
				})

				.keyBy("word")
				.timeWindow(Time.seconds(5))

				.reduce(new ReduceFunction<WordWithCount>() {
					@Override
					public WordWithCount reduce(WordWithCount a, WordWithCount b) {
						return new WordWithCount(a.word, a.count + b.count);
					}
				});

		// print the results with a single thread, rather than in parallel
		windowCounts.print().setParallelism(1);

		env.execute("Socket Window WordCount");
	}

	// ------------------------------------------------------------------------

	/**
	 * Data type for words with count.
	 */
	public static class WordWithCount {

		public String word;
		public long count;

		public WordWithCount() {}

		public WordWithCount(String word, long count) {
			this.word = word;
			this.count = count;
		}

		@Override
		public String toString() {
			return word + " : " + count;
		}
	}
}
import org.apache.flink.api.java.utils.ParameterTool
import org.apache.flink.streaming.api.scala._
import org.apache.flink.streaming.api.windowing.time.Time

/**
 * Implements a streaming windowed version of the "WordCount" program.
 *
 * This program connects to a server socket and reads strings from the socket.
 * The easiest way to try this out is to open a text sever (at port 12345)
 * using the ''netcat'' tool via
 * {{{
 * nc -l 12345
 * }}}
 * and run this example with the hostname and the port as arguments..
 */
object SocketWindowWordCount {

  /** Main program method */
  def main(args: Array[String]) : Unit = {

    // the host and the port to connect to
    var hostname: String = "localhost"
    var port: Int = 0

    try {
      val params = ParameterTool.fromArgs(args)
      hostname = if (params.has("hostname")) params.get("hostname") else "localhost"
      port = params.getInt("port")
    } catch {
      case e: Exception => {
        System.err.println("No port specified. Please run 'SocketWindowWordCount " +
          "--hostname  --port ', where hostname (localhost by default) and port " +
          "is the address of the text server")
        System.err.println("To start a simple text server, run 'netcat -l ' " +
          "and type the input text into the command line")
        return
      }
    }

    // get the execution environment
    val env: StreamExecutionEnvironment = StreamExecutionEnvironment.getExecutionEnvironment

    // get input data by connecting to the socket
    val text: DataStream[String] = env.socketTextStream(hostname, port, '\n')

    // parse the data, group it, window it, and aggregate the counts
    val windowCounts = text
          .flatMap { w => w.split("\\s") }
          .map { w => WordWithCount(w, 1) }
          .keyBy("word")
          .timeWindow(Time.seconds(5))
          .sum("count")

    // print the results with a single thread, rather than in parallel
    windowCounts.print().setParallelism(1)

    env.execute("Socket Window WordCount")
  }

  /** Data type for words with count */
  case class WordWithCount(word: String, count: Long)
}
将文件打包为jar
flink-demo-1.0-SNAPSHOT-jar-with-dependencies.jar
以上代码所写的程序功能是从socket中读取文本,然后每隔5秒打印出每个单词在当前时间往前推5秒的时间窗口内的出现次数。
在9999端口启动本地netcat服务:
$ nc -l 9999
$ flink run /Users/chengc/cc/work/projects/flink-demo/target/SocketWindowWordCount-jar-with-dependencies.jar --port 9999
# 看到控制台输出以下信息代表任务提交成功
Starting execution of program
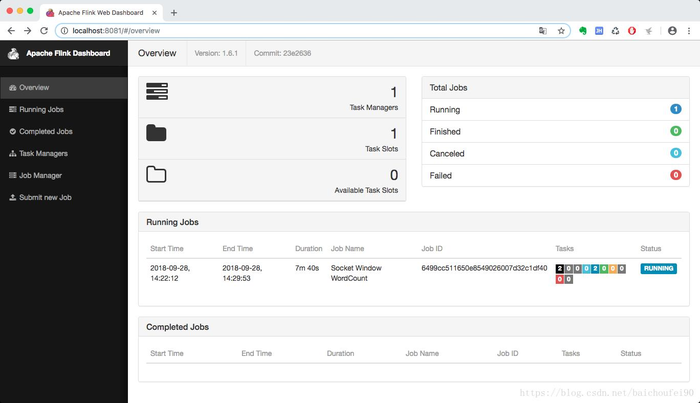
现在我们看看前面提到过的flink web界面:
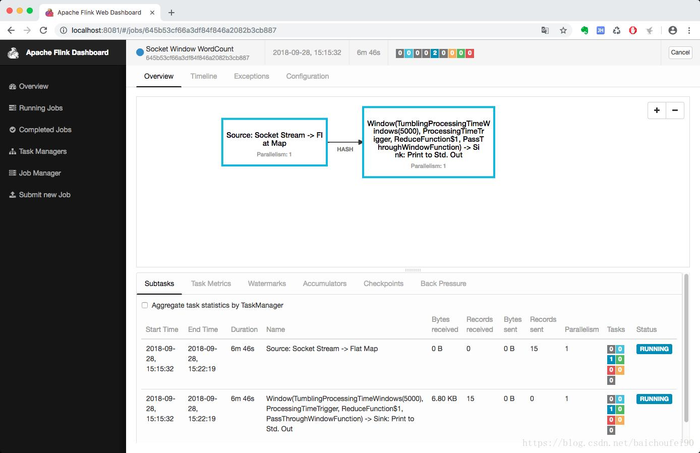
点击这行job信息能看到job详情页:
通过以上步骤我们建立了Flink应用和9999端口的关系,现在我们试试再nc界面输入一些字符串:
$ nc -lk 9999
i am a chinese
who are you
how do you do
how do you do
与此同时,我们使用tailf 查看flink 应用的输出:
$  tail -f log/flink-*-taskexecutor-*.out
i : 1
chine : 1
a : 1
am : 1
who : 1
you : 1
are : 1
how : 2
you : 2
do : 4
可以看到 ,示例程序以翻滚窗口(tumbling window)的形式每隔5秒将前5秒的数据进行了字符统计。
本篇文章主要讲了下Flink的安装和示例程序的提交,希望大家有所收获。
下一章我们学习下Flink的API,看看Flink作者是怎么抽象API的:
Flink系列3-API介绍
Flink-Quickstart

 京公网安备 11010802041100号 | 京ICP备19059560号-4 | PHP1.CN 第一PHP社区 版权所有