本篇接着《Flask 极简 CRUD 操作》继续讲解怎样让页面变得漂亮。在《Flask 极简 CRUD 操作》中,我们实现了基本的 CRUD 操作,如果运行一下,我们发现页面长得像这个样子:

我们可以使用 Bootstrap 这个著名的前端框架,让 web 的开发更迅速和简单。回忆一下,我们当时写的 index.html 代码如下:
<html lang&#61;"en">
<head><meta charset&#61;"UTF-8"><title>Basic CRUDtitle><link rel&#61;"stylesheet" type&#61;"text/css" href&#61;"../static/styles.css">
head>
<body><a href&#61;"{{ url_for(&#39;notesbp.new_note&#39;) }}">New notea><h4> {{ notes|length }} Notes: h4><table><tr><th>IDth><th>Bodyth><th>Actionth>tr>{% for note in notes %}<tr><td> {{note.id}} td><td> {{note.body}} td><td><a href&#61;"{{ url_for(&#39;notesbp.edit_note&#39;, note_id&#61;note.id) }}">Edita><a href&#61;"{{ url_for(&#39;notesbp.delete_note&#39;, note_id&#61;note.id) }}">Deletea>td>tr>{% endfor %}table>
body>
html>
使用 Bootstrap 美化这个界面需要两步&#xff1a;
- 页面引用 Bootstrap 依赖文件&#xff08;css, Javascript代码&#xff09;&#xff0c;我们甚至不用下载&#xff0c;直接使用网络上的 CDN 服务。依赖文件见下面的示例
- 设置 HTML 标签的 class 属性
引用四个依赖文件
<!-- 新 Bootstrap4 核心 CSS 文件 -->
<link rel&#61;"stylesheet" href&#61;"https://cdn.staticfile.org/twitter-bootstrap/4.1.0/css/bootstrap.min.css"><!-- jQuery文件。务必在bootstrap.min.js 之前引入 -->
<script src&#61;"https://cdn.staticfile.org/jquery/3.2.1/jquery.min.js"></script><!-- popper.min.js 用于弹窗、提示、下拉菜单 -->
<script src&#61;"https://cdn.staticfile.org/popper.js/1.12.5/umd/popper.min.js"></script><!-- 最新的 Bootstrap4 核心 Javascript 文件 -->
<script src&#61;"https://cdn.staticfile.org/twitter-bootstrap/4.1.0/js/bootstrap.min.js"></script>
国内推荐使用 : https://www.staticfile.org/&#xff0c; 国际推荐使用&#xff1a;https://cdnjs.com/
设置标签的 class 属性
将 index.html 页面中 table 和 button 的 class 属性为 Bootstrap 预设类别&#xff0c;瞬间即可美颜。index.html 代码变更如下&#xff1a;
<html lang&#61;"en"><head><meta charset&#61;"UTF-8"><title>Basic CRUDtitle><link rel&#61;"stylesheet" href&#61;"https://cdn.staticfile.org/twitter-bootstrap/4.1.0/css/bootstrap.min.css"><script src&#61;"https://cdn.staticfile.org/jquery/3.2.1/jquery.min.js">script><script src&#61;"https://cdn.staticfile.org/popper.js/1.12.5/umd/popper.min.js">script><script src&#61;"https://cdn.staticfile.org/twitter-bootstrap/4.1.0/js/bootstrap.min.js">script>
head><body><a class&#61;"btn btn-primary" href&#61;"{{ url_for(&#39;notesbp.new_note&#39;) }}">New notea><table class&#61;"table table-hover"><tr><th>IDth><th>Bodyth><th>Actionth>tr>{% for note in notes %}<tr><td> {{note.id}} td><td> {{note.body}} td><td><a class&#61;"btn btn-primary btn-sm" href&#61;"{{ url_for(&#39;notesbp.edit_note&#39;, note_id&#61;note.id) }}">Edita><a class&#61;"btn btn-primary btn-sm" href&#61;"{{ url_for(&#39;notesbp.delete_note&#39;, note_id&#61;note.id) }}">Deletea>td>tr>{% endfor %}table>
body>html>
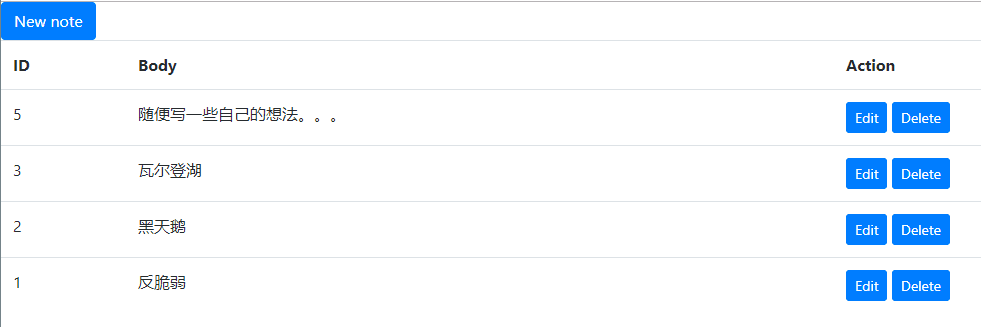
再来看看页面&#xff0c;变成了下面的样子&#xff1a;
将引用依赖移入 base.html
Flask 的模版继承让我们从多个页面引用相同的内容变得简单。既然其他页面也要使用这些依赖&#xff0c;我们不妨放在 base.html 文件中。在 templates 文件夹下面新建一个 base.html 文件&#xff0c;编写代码如下&#xff1a;
<html lang&#61;"en"><head><meta charset&#61;"UTF-8"><title>{% block title %}{% endblock %}title><link href&#61;"https://cdn.staticfile.org/twitter-bootstrap/3.3.7/css/bootstrap.min.css" rel&#61;"stylesheet"><script src&#61;"https://cdn.staticfile.org/jquery/2.1.1/jquery.min.js">script><script src&#61;"https://cdn.staticfile.org/twitter-bootstrap/3.3.7/js/bootstrap.min.js">script>
head><body>{% block body_content %}{% endblock %}
body>html>
base.html 模版文件中定义了一个 body_content 块&#xff0c;其他 html 文件可以从 base.html 文件继承&#xff0c;并且实现 body_content 块就可以了。将 index.html 进行改造&#xff0c;改造后的文件代码如下&#xff1a;
{% extends &#39;base.html&#39; %} {% block body_content %}<div><a href&#61;"{{ url_for(&#39;notesbp.new_note&#39;) }}" class&#61;"btn btn-primary">New notea>div><table class&#61;"table table-hover"><tr><th>IDth><th>Bodyth><th>Actionth>tr>{% for note in notes %}<tr><td> {{note.id}} td><td> {{note.body}} td><td><a class&#61;"btn btn-primary btn-sm" href&#61;"{{ url_for(&#39;notesbp.edit_note&#39;, note_id&#61;note.id) }}">Edita><a class&#61;"btn btn-primary btn-sm" href&#61;"{{ url_for(&#39;notesbp.delete_note&#39;, note_id&#61;note.id) }}">Deletea>td>tr>{% endfor %}table>
{% endblock %}
此时界面效果与之前完全相同。
使用 Flask-Bootstrap
前面代码我们使用 Bootstrap 框架来美化界面&#xff0c;并没有用到 Flask-Bootstrap。那么 Flask-Bootstrap 的作用又是什么呢&#xff1f;简单的来说&#xff1a;
- 自动引用 CDN
- 可以与 WTForm 或其他 Flask 插件比如 Flask-nav 一起使用
安装 Flask-Bootstrap:
pip install flask-bootstrap
关联 Flask app
from flask_bootstrap import Bootstrap
Bootstrap(app)
使用 Flask-Bootstrap 渲染 WTF Form
以 edit_form.html 为例&#xff0c;之前的代码如下&#xff1a;
<html lang&#61;"en">
<head><meta charset&#61;"UTF-8"><title>Edit Notetitle>
head>
<body><h2>Edit Noteh2><form method&#61;"POST">{{ form.body(rows&#61;&#39;10&#39;,cols&#61;&#39;100&#39;) }}<br/>{{ form.submit }}form>
body>
html>
其中 Form 中的字段是通过 WTForm 传入的&#xff0c;对这些字段如何套用 Bootstrap 的样式呢&#xff1f;
- 引用 Flask-Bootstrap 的
wtf.html 文件
{% import &#39;bootstrap/wtf.html&#39; as wtf %}
- 调用
wtf.form_field() 表单宏&#xff1a;
{{ wtf.form_field(some_field) }}
经过改写的 edit_form.html 如下&#xff1a;
{% extends &#39;base.html&#39; %}
{% import &#39;bootstrap/wtf.html&#39; as wtf %}{% block body_content %}<h2>Edit Noteh2><form class&#61;"form" method&#61;"POST">{{ wtf.form_field(form.body) }}{{ wtf.form_field(form.submit) }}form>
{% endblock %}
自定义表单样式
对于表单的样式&#xff0c;比如希望输入 body 的时候有多行&#xff0c;有两种定义方法。方法一是在定义 Form 字段的时候&#xff0c;传入一个 render_kw 参数&#xff0c;这个参数为 dict 类型&#xff0c;如下面这样&#xff1a;
class EditNoteForm(Form):body &#61; TextAreaField(&#39;body&#39;, render_kw&#61;{&#39;class&#39;: &#39;text-body&#39;, &#39;rows&#39;: 10, &#39;placeholder&#39;: &#39;输入您的想法...&#39;})submit &#61; SubmitField(&#39;Update&#39;)
方法二是在渲染时控制样式&#xff1a;
{{ wtf.form_field(form.body, , class&#61;"text-body", rows&#61;"10")) }}
本文源码
源码托管在 Github
参考


 京公网安备 11010802041100号