目录
一.搭建 SpringBoot 底层机制开发环境
1.pom.xml文件配置
2.springboot主程序MainApp.java
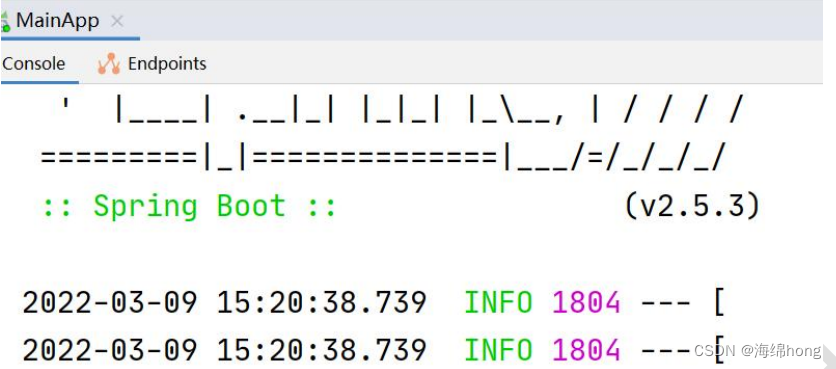
3.启动项目,然后我们准备开始思考
4.开始思考
底层机制分析: 仍然是 我们实现 Spring 容器那一套机制 IO/文件扫描+注解+反射+ 集合+映射集合+映射
二.源码分析: SpringApplication.run()
重点
三.实现 SpringBoot 底层机制 【Tomcat 启动分析 + Spring 容器初始化+Tomcat 如何关联Spring 容器 】
1.实现任务阶段 1- 创建 Tomcat, 并启动
1.1说明: 创建 Tomcat, 并启动
1.2分析+代码实现
2.实现任务阶段 2- 创建 Spring 容器
2.1说明: 创建 Spring 容器
2.2 分析+代码实现
3.实现任务阶段 3- 将 Tomcat 和 Spring 容器关联, 并启动 Spring 容器
3.1 说明: 将 Tomcat 和 Spring 容器关联, 并启动 Spring 容器
3.2 分析+代码实现
3.3debug 一下, 看看是否进行 Spring 容器的初始化工作, 可以看到 ac.refresh() 会将
@SpringBootApplication
public class MainApp {public static void main(String[] args) {ConfigurableApplicationContext ioc =SpringApplication.run(Main.class, args);}
我们发现当我们启动项目的时候tomcat也会直接启动,底层到底发生了什么?
首先先建立一个Dog的文件
之后我们将这个文件config写出来
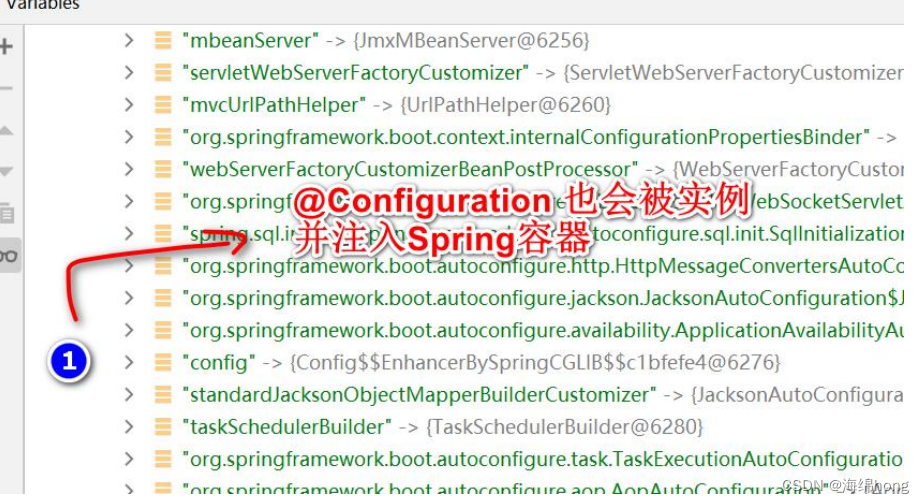
/*** Created with IntelliJ IDEA.** @Author: 海绵hong* @Date: 2022/11/19/22:55* @Description:标识标识的是一个配置类,充当Spring配置文件/容器的角色* 如果该配置类,如果在springboot扫描的包/子包,会被注入到容器中* 在该类中,可以通过这个注解@Bean来注入其他的主键*/
@Configuration
public class Config {/*** 1. 通过@Bean的方式, 将new出来的Bean对象, 放入到Spring容器* 2. 该bean在Spring容器的name/id 默认就是 方法名* 3. 通过方法名, 可以得到注入到spring容器中的dog对象**/@Beanpublic Dog dog(){return new Dog();}}
package com.hong.springboot;import org.springframework.boot.SpringApplication;
import org.springframework.boot.autoconfigure.SpringBootApplication;
import org.springframework.context.ConfigurableApplicationContext;/*** @author 韩顺平* @version 1.0*/
@SpringBootApplication
public class MainApp {public static void main(String[] args) {//启动springboot应用程序/项目//提出问题: 当我们执行run方法时,怎么就启动我们的内置的tomcat?//在分析run方法的底层机制的基础上,我们自己尝试实现ConfigurableApplicationContext ioc =SpringApplication.run(MainApp.class, args);/***  这里我们开始Debug SpringApplication.run()*  1. SpringApplication.java*  public static ConfigurableApplicationContext run(Class primarySource, String... args) {* 		return run(new Class[] { primarySource }, args);*   }**  2.SpringApplication.java : 创建返回 ConfigurableApplicationContext对象*  public static ConfigurableApplicationContext run(Class[] primarySources, String[] args) {* 		return new SpringApplication(primarySources).run(args);*        }**  3. SpringApplication.java**  public ConfigurableApplicationContext run(String... args) {* 		StopWatch stopWatch = new StopWatch();* 		stopWatch.start();* 		DefaultBootstrapContext bootstrapCOntext= createBootstrapContext();* 		ConfigurableApplicationContext cOntext= null;* 		configureHeadlessProperty();* 		SpringApplicationRunListeners listeners = getRunListeners(args);* 		listeners.starting(bootstrapContext, this.mainApplicationClass);* 		try {* 			ApplicationArguments applicatiOnArguments= new DefaultApplicationArguments(args);* 			ConfigurableEnvironment envirOnment= prepareEnvironment(listeners, bootstrapContext, applicationArguments);* 			configureIgnoreBeanInfo(environment);* 			Banner printedBanner = printBanner(environment);* 			cOntext= createApplicationContext(); //严重分析: 创建容器* 			context.setApplicationStartup(this.applicationStartup);* 			prepareContext(bootstrapContext, context, environment, listeners, applicationArguments, printedBanner);* 			refreshContext(context); //严重分析: 刷新应用程序上下文,比如 初始化默认设置/注入相关Bean/启动tomcat* 			afterRefresh(context, applicationArguments);* 			stopWatch.stop();* 			if (this.logStartupInfo) {* 				new StartupInfoLogger(this.mainApplicationClass).logStarted(getApplicationLog(), stopWatch);*                        }* 			listeners.started(context);* 			callRunners(context, applicationArguments);* 		}* 		catch (Throwable ex) {* 			handleRunFailure(context, ex, listeners);* 			throw new IllegalStateException(ex);* 		}** 		try {* 			listeners.running(context);* 		}* 		catch (Throwable ex) {* 			handleRunFailure(context, ex, null);* 			throw new IllegalStateException(ex);* 		}* 		return context;* 	}** 	4. SpringApplication.java : 容器类型很多,会根据你的this.webApplicationType创建对应的容器* 	默认 this.webApplicationType 是 SERVLET 也就是web容器/可以处理servlet* 	protected ConfigurableApplicationContext createApplicationContext() {* 		return this.applicationContextFactory.create(this.webApplicationType);*        }**  5. ApplicationContextFactory.java**  ApplicationContextFactory DEFAULT = (webApplicationType) -> {* 		try {* 			switch (webApplicationType) {* 			case SERVLET://默认是进入到这个分支 ,返回AnnotationConfigServletWebServerApplicationContext容器* 				return new AnnotationConfigServletWebServerApplicationContext();* 			case REACTIVE:* 				return new AnnotationConfigReactiveWebServerApplicationContext();* 			default:* 				return new AnnotationConfigApplicationContext();*                        }* 		}* 		catch (Exception ex) {* 			throw new IllegalStateException("Unable create a default ApplicationContext instance, "* 					+ "you may need a custom ApplicationContextFactory", ex);* 		}* 	};** 	6. SpringApplication.java* 	private void refreshContext(ConfigurableApplicationContext context) {* 		if (this.registerShutdownHook) {* 			shutdownHook.registerApplicationContext(context);*                }* 		refresh(context); //严重分析,真正执行相关任务*  }**  7. SpringApplication.java*  protected void refresh(ConfigurableApplicationContext applicationContext) {* 		applicationContext.refresh();*    }***  8. ServletWebServerApplicationContext.java*  @Override*        public final void refresh() throws BeansException, IllegalStateException {* 		try {* 			super.refresh();//分析这个方法*        }* 		catch (RuntimeException ex) {* 			WebServer webServer = this.webServer;* 			if (webServer != null) {* 				webServer.stop();*            }* 			throw ex;*        }*    }** 9. AbstractApplicationContext.java** @Override*        public void refresh() throws BeansException, IllegalStateException {* 		synchronized (this.startupShutdownMonitor) {* 			StartupStep cOntextRefresh= this.applicationStartup.start("spring.context.refresh");** 			// Prepare this context for refreshing.* 			prepareRefresh();** 			// Tell the subclass to refresh the internal bean factory.* 			ConfigurableListableBeanFactory beanFactory = obtainFreshBeanFactory();** 			// Prepare the bean factory for use in this context.* 			prepareBeanFactory(beanFactory);** 			try {* 				// Allows post-processing of the bean factory in context subclasses.* 				postProcessBeanFactory(beanFactory);** 				StartupStep beanPostProcess = this.applicationStartup.start("spring.context.beans.post-process");* 				// Invoke factory processors registered as beans in the context.* 				invokeBeanFactoryPostProcessors(beanFactory);** 				// Register bean processors that intercept bean creation.* 				registerBeanPostProcessors(beanFactory);* 				beanPostProcess.end();** 				// Initialize message source for this context.* 				initMessageSource();** 				// Initialize event multicaster for this context.* 				initApplicationEventMulticaster();** 				// Initialize other special beans in specific context subclasses.* 				onRefresh(); //严重分析,当父类完成通用的工作后,再重新动态绑定机制回到子类** 				// Check for listener beans and register them.* 				registerListeners();** 				// Instantiate all remaining (non-lazy-init) singletons.* 				finishBeanFactoryInitialization(beanFactory);** 				// Last step: publish corresponding event.* 				finishRefresh();*            }** 			catch (BeansException ex) {* 				if (logger.isWarnEnabled()) {* 					logger.warn("Exception encountered during context initialization - " +* 							"cancelling refresh attempt: " + ex);*                }** 				// Destroy already created singletons to avoid dangling resources.* 				destroyBeans();** 				// Reset 'active' flag.* 				cancelRefresh(ex);** 				// Propagate exception to caller.* 				throw ex;*            }** 			finally {* 				// Reset common introspection caches in Spring's core, since we* 				// might not ever need metadata for singleton beans anymore...* 				resetCommonCaches();* 				contextRefresh.end();*            }*        }*    }*  10. ServletWebServerApplicationContext.java*  @Override* 	protected void onRefresh() {* 		super.onRefresh();* 		try {* 			createWebServer();//看到胜利的曙光,创建webserver 可以理解成会创建指定web服务-Tomcat*                }* 		catch (Throwable ex) {* 			throw new ApplicationContextException("Unable to start web server", ex);*        }    * 	}*   11. ServletWebServerApplicationContext.java**   private void createWebServer() {* 		WebServer webServer = this.webServer;* 		ServletContext servletCOntext= getServletContext();* 		if (webServer == null && servletCOntext== null) {* 			StartupStep createWebServer = this.getApplicationStartup().start("spring.boot.webserver.create");* 			ServletWebServerFactory factory = getWebServerFactory();* 			createWebServer.tag("factory", factory.getClass().toString());* 			this.webServer = factory.getWebServer(getSelfInitializer());//严重分析,使用TomcatServletWebServerFactory 创建一个TomcatWebServer* 			createWebServer.end();* 			getBeanFactory().registerSingleton("webServerGracefulShutdown",* 					new WebServerGracefulShutdownLifecycle(this.webServer));* 			getBeanFactory().registerSingleton("webServerStartStop",* 					new WebServerStartStopLifecycle(this, this.webServer));*                }* 		else if (servletContext != null) {* 			try {* 				getSelfInitializer().onStartup(servletContext);*            }* 			catch (ServletException ex) {* 				throw new ApplicationContextException("Cannot initialize servlet context", ex);*            }*        }* 		initPropertySources();    * 	}** 	12. TomcatServletWebServerFactory.java 会创建Tomcat 并启动Tomcat**        @Override*    public WebServer getWebServer(ServletContextInitializer... initializers) {* 		if (this.disableMBeanRegistry) {* 			Registry.disableRegistry();*        }* 		Tomcat tomcat = new Tomcat();//创建了Tomcat对象* 		File baseDir = (this.baseDirectory != null) ? this.baseDirectory : createTempDir("tomcat");* 	    //做了一系列的设置* 		tomcat.setBaseDir(baseDir.getAbsolutePath());** 		Connector cOnnector= new Connector(this.protocol);* 		connector.setThrowOnFailure(true);* 		tomcat.getService().addConnector(connector);* 		customizeConnector(connector);* 		tomcat.setConnector(connector);* 		tomcat.getHost().setAutoDeploy(false);* 		configureEngine(tomcat.getEngine());* 		for (Connector additionalConnector : this.additionalTomcatConnectors) {* 			tomcat.getService().addConnector(additionalConnector);*        }* 		prepareContext(tomcat.getHost(), initializers);* 		return getTomcatWebServer(tomcat); //严重分析该方法.*    }**    13. TomcatServletWebServerFactory.java , 这里做了校验创建 TomcatWebServer*    protected TomcatWebServer getTomcatWebServer(Tomcat tomcat) {* 		return new TomcatWebServer(tomcat, getPort() >= 0, getShutdown());*        }*    14. TomcatServletWebServerFactory.java*    public TomcatWebServer(Tomcat tomcat, boolean autoStart, Shutdown shutdown) {* 		Assert.notNull(tomcat, "Tomcat Server must not be null");* 		this.tomcat = tomcat;* 		this.autoStart = autoStart;* 		this.gracefulShutdown = (shutdown == Shutdown.GRACEFUL) ? new GracefulShutdown(tomcat) : null;* 		initialize();//分析这个方法.*        }*    15.TomcatServletWebServerFactory.java**    private void initialize() throws WebServerException {* 		logger.info("Tomcat initialized with port(s): " + getPortsDescription(false));* 		synchronized (this.monitor) {* 			try {* 				addInstanceIdToEngineName();** 				Context cOntext= findContext();* 				context.addLifecycleListener((event) -> {* 					if (context.equals(event.getSource()) && Lifecycle.START_EVENT.equals(event.getType())) {* 						// Remove service connectors so that protocol binding doesn't* 						// happen when the service is started.* 						removeServiceConnectors();*                                        }                * 				});** 				// Start the server to trigger initialization listeners* 				this.tomcat.start(); //启动Tomcat** 				// We can re-throw failure exception directly in the main thread* 				rethrowDeferredStartupExceptions();** 				try {* 					ContextBindings.bindClassLoader(context, context.getNamingToken(), getClass().getClassLoader());*                }* 				catch (NamingException ex) {* 					// Naming is not enabled. Continue*                }** 				// Unlike Jetty, all Tomcat threads are daemon threads. We create a* 				// blocking non-daemon to stop immediate shutdown* 				startDaemonAwaitThread();*            }* 			catch (Exception ex) {* 				stopSilently();* 				destroySilently();* 				throw new WebServerException("Unable to start embedded Tomcat", ex);*            }*        }*    }*/System.out.println("hello ioc");}
}
就是创建了一个容器,注入了相应的bean,启动了tomcat
1.修改pom.xml
2.SpringApplication.java
public class HongSpringApplication {//这里我们会创建tomcat对象,并关联Spring容器, 并启动public static void run() {try {//创建Tomcat对象 HspTomcatTomcat tomcat = new Tomcat();//设置9090tomcat.setPort(9090);//启动tomcat.start();//等待请求接入System.out.println("======9090====等待请求=====");tomcat.getServer().await();} catch (Exception e) {e.printStackTrace();}}
}
3.MainApp.java
public class HongMainApp {public static void main(String[] args) {//启动HspSpringBoot项目/程序HspSpringApplication.run();}
}

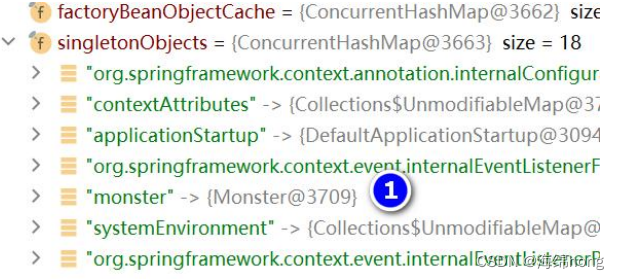
1.Monster.java , 做一个测试 Bean
public class Monster {
}
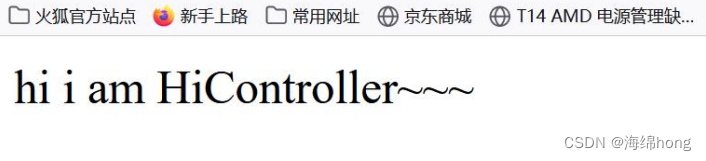
2.HiController.java, 作为 Controller
@RestController
public class HiController {@RequestMapping("/hi")public String hi() {return "hi,hong HiController";}
}
3.HongConfig.java , 作为 Spring 的配置文件.
/*** @author 海绵hong* @version 1.0* HspConfig:配置类-作为Spring的配置文件* 这里有一个问题,容器怎么知道要扫描哪些包? =>一会代码会体现** 在配置类可以指定要扫描包: @ComponentScan("com.hong.hongspringboot")*/
@Configuration
@ComponentScan("com.hong.hongspringboot")
public class HongConfig {//注入Bean - monster 对象到Spring容器.@Beanpublic Monster monster() {return new Monster();}
}
4.WebApplicationInitializer.java , 作为 Spring 的容器.
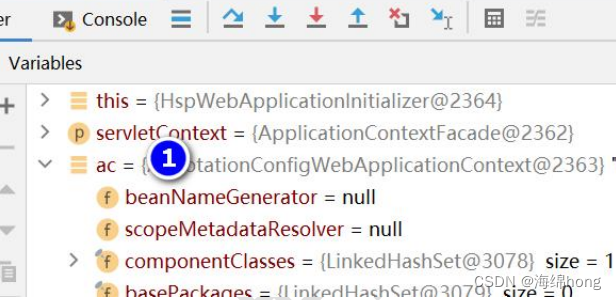
/*** @author 海绵hong* @version 1.0* Initializer: 初始化器*//*** 解读* 1. 创建我们的Spring 容器* 2. 加载/关联Spring容器的配置-按照注解的方式* 3. 完成Spring容器配置的bean的创建, 依赖注入* 4. 创建前端控制器 DispatcherServlet , 并让其持有Spring容器* 5. 当DispatcherServlet 持有容器, 就可以进行分发映射, 请小伙伴回忆我们实现SpringMVC底层机制* 6. 这里onStartup 是Tomcat调用, 并把ServletContext 对象传入*/
public class HspWebApplicationInitializer implements WebApplicationInitializer {@Overridepublic void onStartup(ServletContext servletContext) throws ServletException {System.out.println("startup ....");//加载Spring web application cOnfiguration=> 容器//自己 写过 HongSpringApplicationContextAnnotationConfigWebApplicationContext ac =new AnnotationConfigWebApplicationContext();//在ac中注册 HongConfig.class 配置类ac.register(HongConfig.class);ac.refresh();//完成bean的创建和配置//1. 创建注册非常重要的前端控制器 DispatcherServlet//2. 让DispatcherServlet 持有容器//3. 这样就可以进行映射分发, 回忆一下SpringMvc机制[自己实现过]//HongDispatcherServletDispatcherServlet dispatcherServlet = new DispatcherServlet(ac);//返回了ServletRegistration.Dynamic对象ServletRegistration.Dynamic registration =servletContext.addServlet("app", dispatcherServlet);//当tomcat启动时,加载 dispatcherServletregistration.setLoadOnStartup(1);//拦截请求,并进行分发处理//这里在提示 / 和 /* => 在讲解 java web , 自己去看看.registration.addMapping("/");}
}
public class HongSpringApplication {//这里我们会创建tomcat对象,并关联Spring容器, 并启动public static void run() {try {//创建Tomcat对象 HspTomcatTomcat tomcat = new Tomcat();//1. 让tomcat可以将请求转发到spring web容器,因此需要进行关联//2. "/hong" 就是我们的项目的 application context , 就是我们原来配置tomcat时,指定的application context//3. "D:\\hspedu_springboot\\hsp-springboot" 指定项目的目录tomcat.addWebapp("/hong","D:\\hong_springboot\\hong-springboot");//设置9090tomcat.setPort(9090);//启动tomcat.start();//等待请求接入System.out.println("======9090====等待请求=====");tomcat.getServer().await();} catch (Exception e) {e.printStackTrace();}}
}

结果:


 京公网安备 11010802041100号 | 京ICP备19059560号-4 | PHP1.CN 第一PHP社区 版权所有