
导读
深度神经网络(DNN)通过端到端的深度学习策略在许多具有挑战性的任务上达到了人类水平的性能。深度学习产生了具有多层抽象层次的数据表示;然而,它没有明确地提供任何关于DNNs内部运作的解释,换句话说它的内部运作是一个黑盒子。深度神经网络的成功吸引了神经科学家,他们不仅将DNN应用到生物神经系统模型中,而且还采用了认知神经科学的概念和方法来理解DNN的内部表示。尽管可以使用诸如PyTorch和TensorFlow之类的通用深度学习框架来进行此类跨学科研究,但是使用这些框架通常需要高级编程专家和全面的数学知识。因此迫切需要一个专门为认知神经科学家设计的工具箱,以绘制DNN和大脑的图。在这项研究里,北京师范大学(后文称北师大)研究团队设计并开发了DNNBrain,这是一个基于Python的工具箱,旨在探索DNN和大脑中的内部表示形式。通过集成DNN软件包和完善的脑成像工具,DNNBrain为各种研究场景提供了应用程序和命令行界面,例如提取DNN激活,探测DNN表示,将DNN表示映射到大脑以及可视化DNN表示。北师大研究团队人员表示,希望他们开发的这款工具箱可以加速将DNN应用到生物神经系统建模以及利用认知神经科学范式揭示DNN的黑匣子方面的科学研究。
DNNBrain软件介绍
DNNBrain被设计成为一个集成的工具箱,可以用于描述DNNs的人工表示和大脑的神经表示,如下图表示。
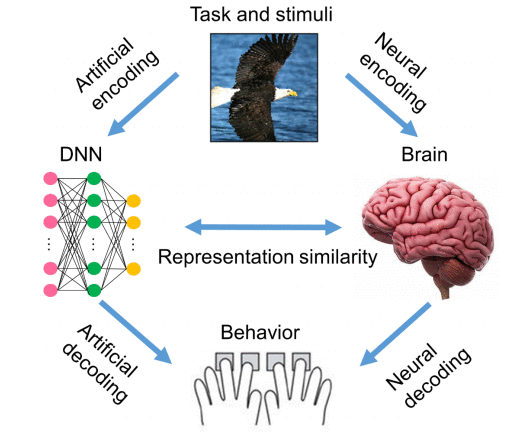
对DNNs和人进行刺激后,可获得人工神经活动和生物神经活动。通过将刺激、人工活动数据和生物神经活动数据与定制设计的辅助IO文件组合在一起,DNNBrain允许用户轻松地描述、比较和可视化DNNs和大脑的表示。
DNNBrain是一个模块化框架,由IO、Base、Model、Algorithm四个模块组成,如下图所示。
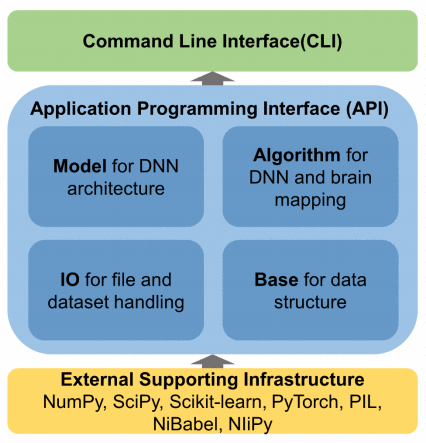
IO模块提供了管理与文件相关的输入和输出操作的工具。Base模块定义用于数组计算和数据转换的基础类。Model模块包含各种DNN模型。Algorithm模块定义了探索神经网络和大脑的各种算法。所有模块都提供了用户友好的API。针对各种研究场景开发了一套CLIs。
Result
为了检查DNN的人工表示,研究人员首先扫描DNN并获得了其神经活动,就像我们使用大脑成像设备扫描人的大脑一样。DNNBrain提供API和CLI来提取DNN用户指定通道的激活状态。下图显示了了三个示例图像(猎豹、哑铃和秃鹰)的AlexNet五个Conv层的激活图,这些图像显示了五个Conv层中每个层的最大平均激活,这表明图像的DNN表示随着 层的深度增加变得更加抽象。
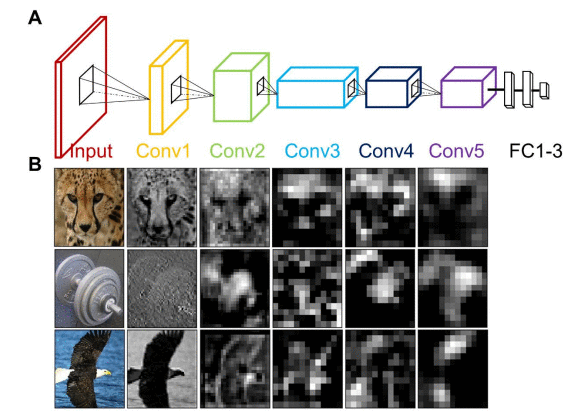
AlexNet架构和示例单元活动模式
上图(A) AlexNet包含五个Conv层,3个FC层和一个1000-way的softmax分类器。(B)提取了三个示例图像(猎豹、哑铃和秃鹰)的AlexNet五个Conv层的激活图。所呈现的通道是在五个Conv层中每个层中显示该示例图像的最大平均激活的通道。
DNNBrain中还实现了编码模型和表示相似性分析,以帮助研究人员检查DNN与大脑表示之间的对应关系。
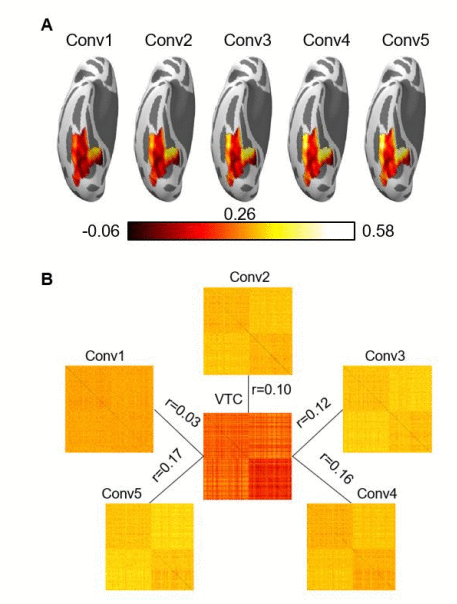
上图(A)使用来自AlexNet Conv层的人工表示法预测VTC BOLD响应的体素式编码模型的编码精度图。(B) BOLD5000刺激的RDM是根据AlexNet的Conv层的人工表示和人类VTC的大脑激活模式计算得出的。将每对图像之间的表示距离量化为它们的表示之间的相关距离。DNN和大脑之间的表示相似性进一步计算为其RDM之间的Pearson相关性。
研究人员使用DNNBrain来可视化AlexNet的三个输出单元(即鸵鸟,孔雀和火烈鸟)的首选功能。选择输出单元作为示例是因为它们产生的功能易于检查(即每个单元对应一个唯一的类别)。这些过程本质上适用于DNN中的任何单元。
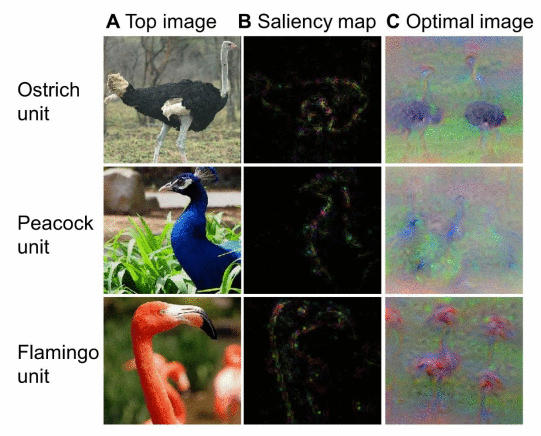
AlexNet的三个输出单元的top刺激,显着性图和合成图像
上图(A)从BOLD5000数据集中发现的top刺激。(B)为(A)中显示的top刺激计算的显着性图。(C)通过增加相应神经元的激活来引导从头开始合成的图像。
总结
北师大研究团队为探索DNN和大脑中的内部表示形式设计并开发了一个基于Python的工具箱--DNNBrain。通过集成DNN软件包和完善的脑成像工具,DNNBrain为各种研究场景提供了应用程序和命令行界面,例如提取DNN激活,探测DNN表示,将DNN表示映射到大脑以及可视化DNN表示。北师大研究团队人员表示,期待他们开发的这款工具箱可以加速将DNN应用到生物神经系统建模以及利用认知神经科学范式揭示DNN的黑匣子方面的科学研究。
软件使用
软件地址:
https://github.com/BNUCNL/dnnbrain
软件文档:
https://dnnbrain.readthedocs.io/
软件安装教程:
https://dnnbrain.readthedocs.io/en/latest/install.html
案例介绍
1.Saliency Image

原图
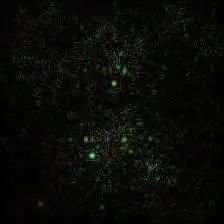
Vanilla Saliency Image
import numpy as npfrom PIL import Image
from dnnbrain.dnn.base import ip
from dnnbrain.dnn.models import AlexNet
from dnnbrain.dnn.algo import VanillaSaliencyImage# Prepare DNN and image
dnn = AlexNet()
image = Image.open('n03223299_27176.JPEG')# Get the vanilla saliency image of the image
# which displays the saliency parts that contribute to
# the activation of the 540th unit of fc3.
vanilla = VanillaSaliencyImage(dnn)
vanilla.set_layer('fc3', 540)
img_out = np.abs(vanilla.backprop(image))# transform to PIL image and save out
img_out = ip.to_pil(img_out, True)
img_out.save('n03223299_27176_vanilla_saliency.JPEG')
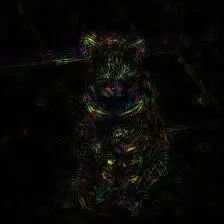
Guided Saliency Image
import numpy as npfrom PIL import Image
from dnnbrain.dnn.base import ip
from dnnbrain.dnn.models import AlexNet
from dnnbrain.dnn.algo import GuidedSaliencyImage# Prepare DNN and image
dnn = AlexNet()
image = Image.open('n03223299_27176.JPEG')# Get the guided saliency image of the image
# which displays the saliency parts that contribute to
# the activation of the 540th unit of fc3.
guided = GuidedSaliencyImage(dnn)
guided.set_layer('fc3', 540)
img_out = np.abs(guided.backprop(image))# transform to PIL image and save out
img_out = ip.to_pil(img_out, True)
img_out.save('n03223299_27176_guided_saliency.JPEG')
2.Transfer Learning
方案1:微调
在这种情况下,将训练所有参数。
import torch
import pickle as pklfrom dnnbrain.dnn.models import AlexNet
from dnnbrain.dnn.core import Stimulus# ---load training and validation data---
stim_train = Stimulus()
stim_train.load('train.stim.csv')
stim_validation = Stimulus()
stim_validation.load('validation.stim.csv')# ---replace the final FC layer with a new one---
# initialize DNN
dnn = AlexNet()
# get the number of input features of the final FC layer
n_in_feat = dnn.model.classifier[6].in_features
# replacement
dnn.model.classifier[6] = torch.nn.Linear(n_in_feat, 2)# ---train the DNN and save out---
train_dict = dnn.train(stim_train, 50, 'classification',data_train=True, data_validation=stim_validation)# save information of training process
pkl.dump(train_dict, open('train_dict.pkl', 'wb'))# save parameters of the retrained DNN
dnn.save('alexnet_tl.pth')
方案2:固定特征提取器
在这种情况下,将仅训练最后一个FC层的参数。其他参数将被冻结。
import torch
import pickle as pklfrom dnnbrain.dnn.models import AlexNet
from dnnbrain.dnn.core import Stimulus# ---load training and validation data---
stim_train = Stimulus()
stim_train.load('train.stim.csv')
stim_validation = Stimulus()
stim_validation.load('validation.stim.csv')# ---replace the final FC layer with a new one---
# initialize DNN and freeze pretrained parameters
dnn = AlexNet()
for param in dnn.model.parameters():param.requires_grad = False# get the number of input features of the final FC layer
n_in_feat = dnn.model.classifier[6].in_features
# replacement
dnn.model.classifier[6] = torch.nn.Linear(n_in_feat, 2)# ---prepare optimizer---
# set learning rate
lr = 0.00001
# set the number of epochs
n_epoch = 50
# pass the last FC layer's parameters to the optimizer
optimizer = torch.optim.Adam(dnn.model.classifier[6].parameters(), lr)# ---train the DNN and save out---
train_dict = dnn.train(stim_train, n_epoch, 'classification', optimizer,data_train=True, data_validation=stim_validation)# save information of training process
pkl.dump(train_dict, open('train_dict.pkl', 'wb'))# save parameters of the retrained DNN
dnn.save('alexnet_tl.pth')
在训练过程中绘制信息
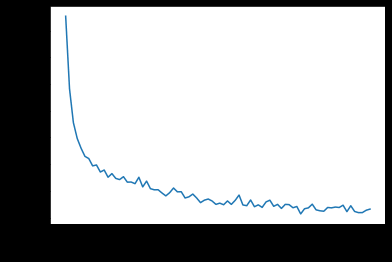
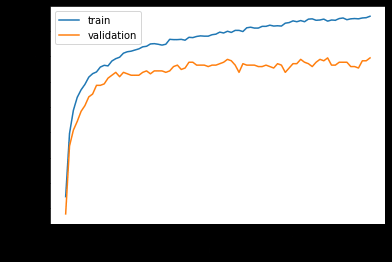
训练过程中的一些信息将返回并保存在train_dict中,包括每个epoch的损失,每个步骤的损失以及每个epoch结束时训练数据和验证数据的预测得分。train_dict是一个dict,我们可以按照如下所示的键访问这些信息:
绘制每个epoch的损失:
from matplotlib import pyplot as pltplt.figure()
plt.plot(train_dict['epoch_loss'])
plt.xlabel('epoch')
plt.ylabel('loss')
plt.show()
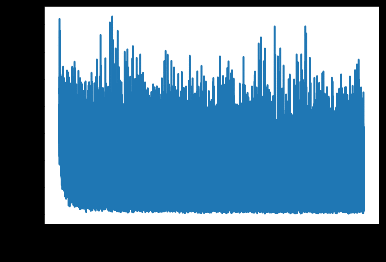
画出每一步的损失:
step_losses = []
for i in train_dict['step_loss']:step_losses.extend(i)plt.figure()
plt.plot(step_losses)
plt.xlabel('step')
plt.ylabel('loss')
plt.show()
在训练和验证数据上绘制预测分数:
plt.figure()
plt.plot(train_dict['score_train'], label='train')
plt.plot(train_dict['score_validation'], label='validation')
plt.xlabel('epoch')
plt.ylabel('accuracy')
plt.legend()
plt.show()
参考链接:
https://doi.org/10.1101/2020.07.05.188847.
DNNBrain: a unifying toolbox for mapping deep neural networks and brains
文章来源于网络,不用于商业行为,若有侵权及疑问,请后台留言!
原创文章转载,请微信或后台留言!
更多阅读
伍冬睿教授:脑机接口中迁移学习的完整流程
EMD算法之Hilbert-Huang Transform原理详解和案例分析
EEGLAB 使用教程 3 -参考电极和重采样
第2期 | 国内脑机接口领域专家教授汇总
精彩长文 | 脑机接口技术的现状与未来!
ICA处理脑电资料汇总
收藏 | 脑电EEG基础与处理汇总
脑机接口BCI学习交流QQ群:903290195
