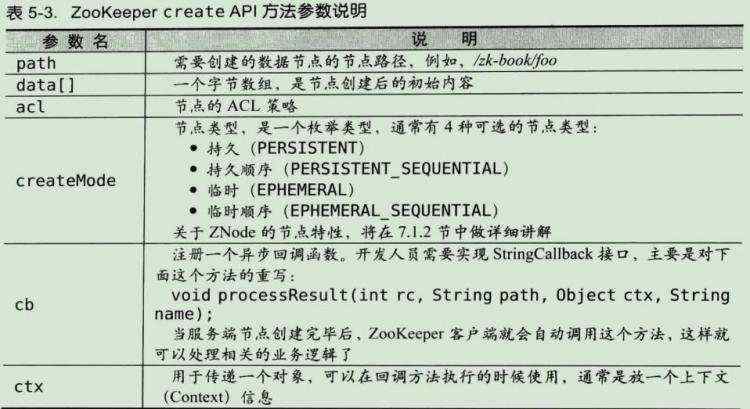
在Solr(一)——初识Solr中介绍了SolrCloud的结构。单机部署SolrCloud的只能通过不同的port来区分不通的Solr Node,在生产环境中一般不同的Solr Node是部署在不同的物理机器上的。接下来将利用bin/solr中提供的scripts在单机快速构建solrCloud。
执行bin/solr_e cloud命令,根据交互提示快速构建单机SolrCloud服务。
hadoop@eric-VirtualBox:/opt/solr-6.6.0$ bin/solr -e cloud

Welcome to the SolrCloud example!

This interactive session will help you launch a SolrCloud cluster on your local workstation.
To begin, how many Solr nodes would you like to run in your local cluster? (specify 1-4 nodes) [2]:
2
Ok, let's start up 2 Solr nodes for your example SolrCloud cluster.
Please enter the port for node1 [8983]:

Please enter the port for node2 [7574]:

Creating Solr home directory /opt/solr-6.6.0/example/cloud/node1/solr
Cloning /opt/solr-6.6.0/example/cloud/node1 into
   /opt/solr-6.6.0/example/cloud/node2

Starting up Solr on port 8983 using command:
"bin/solr" start -cloud -p 8983 -s "example/cloud/node1/solr"

Waiting up to 180 seconds to see Solr running on port 8983 [\]
Started Solr server on port 8983 (pid=3499). Happy searching!


Starting up Solr on port 7574 using command:
"bin/solr" start -cloud -p 7574 -s "example/cloud/node2/solr" -z localhost:9983

Waiting up to 180 seconds to see Solr running on port 7574 [\]
Started Solr server on port 7574 (pid=3718). Happy searching!

INFO  - 2017-09-03 00:36:27.283; org.apache.solr.client.solrj.impl.ZkClientClusterStateProvider; Cluster at localhost:9983 ready

Now let's create a new collection for indexing documents in your 2-node cluster.
Please provide a name for your new collection: [gettingstarted]
seer
How many shards would you like to split seer into? [2]
2
How many replicas per shard would you like to create? [2]
2
Please choose a configuration for the seer collection, available options are:
basic_configs, data_driven_schema_configs, or sample_techproducts_configs [data_driven_schema_configs]


Connecting to ZooKeeper at localhost:9983 ...
INFO  - 2017-09-03 00:37:54.696; org.apache.solr.client.solrj.impl.ZkClientClusterStateProvider; Cluster at localhost:9983 ready
Uploading /opt/solr-6.6.0/server/solr/configsets/data_driven_schema_configs/conf for config seer to ZooKeeper at localhost:9983

Creating new collection 'seer' using command:
http://localhost:8983/solr/admin/collections?action=CREATE&name=seer&numShards=2&replicatiOnFactor=2&maxShardsPerNode=2&collection.cOnfigName=seer

{
  "responseHeader":{
    "status":0,
    "QTime":6365},
  "success":{
    "127.0.1.1:7574_solr":{
      "responseHeader":{
        "status":0,
        "QTime":4610},
      "core":"seer_shard2_replica1"},
    "127.0.1.1:8983_solr":{
      "responseHeader":{
        "status":0,
        "QTime":4942},
      "core":"seer_shard1_replica2"}}}

Enabling auto soft-commits with maxTime 3 secs using the Config API

POSTing request to Config API: http://localhost:8983/solr/seer/config
{"set-property":{"updateHandler.autoSoftCommit.maxTime":"3000"}}
Successfully set-property updateHandler.autoSoftCommit.maxTime to 3000
在交互过程中需要设置以下几个参数:
"bin/solr" start -cloud -p 8983 -s "example/cloud/node1/solr"
"bin/solr" start -cloud -p 7574 -s "example/cloud/node2/solr" -z localhost:9983因为并没有自己部署zookeeper,所以使用的是solr默认集成的zookeeper,-z localhost:9983即为zookeeper的地址,端口为9983。
执行bin/solr status查看服务状态
hadoop@eric-VirtualBox:/opt/solr-6.6.0$ bin/solr status

Found 2 Solr nodes:

Solr process 3499 running on port 8983
{
  "solr_home":"/opt/solr-6.6.0/example/cloud/node1/solr",
  "version":"6.6.0 5c7a7b65d2aa7ce5ec96458315c661a18b320241 - ishan - 2017-05-30 07:32:53",
  "startTime":"2017-09-02T16:36:19.526Z",
  "uptime":"0 days, 0 hours, 3 minutes, 35 seconds",
  "memory":"73.2 MB (%14.9) of 490.7 MB",
  "cloud":{
    "ZooKeeper":"localhost:9983",
    "liveNodes":"2",
    "collections":"1"}}


Solr process 3718 running on port 7574
{
  "solr_home":"/opt/solr-6.6.0/example/cloud/node2/solr",
  "version":"6.6.0 5c7a7b65d2aa7ce5ec96458315c661a18b320241 - ishan - 2017-05-30 07:32:53",
  "startTime":"2017-09-02T16:36:25.033Z",
  "uptime":"0 days, 0 hours, 3 minutes, 30 seconds",
  "memory":"34.3 MB (%7) of 490.7 MB",
  "cloud":{
    "ZooKeeper":"localhost:9983",
    "liveNodes":"2",
    "collections":"1"}}
返回了SolrNode的个数,每个SolrNode的详细信息,Zookeeper地址以及collection个数。通过Admin UI中的cloud页面可以查看SolrCloud服务的结构,如图
从图中可以看出shard的个数,solrNode的个数(对应了replica),以及哪个Replica是Leader。
停止和重启SolrCloud服务
停止solr服务可以使用bin/solr stop -all
重启solr服务可以使用bin/solr restart命令,restart命令说明和相关参数如下:
hadoop@eric-VirtualBox:/opt/solr-6.6.0$ bin/solr restart -help

Usage: solr restart [-f] [-c] [-h hostname] [-p port] [-d directory] [-z zkHost] [-m memory] [-e example] [-s solr.solr.home] [-a "additional-options"] [-V]

  -f            Start Solr in foreground; default starts Solr in the background
                  and sends stdout / stderr to solr-PORT-console.log

  -c or -cloud  Start Solr in SolrCloud mode; if -z not supplied, an embedded Zookeeper
                  instance is started on Solr port+1000, such as 9983 if Solr is bound to 8983

  -h      Specify the hostname for this Solr instance

  -p      Specify the port to start the Solr HTTP listener on; default is 8983
                  The specified port (SOLR_PORT) will also be used to determine the stop port
                  STOP_PORT=($SOLR_PORT-1000) and JMX RMI listen port RMI_PORT=($SOLR_PORT+10000).
                  For instance, if you set -p 8985, then the STOP_PORT=7985 and RMI_PORT=18985

  -d       Specify the Solr server directory; defaults to server

  -z    Zookeeper connection string; only used when running in SolrCloud mode using -c
                   To launch an embedded Zookeeper instance, don't pass this parameter.

  -m    Sets the min (-Xms) and max (-Xmx) heap size for the JVM, such as: -m 4g
                  results in: -Xms4g -Xmx4g; by default, this script sets the heap size to 512m

  -s       Sets the solr.solr.home system property; Solr will create core directories under
                  this directory. This allows you to run multiple Solr instances on the same host
                  while reusing the same server directory set using the -d parameter. If set, the
                  specified directory should contain a solr.xml file, unless solr.xml exists in Zookeeper.
                  This parameter is ignored when running examples (-e), as the solr.solr.home depends
                  on which example is run. The default value is server/solr.

  -e   Name of the example to run; available examples:
      cloud:         SolrCloud example
      techproducts:  Comprehensive example illustrating many of Solr's core capabilities
      dih:           Data Import Handler
      schemaless:    Schema-less example

  -a            Additional parameters to pass to the JVM when starting Solr, such as to setup
                  Java debug options. For example, to enable a Java debugger to attach to the Solr JVM
                  you could pass: -a "-agentlib:jdwp=transport=dt_socket,server=y,suspend=n,address=18983"
                  In most cases, you should wrap the additional parameters in double quotes.

  -noprompt     Don't prompt for input; accept all defaults when running examples that accept user input

  -v and -q     Verbose (-v) or quiet (-q) logging. Sets default log level to DEBUG or WARN instead of INFO

  -V or -verbose Verbose messages from this script
hadoop@eric-VirtualBox:/opt/solr-6.6.0$ bin/solr restart -c -p 8983 -s example/cloud/node1/solr
Waiting up to 180 seconds to see Solr running on port 8983 [\]
Started Solr server on port 8983 (pid=3170). Happy searching!

hadoop@eric-VirtualBox:/opt/solr-6.6.0$ bin/solr restart -c -p 7574 -z localhost:9983 -s example/cloud/node2/solr
Waiting up to 180 seconds to see Solr running on port 7574 [\]
Started Solr server on port 7574 (pid=3467). Happy searching!
-c参数表明是以Cloud的方式启动服务,-p指定SolrNode端口,-s指定core的目录(相当于SOLR_HOME),会在该目录下寻找solr.xml文件。
重新上传配置文件
前面通过solr自带的bin/solr start -e cloud创建单机solrCloud服务配置文件选择的是server/solr/configsets/data_driven_schema_configs目录下的配置文件。如果需要修改schema则需要更新Zookeeper中的配置文件。在原始的managed-schema文件中定义了id字段以及很多其它的可扩展字段,以及各类字段类型。即便是不修改schema配置也可以使用,因为可扩展的动态字段能够满足未来需要添加的字段。更新配置文件可以使用bin/solr提供的zk upconfig命令
hadoop@eric-VirtualBox:/opt/solr-6.6.0$ bin/solr zk upconfig -n data_driven_schema_configs -d /opt/solr-6.6.0/server/solr/configsets/data_driven_schema_configs -z localhost:9983

Connecting to ZooKeeper at localhost:9983 ...
Uploading /opt/solr-6.6.0/server/solr/configsets/data_driven_schema_configs/conf for config data_driven_schema_configs to ZooKeeper at localhost:9983
其中-n指定当前Zookeeper中的配置目录名称,-d指定待上传的最新的配置文件目录。通过Admin UI中Cloud下的Tree页面可以查看所有配置文件
到此单机的SolrCloud服务部署完成。bin/solr中还包含很多其他的scripts命令,详细内容可以参考Solr Control Script Reference


 京公网安备 11010802041100号 | 京ICP备19059560号-4 | PHP1.CN 第一PHP社区 版权所有