目录
import pymysql  # pip install pymysql

# 连接数据库的参数
cOnn= pymysql.connect(host= 'localhost',
                       user='root',
                       password = '123',
                       database='db3',
                       charset = 'utf8')
# cursor = conn.cursor()  # ,游标对象,默认返回的值是元祖类型

cursor = conn.cursor(cursor = pymysql.cursors.DictCursor)  #  返回的值是字典类型
# print(cursor)
sql = "select name from userinfo where id>10"

cursor.execute(sql)
res= cursor.fetchall() # #取出所有的数据 返回的是列表套字典
# res = cursor.fetchone()  # 只获取一条数据
# res = cursor.fetchmany(size)   # 可指定参数, 取出size条数据 返回的是列表套字典
print(res)
cursor.close()
conn.close()
'''
[{'name': '丁丁'}, {'name': '星星'}, {'name': '格格'}, {'name': '张野'}, {'name': '程咬金'}, {'name': '程咬银'}, {'name': '程咬铜'}, {'name': '程咬铁'}]
''' import pymysql
user = input('输入用户名:').strip()
password = input('输入密码:').strip()
# 连接数据库的参数
cOnn= pymysql.connect(host= 'localhost',
user='root',
password = '123',
database='db3',
charset = 'utf8')
# cursor = conn.cursor() # ,游标对象,默认返回的值是元祖类型
cursor = conn.cursor(cursor = pymysql.cursors.DictCursor) # 返回的值是字典类型
# print(cursor)
sql = "select * from user where name='%s' and password='%s'"%(user,password)
print(sql)
# exit()
cursor.execute(sql)
res= cursor.fetchall() # #取出所有的数据 返回的是列表套字典
# res = cursor.fetchone() # 只获取一条数据
# res = cursor.fetchmany(size) # 可指定参数, 取出size条数据 返回的是列表套字典
print(res)
if res:
print('登录成功!')
else:
print('登录失败!')
cursor.close()
conn.close()
'''
输入用户名:zhang' #
输入密码:123
select * from user where name='zhang' #' and password='123'
[{'name': 'zhang', 'password': '123 '}]
登录成功!
'''
'''
输入用户名:zhang' or 1=1 #
输入密码:123
select * from user where name='zhang' or 1=1 #' and password='123'
[{'name': 'zhang', 'password': '123 '}]
登录成功!
'''
# 输入用户名的时候,输入‘#’将后面的密码验证部分注释掉了,语句变成了select * from user where name='zhang' 或者 select * from user where name='zhang' or 1=1,直接跳过了密码的验证环节,出现了sql语句的注入问题。 # 出现sql注入问题主要是我们对用户输入没有做合法性验证,
# 方法1:如果对用户输入的值进行判断或者转译,检查完之后或者转译后就不会出现此类问题了。这样低级安全问题不该出现!
# 方法2:将参数以元组或列表的形式传入execute中,让它帮我们转译和检验;即:cursor.execute(sql,(user,password))
import pymysql
user = input('输入用户名:').strip()
password = input('输入密码:').strip()
# 连接数据库的参数
cOnn= pymysql.connect(host= 'localhost',
user='root',
password = '123',
database='db3',
charset = 'utf8')
# cursor = conn.cursor() # ,游标对象,默认返回的值是元祖类型
cursor = conn.cursor(cursor = pymysql.cursors.DictCursor) # 返回的值是字典类型
# print(cursor)
sql = "select * from user where name=%s and password=%s"
print(sql)
# exit()
cursor.execute(sql,(user,password))
res= cursor.fetchall() # #取出所有的数据 返回的是列表套字典
# res = cursor.fetchone() # 只获取一条数据
# res = cursor.fetchmany(size) # 可指定参数, 取出size条数据 返回的是列表套字典
print(res)
if res:
print('登录成功!')
else:
print('登录失败!')
cursor.close()
conn.close()
'''
输入用户名:zhang
输入密码:123
select * from user where name=%s and password=%s
[{'name': 'zhang', 'password': '123 '}]
登录成功!
'''
'''
输入用户名:zhang' #
输入密码:123
select * from user where name=%s and password=%s
()
登录失败!
'''
        产生的原因:
            因为过于相信用户输入的内容, 根本没有做任何的检验

        解决的方法:
            sql = "select * from user where name=%s and password=%s"

            # execute帮我们做字符串拼接,我们无需且一定不能再为%s加引号了
            cursor.execute(sql, (user, pwd))

        连接:
            ### 连接数据库的参数
            cOnn= pymysql.connect(host='localhost',user='root',password='123qwe',database='test',charset='utf8')
            # cursor = conn.cursor() ### 默认返回的值是元祖类型
            cursor = conn.cursor(cursor=pymysql.cursors.DictCursor) ### 返回的值是字典类型 (*********)

        查:
            fetchall() : 取出所有的数据 返回的是列表套字典
            fetchone() : 取出一条数据 返回的是字典
fetchmany(size) : 取出size条数据 返回的是列表套字典# 插入
import pymysql
# 连接数据库的参数
cOnn= pymysql.connect(host= 'localhost',
user='root',
password = '123',
database='db3',
charset = 'utf8')
cursor = conn.cursor(cursor = pymysql.cursors.DictCursor)
sql = "insert into user(name,password) values(%s,%s)"
print(sql) # insert into user(name,password) values(%s,%s)
# cursor.execute(sql,("tank",'qwe')) # 插入单条
data=[('小王','111'),('小张','222'),('小李','333'),('小张','444'),]
cursor.executemany(sql,data) # 插入多条
conn.commit()
cursor.close()
conn.close()
# 插入单条情况下
'''
mysql> select * from user;
+-------+----------+
| name | password |
+-------+----------+
| zhang | 123 |
| tank | qwe |
+-------+----------+
2 rows in set (0.00 sec)
'''
# 插入多条情况下
'''
mysql> select * from user;
+--------+----------+
| name | password |
+--------+----------+
| zhang | 123 |
| tank | qwe |
| tank | qwe |
| 小王 | 111 |
| 小张 | 222 |
| 小李 | 333 |
| 小张 | 444 |
+--------+----------+
7 rows in set (0.00 sec)
'''# 修改
先给user表增加一个id索引字段;
mysql> alter table user add id int primary key auto_increment FIRST;
Query OK, 0 rows affected (0.50 sec)
Records: 0 Duplicates: 0 Warnings: 0
mysql> select * from user;
+----+--------+----------+
| id | name | password |
+----+--------+----------+
| 1 | zhang | 123 |
| 2 | tank | qwe |
| 3 | tank | qwe |
| 4 | 小王 | 111 |
| 5 | 小张 | 222 |
| 6 | 小李 | 333 |
| 7 | 小张 | 444 |
+----+--------+----------+
7 rows in set (0.00 sec)
# 进行修改操作 将 id=6 的记录的 name 字段的名字修改为 ‘小李子’
import pymysql
# 连接数据库的参数
cOnn= pymysql.connect(host= 'localhost',
user='root',
password = '123',
database='db3',
charset = 'utf8')
cursor = conn.cursor(cursor = pymysql.cursors.DictCursor)
sql = "update user set name = %s where id = %s"
cursor.execute(sql,('小李子',6)) # 插入多条
conn.commit()
cursor.close()
conn.close()
'''
mysql> select * from user;
+----+-----------+----------+
| id | name | password |
+----+-----------+----------+
| 1 | zhang | 123 |
| 2 | tank | qwe |
| 3 | tank | qwe |
| 4 | 小王 | 111 |
| 5 | 小张 | 222 |
| 6 | 小李子 | 333 |
| 7 | 小张 | 444 |
+----+-----------+----------+
7 rows in set (0.00 sec)
'''# 删除
import pymysql
# 连接数据库的参数
cOnn= pymysql.connect(host= 'localhost',
user='root',
password = '123',
database='db3',
charset = 'utf8')
cursor = conn.cursor(cursor = pymysql.cursors.DictCursor)
sql = "delete from user where id>%s"
cursor.execute(sql,6) # 插入多条
conn.commit()
cursor.close()
conn.close()
'''
mysql> select * from user;
+----+-----------+----------+
| id | name | password |
+----+-----------+----------+
| 1 | zhang | 123 |
| 2 | tank | qwe |
| 3 | tank | qwe |
| 4 | 小王 | 111 |
| 5 | 小张 | 222 |
| 6 | 小李子 | 333 |
+----+-----------+----------+
6 rows in set (0.00 sec)
'''一般的应用系统,读写比例在10:1左右,而且插入操作和一般的更新操作很少出现性能问题,在生产环境中,我们遇到最多的,也是最容易出问题的,还是一些复杂的查询操作,因此对查询语句的优化显然是重中之重。说起加速查询,就不得不提到索引了
索引在MySQL中也叫做“键”,是存储引擎用于快速找到记录的一种数据结构。索引对于良好的性能
非常关键,尤其是当表中的数据量越来越大时,索引对于性能的影响愈发重要。
索引优化应该是对查询性能优化最有效的手段了。索引能够轻易将查询性能提高好几个数量级。
索引相当于字典的音序表,如果要查某个字,如果不使用音序表,则需要从几百页中逐页去查。
若索引太多,应用程序的性能可能会受到影响。而索引太少,对查询性能又会产生影响,要找到一个平衡点,这对应用程序的性能至关重要。当然索引也并不是越多越好,我曾经遇到过这样一个问题:某台MySQL服务器iostat显示磁盘使用率一直处于100%,经过分析后发现是由于开发人员添加了太多的索引,在删除一些不必要的索引之后,磁盘使用率马上下降为20%。可见索引的添加也是非常有技术含量的。
优点:提高查询效率;缺点:加了索引之后,会占用大量的磁盘空间
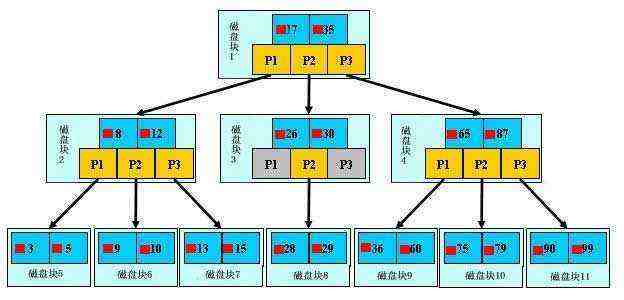
B+树

本质是:通过不断地缩小想要获取数据的范围来筛选出最终想要的结果,同时把随机的事件变成顺序的事件,也就是说,有了这种索引机制,我们可以总是用同一种查找方式来锁定数据
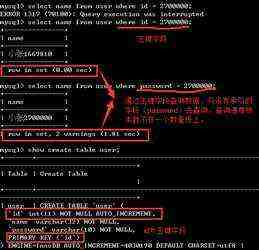
# 插入3000,000条数据做实验   哈哈哈哈 !!!!

import pymysql

# 连接数据库的参数
cOnn= pymysql.connect(host= 'localhost',
                       user='root',
                       password = '123',
                       database='db3',
                       charset = 'utf8')

cursor = conn.cursor(cursor = pymysql.cursors.DictCursor)
l=[]
for i in range(3000000):

    res=(f'小张{i}',str(i))
    l.append(res)

sql = "insert into user(name,password) values(%s,%s)"

cursor.executemany(sql,l)  # 插入多条
conn.commit()

cursor.close()
conn.close()

'''
| 1033019 | 小张2829      | 2829     |
| 1033020 | 小张2830      | 2830     |
| 1033021 | 小张2831      | 2831     |
| 1033022 | 小张2832      | 2832     |
| 1033023 | 小张2833      | 2833     |
| 1033024 | 小张2834      | 2834     |
| 1033025 | 小张2835      | 2835     |
| 1033026 | 小张2836      | 2836     |
| 1033027 | 小张2837      | 2837     |
| 1033028 | 小张2838      | 2838     |
| 1033029 | 小张2839      | 2839     |
| 1033030 | 小张2840      | 2840     |
| 1033031 | 小张2841      | 2841     |
| 1033032 | 小张2842      | 2842     |
| 1033033 | 小张2843      | 2843     |
| 1033034 | 小张2844      | 2844     |
| 1033035 | 小张2845      | 2845     |
| 1033036 | 小张2Ctrl-C -- sending "KILL QUERY 1" to server ...
846   Ctrl-C -- query aborted.
   | 2846     |
+---------+---------------+----------+
3000006 rows in set (2.46 sec)
'''
    索引的种类:(**************************)

        主键索引: 加速查找 + 不能重复 + 不能为空 primary key
        唯一索引: 加速查找 + 不能重复    unique(name)
            联合唯一索引:unique(name, email)
                例子:
                    zekai 123@qq.com
                    zekai 123@qq.cmm

        普通索引: 加速查找   index (name)
联合索引: index (name, email)主键索引:
新增主键索引:
create table xxx(
id int auto_increment ,
primary key(id)
)
改:
alter table xxx change id id int auto_increment primary key;
alter table xxx modify id int auto_increment primary key; # 同上
alter table t1 add primary key (id);
删除主键索引:
mysql> alter table t1 drop primary key;
唯一索引:

                新增:
                    1.
                    create table t2(
                        id int auto_increment primary key,
                        name varchar(32) not null default '',
                        unique u_name (name)
                    )charset utf8

                    2.
                    CREATE  UNIQUE   INDEX  索引名 ON 表名 (字段名) ;
                        create  unique index ix_name on t2(name);

                    3.
                    alter table t2 add unique index ix_name (name)

                删除:
alter table t2 drop index u_name;普通索引:
新增:
1.
create table t3(
id int auto_increment primary key,
name varchar(32) not null default '',
index u_name (name)
)charset utf8
2.
CREATE INDEX 索引名 ON 表名 (字段名) ;
create index ix_name on t3(name);
3.
alter table t3 add index ix_name (name)
删除:
alter table t3 drop index u_name;pymysql操作数据库与索引

 京公网安备 11010802041100号 | 京ICP备19059560号-4 | PHP1.CN 第一PHP社区 版权所有