作者:手机用户2502863361 | 来源:互联网 | 2023-09-10 13:09
一、使用之前,我们先来掌握3个东西是用来干什么的。npm:Nodejs下的包管理器。webpack:它主要的用途是通过CommonJS的语法把所有浏览器端需要发布
一、使用之前,我们先来掌握3个东西是用来干什么的。
npm: Nodejs下的包管理器。
webpack: 它主要的用途是通过CommonJS的语法把所有浏览器端需要发布的静态资源做相应的准备,比如资源的合并和打包。
vue-cli: 用户生成Vue工程模板。(帮你快速开始一个vue的项目,也就是给你一套vue的结构,包含基础的依赖库,只需要 npm install就可以安装)
开始:
![](https://img.php1.cn/3cd4a/1eebe/cd5/21e585a7e21fc7dc.png)
如图,下载8.9.3 LTS (推荐给绝大部分用户使用)
![](https://img.php1.cn/3cd4a/1eebe/cd5/d67981797265d9c7.webp)
双击安装
![](https://img.php1.cn/3cd4a/1eebe/cd5/7cccb7e4b6cb5cb8.webp)
可以使用默认路径,本例子中自行修改为d:\nodejs
![](https://img.php1.cn/3cd4a/189d8/b64/5b34b53b79a39fdd.jpeg)
一路点Next
![](https://img.php1.cn/3cd4a/1eebe/cd5/b386c433a16f5497.webp)
点Finish完成
![](https://img.php1.cn/3cd4a/1eebe/cd5/857a46d091981bac.webp)
![](https://img.php1.cn/3cd4a/1eebe/cd5/8be1ccb5166feb93.webp)
打开CMD,检查是否正常
![](https://img.php1.cn/3cd4a/1eebe/cd5/7494af3c1cda418d.webp)
![](https://img.php1.cn/3cd4a/1eebe/cd5/e62700fe09f8933e.webp)
![](https://img.php1.cn/3cd4a/1eebe/cd5/43a754c811e7ec5c.webp)
再看看另外2个目录,npm的本地仓库跑在系统盘c盘的用户目录了(没见到npm-cache是因为没有用过,一使用缓存目录就生成了),我们试图把这2个目录移动回到D:\nodejs
先如下图建立2个目录
![](https://img.php1.cn/3cd4a/1eebe/cd5/c72d78d7317a9e8e.webp)
然后运行以下2条命令
npm config set prefix "D:\nodejs\node_global"
npm config set cache "D:\nodejs\node_cache"
![](https://img.php1.cn/3cd4a/1eebe/cd5/a1be7872e8d4934f.webp)
如上图,我们再来关注一下npm的本地仓库,输入命令npm list -global
![](https://img.php1.cn/3cd4a/1eebe/cd5/d67981797265d9c7.webp)
输入命令npm config set registry=http://registry.npm.taobao.org 配置镜像站
![](https://img.php1.cn/3cd4a/189d8/b64/5b34b53b79a39fdd.jpeg)
输入命令npm config list 显示所有配置信息,我们关注一个配置文件
C:\Users\Administrator\.npmrc
![](https://img.php1.cn/3cd4a/1eebe/cd5/7d7ef3f69d479716.webp)
使用文本编辑器编辑它,可以看到刚才的配置信息
![](https://img.php1.cn/3cd4a/189d8/978/7dbdf0f38ad53545.jpeg)
![](https://img.php1.cn/3cd4a/1eebe/cd5/443b30bb45e66690.webp)
检查一下镜像站行不行命令1
npm config get registry
![](https://img.php1.cn/3cd4a/1eebe/cd5/02c379d60086f382.webp)
检查一下镜像站行不行命令2
Npm info vue 看看能否获得vue的信息
![](https://img.php1.cn/3cd4a/1eebe/cd5/bcafc120671304eb.webp)
![](https://img.php1.cn/3cd4a/1eebe/cd5/6789f68dabde0aed.png)
注意,此时,默认的模块D:\nodejs\node_modules 目录
将会改变为D:\nodejs\node_global\node_modules 目录,
如果直接运行npm install等命令会报错的。
我们需要做1件事情:
1、增加环境变量NODE_PATH 内容是:D:\nodejs\node_global\node_modules
![](https://img.php1.cn/3cd4a/1eebe/cd5/7cccb7e4b6cb5cb8.webp)
(注意,一下操作需要重新打开CMD让上面的环境变量生效)
一、测试NPM安装vue.js
命令:npm install vue -g
这里的-g是指安装到global全局目录去
![](https://img.php1.cn/3cd4a/1eebe/cd5/8373b1277127c518.webp)
![](https://img.php1.cn/3cd4a/1eebe/cd5/2fdc212433a29829.png)
二、测试NPM安装vue-router
命令:npm install vue-router -g
![](https://img.php1.cn/3cd4a/1eebe/cd5/02c379d60086f382.webp)
![](https://img.php1.cn/3cd4a/1eebe/cd5/086aec93f5e1e9b2.webp)
![](https://img.php1.cn/3cd4a/1eebe/cd5/d942b7ec373849c3.webp)
运行npm install vue-cli -g安装vue脚手架
![](https://img.php1.cn/3cd4a/1eebe/cd5/60405fda58cd0acd.webp)
![](https://img.php1.cn/3cd4a/1eebe/cd5/b428d8f746fb8d47.webp)
编辑环境编辑path
![](https://img.php1.cn/3cd4a/1eebe/cd5/011ac27956d007f0.webp)
对path环境变量添加D:\nodejs\node_global
win10以下版本的,横向显示PATH的,注意添加到最后时,不要有分号【;】
![](https://img.php1.cn/3cd4a/1eebe/cd5/ed19db63ee478b98.png)
重新打开CMD,并且测试vue是否使用正常
![](https://img.php1.cn/3cd4a/1eebe/cd5/3e641eb5f5c8cd90.webp)
注意,vue-cli工具是内置了模板包括 webpack 和 webpack-simple,前者是比较复杂专业的项目,
他的配置并不全放在根目录下的 webpack.config.js 中。
![](https://img.php1.cn/3cd4a/1eebe/cd5/d942b7ec373849c3.webp)
初始化,安装依赖
![](https://img.php1.cn/3cd4a/1eebe/cd5/0a0ce631ec450943.webp)
运行npm install安装依赖
![](https://img.php1.cn/3cd4a/1eebe/cd5/99b88427bc9ce0dc.webp)
npm run dev
![](https://img.php1.cn/3cd4a/1eebe/cd5/4283cd4bbba41b87.png)
成功界面,提示打开地址http://localhost:8080
![](https://img.php1.cn/3cd4a/1e618/bdf/129913486c37ddf6.jpeg)
自动打开浏览器http://localhost:8080/#/
![](https://img.php1.cn/3cd4a/1eebe/cd5/e62700fe09f8933e.webp)
npm run build
生成静态文件,打开dist文件夹下新生成的index.html文件
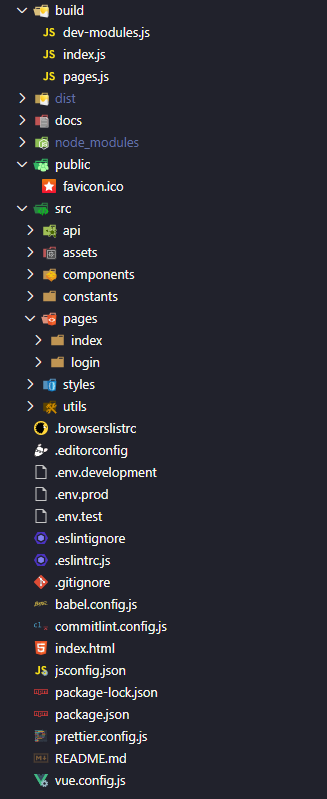
nmp下新建出来的vue01的目录描述:
![](https://img.php1.cn/3cd4a/1eebe/cd5/d84f9786330d9e41.png)
https://www.cnblogs.com/goldlong/p/8027997.html