作者:从前泪流光e_446 | 来源:互联网 | 2023-07-15 21:13
安装JDK一、官方下载地址:http:www.oracle.comtechnetworkjavajavasedownloadsjdk8-downloads-2133151.html
安装JDK
一、官方下载地址:http://www.oracle.com/technetwork/java/javase/downloads/jdk8-downloads-2133151.html
![linux搭建tomcat集群+nginx linux搭建tomcat集群+nginx](https://img2.php1.cn/3cdc5/36a2/3b4/4c0e7385e967d6a1.png)
下载完成后得到:
![linux搭建tomcat集群+nginx linux搭建tomcat集群+nginx](https://img2.php1.cn/3cdc5/36a2/3b4/ccb98728a90d993f.png)
二、上传解压
在xshell中rz上传文件
![linux搭建tomcat集群+nginx linux搭建tomcat集群+nginx](https://img2.php1.cn/3cdc5/36a2/3b4/7b4dd8defca1651c.png)
通过命令:tar -zxvf jdk-8u221-linux-x64.tar.gz解压
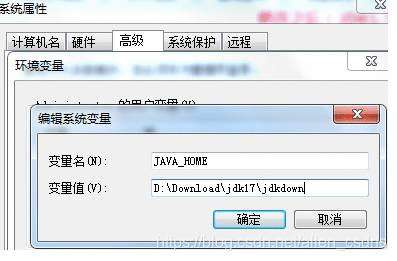
三、配置环境变量
通过命令vim /etc/profile/进入配置环境
![linux搭建tomcat集群+nginx linux搭建tomcat集群+nginx](https://img2.php1.cn/3cdc5/36a2/3b4/e9ee1d7264144617.png)
为了防止你们出错,顺便粘贴出来了
export JAVA_HOME=/usr/local/jdk/jdk1.8.0_221
export PATH=$PATH:$JAVA_HOME/bin
export CLASSPATH=.:$JAVA_HOME/lib/dt.jar:$JAVA_HOME/lib/tools.jar
修改完之后,重新之后用命令source /etc/profile/重启一下配置环境
然后输入 java -version,能看到如图下的版本信息
![linux搭建tomcat集群+nginx linux搭建tomcat集群+nginx](https://img2.php1.cn/3cdc5/36a2/3b4/e816b0506af12dc0.png)
Linux安装nginx
在usr/local创建nginx文件夹
mkdir nginx
https://blog.csdn.net/weixin_33446857/article/details/80840121
安装tomcat
上传apache-tomcat-8.5.45.tar.gz到到usr/local/tomcat下
并且解压tar -zxvf apache-tomcat-8.5.45.tar.gz
![linux搭建tomcat集群+nginx linux搭建tomcat集群+nginx](https://img2.php1.cn/3cdc5/36a2/3b4/0e5ab70addff5aab.png)
进入bin目录下启动 ./start.sh
同时查看进程ps -ef | grep 8080
![linux搭建tomcat集群+nginx linux搭建tomcat集群+nginx](https://img2.php1.cn/3cdc5/36a2/3b4/4c6ea3f5d1bee9b2.png)
或者直接访问
![linux搭建tomcat集群+nginx linux搭建tomcat集群+nginx](https://img2.php1.cn/3cdc5/36a2/3b4/ab943e3b5288a100.png)
配置tomcat集群
复制多几个tomcat
![linux搭建tomcat集群+nginx linux搭建tomcat集群+nginx](https://img2.php1.cn/3cdc5/36a2/3b4/2d7e92e6921131b2.png)
进入系统环境变量配置tomcat集群,否则启动会被覆盖
vim etc/profile
![linux搭建tomcat集群+nginx linux搭建tomcat集群+nginx](https://img2.php1.cn/3cdc5/36a2/3b4/02ffcc01194084e0.png)
同时也要修改每个tomcat的conf目录里面的server.xml里面的端口,以tomcat-8081为例,8080的tomcat就不要修改了
![linux搭建tomcat集群+nginx linux搭建tomcat集群+nginx](https://img2.php1.cn/3cdc5/36a2/3b4/c0eecdbee536a958.png)
![linux搭建tomcat集群+nginx linux搭建tomcat集群+nginx](https://img2.php1.cn/3cdc5/36a2/3b4/f1fbd6ecd4f19d23.png)
![linux搭建tomcat集群+nginx linux搭建tomcat集群+nginx](https://img2.php1.cn/3cdc5/36a2/3b4/401906c1d6f2903e.png)
以此类推,然后配置完毕
同时还要配置nginx
![linux搭建tomcat集群+nginx linux搭建tomcat集群+nginx](https://img2.php1.cn/3cdc5/36a2/3b4/b3a3057acb2030c8.png)
箭头的这几个都要注意,还有那个http要注意,别忘记写
可以通过 netstat -ntpl查看启动状况
然后效果图
![linux搭建tomcat集群+nginx linux搭建tomcat集群+nginx](https://img2.php1.cn/3cdc5/36a2/3b4/fdc5f1fd8aabbe5a.png)
![linux搭建tomcat集群+nginx linux搭建tomcat集群+nginx](https://img2.php1.cn/3cdc5/36a2/3b4/2ad080818db1e8c4.png)
![linux搭建tomcat集群+nginx linux搭建tomcat集群+nginx](https://img2.php1.cn/3cdc5/36a2/3b4/8053ea93f68c1b75.png)
![linux搭建tomcat集群+nginx linux搭建tomcat集群+nginx](https://img2.php1.cn/3cdc5/36a2/3b4/43eb60a313780930.png)
好了,到了这里就差不多了~~~