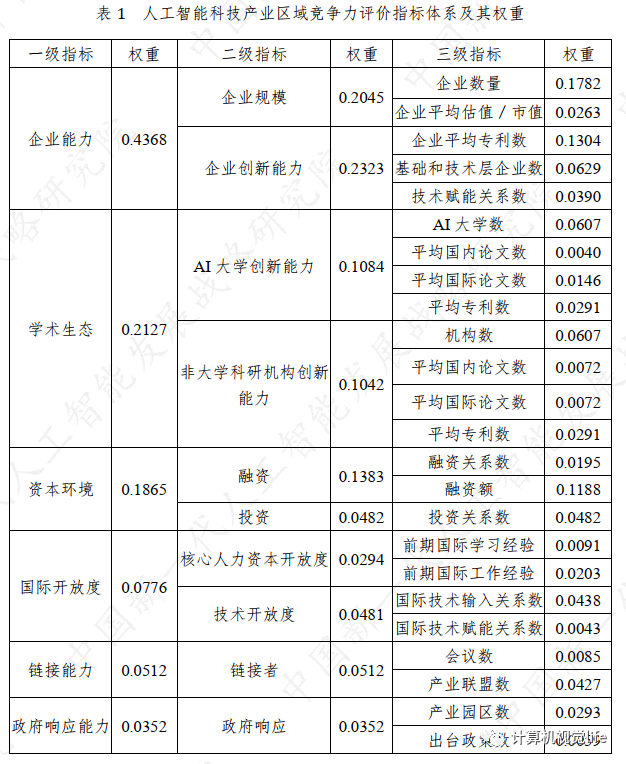
Welcome to this week's programming assignment. Until now, you've always used numpy to build neural networks. Now we will step you through a deep learning framework that will allow you to build neural networks more easily. Machine learning frameworks like TensorFlow, PaddlePaddle, Torch, Caffe, Keras, and many others can speed up your machine learning development significantly. All of these frameworks also have a lot of documentation, which you should feel free to read. In this assignment, you will learn to do the following in TensorFlow:
Programing frameworks can not only shorten your coding time, but sometimes also perform optimizations that speed up your code.
To start, you will import the library:
import math
import numpy as np
import h5py
import matplotlib.pyplot as plt
import tensorflow as tf
from tensorflow.python.framework import ops
from tf_utils import load_dataset, random_mini_batches, convert_to_one_hot, predict
%matplotlib inline
np.random.seed(1)
Now that you have imported the library, we will walk you through its different applications. You will start with an example, where we compute for you the loss of one training example.
y_hat = tf.constant(36, name='y_hat') # Define y_hat constant. Set to 36.
y = tf.constant(39, name='y') # Define y. Set to 39
loss = tf.Variable((y - y_hat)**2, name='loss') # Create a variable for the loss
init = tf.global_variables_initializer() # When init is run later (session.run(init)),
# the loss variable will be initialized and ready to be computed
with tf.Session() as session: # Create a session and print the output
session.run(init) # Initializes the variables
print(session.run(loss)) # Prints the loss
9
Writing and running programs in TensorFlow has the following steps:
Therefore, when we created a variable for the loss, we simply defined the loss as a function of other quantities, but did not evaluate its value. To evaluate it, we had to runinit=tf.global_variables_initializer(). That initialized the loss variable, and in the last line we were finally able to evaluate the value ofloss and print its value.
Now let us look at an easy example. Run the cell below:
a = tf.constant(2)
b = tf.constant(10)
c = tf.multiply(a,b)
print(c)
Tensor("Mul:0", shape=(), dtype=int32)
As expected, you will not see 20! You got a tensor saying that the result is a tensor that does not have the shape attribute, and is of type "int32". All you did was put in the 'computation graph', but you have not run this computation yet. In order to actually multiply the two numbers, you will have to create a session and run it.
sess = tf.Session()
print(sess.run(c))
20
Great! To summarize, remember to initialize your variables, create a session and run the operations inside the session.
Next, you'll also have to know about placeholders. A placeholder is an object whose value you can specify only later. To specify values for a placeholder, you can pass in values by using a "feed dictionary" (feed_dict variable). Below, we created a placeholder for x. This allows us to pass in a number later when we run the session.
# Change the value of x in the feed_dict
x = tf.placeholder(tf.int64, name = 'x')
print(sess.run(2 * x, feed_dict = {x: 3}))
sess.close()
6
When you first defined x you did not have to specify a value for it. A placeholder is simply a variable that you will assign data to only later, when running the session. We say that you feed data to these placeholders when running the session.
Here's what's happening: When you specify the operations needed for a computation, you are telling TensorFlow how to construct a computation graph. The computation graph can have some placeholders whose values you will specify only later. Finally, when you run the session, you are telling TensorFlow to execute the computation graph.
Lets start this programming exercise by computing the following equation:
Exercise: Compute
X = tf.constant(np.random.randn(3,1), name = "X")You might find the following functions helpful:
# GRADED FUNCTION: linear_function
def linear_function():
"""
Implements a linear function:
Initializes W to be a random tensor of shape (4,3)
Initializes X to be a random tensor of shape (3,1)
Initializes b to be a random tensor of shape (4,1)
Returns:
result -- runs the session for Y = WX + b
"""
np.random.seed(1)
### START CODE HERE ### (4 lines of code)
X = tf.constant(np.random.randn(3,1), name = "X")
W = tf.constant(np.random.randn(4,3), name = "W")
b = tf.constant(np.random.randn(4,1), name = "b")
Y = tf.add(tf.matmul(W, X),b)
### END CODE HERE ###
# Create the session using tf.Session() and run it with sess.run(...) on the variable you want to calculate
### START CODE HERE ###
sess = tf.Session()
result = sess.run(Y)
### END CODE HERE ###
# close the session
sess.close()
return result
print( "result = " + str(linear_function()))
result = [[-2.15657382] [ 2.95891446] [-1.08926781] [-0.84538042]]
Expected Output :
| result | [[-2.15657382] [ 2.95891446] [-1.08926781] [-0.84538042]] |
Great! You just implemented a linear function. Tensorflow offers a variety of commonly used neural network functions like tf.sigmoid and tf.softmax. For this exercise lets compute the sigmoid function of an input.
You will do this exercise using a placeholder variable x. When running the session, you should use the feed dictionary to pass in the input z. In this exercise, you will have to (i) create a placeholder x, (ii) define the operations needed to compute the sigmoid using tf.sigmoid, and then (iii) run the session.
Exercise : Implement the sigmoid function below. You should use the following:
tf.placeholder(tf.float32, name = "...")tf.sigmoid(...)sess.run(..., feed_dict = {x: z})Note that there are two typical ways to create and use sessions in tensorflow:
Method 1:
sess = tf.Session()# Run the variables initialization (if needed), run the operationsresult = sess.run(..., feed_dict = {...})sess.close() # Close the sessionMethod 2:
with tf.Session() as sess: # run the variables initialization (if needed), run the operations result = sess.run(..., feed_dict = {...}) # This takes care of closing the session for you :)# GRADED FUNCTION: sigmoid
def sigmoid(z):
"""
Computes the sigmoid of z
Arguments:
z -- input value, scalar or vector
Returns:
results -- the sigmoid of z
"""
### START CODE HERE ### ( approx. 4 lines of code)
# Create a placeholder for x. Name it 'x'.
x = tf.placeholder(tf.float32, name = 'x')
# compute sigmoid(x)
sigmoid = tf.sigmoid(x)
# Create a session, and run it. Please use the method 2 explained above.
# You should use a feed_dict to pass z's value to x.
with tf.Session() as sess:
# Run session and call the output "result"
result = sess.run(sigmoid, feed_dict = {x: z})
### END CODE HERE ###
return result
print ("sigmoid(0) = " + str(sigmoid(0)))
print ("sigmoid(12) = " + str(sigmoid(12)))
sigmoid(0) = 0.5sigmoid(12) = 0.999994
Expected Output :
| sigmoid(0) | 0.5 |
| sigmoid(12) | 0.999994 |
To summarize, you how know how to:
You can also use a built-in function to compute the cost of your neural network. So instead of needing to write code to compute this as a function of


 京公网安备 11010802041100号 | 京ICP备19059560号-4 | PHP1.CN 第一PHP社区 版权所有