在gateway的依赖中引入spring-cloud-starter-alibaba-nacos-discovery
		<dependency>
            <groupId>com.alibaba.cloudgroupId>
            <artifactId>spring-cloud-starter-alibaba-nacos-discoveryartifactId>
            <version>2021.1version>
        dependency>
        <dependency>
            <groupId>org.springframework.cloudgroupId>
            <artifactId>spring-cloud-starter-gatewayartifactId>
            <version>3.0.1version>
        dependency>

        <dependency>
            <groupId>org.springframework.bootgroupId>
            <artifactId>spring-boot-starter-actuatorartifactId>
        dependency>
在application.yml中暴露节点和使用nacos注册中心
server:
  port: 9001
spring:
  application:
    name: tools2-gateway
  cloud:
    nacos:
      discovery:
        server-addr: localhost:9000
management:
  endpoints:
    web:
      exposure:
        include: "*"
最后在启动类中使用@EnableDiscoveryClient注解
package pers.lmc.tools2.gateway;
import org.springframework.boot.SpringApplication;
import org.springframework.boot.autoconfigure.springbootApplication;
import org.springframework.cloud.client.discovery.EnableDiscoveryClient;
/**
 * @author lmc
 * @Description: TODO
 * @Create 2022-04-04 16:28
 * @version: 1.0
 */
@SpringBootApplication
@EnableDiscoveryClient
public class Gateway2Application {
    public static void main(String[] args) {
        SpringApplication.run(Gateway2Application.class, args);
    }
}
启动之后可以在NACOS的【服务管理】- 【服务列表】的默认public命名空间找到,分组默认为DEFAULT_GROUP
由于我们的项目经常都会出现多种环境(dev,test,prod等等),在使用Eureka作为注册中心的时候,我们是部署了不同环境的eureka服务,每个环境对应一个注册中心。而在NACOS中,我们部署一个服务就好。
用于进行租户粒度的配置隔离。不同的命名空间下,可以存在相同的 Group 或 Data ID 的配置。Namespace 的常用场景之一是不同环境的配置的区分隔离,例如开发测试环境和生产环境的资源(如配置、服务)隔离等。
Nacos 中的一组配置集,是组织配置的维度之一。通过一个有意义的字符串(如 Buy 或 Trade )对配置集进行分组,从而区分 Data ID 相同的配置集。当您在 Nacos 上创建一个配置时,如果未填写配置分组的名称,则配置分组的名称默认采用 DEFAULT_GROUP 。配置分组的常见场景:不同的应用或组件使用了相同的配置类型,如 database_url 配置和 MQ_topic 配置。
在NACOS的【命名空间】中,选择右上角【新建命名空间】,创建新命名空间

在这里我创建了开发环境的命名空间devspace
application.yml
server:
  port: 9001
spring:
  application:
    name: tools2-gateway
  profiles:
    active: dev
management:
  endpoints:
    web:
      exposure:
        include: "*"
application-dev.yml
spring:
  cloud:
    nacos:
      discovery:
        server-addr: localhost:9000
        namespace: f92060d8-326f-483c-8bb7-c6dba0118b2c # 命名空间ID
        group: ${spring.profiles.active}  # 分组名
重新启动gateway服务,可以在NACOS服务列表中看到

在系统开发过程中,开发者通常会将一些需要变更的参数、变量等从代码中分离出来独立管理,以独立的配置文件的形式存在。目的是让静态的系统工件或者交付物(如 WAR,JAR 包等)更好地和实际的物理运行环境进行适配。配置管理一般包含在系统部署的过程中,由系统管理员或者运维人员完成。配置变更是调整系统运行时的行为的有效手段。
系统配置的编辑、存储、分发、变更管理、历史版本管理、变更审计等所有与配置相关的活动。
一个具体的可配置的参数与其值域,通常以 param-key=param-value 的形式存在。例如我们常配置系统的日志输出级别(logLevel=INFO|WARN|ERROR) 就是一个配置项。
一组相关或者不相关的配置项的集合称为配置集。在系统中,一个配置文件通常就是一个配置集,包含了系统各个方面的配置。例如,一个配置集可能包含了数据源、线程池、日志级别等配置项。
Nacos 中的某个配置集的 ID。配置集 ID 是组织划分配置的维度之一。Data ID 通常用于组织划分系统的配置集。一个系统或者应用可以包含多个配置集,每个配置集都可以被一个有意义的名称标识。Data ID 通常采用类 Java 包(如 com.taobao.tc.refund.log.level)的命名规则保证全局唯一性。此命名规则非强制。
        <dependency>
            <groupId>com.alibaba.cloudgroupId>
            <artifactId>spring-cloud-starter-alibaba-nacos-configartifactId>
            <version>2021.1version>
        dependency>
        <dependency>
            <groupId>org.springframework.cloudgroupId>
            <artifactId>spring-cloud-starter-bootstrapartifactId>
            <version>3.1.1version>
        dependency>
我们在使用Spring Cloud Config时都会使用bootstrap的文件名。Nacos和Spring Cloud Config一样,在项目初始化时,要保证先从配置中心进行拉取,拉取配置之后,才能保证项目的正常启动,也要使用bootstrap的配置文件名,否则读取不到配置。
bootstrap.yml
server:
  port: 9001
spring:
  application:
    name: tools2-gateway
  profiles:
    active: dev
management:
  endpoints:
    web:
      exposure:
        include: "*"
bootstrap-dev.yml
spring:
  cloud:
    nacos:
      server-addr: localhost:9000 # 当同时使用服务发现和配置管理时,未避免配置两次server-addr,可以将服务地址写在这里
      discovery:
        #        server-addr: localhost:9000
        namespace: f92060d8-326f-483c-8bb7-c6dba0118b2c # 命名空间ID
        group: ${spring.profiles.active}  # 组名
      config:
        #        server-addr: localhost:9000
        namespace: f92060d8-326f-483c-8bb7-c6dba0118b2c
        group: ${spring.profiles.active}
        file-extension: yaml  # 配置内容的数据格式
在 Nacos Spring Cloud 中,dataId 的完整格式如下:
${prefix}-${spring.profiles.active}.${file-extension}
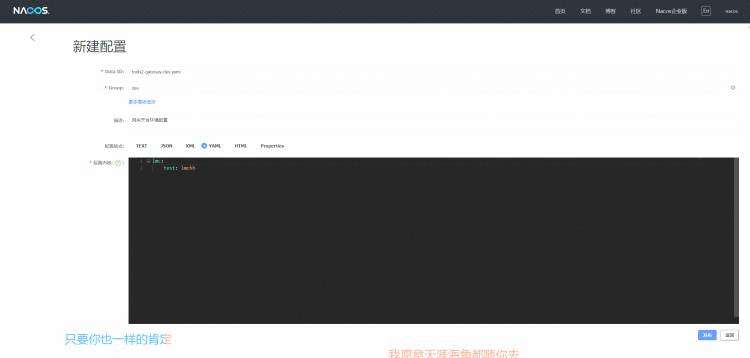
prefix 默认为 spring.application.name 的值,也可以通过配置项 spring.cloud.nacos.config.prefix来配置。spring.profiles.active 即为当前环境对应的 profile。 注意:当 spring.profiles.active 为空时,对应的连接符 - 也将不存在,dataId 的拼接格式变成 ${prefix}.${file-extension}file-exetension 为配置内容的数据格式,可以通过配置项 spring.cloud.nacos.config.file-extension 来配置。目前只支持 properties 和 yaml 类型。在NACOS页面的【配置管理】 &#8211; 【配置列表】中,点击右上角【+】添加dataID,命名为 tools2-gateway-dev.yaml,如下所示:

配置完毕后,我们就需要测试验证刚才的配置是否正确。可以通过在项目中创建接口验证,如下所示:
package pers.lmc.tools2.gateway.controller;
import org.springframework.beans.factory.annotation.Value;
import org.springframework.cloud.context.config.annotation.RefreshScope;
import org.springframework.web.bind.annotation.RequestMapping;
import org.springframework.web.bind.annotation.RestController;
/**
 * @author lmc
 * @Description: TODO
 * @Create 2022-04-05 17:36
 * @version: 1.0
 */
@RestController
@RefreshScope
public class TestController {
    @Value("${lmc.test:lmc}")
    private String test;
    @RequestMapping("test")
    public String test() {
        return test;
    }
}
创建完毕,启动项目,访问:http://localhost:9001/test,得到的结果为:
lmchh
在NACOS修改配置lmc.test为lmchhh,重新访问接口http://localhost:9001/test,得到结果:
lmchhh
即配置正确。
前面的配置一个服务只对应了一个配置dataID,但在实际上我们一个服务的配置来源可能不止一处。例如上面gateway中,当前只有一个tools-gateway-dev.yaml指定了开发环境。但是,如果我想把路由也在NACOS配置,那这时候意味着,不管是dev,test还是prod环境都共用这个路由配置,这个时候就需要用到nacos的配置集。

bootstrap-dev.yml
spring:
  cloud:
    nacos:
      server-addr: localhost:9000 # 当同时使用服务发现和配置管理时,未避免配置两次server-addr,可以将服务地址写在这里
      discovery:
        #        server-addr: localhost:9000
        namespace: 8628e5dd-a236-4016-b94f-565a001faf2f # 命名空间ID
        group: ${spring.profiles.active}  # 组名
      config:
        #        server-addr: localhost:9000
        namespace: 8628e5dd-a236-4016-b94f-565a001faf2f
        group: ${spring.profiles.active}
        file-extension: yaml  # 配置内容的数据格式
        extension-configs[0]:
          data-id: ${spring.application.name}-${spring.profiles.active}.${spring.cloud.nacos.config.file-extension}
          group: ${spring.profiles.active}
        extension-configs[1]:
          data-id: ${spring.application.name}.${spring.cloud.nacos.config.file-extension}
          group: public
配置完毕后,我们就需要测试验证刚才的配置是否正确。可以通过在项目中创建接口验证,如下所示:
package pers.lmc.tools2.gateway.controller;
import org.springframework.beans.factory.annotation.Value;
import org.springframework.cloud.context.config.annotation.RefreshScope;
import org.springframework.web.bind.annotation.RequestMapping;
import org.springframework.web.bind.annotation.RestController;
/**
 * @author lmc
 * @Description: TODO
 * @Create 2022-04-05 17:36
 * @version: 1.0
 */
@RestController
@RefreshScope
public class TestController {
    @Value("${lmc.test:lmc}")
    private String test;
    @Value("${lmc.public:pub}")
    private String pub;
    @RequestMapping("test")
    public String test() {
        return test;
    }
    @RequestMapping("pub")
    public String pub() {
        return pub;
    }
}
创建完毕,启动项目,访问:http://localhost:9001/test 和 http://localhost:9001/pub,查看返回结果

 京公网安备 11010802041100号 | 京ICP备19059560号-4 | PHP1.CN 第一PHP社区 版权所有