VSCode插件大法好。
简单可执行的方案,直接安装 VSCode ESlint 插件,提示、修复不合规代码。
下面内容都是过时的。忽略忽略~
目的
- 自动检测语法错误,提升代码质量的同时也是的代码风格统一,较少交接成本。
- 结合IDE自动解决低级语法错误,提高开发效率。
前言
-
ESLint是什么?
ESLint最初是由Nicholas C. Zakas 于2013年6月创建的开源项目。它的目标是提供一个插件化的Javascript代码检测工具。
-
为什么要用ESlint?
保证团队内代码风格统一、提高代码质量、减少低级错误等
-
使用ESLint的成本?
对于各方和团队都有需要一定的事件适应。适应之后对团队和个人的收益远大于成本
-
如何使用ESLint?
npm i -g eslint => eslint index.js => eslint --fix index.js
http://eslint.cn/docs/user-guide/command-line-interface
-
安装

ESLint中文文档: http://eslint.cn/docs/user-guide/getting-started
集成
项目集成:
由于我们项目已经集成了ESLint。接下来我们看一下该项目中是如何集成ESLint。
- 在项目内安装ESLint。

- 设置ESLint规则。

- 在webpack中调用ESLint

- eslint-loader 与 ESLint之间的关系

开发工具集成
集成后,开发工具可以可视化的提示代码不规范的地方,并且自动fix不规范的地方。
| 序号 | 工具 | 进度 | 备注 |
|---|
| 1 | WebStorm | 100% | |
| 2 | IDE | 100% | |
| 3 | VSCode | 100% | |
| 3 | Sublime Text | 0% | |
WebStorm、IDE
- 开启开发工具ESLint工具,并修改配置路径
Preferences > 搜索:ESLint

- 配置项目Code Style
Prederences > Editor > Code Style > Javascript

VSCode
集成前,默认您的VSCode已经安装完vue相关插件,能正常开发项目。
-
安装VSCode相关插件
ESLint、Vetur、Prettier。
Tip:图中为我个人的已安装的插件,并不要求全部安装,对插件感兴趣的了解一下用途。

-
修改插件设置
将以下参数填入VSCode 用户设置 或 工作区设置。两者区别就是字面意思。
{"files.autoSave": "afterDelay","files.autoSaveDelay": 800,"editor.formatOnSave": true,"eslint.autoFixOnSave": true,"Javascript.format.insertSpaceAfterFunctionKeywordForAnonymousFunctions": false,"prettier.singleQuote": true,"prettier.eslintIntegration": true,"eslint.validate": ["Javascript","Javascriptreact",{"language": "html","autoFix": true},{"language": "vue","autoFix": true}],"eslint.alwaysShowStatus": true,"vetur.format.defaultFormatter.html": "prettyhtml","vetur.format.styleInitialIndent": true,"vetur.format.scriptInitialIndent": true,"editor.quickSuggestions": {"other": true,"comments": true,"strings": true},"Javascript.format.insertSpaceAfterOpeningAndBeforeClosingNonemptyBraces": false,"typescript.format.insertSpaceAfterOpeningAndBeforeClosingNonemptyBraces": false
}
- 如何启用自动格式化
快捷键主动触发格式化:
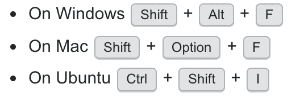
手动保存触发格式化: - Mac:Command + S
- Windows:Ctrl + S
配置介绍
-
目前项目采用的rules配置介绍:
附带中文解释:https://github.com/yuliangGit/blog/blob/master/rules-chinese.js
-
ESLint rule 规则详解页面
替换url末尾的 规则名称(no-console),可以查看不同规则的详解
http://eslint.cn/docs/4.0.0/rules/no-console
拓展
-
如何为ESLint贡献一个自定义的rule?
http://eslint.cn/docs/developer-guide/working-with-rules
no-console 源码参考:https://github.com/yuliangGit/blog/blob/master/no-console-code.js
-
如何编写一个ESLint插件?
规范文档:http://eslint.cn/docs/developer-guide/working-with-plugins
示例:https://github.com/standard/eslint-plugin-standard
参考
- ESLint官网 http://eslint.cn/
- Airbnb 规则中文文档 https://github.com/yuche/Javascript


 京公网安备 11010802041100号