spring mvc可以说是大部分小伙伴做web项目的第一个使用到的框架,当然如果比较久远的话大家还会学到structs或structs2,不过有一些原因被淘汰了。之前用SSH也逐步转变成了SSM框架。当然目前到了微服务项目也离不开它,唯一不同的是前后端分离了,基本不需要他的视图。当然小编还是会带过他是视图。
今天为了大家带来spring mvc的整体架构以及核心流程。咱们进入正题
在刚刚学习java企业应用级应用的时候,咱们首先学到的是Servlet,那其实spring mvc是基于他来封装开发的,那咱们先来回顾他的流程
先看一下下图:
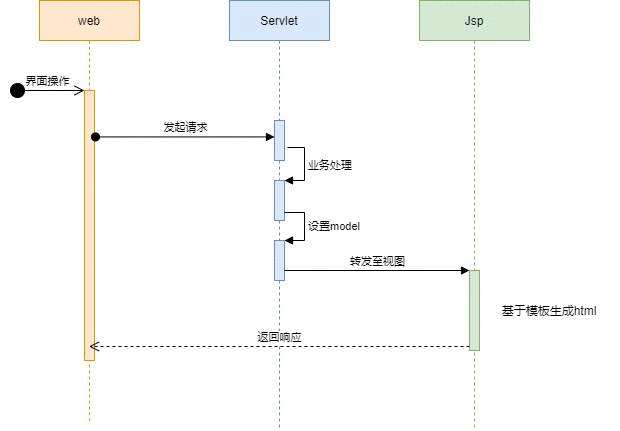
看了上图,其实流程比较简单一目了然,那web怎么到达Servlet以及Servlet怎么到达Jsp的,他的本质又是什么?这里涉及到一些知识。
当然这个不是重点,接下来我们看一下spring mvc的流程
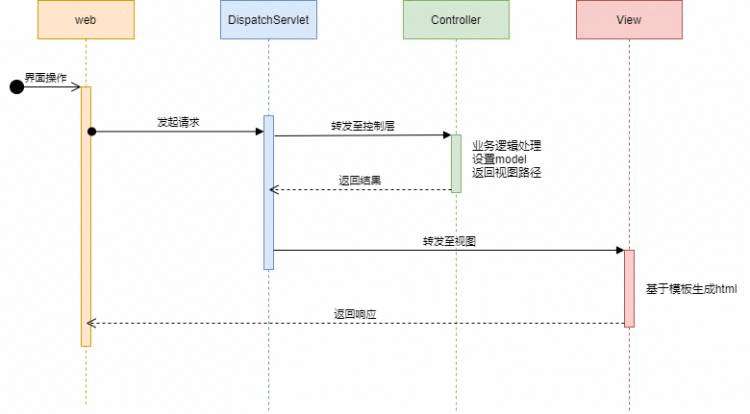
其实和Servlet差不多,但是多出了Controller层,将业务逻辑交给了Controller,之后返回给DispatchServlet再转发给View,然后基于模板生成html再返回给浏览器。
那spring mvc为什么要加上控制层,相较于servlet流程有哪些优点,那咱们继续往下看。
传统的映射体系,学习servlet的时候大家应该知道,我们配置一个映射的话,基本就是xx/xx.do,这样映射比较麻烦,第二是传递的参数,参数获取或封装都比较麻烦,第三就是servlet请求如果有多个就需要有多个servlet来处理。还有其他的问题,基于上面的种种问题,那spring mvc进行了优化。那首先我们看一下他的体系结构图:
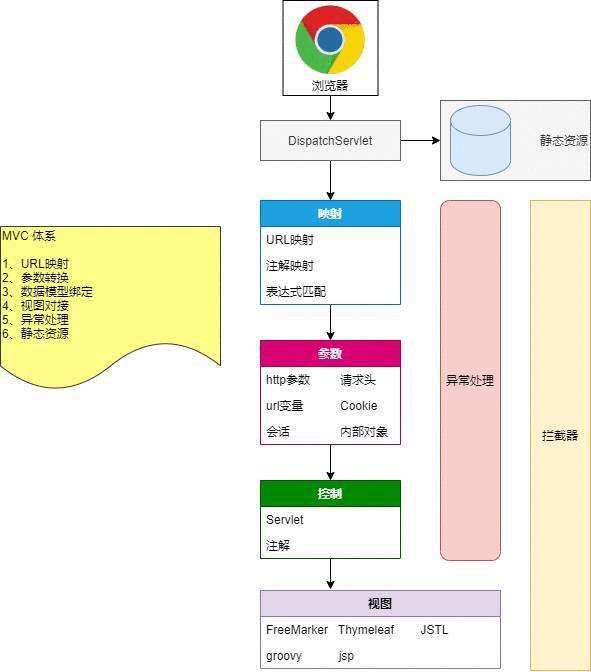
优点:
看了体系结构,那我们看一下他的核心流程以及细节。这里会涉及他的源码:
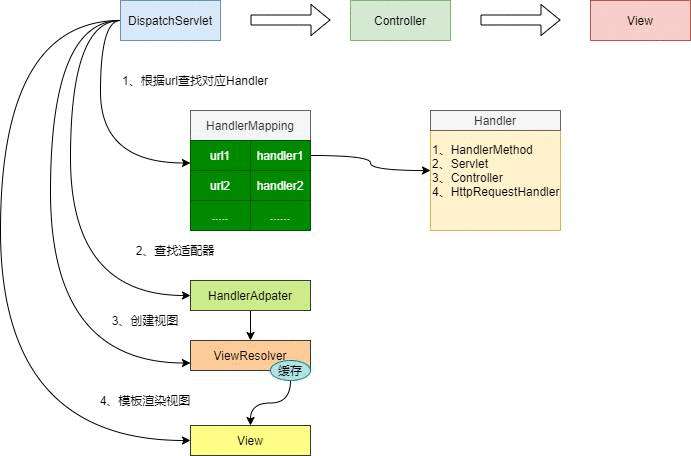
这里演示的是平常不太用到的
**Servlet**
```java
@Controller("/servlet")
public class ServletHandler extends HttpServlet {
    @Override
    protected void doGet(HttpServletRequest req, HttpServletResponse resp) throws IOException {
        resp.getWriter().write("hello luban uncle");
    }
}
@Component
public class ServletHandlerAdapter implements HandlerAdapter {
	@Override
	public boolean supports(Object handler) {
		return (handler instanceof Servlet);
	}
	@Override
	public ModelAndView handle(HttpServletRequest request, HttpServletResponse response, Object handler)
			throws Exception {
		((Servlet) handler).service(request, response);
		return null;
	}
	@Override
	public long getLastModified(HttpServletRequest request, Object handler) {
		return -1;
	}
}
值得注意的是Servlet需要加上对应的适配器,因为servlet没有自己的适配得手工加上,如果不加则会报错
javax.servlet.ServletException: javax.servlet.ServletException: No adapter for handler [com.lecture.mvc.ServletHandler@409c7566]: The DispatcherServlet configuration needs to include a HandlerAdapter that supports this handler
其他的为什么不用加,想必大家已经明白了,因为spring对大多数已经自动加入了handlerAdapter,不需要手动加进去。
具体是在springwebmvc的jar下面的DispatcherServlet.properties文件。
org.springframework.web.servlet.HandlerAdapter=org.springframework.web.servlet.mvc.HttpRequestHandlerAdapter,\
	org.springframework.web.servlet.mvc.SimpleControllerHandlerAdapter,\
	org.springframework.web.servlet.mvc.method.annotation.RequestMappingHandlerAdapter
controller
@Component("/hi")
public class ControllerHandler implements Controller {
    @Override
    public ModelAndView handleRequest(HttpServletRequest request, HttpServletResponse response) {
        //viewResolver
        ModelAndView userView = new ModelAndView("userView");
        userView.addObject("name","hello");
        return userView;
    }
}
**HttpRequestHandler**
```java
public class HttpRequestHandlerTest implements HttpRequestHandler {
    @Override
    public void handleRequest(HttpServletRequest httpServletRequest, HttpServletResponse httpServletResponse) throws ServletException, IOException {
        httpServletResponse.getWriter().write("hello world http request handler");
    }
}
看到这儿大家是否觉得有疑问,那为什么没有HandlerMethod的代码示例,这个暂且不表,小编后续会说明。
实际过程中controller和HttpRequestHandler在实际过程中99%是不会用到的,那为什么会有这两个呢,主要是为了动态扩展Handler,这两种bean,直接可以放入spring的ioc容器里面。
接下来小编看一下他的初始化过程。
上面的HandlerMapping,HandlerAdpater,ViewResolver以及View本质上都是Bean,并被spring Ioc容器所管理,那这些bean怎么被DispatchServlet所使用的呢,其实很简单,他在启动的时候找出上面的Bean并且添加进去,那这样DispatchServlet必须有初始化的动作。下图看DispatchServlet中包含哪些:
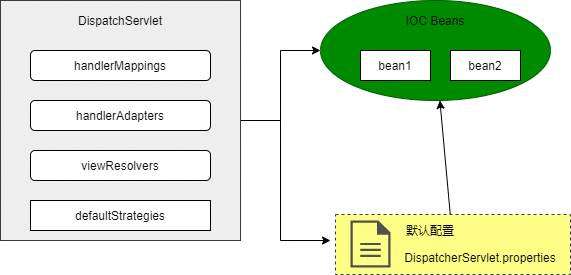
从上图可看出中DispatchServlet组件中包含多个HandlerMapping,HandlerAdpater以及ViewResolver,当然大家是否有疑问怎么没有View了,其实View是动态生成的,然后看一下源码:
org.springframework.web.servlet.DispatcherServlet
protected void onRefresh(ApplicationContext context) {
        this.initStrategies(context);
    }
    protected void initStrategies(ApplicationContext context) {
        this.initMultipartResolver(context);
        this.initLocaleResolver(context);
        this.initThemeResolver(context);
        //初始化HandlerMappings
        this.initHandlerMappings(context);
        //初始化HandlerAdapters
        this.initHandlerAdapters(context);
        this.initHandlerExceptionResolvers(context);
        this.initRequestToViewNameTranslator(context);
        //初始化HandlerAdapters
        this.initViewResolvers(context);
        this.initFlashMapManager(context);
    }
大家先不需要关心其他的组件,因为不属于核心组件。这里初始化的源码咱们只看一个initHandlerMappings,因为其他的init都相差不大,很简单
initHandlerMappings
private void initHandlerMappings(ApplicationContext context) {
		this.handlerMappings = null;
		if (this.detectAllHandlerMappings) {
			// Find all HandlerMappings in the ApplicationContext, including ancestor contexts.
			//找到容器中所以的HandlerMappings
			Map<String, HandlerMapping> matchingBeans =
					BeanFactoryUtils.beansOfTypeIncludingAncestors(context, HandlerMapping.class, true, false);
			if (!matchingBeans.isEmpty()) {
				//设置进去
				this.handlerMappings = new ArrayList<>(matchingBeans.values());
				// We keep HandlerMappings in sorted order. 排序
				AnnotationAwareOrderComparator.sort(this.handlerMappings);
			}
		}
		else {
			try {
				HandlerMapping hm = context.getBean(HANDLER_MAPPING_BEAN_NAME, HandlerMapping.class);
				this.handlerMappings = Collections.singletonList(hm);
			}
			catch (NoSuchBeanDefinitionException ex) {
				// Ignore, we'll add a default HandlerMapping later.
			}
		}
		// Ensure we have at least one HandlerMapping, by registering
		// a default HandlerMapping if no other mappings are found.
		if (this.handlerMappings == null) {
			//都为空则去找配置文件内容,就去找对应的文件
			this.handlerMappings = getDefaultStrategies(context, HandlerMapping.class);
			if (logger.isTraceEnabled()) {
				logger.trace("No HandlerMappings declared for servlet '" + getServletName() +
						"': using default strategies from DispatcherServlet.properties");
			}
		}
	}
这样组件初始化就完成了。接下来初始化后怎么调用到他。那接着看一下调用的流程以及源码。
首先调用的时序图如下:
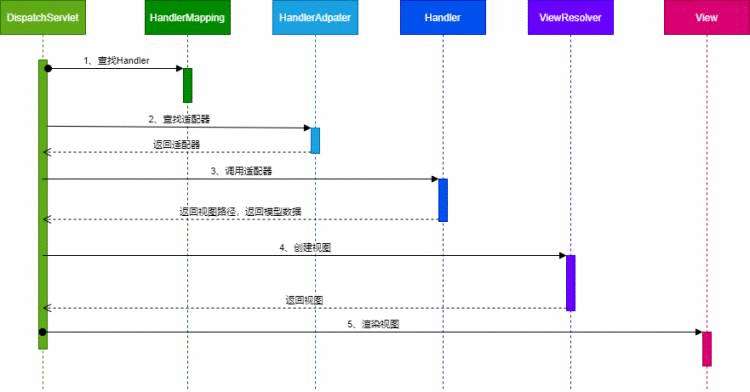
时序图非常简单,那咱们看一下源码:
首先不管是post还是get最终都回到这个org.springframework.web.servlet.DispatcherServlet#doService
@Override
	protected void doService(HttpServletRequest request, HttpServletResponse response) throws Exception {
		logRequest(request);
		.......
		try {
			//调用到doDispatch方法
			doDispatch(request, response);
		}
		.....
	}
doDispatch
protected void doDispatch(HttpServletRequest request, HttpServletResponse response) throws Exception {
		HttpServletRequest processedRequest = request;
		HandlerExecutionChain mappedHandler = null;
		boolean multipartRequestParsed = false;
		WebAsyncManager asyncManager = WebAsyncUtils.getAsyncManager(request);
		try {
			ModelAndView mv = null;
			Exception dispatchException = null;
			try {
				processedRequest = checkMultipart(request);
				multipartRequestParsed = (processedRequest != request);
				// Determine handler for the current request.
				//找到我们的handler,也就是从handlerMappings中找到我们的映射
				//拿到的是HandlerExecutionChain  里面包装了Handler,里面使用HandlerExecutionChain
				//主要里面有需要执行的拦截器的方法
				mappedHandler = getHandler(processedRequest);
				if (mappedHandler == null) {
					noHandlerFound(processedRequest, response);
					return;
				}
				// Determine handler adapter for the current request.
				//找到我们的handler适配器,handlerAdapters里面查找,如果找不到直接报错
				HandlerAdapter ha = getHandlerAdapter(mappedHandler.getHandler());
				// Process last-modified header, if supported by the handler.
				String method = request.getMethod();
				boolean isGet = "GET".equals(method);
				if (isGet || "HEAD".equals(method)) {
					long lastModified = ha.getLastModified(request, mappedHandler.getHandler());
					if (new ServletWebRequest(request, response).checkNotModified(lastModified) && isGet) {
						return;
					}
				}
				//找到适配器后首先是执行前置拦截方法,看是否被拦截
				if (!mappedHandler.applyPreHandle(processedRequest, response)) {
					return;
				}
				// Actually invoke the handler.
				//真正调用Handler根据适配器发起调用,返回了modelAndView
				mv = ha.handle(processedRequest, response, mappedHandler.getHandler());
				if (asyncManager.isConcurrentHandlingStarted()) {
					return;
				}
				//设置viewName
				applyDefaultViewName(processedRequest, mv);
				//后置处理
				mappedHandler.applyPostHandle(processedRequest, response, mv);
			}
			catch (Exception ex) {
				dispatchException = ex;
			}
			catch (Throwable err) {
				// As of 4.3, we're processing Errors thrown from handler methods as well,
				// making them available for @ExceptionHandler methods and other scenarios.
				dispatchException = new NestedServletException("Handler dispatch failed", err);
			}
			//这里是创建视图并渲染
			processDispatchResult(processedRequest, response, mappedHandler, mv, dispatchException);
		}
		catch (Exception ex) {
			triggerAfterCompletion(processedRequest, response, mappedHandler, ex);
		}
		catch (Throwable err) {
			triggerAfterCompletion(processedRequest, response, mappedHandler,
					new NestedServletException("Handler processing failed", err));
		}
		finally {
			if (asyncManager.isConcurrentHandlingStarted()) {
				// Instead of postHandle and afterCompletion
				if (mappedHandler != null) {
					mappedHandler.applyAfterConcurrentHandlingStarted(processedRequest, response);
				}
			}
			else {
				// Clean up any resources used by a multipart request.
				if (multipartRequestParsed) {
					cleanupMultipart(processedRequest);
				}
			}
		}
	}
创建视图org.springframework.web.servlet.view.AbstractCachingViewResolver#resolveViewName
public View resolveViewName(String viewName, Locale locale) throws Exception {
		//不使用缓存直接创建
		if (!isCache()) {
			return createView(viewName, locale);
		}
		else {
			//双重锁检测
			Object cacheKey = getCacheKey(viewName, locale);
			View view = this.viewAccessCache.get(cacheKey);
			if (view == null) {
				synchronized (this.viewCreationCache) {
					view = this.viewCreationCache.get(cacheKey);
					if (view == null) {
						// Ask the subclass to create the View object.
						view = createView(viewName, locale);
						if (view == null && this.cacheUnresolved) {
							view = UNRESOLVED_VIEW;
						}
						if (view != null) {
							//这里因为view是有容量的,这里viewCreationCache使用了LinkedHashMap
							//这边满了之后会溢出淘汰最近最少使用LRU
							this.viewAccessCache.put(cacheKey, view);
							this.viewCreationCache.put(cacheKey, view);
						}
					}
				}
			}
			else {
				if (logger.isTraceEnabled()) {
					logger.trace(formatKey(cacheKey) + "served from cache");
				}
			}
			return (view != UNRESOLVED_VIEW ? view : null);
		}
	}
渲染视图 也就是讲model作为属性填充到request,然后request进行forward转发
org.springframework.web.servlet.view.AbstractView#render
public void render(@Nullable Map<String, ?> model, HttpServletRequest request,
			HttpServletResponse response) throws Exception {
		if (logger.isDebugEnabled()) {
			logger.debug("View " + formatViewName() +
					", model " + (model != null ? model : Collections.emptyMap()) +
					(this.staticAttributes.isEmpty() ? "" : ", static attributes " + this.staticAttributes));
		}
		Map<String, Object> mergedModel = createMergedOutputModel(model, request, response);
		prepareResponse(request, response);
		renderMergedOutputModel(mergedModel, getRequestToExpose(request), response);
	}
org.springframework.web.servlet.view.InternalResourceView#renderMergedOutputModel
protected void renderMergedOutputModel(
			Map<String, Object> model, HttpServletRequest request, HttpServletResponse response) throws Exception {
		// Expose the model object as request attributes.
		//填充模型
		exposeModelAsRequestAttributes(model, request);
		// Expose helpers as request attributes, if any.
		exposeHelpers(request);
		// Determine the path for the request dispatcher.
		String dispatcherPath = prepareForRendering(request, response);
		// Obtain a RequestDispatcher for the target resource (typically a JSP).
		RequestDispatcher rd = getRequestDispatcher(request, dispatcherPath);
		if (rd == null) {
			throw new ServletException("Could not get RequestDispatcher for [" + getUrl() +
					"]: Check that the corresponding file exists within your web application archive!");
		}
		// If already included or response already committed, perform include, else forward.
		if (useInclude(request, response)) {
			response.setContentType(getContentType());
			if (logger.isDebugEnabled()) {
				logger.debug("Including [" + getUrl() + "]");
			}
			rd.include(request, response);
		}
		else {
			// Note: The forwarded resource is supposed to determine the content type itself.
			if (logger.isDebugEnabled()) {
				logger.debug("Forwarding to [" + getUrl() + "]");
			}
			rd.forward(request, response);
		}
	}
看源码的话可能不是那么容易,希望大家调试一遍那就啥都明白了。
小编好久没有写ssm框架,然后又web.xml以及dispatchServlet的配置了,手好生疏,但是这个不是重点,重点是我们能够了解里面对应的代码,以及整体的流程即可。这里虽然有一些即使用了那么多年的spring也没接触到一些内容,比方说HttpRequestHandler ,其实他和@ResponseBody注解相似。
这里主要是回顾spring mvc,让大家知道怎么用以及为什么这么用。包括之前为什么我们要在spring.xml中配置HandlerAdpater。源码阅读还是枯燥的。希望再接再厉,吃透ssm的常用方法及框架。

 京公网安备 11010802041100号 | 京ICP备19059560号-4 | PHP1.CN 第一PHP社区 版权所有