 1. 开发工具:IntelliJ IDEA
 2. 百度搜索--IntelliJ  IDEA--Ultimate版本
 3. lanyu注册码:淘宝上购买JetBrain全家桶
 4. 安装教程:https://www.runoob.com/w3cnote/intellij-idea-usage.html
· 安装过程中忽略的步骤和截图都是next
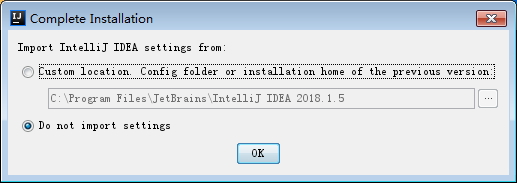
http://idea.lanyus.com/
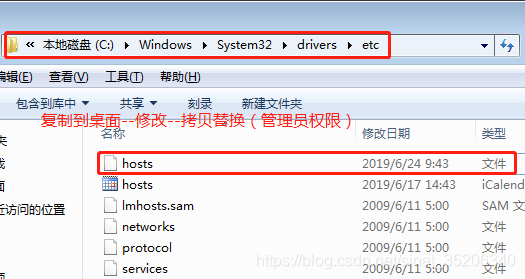
替换内容:现将host复制出来
0.0.0.0 account.jetbrains.com
0.0.0.0 www.jetbrains.com
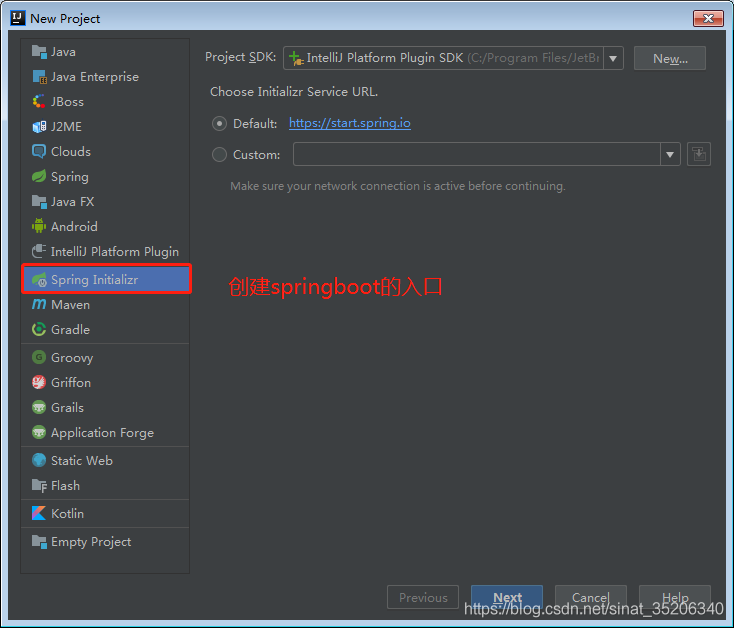
创建一个springboot工程

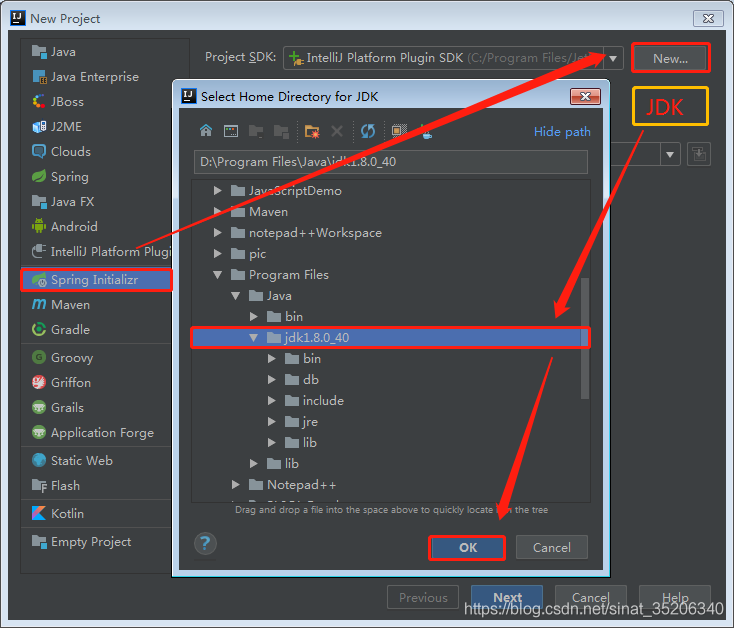
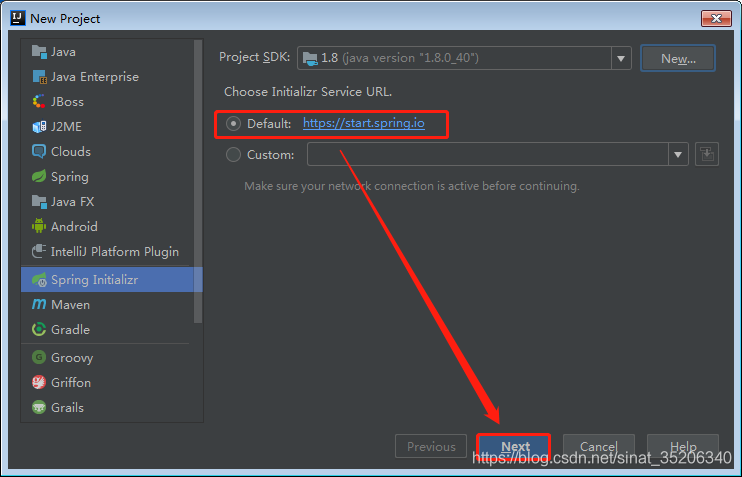
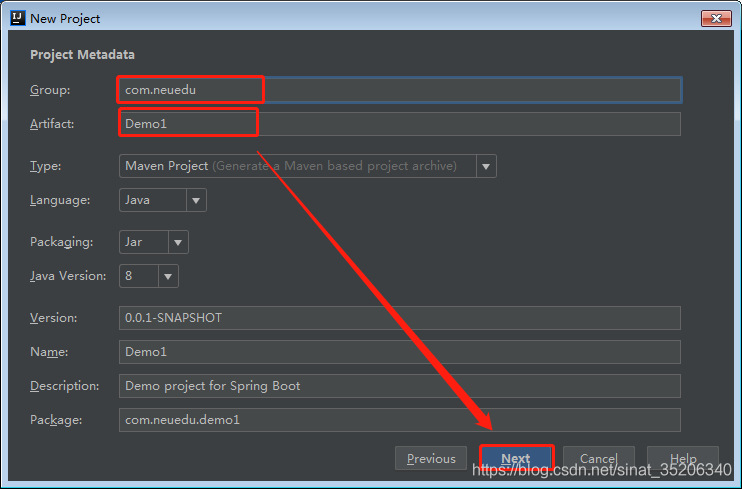
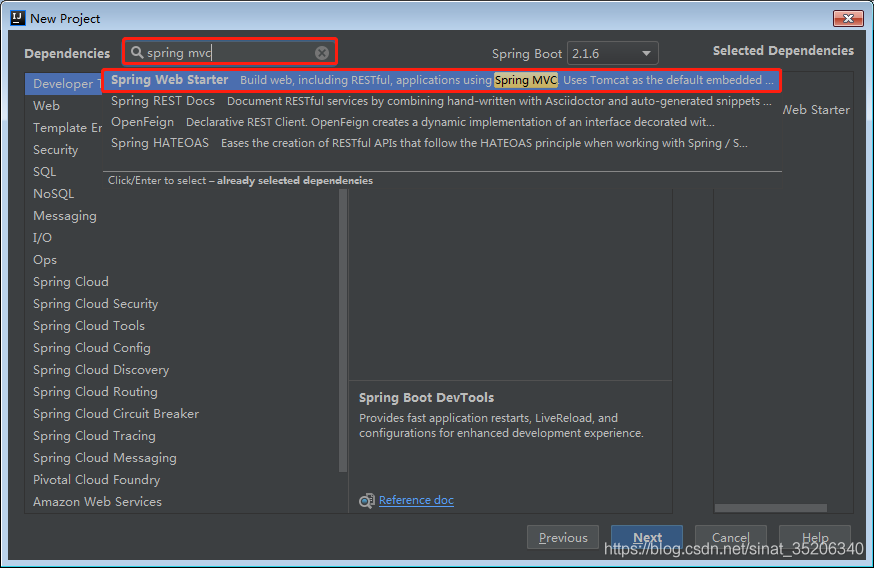
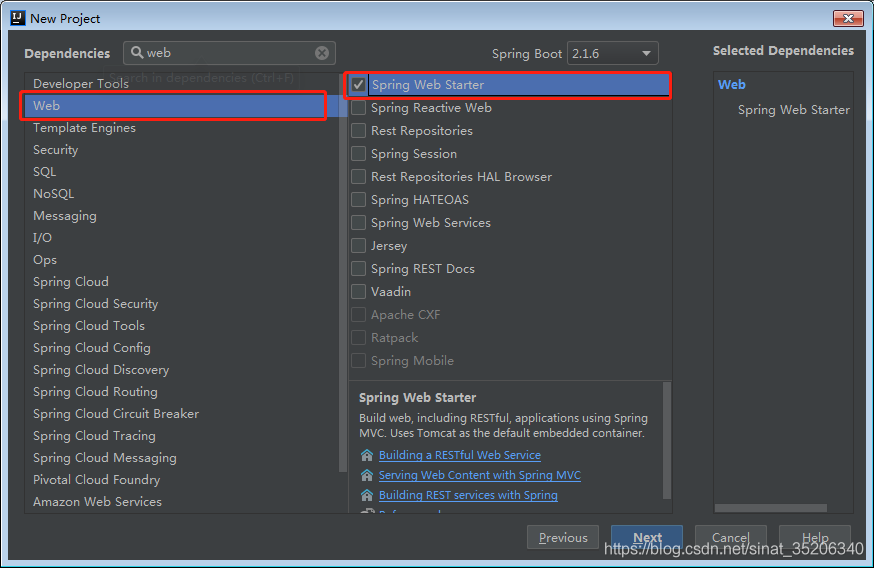

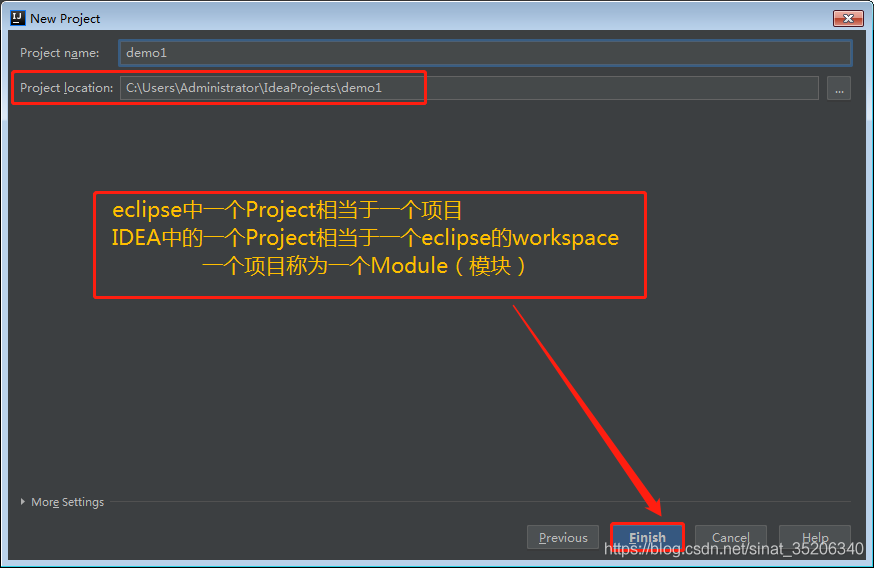
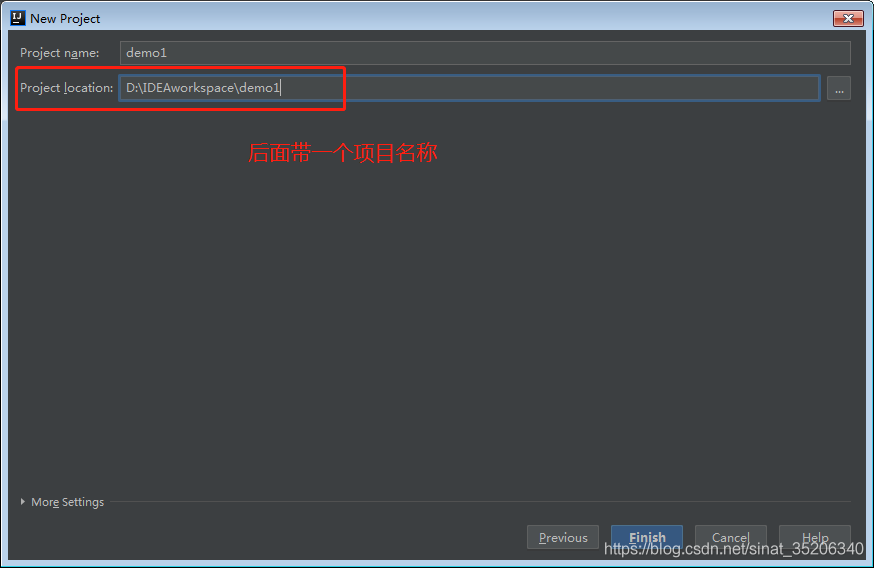
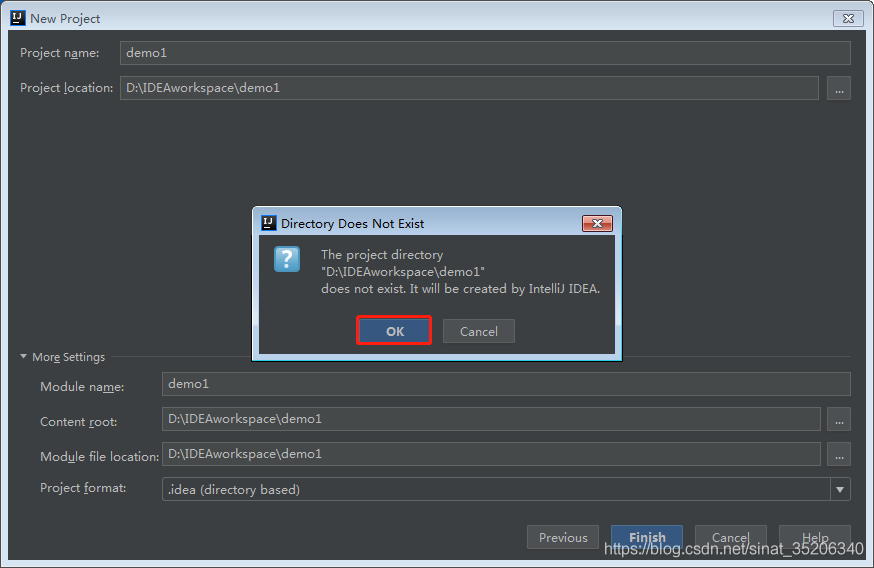
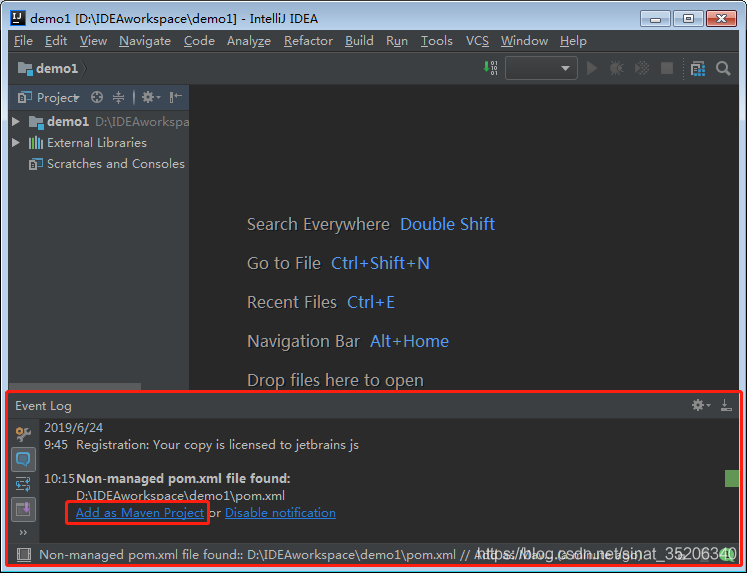
遇到问题:如果pom文件的前面不是一个大M,修改方式:


如果计算机中已经有了Maven,IntelliJ自带的内置的Maven插件,在当前计算机的目录下
C:UsersAdministrator.m2repository

spring boot官网:
https://spring.io/projects/spring-boot/

https://start.spring.io/
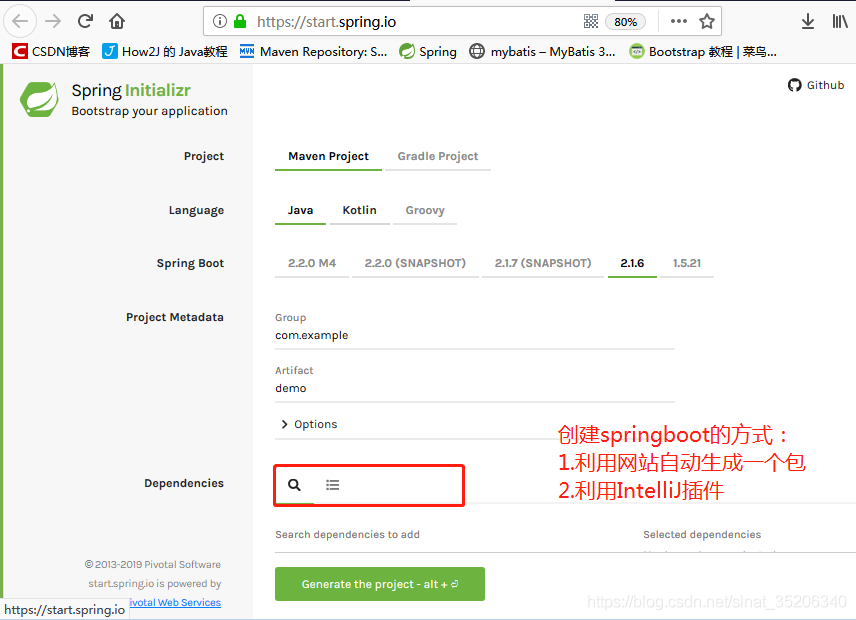
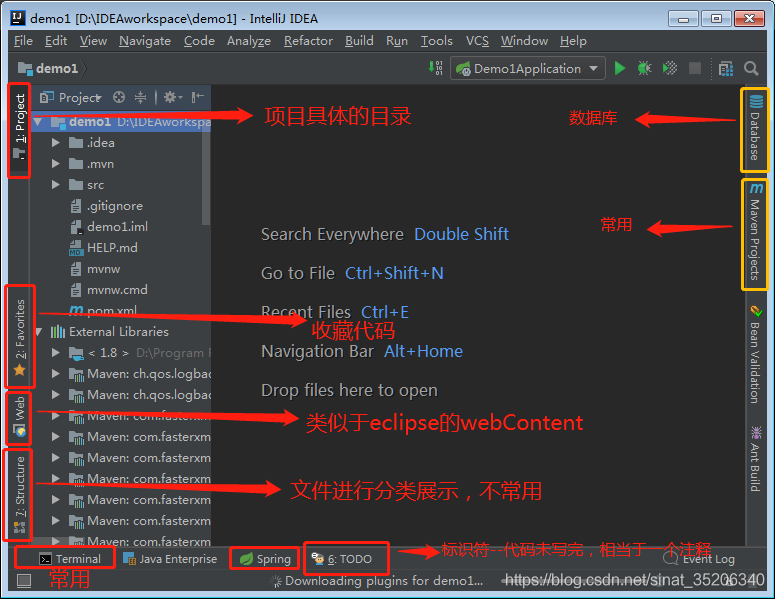
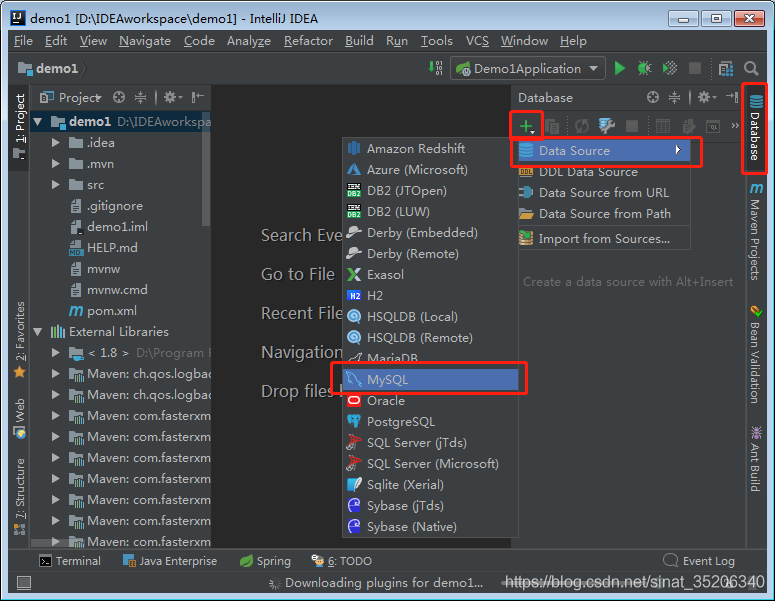
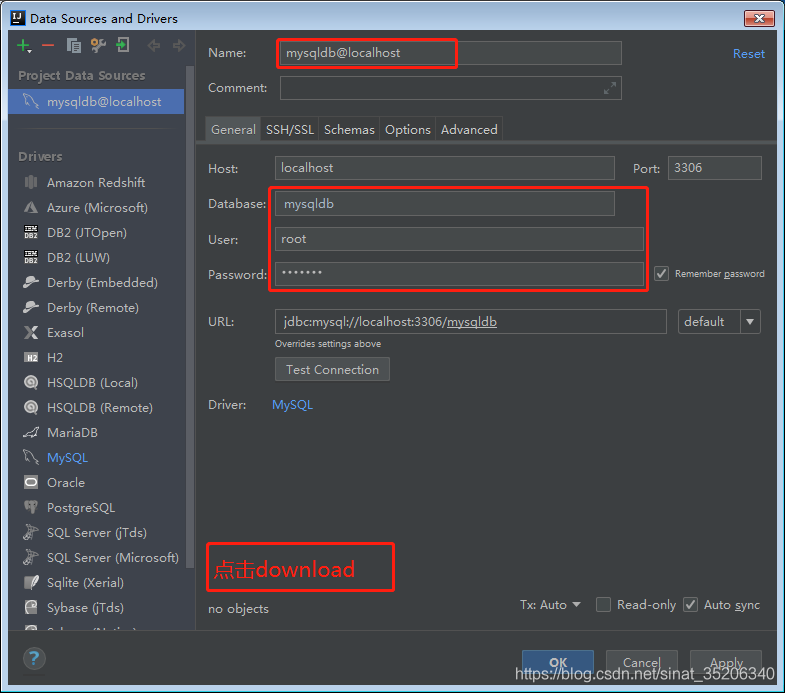
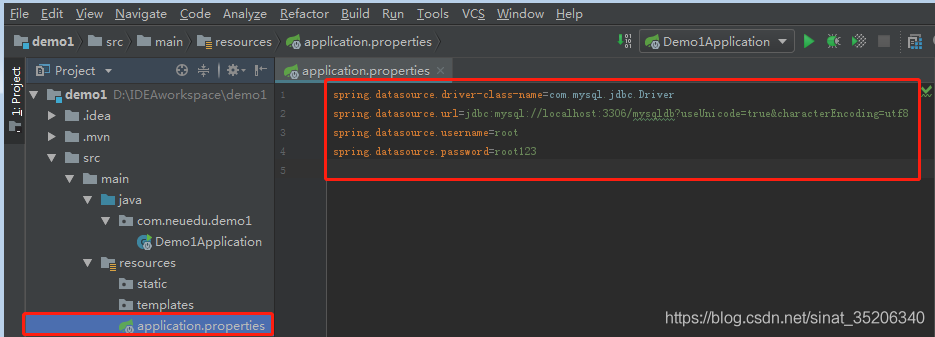
IDE连接数据库详细步骤:

.idea目录和.mvn目录与开发工具有关,不是源码


修改IDE中字体的大小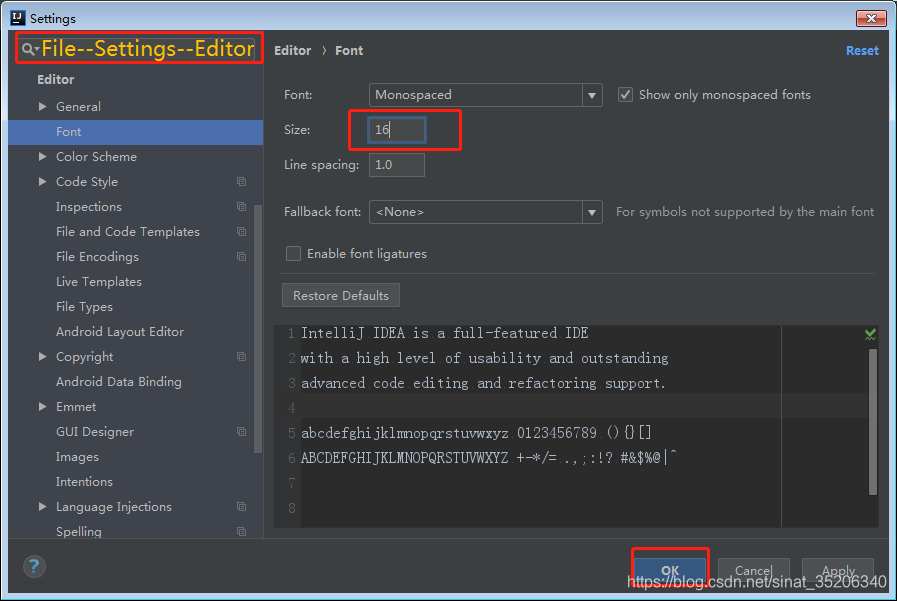
利用鼠标的滚轮控制字体大小
课后作业:需要在application.properties文件中配置

#前台表单提交字符串转换为Date
spring.mvc.date-format=yyyy-MM-dd HH:mm:ss

#后台的Date类型转换指定格式的字符串在json当中
spring.jackson.date-format=yyyy-MM-dd HH:mm:ss
spring.jackson.time-zone=GMT+8


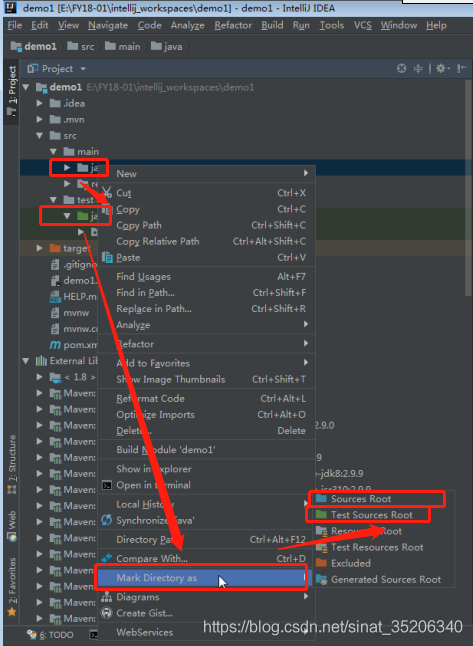
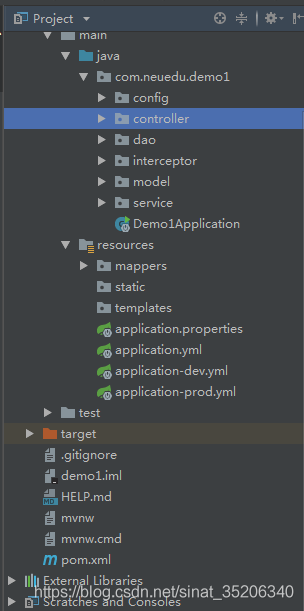
正常情况:蓝色的文件夹--java文件  |  绿色的文件夹--test测试文件
如果文件夹没有颜色,说明不是Maven工程,进行修改:
工程连接数据库进行访问:

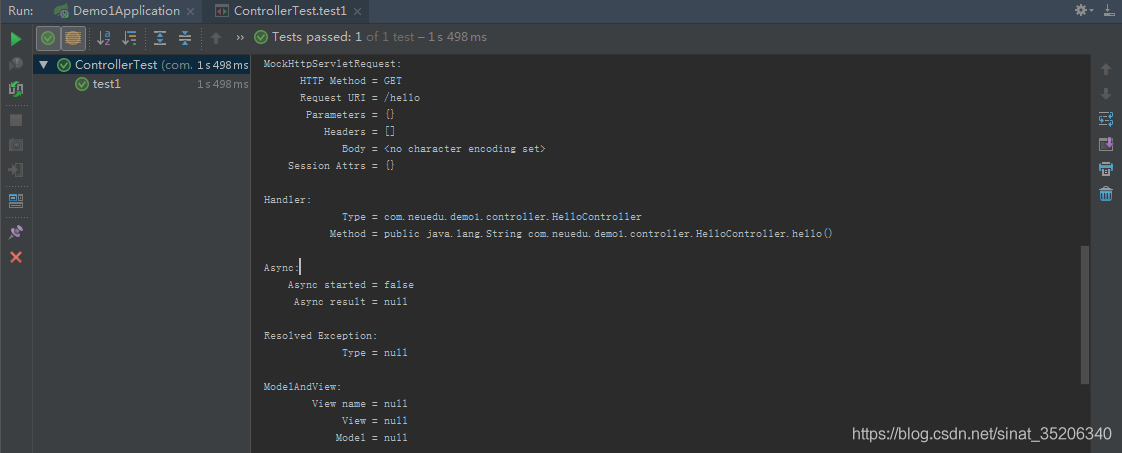
控制台打印结果:
package com.neuedu.demo1.model;

import java.util.Date;

public class Book {

    // 包装类和基本数据类型的区别
    private Integer bookNo;

    private String  bookName;

    private String author;

    private Date date;

    // 快速生成构造函数和get、set方法
    // 快捷键:alt+enter(单独生成单个属性,鼠标定位)
    //         alt+insert(批量创建),shift+上下选中回车
    public Integer getBookNo() {
        return bookNo;
    }

    public void setBookNo(Integer bookNo) {
        this.bookNo = bookNo;
    }

    public String getBookName() {
        return bookName;
    }

    public void setBookName(String bookName) {
        this.bookName = bookName;
    }

    public String getAuthor() {
        return author;
    }

    public void setAuthor(String author) {
        this.author = author;
    }

    public Date getDate() {
        return date;
    }

    public void setDate(Date date) {
        this.date = date;
    }

    public Book(Integer bookNo, String bookName, String author, Date date) {
        this.bookNo = bookNo;
        this.bookName = bookName;
        this.author = author;
        this.date = date;
    }

    public Book() {

    }
}

Lombok的优点:以简单的注解形式来简化java代码,提高开发人员的开发效率

1.Lombok自动生成实体类中的get/set/toString等方法
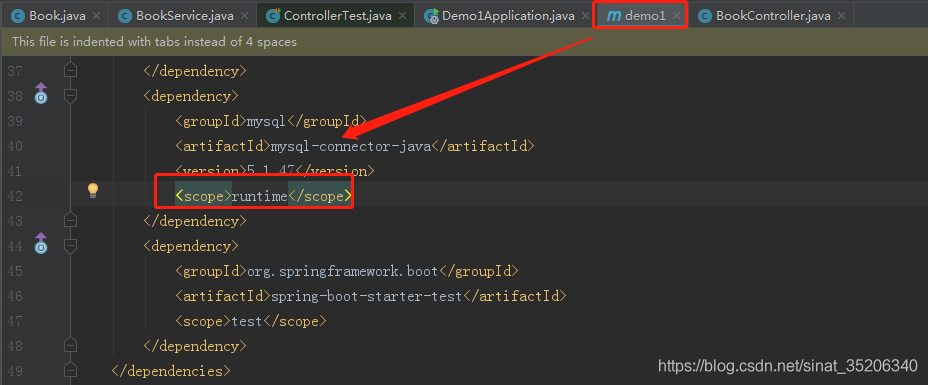
  <scope>providedscope>的含义是:只在编译期起作用
2.在Pom.xml文件中添加依赖:
    https://mvnrepository.com/artifact/org.projectlombok/lombok/1.18.8

	<dependency>
   	    <groupId>org.projectlombokgroupId>
    	<artifactId>lombokartifactId>
    	<version>1.18.8version>
   		<scope>providedscope>
	dependency>
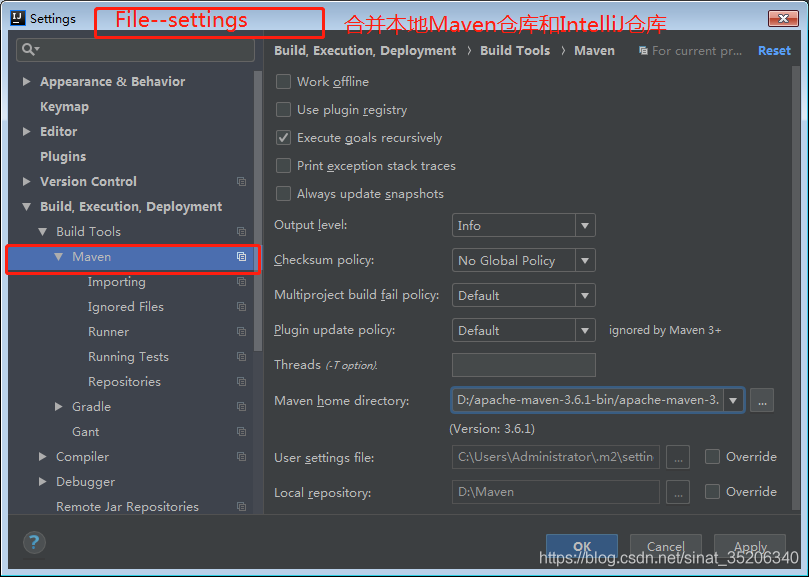
3.使IntelliJ使用默认的仓库和本地的Maven仓库合并
4.使用lombok
// 1.在项目当中引入lombok依赖,作用域:provided(只在编译器,不会被打包进项目)
// 2.给IDE装lombok插件

package com.neuedu.demo1.model;

//import com.fasterxml.jackson.annotation.JsonFormat;
import lombok.Data;
//import org.springframework.format.annotation.DateTimeFormat;

import java.util.Date;

@Data public class Book {

    // 包装类和基本数据类型的区别
    private Integer bookNo;

    private String  bookName;

    private String author;

//    // 方式二:日期格式转换
//    // 局部配置优先于全局配置
//    @DateTimeFormat(pattern="yyyy-MM-dd HH:mm:ss")
////    @JsonFormat(timezOne= "GMT+8",pattern = "yyyy/MM/dd")
    private Date publishDate;
//
//    // 快速生成构造函数和get、set方法
//    // 快捷键:alt+enter(单独生成单个属性,鼠标定位)
//    //         alt+insert(批量创建),shift+上下选中回车
//
//    public Book() {
//    }
//
//    public Book(Integer bookNo, String bookName, String author, Date publishDate) {
//
//        this.bookNo = bookNo;
//        this.bookName = bookName;
//        this.author = author;
//        this.publishDate = publishDate;
//    }
//
//    public Integer getBookNo() {
//
//        return bookNo;
//    }
//
//    public void setBookNo(Integer bookNo) {
//        this.bookNo = bookNo;
//    }
//
//    public String getBookName() {
//        return bookName;
//    }
//
//    public void setBookName(String bookName) {
//        this.bookName = bookName;
//    }
//
//    public String getAuthor() {
//        return author;
//    }
//
//    public void setAuthor(String author) {
//        this.author = author;
//    }
//
//    public Date getPublishDate() {
//        return publishDate;
//    }
//
//    public void setPublishDate(Date publishDate) {
//        this.publishDate = publishDate;
//    }
}
package com.neuedu.demo1.controller;
import com.neuedu.demo1.model.Book;
import com.neuedu.demo1.service.BookService;
import org.springframework.beans.factory.annotation.Autowired;
import org.springframework.web.bind.annotation.PathVariable;
import org.springframework.web.bind.annotation.RequestMapping;
import org.springframework.web.bind.annotation.RestController;

@RestController
public class BookController {

    @Autowired
    private BookService bookService;

    // 请求路径/book/1001
    @RequestMapping("/book/{id}")
    public Book findBook(@PathVariable("id") Integer id){

        Book book = new Book();
        book.getAuthor();
        // 1.在项目当中引入lombok依赖,作用域:provided(只在编译器,不会被打包进项目)
        // 2.给IDE装lombok插件
        return bookService.findBookById(id);
    }
}
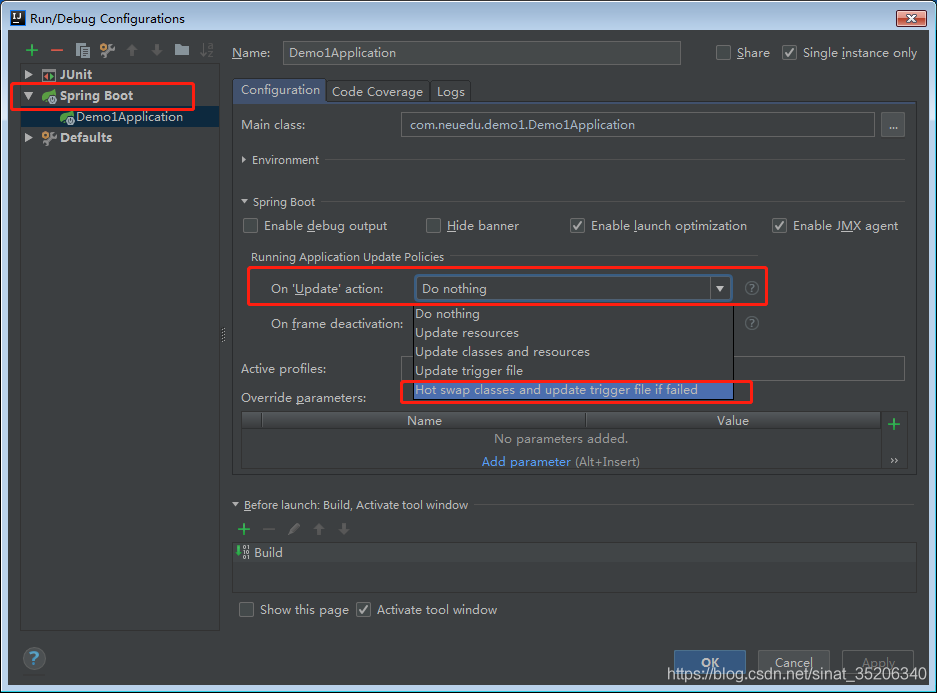
在edit configuration 中修改 on update action 属性的值为:hot swap classes and update trigger File if failed

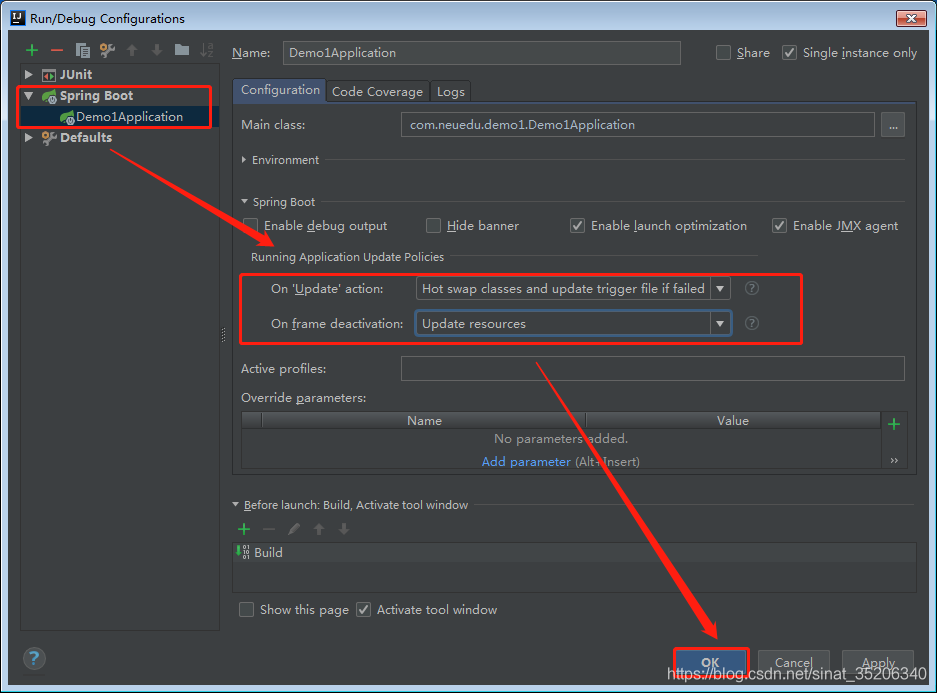
方式一的缺点:在类中添加新的方法时,报错
理由:java类都是编译生成字节码文件,新的方法字节码文件中不存在
方式二优点:新增方法也可以进行编译运行
全局重新编译--速度较慢
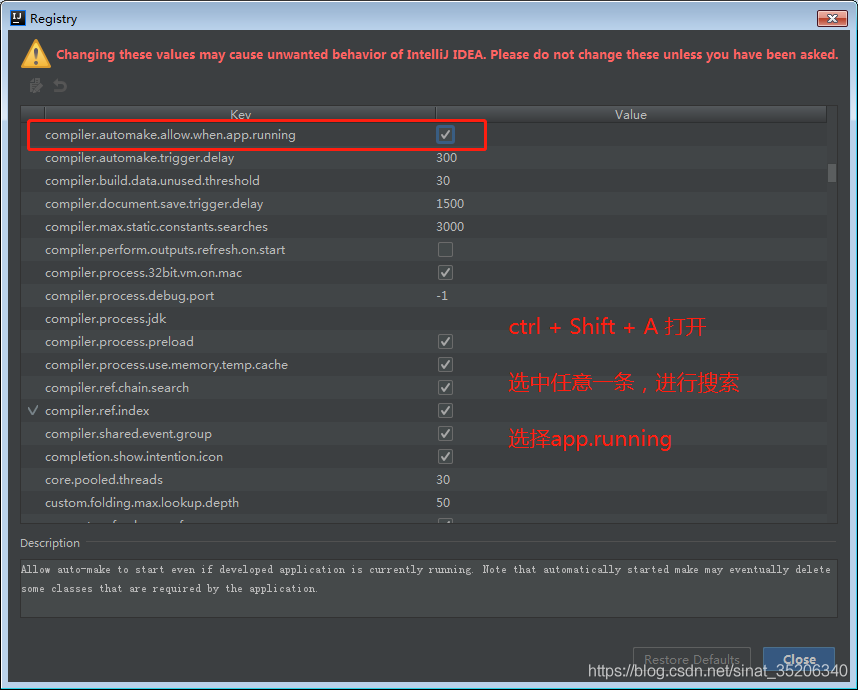
ctrl+shift+A快速搜索设置项
方式二详细步骤:
	通过springboot devtools配置热重启
    	1. 将springboot devtools依赖包引入项目依赖中,通过pom
     	2. 在intellij 中配置complier的build project automatically为true
     	3. ctrl+shift+a(快速搜索设置项)搜索 registry,设置属性
     	   complier.automake.allow.when.app.running 为true
		   在eclipse中直接引入devtools即可
在eclipse中只需要添加pom依赖
	<dependency>
			<groupId>org.springframework.bootgroupId>
			<artifactId>spring-boot-devtoolsartifactId>
			<scope>runtimescope>
			<optional>trueoptional>
	dependency>


	java config 的几个注解与xml配置的对应关系
		@Configuration 对应一个xml配置文件
		@Bean  对应xml中的<bean>标签
		@ComponentScan 对应xml 中的<context:component-scan>
		@Scope注解对应<bean scope="">的属性
		@Import注解对应<import>
		@PropertyResource注解对应xml中的<context:property-placeholder>注解
		@ImportResource 注解可以引入xml文件,将javaconfig 和xmlconfig结合使用,


application.yml
	#server:
	#  port: 8080
	#  servlet:
	#    context-path: /demo1
	# 设置日志等级
	logging:
	  level:
	    org:
	    springframework: debug
	    com:
	      neuedu: debug
	# 生成的日志文件路径
	  file: d:/
package com.neuedu.demo1.controller;
import org.slf4j.ILoggerFactory;
import org.slf4j.Logger;
import org.slf4j.LoggerFactory;
import org.springframework.web.bind.annotation.GetMapping;
import org.springframework.web.bind.annotation.PathVariable;
import org.springframework.web.bind.annotation.RequestMapping;
import org.springframework.web.bind.annotation.RestController;

import javax.servlet.http.HttpSession;

@RestController
//@Controller
public class HelloController {

    private static Logger logger = LoggerFactory.getLogger(HelloController.class);

    //    @ResponseBody
    @GetMapping("/hello")
    public String hello(){

        logger.debug("hello Log");
        // 返回的是一个逻辑ModelAndView视图名称
        return "{"content":"hello Spring Boot 热部署!!"}";
    }
}
application-dev.yml
server:
  port: 8080
application-prod.yml
server:
  port: 8888
application.yml
# 实现在多个环境下进行切换
# 没有配置,默认是8080
# prod生产环境和开发环境Dev(名字可以改变)
# 新建两个application-dev和application-prod的文件
# application是spring的固定格式
  profiles:
    active: prod
com.neuedu.demo1.interceptor.AuthInterceptor
package com.neuedu.demo1.interceptor;
import org.springframework.web.servlet.HandlerInterceptor;
import javax.servlet.http.HttpServletRequest;
import javax.servlet.http.HttpServletResponse;
// 拦截器
public class AuthInterceptor implements HandlerInterceptor {

    @Override
    public boolean preHandle(HttpServletRequest request, HttpServletResponse response, Object handler) throws Exception {
         String username = (String) request.getSession().getAttribute("username");
         if(username != null && !"".equals(username)){
            return true;
         }
         response.getWriter().print("Access denied!");
         return false;
    }
}
com.neuedu.demo1.config.AppConfig
package com.neuedu.demo1.config;
import com.neuedu.demo1.interceptor.AuthInterceptor;
import org.springframework.boot.SpringBootConfiguration;
import org.springframework.web.servlet.config.annotation.InterceptorRegistry;
import org.springframework.web.servlet.config.annotation.WebMvcConfigurer;
@SpringBootConfiguration
public class AppConfig implements WebMvcConfigurer {

    // 拦截所有的请求/**,除了/login
    @Override
    public void addInterceptors(InterceptorRegistry registry) {
        registry.addInterceptor(new AuthInterceptor())
                .addPathPatterns("/**")
                .excludePathPatterns("/login/*");
    }
}
主流的前后端分离的基于Javascript 的mvvm框架:
vue.js(简易)   react.js(强大,学习成本高)    augluar.js   ext.js   ember.js

分布式框架:dubbo(阿里使用的框架)

学习:Redis、JPA、GSON、thymeleaf
package com.neuedu.demo1.config;
import com.neuedu.demo1.interceptor.AuthInterceptor;
import org.springframework.boot.SpringBootConfiguration;
import org.springframework.web.servlet.config.annotation.InterceptorRegistry;
import org.springframework.web.servlet.config.annotation.WebMvcConfigurer;

@SpringBootConfiguration
public class AppConfig implements WebMvcConfigurer {

    // 拦截所有的请求/**,除了/login
    @Override
    public void addInterceptors(InterceptorRegistry registry) {
        registry.addInterceptor(new AuthInterceptor())
                .addPathPatterns("/**")
                .excludePathPatterns("/login/*");
    }
}
package com.neuedu.demo1.controller;

import com.neuedu.demo1.model.Book;
import com.neuedu.demo1.service.BookService;
import org.springframework.beans.factory.annotation.Autowired;
import org.springframework.web.bind.annotation.PathVariable;
import org.springframework.web.bind.annotation.RequestMapping;
import org.springframework.web.bind.annotation.RestController;

@RestController
public class BookController {

    @Autowired
    private BookService bookService;

    // 请求路径/book/1001
    @RequestMapping("/book/{id}")
    public Book findBook(@PathVariable("id") Integer id){

        Book book = new Book();
        book.getAuthor();
        // 1.在项目当中引入lombok依赖,作用域:provided(只在编译器,不会被打包进项目)
        // 2.给IDE装lombok插件
        return bookService.findBookById(id);
    }
}
package com.neuedu.demo1.controller;

import org.slf4j.ILoggerFactory;
import org.slf4j.Logger;
import org.slf4j.LoggerFactory;
import org.springframework.web.bind.annotation.GetMapping;
import org.springframework.web.bind.annotation.PathVariable;
import org.springframework.web.bind.annotation.RequestMapping;
import org.springframework.web.bind.annotation.RestController;

import javax.servlet.http.HttpSession;

@RestController
//@Controller
public class HelloController {

    private static Logger logger = LoggerFactory.getLogger(HelloController.class);

    //    @ResponseBody
    @GetMapping("/hello")
    public String hello(){

        logger.debug("hello Log");
        // 返回的是一个逻辑ModelAndView视图名称
        return "{"content":"hello Spring Boot 热部署!!"}";
    }
    @GetMapping("/hi")
    public String hi
            var cpro_id = "u6885494";

 京公网安备 11010802041100号 | 京ICP备19059560号-4 | PHP1.CN 第一PHP社区 版权所有