
树莓派ram更换
Adding memory is one of the easier ways to boost your PC’s performance. There are a few things to check before spending your money, though, so let’s talk about them.
增加内存是提高PC性能的较简单方法之一。 不过,花一些钱之前要检查一些事情,所以让我们谈谈它们。
As with most things about upgrading your PC, figuring out what you need and then doing some comparison shopping is the hard part. After that, physically installing your new memory is a breeze by comparison. Here are some of the things you’ll need to figure out when making your decision.
与大多数有关升级PC的事情一样,弄清您的需求然后进行比较购物是困难的部分。 在那之后,相比之下,物理安装新内存变得轻而易举。 这是您在做出决定时需要弄清楚的一些事情。
Generally speaking, more RAM is better. That said, the law of diminishing returns applies. Moving from 4 GB to 8 GB of RAM is likely to make a huge difference. Moving from 8 GB to 16 GB still shows some good gains in performance, but not as much. And moving beyond 16 GB is going to be a smaller boost still. Of course, some of that depends on what you use your PC for.
一般来说,RAM越多越好。 也就是说,适用收益递减法。 从4 GB的RAM转移到8 GB的RAM可能会产生巨大的变化。 从8 GB迁移到16 GB仍显示出一些不错的性能提升,但幅度不大。 超过16 GB的增长幅度仍然较小。 当然,其中一些取决于您使用PC的用途。
Right now, we generally recommend at least 8 GB of RAM for most people. That’s kind of the sweet spot for how the majority of people use their PCs. If you’re a gamer, or you often multitask lots of bigger programs, you’ll probably want 12-16 GB, if that fits in your budget.
目前, 我们通常建议大多数人至少使用8 GB的RAM 。 对于大多数人而言,这是最佳的选择。 如果您是游戏玩家,或者您经常将大量较大的程序多任务处理,那么您可能需要12-16 GB(如果适合您的预算)。
And, if you work with large media files (like projects in Photoshop or Lightroom), you use virtual machines on your PC, or have other specialized needs, you’ll want as much RAM as you can afford (and that your PC can physically accommodate).
而且,如果您使用大型媒体文件(例如Photoshop或Lightroom中的项目),在PC上使用虚拟机或有其他特殊需求,则将需要尽可能多的RAM(并且PC可以物理地容纳)。
It’s easy enough to pop open your Settings app, head to the “About This PC” section, and see how much RAM you have.
弹出您的“设置”应用程序很简单,转到“关于此PC”部分,然后查看有多少RAM。
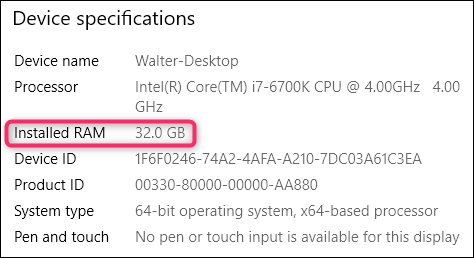
That only tells part of the story, though. That 32 GB listed in the screenshot above (yes, it’s a lot—this system is used to run multiple virtual machines at the same time) might be four modules of 8 GB each, or it might be two modules of 16 GB each. That matters when you’re upgrading because memory is typically installed in pairs, and different systems can have different numbers of slots available.
不过,这只能说明部分故事。 上面的屏幕快照中列出的32 GB(是的,很多–该系统用于同时运行多个虚拟机)可能是四个8 GB的模块,或者可能是两个16 GB的模块。 这在升级时很重要,因为内存通常成对安装,并且不同的系统可以具有不同数量的可用插槽。
For example, let’s assume we wanted to upgrade that system to even more RAM. We now need to know some additional information. How many total memory slots does the PC have? How many RAM modules are installed? Are there free slots?
例如,假设我们想将该系统升级到更多RAM。 现在,我们需要了解一些其他信息。 PC总共有多少个内存插槽? 安装了多少个RAM模块? 有免费的插槽吗?
For that, you could open up your case and count the number of modules and slots inside, or you could turn to another tool. There are several hardware information tools out there, but our favorite is the free version Speccy (made by Piriform, the makers of CCleaner).
为此,您可以打开机箱并计算其中的模块和插槽的数量,或者可以使用其他工具。 有几种硬件信息工具,但我们最喜欢的是免费版本Speccy (由CCleaner的制造商Piriform制造)。
After installing and running Speccy, we just switch to the RAM category on the left, and the right panel shows us gives us the info we need.
安装并运行Speccy之后,我们只需切换到左侧的RAM类别,右侧面板会显示给我们所需的信息。
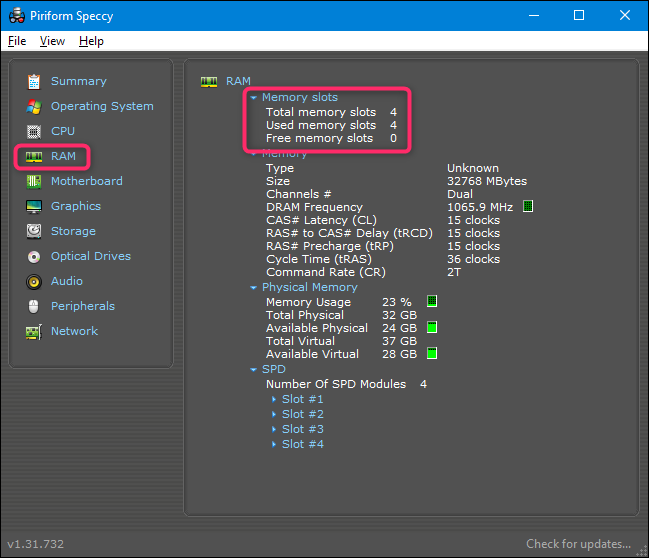
Unfortunately, we can now see that we have four total slots available and that all four are taken up with memory modules. Since we have 32 GB total RAM, we can assume that we have four 8 GB modules in place. This means that to get more RAM in the machine, we need to replace some or all of what’s there.
不幸的是,我们现在可以看到总共有四个可用插槽,并且所有四个插槽都占用了内存模块。 因为我们有32 GB的总RAM,所以我们可以假设我们有四个8 GB的模块。 这意味着要在计算机中获得更多RAM,我们需要替换其中的部分或全部。
If we had found that only two slots were taken up by two 16 GB RAM modules, we could have simply added another pair of modules—two 8 GB modules for a total of 48 GB, or two more 16 GB modules for a total of 64 GB.
如果我们发现两个16 GB的RAM模块仅占用了两个插槽,那么我们可以简单地添加另一对模块-两个8 GB的模块总计48 GB,或者另外两个16 GB的模块总计64 GB GB。
The other part of the RAM equation is knowing how much total RAM your computer can support. There are two factors here: the maximum RAM your version of Windows can handle, and the maximum that your motherboard can handle. Whatever is lower is what you’re stuck with, but it’s typically the motherboard that’s the more limiting factor.
RAM公式的另一部分是知道您的计算机可以支持多少总RAM。 这里有两个因素:Windows版本可以处理的最大RAM和主板可以处理的最大RAM。 越低越难,但通常限制更大的因素是主板。
The Windows part is easy:
Windows部分很简单:
32-bit Windows: 32-bit versions of Windows 10 can only handle up to 4 GB of RAM, no matter whether you’re running the Home, Professional, or Enterprise edition. The same holds true for Windows 7.
32位Windows:无论您运行的是Home,Professional还是Enterprise版本,Windows 10的32位版本最多只能处理4 GB的RAM。 对于Windows 7也是一样。
64-bit Windows: 64-bit versions of Windows can handle up to 128 GB for Windows 10 Home, and up to 2 TB for Windows 10 Education, Professional, or Enterprise. On Windows 7, things are a bit different. The Home Basic edition can handle up to 8 GB, Home Premium up to 16 GB, and Professional up to 192 GB.
64位Windows: 64位版本的Windows在Windows 10家庭版中最多可以处理128 GB,在Windows 10教育版,专业版或企业版中最多可以处理2 TB。 在Windows 7上,情况有所不同。 家庭普通版最多可处理8 GB,家庭高级版最多可处理16 GB,专业版最多可处理192 GB。
The second part of the equation (how much your motherboard can handle) depends entirely on the manufacturer, though most modern computers will support at least 8 GB, and more likely 16 GB or more.
等式的第二部分(主板可以处理多少)完全取决于制造商,尽管大多数现代计算机将支持至少8 GB,更可能支持16 GB或更多。
You’ll need to check the documentation for your motherboard or PC for the details. If you’re unsure what motherboard you have, you can again turn to Speccy, where the Motherboard category shows you the information you need.
您需要查看主板或PC的文档以了解详细信息。 如果不确定所拥有的主板,可以再次转到Speccy,在“主板”类别中向您显示所需的信息。
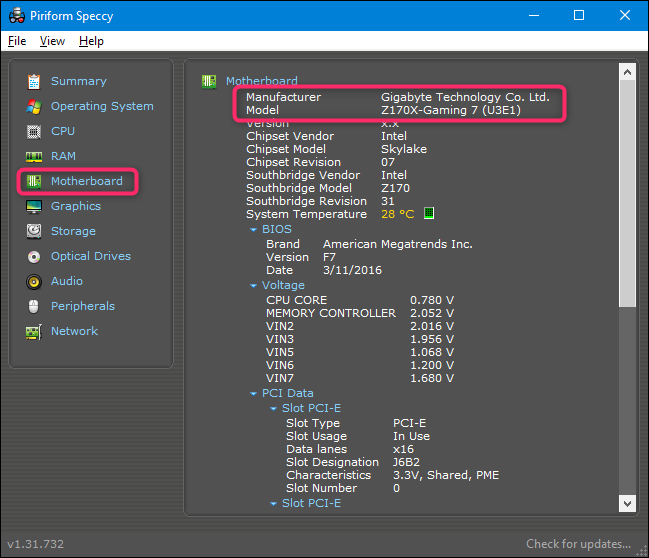
Just hit up Google with your model number and you should find what you’re after.
只需用您的型号打起Google,您就应该找到想要的。
You’re also going to need to determine what type of RAM your computer is capable of using. And there are a few parts to that puzzle, as well.
您还需要确定计算机可以使用哪种类型的RAM。 这个难题也有几个部分。
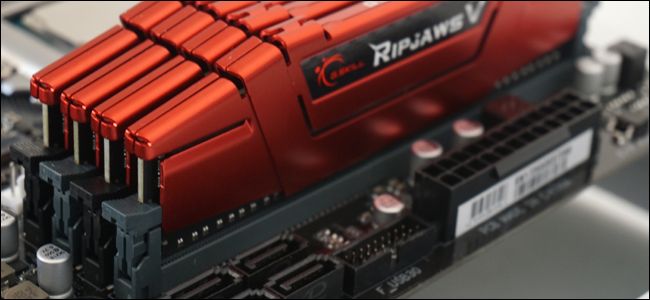
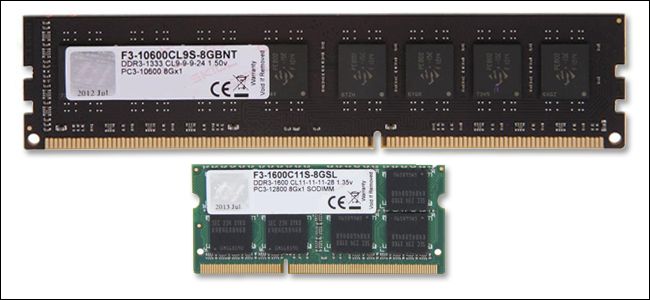
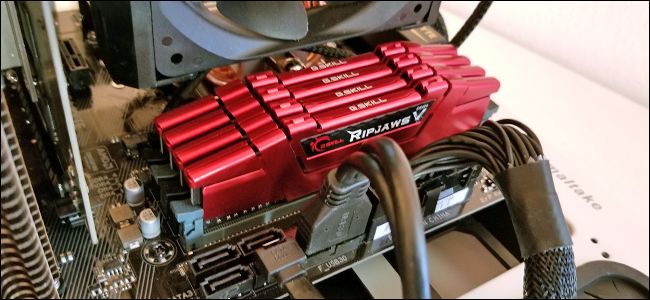
First up, RAM for desktops usually comes in DIMM modules (the longer stick pictured on top in the image below). RAM for laptops—and some ultra compact desktops—comes in smaller SODIMM modules (the shorter one on the bottom in the image below).
首先,用于台式机的RAM通常位于DIMM模块中(下图中顶部较长的杆如图所示)。 笔记本电脑和某些超紧凑型台式机的RAM位于较小的SODIMM模块中(下图底部的较短的DIMM)。
Next, check the generation of RAM your computer’s motherboard accepts. This information is presented as a DDR version:
接下来,检查计算机主板接受的RAM的生成。 此信息以DDR版本显示:
DDR2: This generation was introduced in 2003. Chances are your computer is not using DDR2 memory unless it’s a pretty old system.
DDR2:这一代产品于2003年推出。很有可能您的计算机不使用DDR2内存,除非它是一个相当老的系统。
DDR3: This generation was introduced in 2007. It’s much more common in PCs that were built in the last 5-8 years use DDR3, and it’s still a common choice in budget computers today.
DDR3:这一代产品于2007年推出。在过去5到8年内使用DDR3的PC中更为常见,并且在当今的预算型计算机中仍然是常见的选择。
DDR4: This generation was introduced around 2014. It’s found on most brand-new computers, especially those designed for (or built by) gamers and enthusiasts.
DDR4:这一代产品于2014年左右推出。在大多数全新计算机上都可以找到它,特别是那些为游戏玩家和发烧友设计(或制造)的计算机。
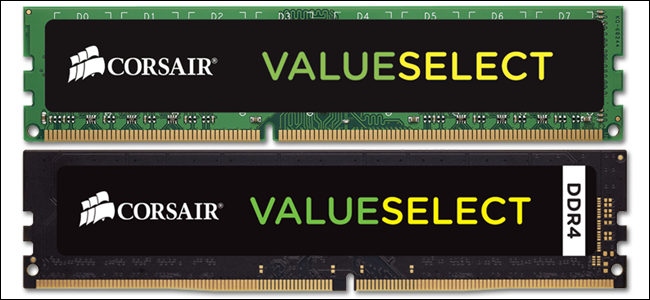
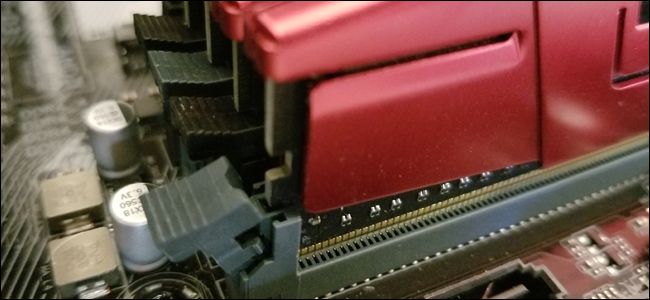
Motherboards are designed for a specific generation of RAM, so you’ll need to determine what you need. You can’t just buy the latest DDR4 RAM and stick it in a PC designed for DDR3. In fact, it wouldn’t even physically fit. Note the different position of the notches at the bottom of the memory below. They’re keyed differently so that can’t be inserted into slots not designed for them.
主板是为特定一代的RAM设计的,因此您需要确定所需的东西。 您不能只购买最新的DDR4 RAM并将其粘贴在专为DDR3设计的PC中。 实际上,它甚至不适合身体。 请注意以下存储器底部的槽口不同位置。 它们的键位不同,因此无法插入非专为它们设计的插槽中。
So, the next obvious question. How do you know which generation you need? The answer, of course, is that we’re going to turn to Speccy again. Switch back on the RAM category on the left. On the right, at the bottom, expand the “SPD” entry. And right there, you can see the generation, size, manufacturer, and model number of each RAM module you have installed.
因此,下一个明显的问题。 您怎么知道您需要哪一代? 答案当然是,我们将再次转向Speccy。 重新打开左侧的RAM类别。 在右侧的底部,展开“ SPD”条目。 在这里,您可以看到已安装的每个RAM模块的型号,大小,制造商和型号。
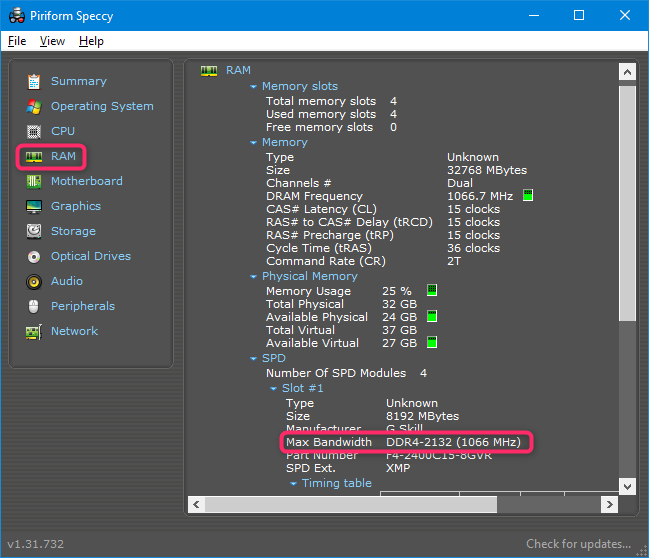
So now we know that this PC uses DDR4 memory.
因此,现在我们知道该PC使用DDR4内存。
If you go shopping for (or reading about) memory, you’ll also see a couple of other specifications that get talked about a lot: RAM speed and latency (also called timings).
如果您去购物(或阅读有关内存的信息),您还会看到很多其他有关规格的话题:RAM速度和延迟(也称为计时)。
RAM Speed: This is based on a rather complicated combination of hardware factors, and the relative speed of RAM is specific within a generation. Speeds are usually labeled using either the older standard (in which case you’ll see speeds like PC2/PC3/PC4) or the new standard that also includes a more specific speed rating (in which case a speed would look more like DDR 1600).
RAM速度:这是基于硬件因素的相当复杂的组合,RAM的相对速度在一代人中是特定的。 速度通常使用较旧的标准(在这种情况下,您会看到类似PC2 / PC3 / PC4的速度)或新标准(也包括更具体的速度等级)(在这种情况下,速度看起来更像是DDR 1600)进行标记。 。
Latency: This deals with how fast the RAM module can access its own hardware. Lower latency means faster data access. Latency timings are presented as a series of four numbers, so you might see something like 5-5-5-15.
延迟:这涉及RAM模块访问其自身硬件的速度。 较低的延迟意味着更快的数据访问。 延迟时间是由四个数字组成的序列,因此您可能会看到类似5-5-5-15的内容。
The truth, though, is that speed and latency just isn’t all that important. Higher speed and lower latency RAM really isn’t that much faster than the lower speed, higher latency stuff. You’ll find a lot of talk about it from people who like to brag about their systems, but it’s pretty safe to ignore. Even with a high performance gaming machine, it just doesn’t make that much difference—especially since most of gaming is handled by the RAM on discrete graphics cards.
但事实是,速度和延迟并不是那么重要。 更高速度和更低延迟的RAM实际上并没有比更低速度,更高延迟的东西要快得多。 您会发现很多喜欢炫耀自己系统的人都在谈论它,但是忽略它是非常安全的。 即使使用高性能的游戏机,它也没有太大的区别,特别是因为大多数游戏都是由独立显卡上的RAM处理的。
That said, there are a couple of things that are important to keep in mind.
就是说,有几件事需要牢记。
Your motherboard or PC might limit the speed of the RAM it supports, mostly because it was designed for the RAM that was out at the time the motherboard was manufactured. Check your system specs to see what it can handle. It might even be that you can update your BIOS to support higher speed RAM if you want. Check your manufacturer’s website for that.
您的主板或PC可能会限制其支持的RAM的速度,主要是因为它是为制造主板时已用完的RAM设计的。 检查您的系统规格,看它能处理什么。 您甚至可以根据需要更新BIOS以支持更高速度的RAM。 检查您的制造商的网站。
For latency, it’s best if you use modules that sport the same latency numbers. It’s not critical, especially if you’re adding memory to a system. But if you’re replacing memory, you might as well get all the same kind.
对于延迟,最好使用具有相同延迟数字的模块。 这并不重要,特别是如果要向系统添加内存。 但是,如果要更换内存,则最好也使用相同的内存。
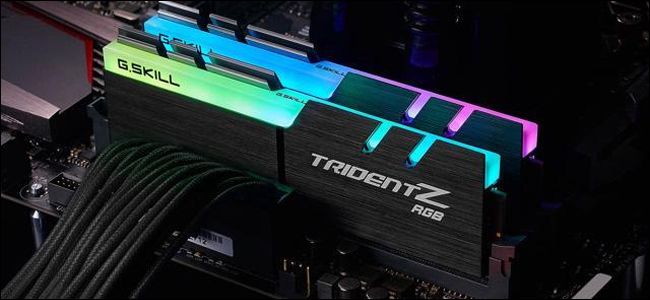
They’re mostly meaningless. RGB LEDs on your RAM looks neat in a desktop case with a window (if you’re into that sort of thing). And flashy heat sinks might be advantageous if you’re planning to overclock your memory. If neither of these things appeal to you, don’t look for those specific features—they’ll only make your memory more expensive.
他们大多毫无意义。 在带有窗口的台式机机箱中,RAM上的RGB LED看起来很整洁(如果您喜欢这种东西)。 如果您打算超频存储,闪闪发光的散热器可能会很有用。 如果这两种方法都对您没有吸引力,请不要寻找那些特定的功能-它们只会使您的内存更昂贵。
Upgrading RAM in a laptops is a trickier subject than with desktops. Some laptops have an access panel that lets you swap out RAM modules easily. Some have one or two RAM slots available through an access panel, while others are tucked away where you can’t really get to them. Some laptops require that you pretty much disassemble the whole thing to change the RAM. And some laptops don’t have RAM slots at all; their memory is soldered to the motherboard.
与台式机相比,在笔记本电脑中升级RAM是一个棘手的问题。 某些笔记本电脑具有检修面板,可让您轻松更换RAM模块。 有些通过检修面板有一个或两个RAM插槽,而另一些则藏在您无法真正接触到它们的地方。 一些笔记本电脑要求您几乎将整个设备拆开以更换RAM。 而且有些笔记本电脑根本没有RAM插槽。 它们的内存焊接到了主板上。
To figure out which situation applies to you, you’re going to have to do some research. Check your user manual, hit up the manufacturer web site, or do some quick Googling—odds are pretty good that the question has been answered for your specific model.
为了弄清楚哪种情况适合您,您将需要做一些研究。 查看您的用户手册,访问制造商的网站,或快速浏览一下-奇怪的是,对于您的特定型号,该问题已得到回答。
Replacing the memory in your desktop is usually pretty straightforward. You’ll need a Philips-head screwdriver to open the case, and that’s about it. Note that these instructions are for a standard ATX tower-style case—if you have a more exotic case design, you may need to work a little harder or position the computer oddly to open it and access its internal components.
通常,替换台式机中的内存非常简单。 您只需要一把飞利浦头螺丝刀就可以打开外壳,仅此而已。 请注意,这些说明适用于标准的ATX塔式机箱–如果您的机箱设计更新颖,则可能需要加倍努力或奇怪地放置计算机才能打开它并访问其内部组件。
Remove all the cables and external accessories from your computer, then move it to a table or desk. Ideally you want a cool, dry work area that isn’t carpeted. If your home is particularly susceptible to static shocks, you might want an anti-static bracelet as well.
从计算机上卸下所有电缆和外部附件,然后将其移到桌子或桌子上。 理想情况下,您需要一个凉爽,干燥且没有地毯的工作区域。 如果您的房屋特别容易受到静电冲击,则可能还需要防静电手链。
Remove the screws on the back holding the access panel in place. You’re going to remove the access panel from the left side of the PC (assuming you’re looking at the front). On some cases, you’ll need to remove the whole cover. Then set the case on it’s side with the internals exposed.
拧下将检修面板固定到位的背面的螺钉。 您将要从PC的左侧卸下检修面板(假设您在前面)。 在某些情况下,您需要卸下整个保护套。 然后将机壳侧放,内部露出。
At this point you should be looking down at the motherboard. The RAM should be easy to spot. It will be two or more modules sticking up from slots that are usually near the CPU, but more toward the front of the computer.
此时,您应该低头看主板。 RAM应该易于发现。 通常在CPU附近的插槽中会黏着两个或更多模块,而在计算机的正面则更多。
To remove the existing RAM, look for the plastic tabs at either end of the RAM slots. Simply press these tabs down (away from the RAM) until they click. The module should pop up slightly, and it’s ready to be pulled out. Repeat this step with all the modules you want to remove.
要卸下现有的RAM,请在RAM插槽的任一端寻找塑料卡舌。 只需向下按下这些选项卡(远离RAM),直到它们单击为止。 该模块应该会弹出,并准备将其拔出。 对要删除的所有模块重复此步骤。
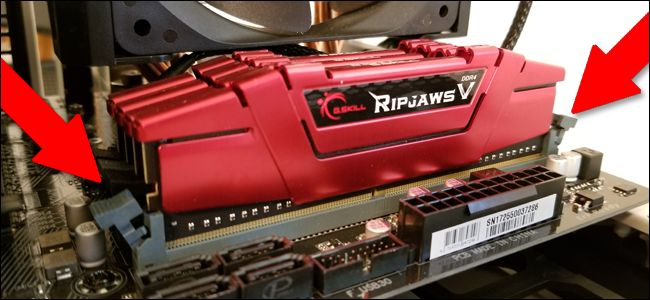
Then, just lift each module straight up and out of the slot.
然后,将每个模块笔直向上提起并从插槽中提出。
Before you plug the new RAM in, take a look at the slots. Remember how we said RAM is installed in pairs? Where you install it matters. On the motherboard in the image below, the paired slots are different colors—black for one pair, and gray for the other pair. If you’re installing fewer modules than the motherboard holds (or you have two mismatched pairs—like two 8 GB modules and two 4 GB modules), you’ll need to install pairs in matching slots.
在插入新的RAM之前,请先查看一下插槽。 还记得我们所说的成对安装RAM吗? 安装位置很重要。 在下图中的主板上,成对的插槽具有不同的颜色-一对黑色,另一对灰色。 如果您要安装的模块数量少于主板所能容纳的数量(或者您有两对不匹配的模块,例如两个8 GB的模块和两个4 GB的模块),则需要在匹配的插槽中安装对。
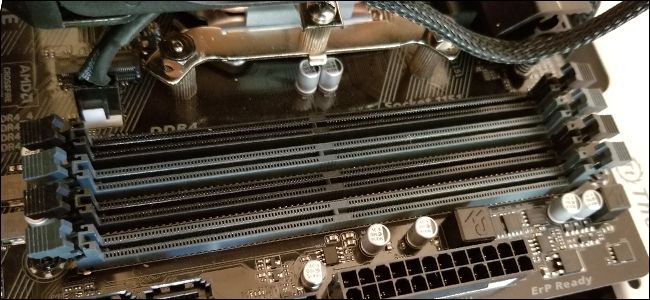
Note: Some motherboards use different indicators for slot pairs. Check your specifications if you’re unsure.
注意 :某些主板的插槽对使用不同的指示器。 如果不确定,请检查规格。
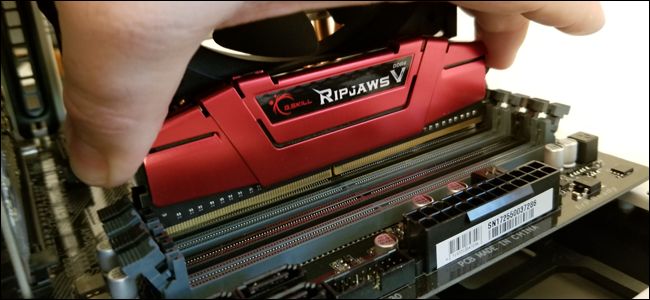
To install the new RAM align the electrical contacts with the memory slot, making sure the notch in the connector is positioned correctly—they can only fit in in one orientation. Then press the memory module into place gently until you hear the plastic tabs on either end of the slot click into place, securing the module.
要安装新的RAM,将电触点与内存插槽对齐,并确保连接器中的槽口正确定位-它们只能以一种方向安装。 然后轻轻地将内存模块按入到位,直到听到插槽两端的塑料卡舌卡入到位以固定模块为止。
If you unplugged any of the power or data cords on your machine to get better access to the RAM slots, plug them back in now.
如果您拔掉了机器上的任何电源线或数据线以更好地访问RAM插槽,请立即将它们重新插入。
Replace the access panel and screw it back down on the rear of the machine. You’re done! Take your machine back to its usual spot and plug everything back in.
装回检修面板,然后将其重新拧紧到机器背面。 你完成了! 将您的机器恢复到通常的位置,然后重新插入所有电源。
Before you start, you need to determine where the RAM DIMM or DIMMs are on your laptop, and how you’ll reach them. The bigger your laptop is, the more likely it is that you’ll be able to access the memory without disassembling it completely. The smaller and lighter your laptop is, the more likely it is that the memory is soldered to the motherboard and can’t be changed at all. Ultralight laptops almost never have user-accessible memory.
在开始之前,您需要确定膝上型计算机上RAM DIMM或DIMM的位置以及如何接触它们。 您的笔记本电脑越大,越有可能无需完全拆卸即可访问内存。 笔记本电脑越小越轻,内存焊接到主板的可能性就越大,根本无法更改。 超轻型笔记本电脑几乎从来没有用户可访问的内存。
Most laptops that allow user-accessible memory upgrades to do so either through a small access panel on the bottom of the case, or by performing some level of disassembly (sometimes by removing the entire bottom, sometimes by removing the keyboard, sometimes a combination). Consult your laptop’s user manual or do some web searches to find information for your model.
大多数允许用户访问内存升级的笔记本电脑都可以通过外壳底部的小检修面板或通过一定程度的拆卸来进行升级(有时通过拆下整个底部,有时通过拆下键盘,有时通过组合使用) 。 请查阅您笔记本电脑的用户手册,或进行一些网络搜索以查找有关您的型号的信息。
Before you start, turn off your laptop and remove all cables, accessories, and batteries.
在开始之前,请关闭笔记本电脑并拔下所有电缆,附件和电池。

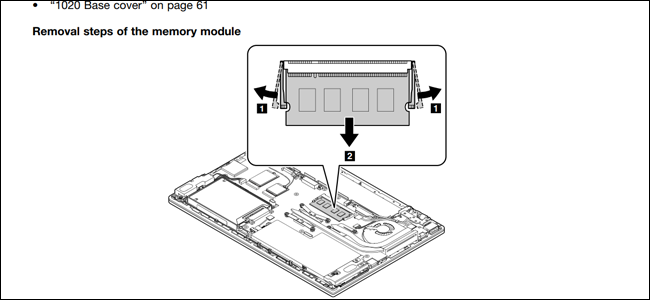
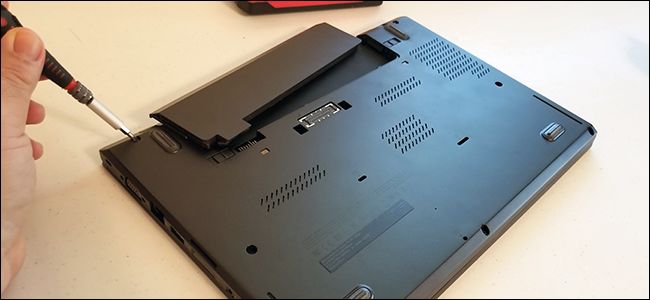
My ThinkPad T450s is pretty middle-of-the-road here: it requires me to remove the battery, take out eight different screws, and pop off the metal bottom to access the RAM. Other designs only require you to remove a single screw, then take off a sectional cover. I only have access to one DIMM slot, the other is soldered to the motherboard.
我的ThinkPad T450s在这里很普通:它需要我卸下电池,取出八个不同的螺钉,然后从金属底部弹出以访问RAM。 其他设计只需要卸下一个螺丝,然后取下分体式盖板即可。 我只能访问一个DIMM插槽,另一个插槽已焊接到主板上。
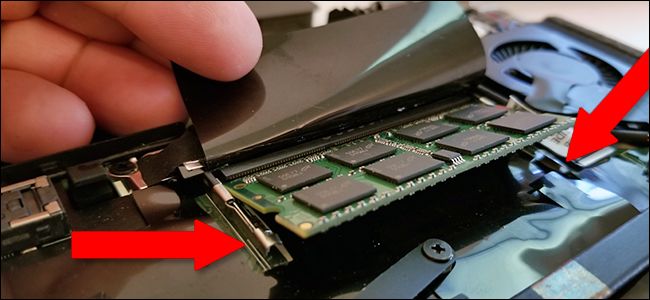
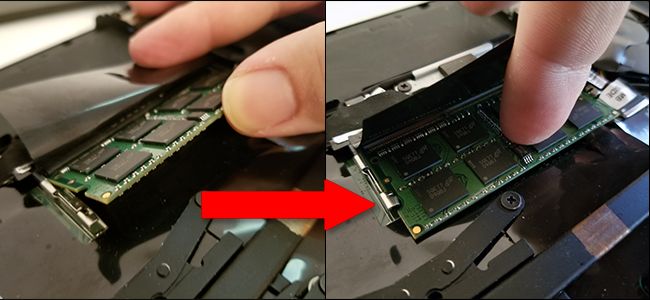
To insert a new DIMM, I have to remove the one that’s already in the slot. To do this, I gently pull the two tabs locking down the DIMM on either side. The RAM DIMM springs up at a diagonal angle.
要插入新的DIMM,我必须卸下插槽中已插入的DIMM。 为此,我轻轻地拉动两个卡舌,将两侧的DIMM固定住。 RAM DIMM以对角线角度弹起。
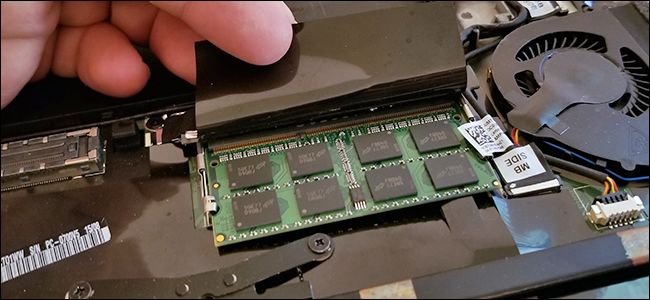
In this position, simply grip the card gently and pull it out of the slot. Be careful not to touch the electrical contacts, and set the module aside.
在此位置,只需轻轻地握住卡并将其从插槽中拉出即可。 注意不要触摸电触点,并将模块放在一旁。
To insert the new module, go in at the same angle. (You’ll have to eyeball it if you didn’t have to remove one). The module should sit in the slot evenly, with no electrical contacts still visible. Next, push down on the module until it’s parallel with the housing. The pressure should make the clips clamp down on the module automatically, locking it into place. Repeat these steps with the second module if you’re installing more than one at a time.
要插入新模块,请以相同角度进入。 (如果您不必删除其中一个,则必须加以注意)。 模块应均匀放置在插槽中,并且仍看不到电气触点。 接下来,向下推模块,直到其与外壳平行。 压力应使夹子自动夹紧模块,将其锁定到位。 如果您一次安装多个模块,请对第二个模块重复这些步骤。
Then, you put everything back together. With the battery back in place, you’re ready to start your laptop and make sure the operating system recognizes the new RAM.
然后,您将所有内容放回原处。 放回电池后,您就可以启动笔记本电脑,并确保操作系统可以识别新的RAM。
When you’re finished installing the RAM, you want to make sure it’s working correctly. Depending on your PC, the BIOS may display the amount of memory on the initial boot up screen. If you don’t see that, you can load into your PC’s BIOS or just let your operating system start and then check out the amount of recognized RAM there. In Windows 10, you can just head to Settings > System > About.
完成安装RAM后,您要确保其正常工作。 根据您的PC,BIOS可能会在初始启动屏幕上显示内存量。 如果没有看到,则可以加载到PC的BIOS中,或者只是让操作系统启动,然后在此处查看可识别的RAM数量。 在Windows 10中,您可以直接转到“设置”>“系统”>“关于”。
If your PC is showing less RAM than it should, there are a few possible explanations.
如果您的PC显示的RAM少于应有的数量, 则可能有一些解释 。
The first is that you made a mistake during installation and one or more modules aren’t fully seated. To solve this, simply go back and double-check that all the modules are fully inserted into their slots.
首先是您在安装过程中犯了一个错误,并且一个或多个模块没有完全安装到位。 要解决此问题,只需返回并仔细检查所有模块是否已完全插入其插槽中。
The next possibility is that the RAM isn’t compatible with your motherboard (perhaps the wrong generation), or you installed a module that has a capacity higher than its slot allows. You need to go back to the compatibility checks and make sure you’re using the correct RAM.
下一种可能性是RAM与您的主板不兼容(可能是错误的一代),或者您安装的模块的容量大于其插槽允许的容量。 您需要返回兼容性检查,并确保使用正确的RAM。
And finally, if all else fails, it’s possible that you have a bad memory module, which will need to be replaced.
最后,如果其他所有方法均失败,则可能是您的内存模块损坏,需要更换。
Image credit: Corsair, Newegg, Newegg, iFixIt, GSkill, Lenovo
图片来源: Corsair , Newegg, Newegg, iFixIt, GSkill, Lenovo
翻译自: https://www.howtogeek.com/346541/how-to-upgrade-or-replace-your-pcs-ram/
树莓派ram更换


![[大整数乘法] java代码实现](https://img1.php1.cn/3cd4a/24c6f/9f3/0133bb25da242824.jpeg)

 京公网安备 11010802041100号 | 京ICP备19059560号-4 | PHP1.CN 第一PHP社区 版权所有