本文介绍 mongodb 的基本使用,常用操作.主要讲 pymongo 的使用, 同时必要的时候会说一些 源码的 以及注意事项.
涉及主要说了一些常见的问题, monggodb 中经常用过的查询操作.
#!/usr/bin/env python3
# -*- coding: utf-8 -*-
"""
@Time    : 2019/3/23 21:39
@File    : test_pymogo.py
@Author  : [email protected]

按照 object_id  查询 document

"""

from pymongo import MongoClient
# mongo URI  连接配置
from config.DB import SHOUFUYOU_REPORTING_URI, SHOUFUYOU_REPORTING_DB_NAME

# 导入这个包
from bson.objectid import ObjectId

# 通过uri 连接 pymongo 生成 client
client = MongoClient(SHOUFUYOU_REPORTING_URI)

# 获取 db 通过名称 获取db .
mongo_db = client[SHOUFUYOU_REPORTING_DB_NAME]

# 获取collection
call_record = mongo_db['callRecord']


if __name__ == '__main__':
    # 查询条件, 相当于 where 后面跟的条件
    # filter_ = {'_id': ObjectId('5be2b43da90ec1470078ef53')}
    filter_ = {'_id': ObjectId('5be2b43da90ec1470078ef50')}

    # 过滤字段, 需要筛选出来 你想要的字段, 相当于 select 后面跟的 字段,
    #  格式 '字段名':1 显示, '字段名':0 不显示. 默认 是都显示出来, 如果指定了字段 则根据指定条件 ***显示.
    projection = {'source_type': 1, '_id': 1}

    # 根据mongo_id  查询数据, 如果没有返回 None
    document = call_record.find_one(filter=filter_, projection=projection)

    print(document)
    #结果  {'_id': ObjectId('5be2b43da90ec1470078ef53'), 'source_type': 'android'}
通过 URI 连接 到mongodb, 之后获取db, 最后 获取collection 就可以了. 之后 就可以 find取查询 数据库了.
get_database参考这个文档 http://api.mongodb.com/python/current/tutorial.html#getting-a-database
注意这里用的 是 find_one 这个方法 只是用来查询确定一条文档,才会使用. 一般 情况下 会使用 find 这个命令 会多一些.
举个简单的例子吧 .
find 的使用,在 mongodb 查询 find 用的是最多的.
find 返回 结果是一个cursor , 如果没有结果就会 None .
#!/usr/bin/env python3
# -*- coding: utf-8 -*-
"""
@Time    : 2019/3/23 21:39
@File    : test_pymogo.py
@Author  : [email protected]

find  基本用法 in

"""

from pymongo import MongoClient
# mongo URI  连接配置
from config.DB import SHOUFUYOU_REPORTING_URI, SHOUFUYOU_REPORTING_DB_NAME

# 导入这个包
from bson.objectid import ObjectId

client = MongoClient(SHOUFUYOU_REPORTING_URI)

# 获取 db
mongo_db = client[SHOUFUYOU_REPORTING_DB_NAME]

# 获取collection
call_record = mongo_db['callRecord']

if __name__ == '__main__':

    mongo_id_list_test = [
        # 数据 mongo_id
        ObjectId("5be2b43da90ec1470078ef53"),
        ObjectId("5be3ec1da90ec146d71b551f"),
        ObjectId("5be422eba90ec106a54840b2")

    ]

    # mongodb  in 查询, 查询条件
    filter_ = {"_id": {"$in": mongo_id_list_test}}

    # 筛选字段
    projection = {
        '_id': 1,
        'created_time': 1,
    }

    # cursor  注意 find 并不会返回文档, 而是返回一个cursor 对象
    documents = call_record.find(filter_, projection)

    print(f"documents:{documents}")

    # 需要迭代对象,才能取到值.
    for doc in documents:
        print(doc)
结果如下:
documents:
{'_id': ObjectId('5be2b43da90ec1470078ef53'), 'created_time': '2018-11-07 17:45:33'}
{'_id': ObjectId('5be3ec1da90ec146d71b551f'), 'created_time': '2018-11-08 15:56:13'}
{'_id': ObjectId('5be422eba90ec106a54840b2'), 'created_time': '2018-11-08 19:50:03'}
来说下 find 的参数. find 参数 还是挺多的.
这里只说几个比较重要的.
and 语法 如下 :
#!/usr/bin/env python3
# -*- coding: utf-8 -*-
"""
@Time    : 2019/3/23 21:39
@File    : test_pymogo.py
@Author  : [email protected]

find  基本用法 and  用法


use xinyongfei_rcs_gateway;

db.getCollection("fudataLog").find(
    {
        "$and" : [
            {
                "status" : "SUCCESS"
            },
            {
                "created_time" : {
                    "$gte" : "2018-05-22 17:18:45"
                }
            },
            {
                "created_time" : {
                    "$lt" : "2018-05-29 17:18:45"
                }
            },
            {
                "status" : "SUCCESS"
            }
        ]
    }
);


"""
from pymongo import MongoClient
# mongo URI  连接配置
from config.DB import XINYONGFEI_RCS_GATEWAY_URI, XINYONGFEI_RCS_GATEWAY_DB_NAME


def test_mongo_between():
    """
    { $and: [ { "created_time": { $gte: "2018-05-22 16:31:05" } },
        { "created_time": { $lt: "2018-05-25 16:31:05" } }, { "method_id": "commerceReportPull" } ]
    }
    :return:
    """

    _uri = XINYONGFEI_RCS_GATEWAY_URI
    _dbname = XINYONGFEI_RCS_GATEWAY_DB_NAME

    collecion_name = 'fudataLog'

    client = MongoClient(_uri)
    db = client[_dbname]
    collecion = db[collecion_name]

    # 查询 时间段 是在   '2018-05-22 16:31:05' <=create_time <'2018-05-30 16:31:05'
    # 并且  method_id = commerceReportPull , status = SUCCESS 的记录
    doamin = {
        "$and": [
            {"created_time": {"$lt": "2018-10-30 16:31:05"}},
            {"created_time": {"$gte": "2018-10-17 18:13:12"}},
            {"method_id": "commerceGetOpenId"},
            {"status": "SUCCESS"}
        ]
    }

    fields = {"return_data.open_id": 1,
              "created_time": 1,
              'method_id': 1,
              "status": 1,
              # 不显示 mongo_id
              '_id': 0
              }

    cursor = collecion.find(filter=doamin, projection=fields)

    # 查看有多少记录
    print(f"cursor.count():{cursor.count()}")

    # 需要迭代对象,才能取到值.
    for doc in cursor:
        print(doc)


if __name__ == '__main__':
    test_mongo_between()
    pass
结果如下:
cursor.count():14
{'created_time': '2018-10-17 18:13:12', 'method_id': 'commerceGetOpenId', 'status': 'SUCCESS', 'return_data': {'open_id': 'wdw66blejdcb3qhppc0kyo1yqhb6th3vlod0tgl9'}}
{'created_time': '2018-10-17 18:13:12', 'method_id': 'commerceGetOpenId', 'status': 'SUCCESS', 'return_data': {'open_id': 'wdw66blejdcb3qhppc0kyo1yqhb6th3vlod0tgl9'}}
{'created_time': '2018-10-17 18:13:12', 'method_id': 'commerceGetOpenId', 'status': 'SUCCESS', 'return_data': {'open_id': 'wdw66blejdcb3qhppc0kyo1yqhb6th3vlod0tgl9'}}
{'created_time': '2018-10-18 14:18:42', 'method_id': 'commerceGetOpenId', 'status': 'SUCCESS', 'return_data': {'open_id': 'v0fahoarvxwixtu64yxtdhxaxa0x0azhlrt0bhxd'}}
{'created_time': '2018-10-18 14:18:42', 'method_id': 'commerceGetOpenId', 'status': 'SUCCESS', 'return_data': {'open_id': 'v0fahoarvxwixtu64yxtdhxaxa0x0azhlrt0bhxd'}}
{'created_time': '2018-10-18 14:18:42', 'method_id': 'commerceGetOpenId', 'status': 'SUCCESS', 'return_data': {'open_id': 'v0fahoarvxwixtu64yxtdhxaxa0x0azhlrt0bhxd'}}
{'created_time': '2018-10-18 18:59:27', 'method_id': 'commerceGetOpenId', 'status': 'SUCCESS', 'return_data': {'open_id': '929loss67cisw42f8ocvrgonsxwkl5clryvuihlx'}}
{'created_time': '2018-10-26 17:50:39', 'method_id': 'commerceGetOpenId', 'status': 'SUCCESS', 'return_data': {'open_id': 'p5lmxzfgprnhpuvv3pkjlt8iv6wtc9wzevzywk4x'}}
{'created_time': '2018-10-26 17:50:39', 'method_id': 'commerceGetOpenId', 'status': 'SUCCESS', 'return_data': {'open_id': 'p5lmxzfgprnhpuvv3pkjlt8iv6wtc9wzevzywk4x'}}
{'created_time': '2018-10-29 18:20:48', 'method_id': 'commerceGetOpenId', 'status': 'SUCCESS', 'return_data': {'open_id': 'ijhyxce9he3dgsoadt9z377cxcqqwdto3abgiz4w'}}
{'created_time': '2018-10-29 18:20:48', 'method_id': 'commerceGetOpenId', 'status': 'SUCCESS', 'return_data': {'open_id': 'ijhyxce9he3dgsoadt9z377cxcqqwdto3abgiz4w'}}
{'created_time': '2018-10-29 18:20:48', 'method_id': 'commerceGetOpenId', 'status': 'SUCCESS', 'return_data': {'open_id': 'ijhyxce9he3dgsoadt9z377cxcqqwdto3abgiz4w'}}
{'created_time': '2018-10-29 18:44:18', 'method_id': 'commerceGetOpenId', 'status': 'SUCCESS', 'return_data': {'open_id': 'g1zu3wgncengql9dis2u3ghfnqh3ghtjlob4o2mv'}}
{'created_time': '2018-10-29 18:44:18', 'method_id': 'commerceGetOpenId', 'status': 'SUCCESS', 'return_data': {'open_id': 'g1zu3wgncengql9dis2u3ghfnqh3ghtjlob4o2mv'}}

Process finished with exit code 0
注意 and 查询条件 的写法
 doamin = {
        "$and": [
            {"created_time": {"$lt": "2018-10-30 16:31:05"}},
            {"created_time": {"$gte": "2018-10-17 18:13:12"}},
            {"method_id": "commerceGetOpenId"},
            {"status": "SUCCESS"}
        ]
    }
#!/usr/bin/env python3
# -*- coding: utf-8 -*-
"""
@Time    : 2019/3/23 21:39
@File    : test_pymogo.py
@Author  : [email protected]

find  基本用法 or   用法


"""
from pymongo import MongoClient
# mongo URI  连接配置
from config.DB import XINYONGFEI_RCS_GATEWAY_URI, XINYONGFEI_RCS_GATEWAY_DB_NAME


def test_mongo_or():
    """
    or 的使用
    doamin = {
        "$or": [
            {"user_id": "99063974"},
            {"user_id": "99063770"},
        ]
    }


    :return:
    """

    _uri = XINYONGFEI_RCS_GATEWAY_URI
    _dbname = XINYONGFEI_RCS_GATEWAY_DB_NAME

    collection_name = 'fudataLog'

    client = MongoClient(_uri)
    db = client[_dbname]
    collection = db[collection_name]

    doamin = {
        "$or": [
            {"user_id": "99063974"},
            {"user_id": "99063770"},
        ]
    }

    fields = {
        "user_id": 1,
        "status": 1,
        # 不显示 mongo_id
        '_id': 0
    }

    cursor = collection.find(filter=doamin, projection=fields)

    # 查看有多少记录
    print(f"cursor.count():{cursor.count()}")

    # 需要迭代对象,才能取到值.
    for doc in cursor:
        print(doc)


if __name__ == '__main__':
    test_mongo_or()
    pass
结果如下:
cursor.count():34
{'user_id': '99063770', 'status': 'SUCCESS'}
{'user_id': '99063770', 'status': 'SUCCESS'}
{'user_id': '99063770', 'status': 'ERROR'}
{'user_id': '99063770', 'status': 'ERROR'}
{'user_id': '99063974', 'status': 'SUCCESS'}
{'user_id': '99063974', 'status': 'ERROR'}
{'user_id': '99063974', 'status': 'SUCCESS'}
...
这样就可以了,可以看出 这样全部文档 被查找出来了.
主要是 or 的用法, 这里只是把 and 换成了or 其他不变.
这里查询 user_id 是99063974 or 99063770 的文档 .
    doamin = {
        "$or": [
            {"user_id": "99063974"},
            {"user_id": "99063770"},
        ]
    }
可以看出 结果已经 找出来了, 但是结果里面 可能有status 等于error的记录, 我们可不可以拿到全是成功 记录呢, 肯定是可以的. 取结果集中成功的记录. 只要在添加一个条件即可.
看下面的例子:
def test_mongo_or_and():
    """
    and 和 or 的使用
    doamin = {

        "status": "SUCCESS",
        "$or": [
            {"user_id": "99063974"},
            {"user_id": "99063770"},
        ]
    }

    :return:
    """

    _uri = XINYONGFEI_RCS_GATEWAY_URI
    _dbname = XINYONGFEI_RCS_GATEWAY_DB_NAME
    collection_name = 'fudataLog'

    client = MongoClient(_uri)
    db = client[_dbname]
    collection = db[collection_name]

    doamin = {

        "status": "SUCCESS",
        "$or": [
            {"user_id": "99063974"},
            {"user_id": "99063770"},
        ]
    }

    fields = {
        "user_id": 1,
        "status": 1,
        # 不显示 mongo_id
        '_id': 0
    }

    cursor = collection.find(filter=doamin, projection=fields)

    # 查看有多少记录
    print(f"cursor.count():{cursor.count()}")

    # 需要迭代对象,才能取到值.
    for doc in cursor:
        print(doc)
结果如下:
cursor.count():6
{'user_id': '99063770', 'status': 'SUCCESS'}
{'user_id': '99063770', 'status': 'SUCCESS'}
{'user_id': '99063770', 'status': 'SUCCESS'}
{'user_id': '99063974', 'status': 'SUCCESS'}
{'user_id': '99063974', 'status': 'SUCCESS'}
{'user_id': '99063974', 'status': 'SUCCESS'}
mongodb 常用的一些查询:
#!/usr/bin/env python3
# -*- coding: utf-8 -*-
"""
@Time    : 2019/3/23 21:39
@File    : test_pymongo_condition.py
@Author  : [email protected]


条件查询 :


1 范围查询: 按照时间范围 查询, 按照 user_id  查询 某一范围的数据.

filter_ = {
    #  查询时间范围,并且 user_id='99063857' 并且时间返回为 下面之间的数据
    "$and": [
        {"created_time": {"$lte": '2018-12-07 15:25:43'}},
        {"created_time": {"$gt": '2018-09-01 16:00:30'}},
        {'user_id': "99063857"}

    ]

}


2 TODO


"""

from pymongo import MongoClient

from config.DB import SHOUFUYOU_REPORTING_URI, SHOUFUYOU_REPORTING_DB_NAME

client = MongoClient(SHOUFUYOU_REPORTING_URI)

# 获取 db
mongo_db = client[SHOUFUYOU_REPORTING_DB_NAME]

# 获取collection
call_record = mongo_db['callRecord']

fields = {'_id': 0, 'created_time': 1, "user_id": 1}
filter_ = {
    #  查询时间范围,并且 user_id='99063857' 并且时间返回为 下面之间的数据
    "$and": [
        {"created_time": {"$lte": '2018-12-07 15:25:43'}},
        {"created_time": {"$gt": '2018-09-01 16:00:30'}},
        {'user_id': "99063857"}

    ]

}

cursor = call_record.find(filter=filter_, projection=fields).limit(5)

print(cursor.count())

for doc in cursor:
    print(doc)
#!/usr/bin/env python3
# -*- coding: utf-8 -*-
"""
@Time    : 2019/3/23 21:39
@File    : test_pymogo.py
@Author  : [email protected]

find  基本用法 in

# mongodb  in 查询
mongo_id_list_test = [
    # 数据 mongo_id
    ObjectId("5be2b43da90ec1470078ef53"),
    ObjectId("5be3ec1da90ec146d71b551f"),
    ObjectId("5be422eba90ec106a54840b2")

]
filter_ = {"_id": {"$in": mongo_id_list_test}}
"""

from pymongo import MongoClient
# mongo URI  连接配置
from config.DB import SHOUFUYOU_REPORTING_URI, SHOUFUYOU_REPORTING_DB_NAME

# 导入这个包
from bson.objectid import ObjectId

client = MongoClient(SHOUFUYOU_REPORTING_URI)

# 获取 db
mongo_db = client[SHOUFUYOU_REPORTING_DB_NAME]

# 获取collection
call_record = mongo_db['callRecord']

if __name__ == '__main__':

    mongo_id_list_test = [
        # 数据 mongo_id
        ObjectId("5be2b43da90ec1470078ef53"),
        ObjectId("5be3ec1da90ec146d71b551f"),
        ObjectId("5be422eba90ec106a54840b2")

    ]
    # mongodb  in 查询
    filter_ = {"_id": {"$in": mongo_id_list_test}}

    projection = {
        '_id': 1,
        'created_time': 1,
    }

    # cursor  注意 find 并不会返回文档, 而是返回一个cursor 对象
    documents = call_record.find(filter_, projection)

    print(f"documents:{documents}")

    # 需要迭代对象,才能取到值.
    for doc in documents:
        print(doc)
pymongo.ASCENDING 升序
pymongo.DESCENDING 降序
#!/usr/bin/env python3
# -*- coding: utf-8 -*-
"""
@Time    : 2019/3/23 21:39
@File    : test_pymongo_condition.py
@Author  : [email protected]


排序操作 :

pymongo.ASCENDING  升序
pymongo.DESCENDING  降序


for doc in collection.find().sort('field', pymongo.ASCENDING):
    print(doc)


for doc in collection.find().sort([
        ('field1', pymongo.ASCENDING),
        ('field2', pymongo.DESCENDING)]):
    print(doc)


"""
import pymongo
from pymongo import MongoClient

from config.DB import SHOUFUYOU_REPORTING_URI, SHOUFUYOU_REPORTING_DB_NAME

client = MongoClient(SHOUFUYOU_REPORTING_URI)

# 获取 db
mongo_db = client[SHOUFUYOU_REPORTING_DB_NAME]

# 获取collection
call_record = mongo_db['callRecord']


def test_sort(collection):
    fields = {'_id': 0, 'created_time': 1, "user_id": 1}
    filter_ = {
        #  查询时间范围,并且 user_id='99063857' 并且时间返回为 下面之间的数据
        "$and": [
            {"created_time": {"$lte": '2018-12-07 15:25:43'}},
            {"created_time": {"$gt": '2018-09-01 16:00:30'}},

        ]

    }

    # 按照 create_time 降序排序
    cursor = collection.find(filter=filter_, projection=fields).sort([
        ('created_time', pymongo.DESCENDING),

    ]).limit(10)

    print(cursor.count())

    for doc in cursor:
        print(doc)


def test_sort_multi(collection):
    fields = {'_id': 0, 'created_time': 1, "user_id": 1}
    filter_ = {
        #  查询时间范围,并且 user_id='99063857' 并且时间返回为 下面之间的数据
        "$and": [
            {"created_time": {"$lte": '2018-12-07 15:25:43'}},
            {"created_time": {"$gt": '2018-09-01 16:00:30'}},

        ]

    }

    # 按照 create_time 降序排序
    # 注意这里的排序 是有顺序的,这里是先按照usre_id 升序,之后在按照created_time 降序排序.
    cursor = collection.find(filter=filter_, projection=fields).sort([
        ('user_id', pymongo.ASCENDING),
        ('created_time', pymongo.DESCENDING),

    ]).limit(50)

    print(cursor.count())

    for doc in cursor:
        print(doc)


if __name__ == '__main__':
    # test_sort(call_record)
    test_sort_multi(call_record)
有时候 我们希望可以跳过几个文档, 限制文档的数量. 这个时候 就可以使用 skip 和 limit 来完成这样的操作 ,使用起来也非常方便.
#!/usr/bin/env python3
# -*- coding: utf-8 -*-
"""
@Time    : 2019/4/3 11:56
@File    : test_cursor_skip_limit .py
@Author  : [email protected]
"""

from pymongo import MongoClient

from config.DB import SHOUFUYOU_REPORTING_URI, SHOUFUYOU_REPORTING_DB_NAME

client = MongoClient(SHOUFUYOU_REPORTING_URI, maxPoolSize=50)
mongo_db = client[SHOUFUYOU_REPORTING_DB_NAME]
collection = mongo_db['contacts']

domain = {"event_id": "1000073"}
fields = {'_id': 1, 'created_time': 1, 'event_id': 1}


cursor = collection.find(domain, fields)


# copy 一份 cursor 对象.
cursor_copy = cursor.clone()

values = cursor.skip(3).limit(2)
print(f"count:{values.count()}")
for item in values:
    print(item)

print("--------copy cursor  top 10 document------")

for idx, doc in enumerate(cursor_copy[0:10]):
    print(idx, doc)
结果如下:
count:393
{'_id': ObjectId('5bc86b34a90ec16e6c44dcca'), 'event_id': '1000073', 'created_time': '2018-10-18 19:15:00'}
{'_id': ObjectId('5bc87a85a90ec16e6e222242'), 'event_id': '1000073', 'created_time': '2018-10-18 20:20:21'}
--------copy cursor  top 10 document------
0 {'_id': ObjectId('5bc5ab05a90ec16eb23ee498'), 'event_id': '1000073', 'created_time': '2018-10-16 17:10:29'}
1 {'_id': ObjectId('5bc69975a90ec16ea023e42d'), 'event_id': '1000073', 'created_time': '2018-10-17 10:07:49'}
2 {'_id': ObjectId('5bc712afa90ec16ea20ff19f'), 'event_id': '1000073', 'created_time': '2018-10-17 18:45:03'}
3 {'_id': ObjectId('5bc86b34a90ec16e6c44dcca'), 'event_id': '1000073', 'created_time': '2018-10-18 19:15:00'}
4 {'_id': ObjectId('5bc87a85a90ec16e6e222242'), 'event_id': '1000073', 'created_time': '2018-10-18 20:20:21'}
5 {'_id': ObjectId('5bd27f8ea90ec1277f7e91d1'), 'event_id': '1000073', 'created_time': '2018-10-26 10:44:30'}
6 {'_id': ObjectId('5bd6de89a90ec12779579b77'), 'event_id': '1000073', 'created_time': '2018-10-29 18:18:49'}
7 {'_id': ObjectId('5bd6e416a90ec1278e0a16e8'), 'event_id': '1000073', 'created_time': '2018-10-29 18:42:30'}
8 {'_id': ObjectId('5bd81a1ea90ec127806c7670'), 'event_id': '1000073', 'created_time': '2018-10-30 16:45:18'}
9 {'_id': ObjectId('5be015d8a90ec146e7432850'), 'event_id': '1000073', 'created_time': '2018-11-05 18:05:12'}
从以上的结果可以看出来,skip 3 , limit 2 . 就是下面idx 3 ,4的值.
上面 的写法 也可以这样写:
values = cursor.limit(2).skip(3)
为什么可以这样写呢? 感觉非常像链式编程了. 为什么可以这样随意控制呢?
其实 这里 limit 最后 返回的 也是cursor 对象, skip 返回的也是cursor 对象. 所以 这样 就可以 一直 .skip().limit().skip() 这种方式进行编程.
这两个方法 返回的都是自己 的对象, 也就是对应 代码:
看下 skip 代码, 首先 检查skip 类型,做了一些简单的判断, 之后把 skip 保存到 自己 私有变量里面. self.__skip
   def skip(self, skip):
        """Skips the first `skip` results of this cursor.

        Raises :exc:`TypeError` if `skip` is not an integer. Raises
        :exc:`ValueError` if `skip` is less than ``0``. Raises
        :exc:`~pymongo.errors.InvalidOperation` if this :class:`Cursor` has
        already been used. The last `skip` applied to this cursor takes
        precedence.

        :Parameters:
          - `skip`: the number of results to skip
        """
        if not isinstance(skip, integer_types):
            raise TypeError("skip must be an integer")
        if skip <0:
            raise ValueError("skip must be >= 0")
        self.__check_okay_to_chain()

        self.__skip = skip
        return self
limit 的方法实现 其实和skip 是差不多的.
    def limit(self, limit):
        """Limits the number of results to be returned by this cursor.

        Raises :exc:`TypeError` if `limit` is not an integer. Raises
        :exc:`~pymongo.errors.InvalidOperation` if this :class:`Cursor`
        has already been used. The last `limit` applied to this cursor
        takes precedence. A limit of ``0`` is equivalent to no limit.

        :Parameters:
          - `limit`: the number of results to return

        .. mongodoc:: limit
        """
        if not isinstance(limit, integer_types):
            raise TypeError("limit must be an integer")
        if self.__exhaust:
            raise InvalidOperation("Can't use limit and exhaust together.")
        self.__check_okay_to_chain()

        self.__empty = False
        self.__limit = limit
        return self
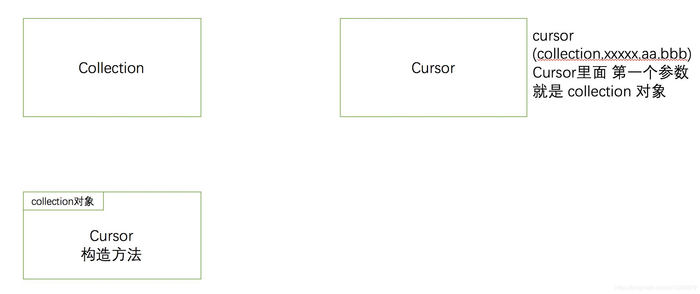
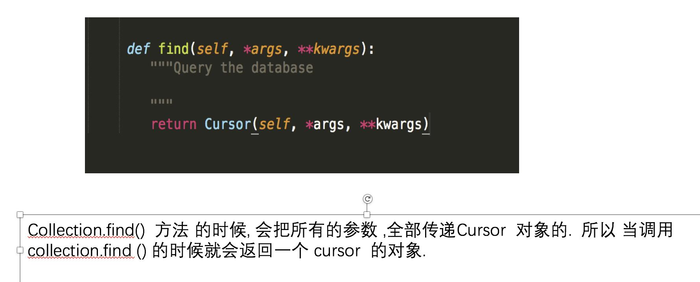
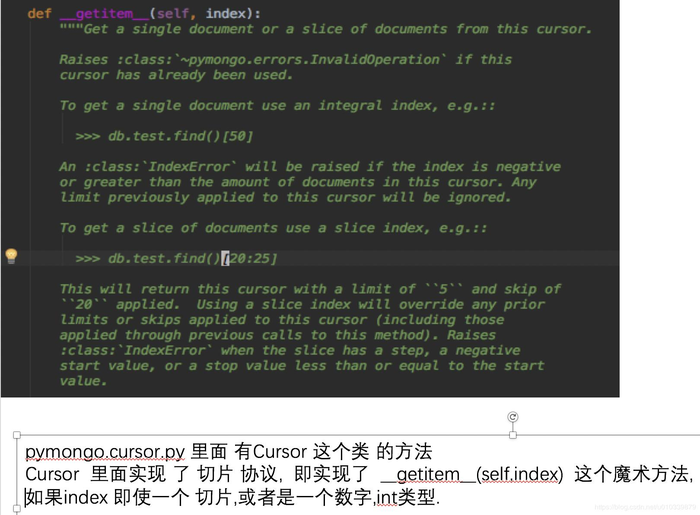
cursor 对象 可以通过collection.find() 来返回一个 cursor 对象
cursor对象 可以实现了切片协议, 因此可以使用 切片操作.
cursor.count() 方法 可以查询 查询了多少 文档,返回文档总数.
#!/usr/bin/env python3
# -*- coding: utf-8 -*-
"""
@Time    : 2019/4/3 11:56
@File    : test_cursor_getitem.py
@Author  : [email protected]
"""

from pymongo import MongoClient

from config.DB import SHOUFUYOU_REPORTING_URI, SHOUFUYOU_REPORTING_DB_NAME

client = MongoClient(SHOUFUYOU_REPORTING_URI, maxPoolSize=50)
mongo_db = client[SHOUFUYOU_REPORTING_DB_NAME]
collection = mongo_db['contacts']

domain = {"event_id": "1000073"}
fields = {'_id': 1, 'created_time': 1, 'event_id': 1}

# 切片操作.
values = collection.find(domain, fields)[2:5]

print(f"count:{values.count()}")

for item in values:
    print(item)
count:393
{'_id': ObjectId('5bc712afa90ec16ea20ff19f'), 'event_id': '1000073', 'created_time': '2018-10-17 18:45:03'}
{'_id': ObjectId('5bc86b34a90ec16e6c44dcca'), 'event_id': '1000073', 'created_time': '2018-10-18 19:15:00'}
{'_id': ObjectId('5bc87a85a90ec16e6e222242'), 'event_id': '1000073', 'created_time': '2018-10-18 20:20:21'}


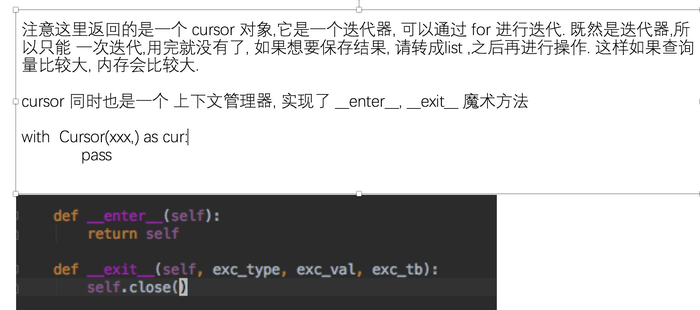
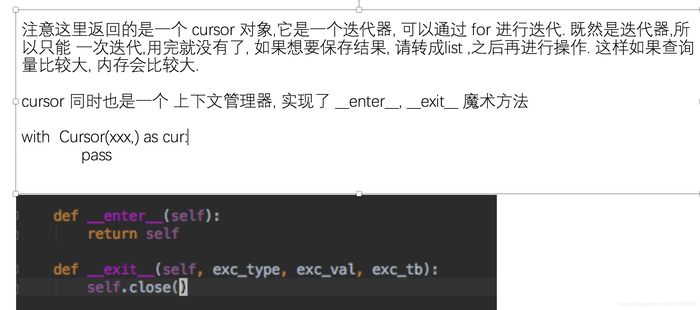
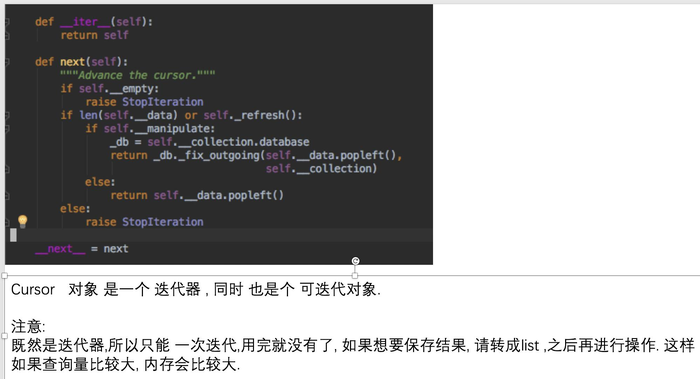

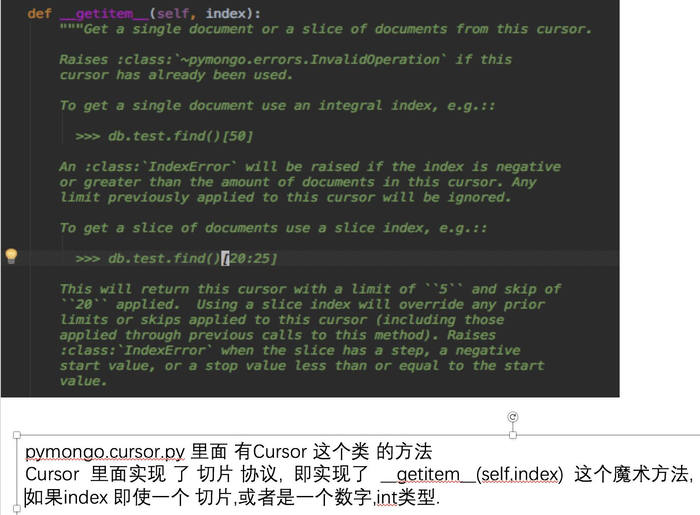


实现 从 mongodb 中读取 数据, 通过配置 字段,以及筛选条件 来完成 参数的配置.
实现 read 方法 批量读取数据.
from pymongo import MongoClient
from config.DB import XINYONGFEI_RCS_GATEWAY_URI, XINYONGFEI_RCS_GATEWAY_DB_NAME
import logging

logger = logging.getLogger(__name__)


class MongoReader(BaseReader):
    def __init__(self, uri, db_name, collecion_name, domain, fields):
        """
        mongo reader    工具类
        :param url:  uri mongo 连接的URI
        :param db_name:  db名称
        :param collecion_name:  collection_name
        :param domain:   查询条件
        :param fields:  过滤字段  {"name":1,"_id":1}
        """
        super().__init__(url=uri)

        self._dbname = db_name
        self._collecion_name = collecion_name

        self.domain = domain
        self.fields = fields

        client = MongoClient(self.url)
        db = client[self._dbname]
        self.collecion = db[self._collecion_name]

        # 最大读取数量
        self.max_count = 30000000000000


    def read(self, start=0, step=1000):

        limit = step - start
        skip_number = start

        count = self.collecion.count_documents(filter=self.domain)
        logger.info(f"total count:{count}")
        while True:
            logger.info(f'limit:{limit},skip:{skip_number}, start:{skip_number-start},end:{skip_number+limit}')
            # cursor = self.collecion.find(self.domain, self.fields, no_cursor_timeout=True).limit(limit).skip(
            #     skip_number)

            cursor = self.collecion.find(self.domain, self.fields, no_cursor_timeout=True).limit(limit).skip(
                skip_number)

            # 查询数据量
            number = cursor.count(with_limit_and_skip=True)
            if number:
                yield [d for d in cursor]

            skip_number += number
            if number = self.max_count:
                logger.info("skip_number:{},self.max_count:{}.skip_number >= self.max_count,break".format(
                    skip_number,
                    self.max_count))
                # 把cursor 关掉
                cursor.close()
                break


if __name__ == '__main__':
    start_time = '2018-10-01 11:03:05'
    end_time = '2019-01-20 14:03:49'

    reader_cOnfig= {
        'uri': XINYONGFEI_RCS_GATEWAY_URI,
        'db_name': XINYONGFEI_RCS_GATEWAY_DB_NAME,
        'domain': {"$and": [{"created_time": {"$lt": end_time}}, {"created_time": {"$gte": start_time}},
                            {"method_id": "securityReport"}, {"status": "SUCCESS"}]},
        'fields': {"created_time": 1, "user_id": 1, "_id": 1},
        'collecion_name': 'moxieSecurityLog',
    }

    reader = MongoReader(**reader_config)

    for data in reader.read():
        print(data)
    print('frank')
报错如下:
pymongo.errors.CursorNotFound: Cursor not found, cursor id: 387396591387
Exception in thread consumer_14:
Traceback (most recent call last):
  File "/usr/local/Cellar/python3/3.6.4_2/Frameworks/Python.framework/Versions/3.6/lib/python3.6/threading.py", line 916, in _bootstrap_inner
    self.run()
  File "/Users/frank/PycharmProjects/xinyongfei-bi-model/rcsdecisionv2.py", line 843, in run
    result = self.parse(values)
  File "/Users/frank/PycharmProjects/xinyongfei-bi-model/rcsdecisionv2.py", line 872, in parse
    for posts in posts_list:
  File "/Users/frank/PycharmProjects/xinyongfei-bi-model/venv3/lib/python3.6/site-packages/pymongo/cursor.py", line 1132, in next
    if len(self.__data) or self._refresh():
  File "/Users/frank/PycharmProjects/xinyongfei-bi-model/venv3/lib/python3.6/site-packages/pymongo/cursor.py", line 1075, in _refresh
    self.__max_await_time_ms))
  File "/Users/frank/PycharmProjects/xinyongfei-bi-model/venv3/lib/python3.6/site-packages/pymongo/cursor.py", line 947, in __send_message
    helpers._check_command_response(doc['data'][0])
  File "/Users/frank/PycharmProjects/xinyongfei-bi-model/venv3/lib/python3.6/site-packages/pymongo/helpers.py", line 207, in _check_command_response
    raise CursorNotFound(errmsg, code, response)
pymongo.errors.CursorNotFound: Cursor not found, cursor id: 387396591387
问题分析:
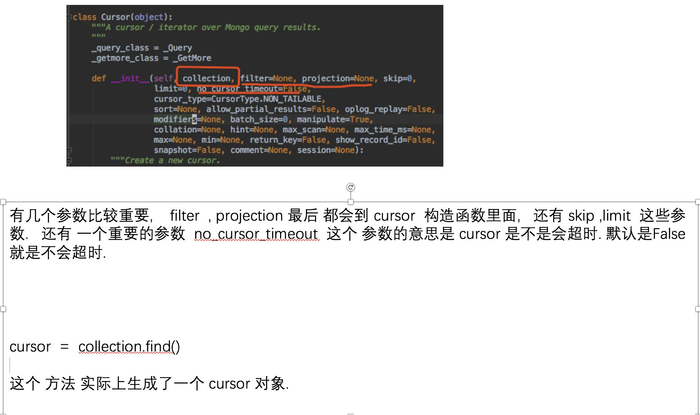
cursor 超时了.
设置参数 no_cursor_timeout = True
解决方案 :
demos = db['demo'].find({},{"_id": 0},no_cursor_timeout = True)
for cursor in demos:
        do_something()
demo.close() # 关闭游标
官方文档:
官方文档 默认 是10min , 就会关闭 cursor , 这里 可以设置一个 永不超时的参数.
no_cursor_timeout (optional): if False (the default), any returned cursor is closed by the server after 10 minutes of inactivity. If set to True, the returned cursor will never time out on the server. Care should be taken to ensure that cursors with no_cursor_timeout turned on are properly closed.
参考资料:
https://www.jianshu.com/p/a8551bd17b5b

http://api.mongodb.com/python/current/api/pymongo/collection.html#pymongo.collection.Collection.find
参考文档 :
1 api cursor http://api.mongodb.com/python/current/api/pymongo/cursor.html
2 api count_documents http://api.mongodb.com/python/current/api/pymongo/collection.html#pymongo.collection.Collection.count_documents
3 api collecion.html http://api.mongodb.com/python/current/api/pymongo/collection.html
4 api 排序操作 http://api.mongodb.com/python/current/api/pymongo/cursor.html#pymongo.cursor.Cursor.sort
5 mongodb tutorial http://api.mongodb.com/python/current/tutorial.html
1 Python3中PyMongo的用法 https://zhuanlan.zhihu.com/p/29435868
2 Python3 中PyMongo 的用法 https://cloud.tencent.com/developer/article/1005552
3 菜鸟用Python操作MongoDB,看这一篇就够了 https://cloud.tencent.com/developer/article/1169645
4 PyMongo 库使用基础使用速成教程 https://www.jianshu.com/p/acc57241f9f0

 京公网安备 11010802041100号 | 京ICP备19059560号-4 | PHP1.CN 第一PHP社区 版权所有