在这篇文章我将展示执行从一个三个成员组成的Galera Cluster(在这个案例中我使用PXC 5.7.14)在线迁移到3个成员组成的MySQL Group Replication(MySQL COmmunity 5.7.17)
不要忘记在改造Group Replication作为后端数据库之前,应该验证你的应用程序匹配GR的需求和限制。验证之后你就可以开始了!
我们先瞧一下当前状况
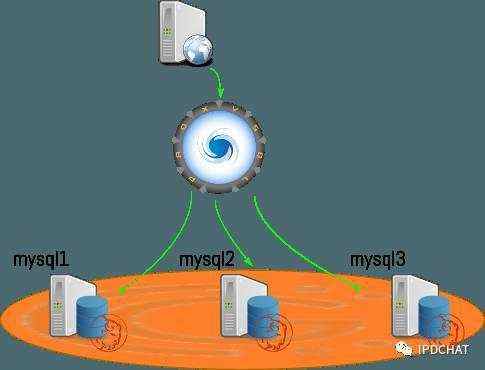
我们有一个应用程序(sysbench0.5),经由PROXYSQL读写一个Galera Cluster(Percona Xtradb Cluster 5.7.14)。我们写入所有的节点(Multi-Master)而且我们将会在我们的MySQL Group Replication上做同样的事,我们将使用一个Multi-Primary Group.
这条命令用来模仿我们的应用程序(访问数据库)
while true; do sysbench --test=/usr/share/doc/sysbench/tests/db/oltp.lua \
--mysql-host=127.0.0.1 --mysql-port=6033 --mysql-password=fred \
--mysql-table-engine=innodb --mysql-user=fred --max-requests=0 \
--tx-rate=20 --num-threads=2 --report-interval=1 run ; done;
这些是服务器的概况:
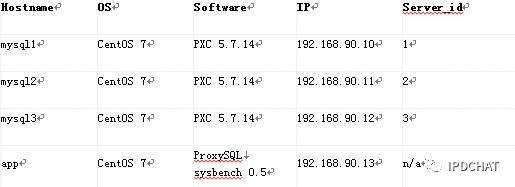
目标是是用MySQL 5.7.17 with Group Relication一台台的替换所有的PXC节点,并且避免停机。
对于熟悉ProxySQL的朋友,以下是我们如何在这种proxy查看Galera节点:
ProxySQL Admin> select hostname, status, hostgroup_id from runtime_mysql_servers;
+---------------+--------+--------------+
| hostname | status | hostgroup_id |
+---------------+--------+--------------+
| 192.168.90.12 | ONLINE | 1 |
| 192.168.90.10 | ONLINE | 1 |
| 192.168.90.11 | ONLINE | 1 |
+---------------+--------+--------------+
对于不熟悉ProxySQL的朋友请移步之前的帖子:HA with MySQL Group Replication and ProxySQL
为了能够如期开始,我们需要在每个PXC几点上打开binlog,和启用MySQL GTIDs,所以在my.cnf你必须配置:
enforce_gtid_cOnsistency= on
gtid_mode = on
log_bin
log_slave_updates
移除一个节点并迁移到MySQL 5.7.17
我们的第一步的第一个部分是停止mysqld并在PXC packages移除mysql3(节点)
[root@mysql3]# systemctl stop mysql
ProxySQL Admin> select hostname, status from runtime_mysql_servers;
+---------------+---------+
| hostname | status |
+---------------+---------+
| 192.168.90.11 | ONLINE |
| 192.168.90.12 | SHUNNED |
| 192.168.90.10 | ONLINE |
+---------------+---------+
我们的应用程序当然已久在运行(可能引起失去连接),因为在这个案例中sysbench在一个循环中调用
我们所有的节点运行在Centos 7下,我们将el7的mysql57 community repo
[root@mysql3 ~]# yum install http://dev.mysql.com/get/mysql57-community-release-el7-9.noarch.rpm
接下来我们更换包
[root@mysql3 ~]# yum -y swap Percona-XtraDB-Cluster* mysql-community-server mysql-community-libs-compat
...
=========================================================================================================
Package Arch Version Repository Size
=========================================================================================================
Installing:
mysql-community-libs-compat x86_64 5.7.17-1.el7 mysql57-community 2.0 M
mysql-community-server x86_64 5.7.17-1.el7 mysql57-community 162 M
Removing:
Percona-XtraDB-Cluster-57 x86_64 5.7.14-26.17.1.el7 @percona-release-x86_64 0.0
Percona-XtraDB-Cluster-client-57 x86_64 5.7.14-26.17.1.el7 @percona-release-x86_64 37 M
Percona-XtraDB-Cluster-server-57 x86_64 5.7.14-26.17.1.el7 @percona-release-x86_64 227 M
Percona-XtraDB-Cluster-shared-57 x86_64 5.7.14-26.17.1.el7 @percona-release-x86_64 3.7 M
Percona-XtraDB-Cluster-shared-compat-57 x86_64 5.7.14-26.17.1.el7 @percona-release-x86_64 6.7 M
Installing for dependencies:
mysql-community-client x86_64 5.7.17-1.el7 mysql57-community 24 M
mysql-community-common x86_64 5.7.17-1.el7 mysql57-community 271 k
mysql-community-libs x86_64 5.7.17-1.el7 mysql57-community 2.1 M
Transaction Summary
=========================================================================================================
Install 2 Packages (+3 Dependent packages)
Remove 5 Packages
在这步之后,到修改my.cnf和注释掉所有wsrep参数和pxc相关参数,并增加一些强制性的扩展(参数)
备注:wsrep参数参考
http://galeracluster.com/documentation-webpages/mysqlwsrepoptions.html
binlog_checksum = none
master_info_repository = TABLE
relay_log_info_repository = TABLE
transaction_write_set_extraction = XXHASH64
loose-group_replication_group_name="afb80f36-2bff-11e6-84e0-0800277dd3bf"
loose-group_replication_start_on_boot=off
loose-group_replication_local_address= "192.168.90.12:3406"
loose-group_replication_group_seeds= "192.168.90.10:3406,192.168.90.11:3406"
loose-group_replication_bootstrap_group= off
loose-group_replication_single_primary_mode= off
之后我们移动这台server到另外一个ProxySQL主机组:
ProxySQL Admin> update mysql_servers set hostgroup_id =2 where hostname ="192.168.90.12";
ProxySQL Admin> load mysql servers to runtime;
ProxySQL Admin> select hostname, status, hostgroup_id from runtime_mysql_servers;
+---------------+---------+--------------+
| hostname | status | hostgroup_id |
+---------------+---------+--------------+
| 192.168.90.11 | ONLINE | 1 |
| 192.168.90.10 | ONLINE | 1 |
| 192.168.90.12 | SHUNNED | 2 |
+---------------+---------+--------------+
接下来开启mysqld
[root@mysql3 ~]# systemctl start mysqld
[root@mysql3 ~]# mysql
Welcome to the MySQL monitor. Commands end with ; or \g.
Your MySQL connection id is 5
Server version: 5.7.17-log MySQL Community Server (GPL)
...
建立一个节点的Group Replication cluster
我们需要引导刚才主机组
这是很简单的一步
mysql3> INSTALLPLUGIN group_replication SONAME 'group_replication.so';
mysql3> SET GLOBALgroup_replication_bootstrap_group=ON;
mysql3> STARTGROUP_REPLICATION;
mysql3> SET GLOBALgroup_replication_bootstrap_group=OFF;
现在主机组被开启了:
mysql3> select * fromperformance_schema.replication_group_members\G
***************************1. row ***************************
CHANNEL_NAME:group_replication_applier
MEMBER_ID:9e8416d7-b1c6-11e6-bc10-08002718d305
MEMBER_HOST: mysql3.localdomain
MEMBER_PORT: 3306
MEMBER_STATE: ONLINE
下一步不是现在所需要的,但是现在也是为了恢复操作而设置授权的最佳时刻,你可能会忘记这一步。
mysql1> CHANGE MASTERTO MASTER_USER='repl', MASTER_PASSWORD='password'
FOR CHANNEL'group_replication_recovery';
这个用户还没有建立但是我们将在下一步直接建立(将被复制到所有的节点)
使MySQL 5.7.17这台接到PXC做复制
现在我们需要在Galera cluster为新的MySQL5.7服务器建立一个复制用户(为了之后的组复制的恢复操作)
mysql1> CREATE USER 'repl'@'192.168.90.%' IDENTIFIED BY 'password';
mysql1> GRANT REPLICATION SLAVE ON *.* TO 'repl'@'192.168.90.%';
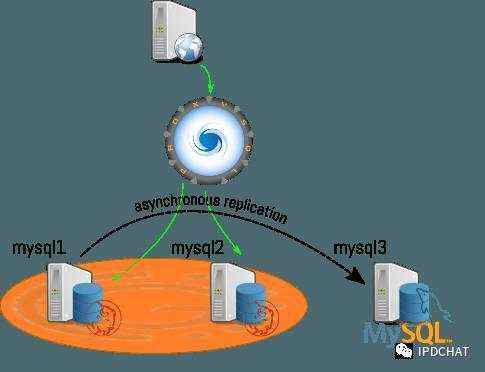
开始从GaleraCluster到新MySQL服务器的异步复制
mysql3> CHANGE MASTER TO MASTER_HOST="192.168.90.10", MASTER_USER="repl",
MASTER_PASSWORD='password', MASTER_AUTO_POSITION=1;
mysql3> START SLAVE;
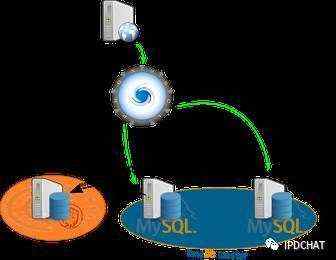
Now we have the following environment:
现在环境是这样的:
迁移扩展节点到新的复制组
在mysql2做几乎相同的操作
stop mysql
install mysql community repository
swap the packages
modify my.cnf
put mysql2 in hostgroup_id 2 in ProxySQL
start mysqld
join the group
跳过1-4点
和Galera不一样,Mysql Group Replication强制要求所有的节点都要有唯一的server id。在这一步我们必须小心设置mysql2
不要忘记在 group_replication_local_address and group_replication_group_seeds参数中为mysql3和mysql2交换地址(这块说的略微有些歧义, 可以参考第一步中90.12这台的配置,loose-group_replication_local_address设置为本机地址和端口,loose-group_replication_group_seeds设置为另外两台服务器地址和端口)
loose-group_replication_local_address= "192.168.90.11:3406"
loose-group_replication_group_seeds= "192.168.90.10:3406,192.168.90.12:3406"
在ProxySQL中把mysql2放入组id2,于是:
ProxySQL Admin> select hostname, status, hostgroup_id from runtime_mysql_servers;
+---------------+---------+--------------+
| hostname | status | hostgroup_id |
+---------------+---------+--------------+
| 192.168.90.10 | ONLINE | 1 |
| 192.168.90.12 | ONLINE | 2 |
| 192.168.90.11 | SHUNNED | 2 |
+---------------+---------+--------------+
开启mysqld,是时间加入复制组了(上边的第7点)!
mysql2> INSTALL PLUGIN group_replication SONAME 'group_replication.so';
mysql2> CHANGE MASTER TO MASTER_USER='repl', MASTER_PASSWORD='password'
FOR CHANNEL 'group_replication_recovery';
mysql2> START GROUP_REPLICATION;
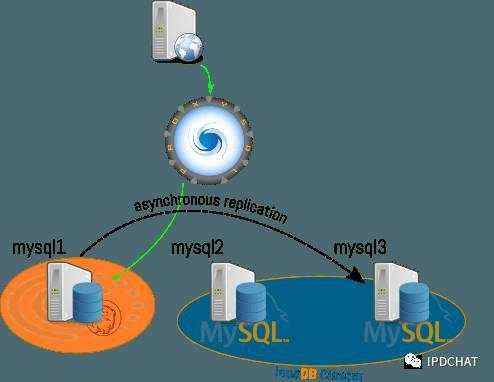
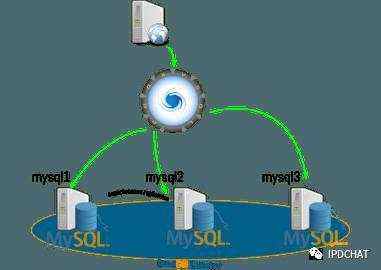
现在的新环境:
mysql3> select * from performance_schema.replication_group_members\G
*************************** 1. row ***************************
CHANNEL_NAME: group_replication_applier
MEMBER_ID: 5221ffcf-c1e0-11e6-b1f5-08002718d305
MEMBER_HOST: pxc2
MEMBER_PORT: 3306
MEMBER_STATE: ONLINE
*************************** 2. row ***************************
CHANNEL_NAME: group_replication_applier
MEMBER_ID: 5a2d38db-c1e0-11e6-8bf6-08002718d305
MEMBER_HOST: pxc3
MEMBER_PORT: 3306
MEMBER_STATE: ONLINE
应用程序连接到新的Cluster
到时间把应用程序连接到新的MySQL Group Replication Cluster了。我们修改mysql2和mysql3的主机组id为1,mysql1的组id为2,之后我们加载runtime,停止mysql1的mysql
ProxySQL Admin> select hostname, status, hostgroup_id from runtime_mysql_servers;
+---------------+--------+--------------+
| hostname | status | hostgroup_id |
+---------------+--------+--------------+
| 192.168.90.10 | ONLINE | 1 |
| 192.168.90.12 | ONLINE | 2 |
| 192.168.90.11 | ONLINE | 2 |
+---------------+--------+--------------+
ProxySQL Admin> update mysql_servers set hostgroup_id =2 where hostname ="192.168.90.10";
ProxySQL Admin> update mysql_servers set hostgroup_id =1 where hostname ="192.168.90.11";
ProxySQL Admin> update mysql_servers set hostgroup_id =1 where hostname ="192.168.90.12";
ProxySQL Admin> load mysql servers to runtime;
ProxySQL Admin> select hostname, status, hostgroup_id from runtime_mysql_servers;
+---------------+--------+--------------+
| hostname | status | hostgroup_id |
+---------------+--------+--------------+
| 192.168.90.12 | ONLINE | 1 |
| 192.168.90.11 | ONLINE | 1 |
| 192.168.90.10 | ONLINE | 2 |
+---------------+--------+--------------+
这种情况下我们使用ProxySQL尽快更换mysql1的组,所有的连接到它的连接被kill,而且所有连接将连接到Mysql Group Replication这部分节点
[root@mysql1 ~]# systemctl stop mysql
最终,我们有两个选项,或者我们配置剩下的PXC节点作为从库,这样我们仍然可以回滚迁移(我愿意之后考虑添加一个扩展节点到当前Mysql Group Replication Cluster,集群不能容忍任何故障)。或者我们直接迁移剩下的节点到Group Replication
结论
如你所见,迁移你的当前Galera环境到MySQL Group Replication并不复杂,而且很小的影响就能搞定
不要迟疑,像往常一样留下你的评论。
注意,也可以交换step2和step3,意味着异步复制可以在Group Replication开启之前就可以做。如果这样,在开启Group Replication时可能会发生异步复制失败的情况,当开启复制恢复,没有事务能被执行
你可以在SHOW SLAVE STATUS的结果看到下边信息:
Last_SQL_Error: Error in Xid_log_event: Commit could not be completed,
'Error on observer while running replication hook 'before_commit'.'
Error log 也给出相关信息:
[Note] Plugin group_replication reported: 'Starting group replication recovery
with view_id 14817109352506883:1'
[Note] Plugin group_replication reported: 'Only one server alive.
Declaring this server as online within the replication group'
[ERROR] Plugin group_replication reported: 'Transaction cannot be executed while Group Replication
is recovering. Try again when the server is ONLINE.'
[ERROR] Run function 'before_commit' in plugin 'group_replication' failed
[ERROR] Slave SQL for channel '': Error in Xid_log_event: Commit could not be completed,
'Error on observer while running replication hook 'before_commit'.', Error_code: 3100
[Warning] Slave: Error on observer while running replication hook 'before_commit'. Error_code: 3100
[ERROR] Error running query, slave SQL thread aborted. Fix the problem, and restart
the slave SQL thread with "SLAVE START". We stopped at log 'pxc1-bin.000009' position 76100764
[Note] Plugin group_replication reported: 'This server was declared online within the replication group'
只需重新开启复制解决问题:
mysql3> STOP SLAVE;
mysql3> START SLAVE;
点击原文,查看原文内容~
本文为IPD原创翻译,如需转载,请注明出处~

 京公网安备 11010802041100号 | 京ICP备19059560号-4 | PHP1.CN 第一PHP社区 版权所有