RabbitMQ是一个在AMQP基础上完整的,可复用的企业消息系统。他遵循Mozilla Public License开源协议。
MQ全称为Message Queue, 消息队列(MQ)是一种应用程序对应用程序的通信方法。应用程序通过读写出入队列的消息(针对应用程序的数据)来通信,而无需专用连接来链接它们。消 息传递指的是程序之间通过在消息中发送数据进行通信,而不是通过直接调用彼此来通信,直接调用通常是用于诸如远程过程调用的技术。排队指的是应用程序通过 队列来通信。队列的使用除去了接收和发送应用程序同时执行的要求。
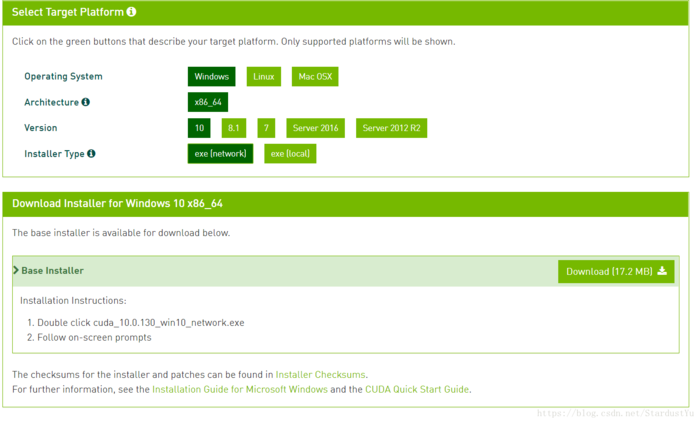
RabbitMQ安装
| 1 2 3 4 5 6 7 8 |
|
注意:service rabbitmq-server start/stop
安装API
| 1 2 3 4 5 6 7 |
|
使用API操作RabbitMQ
基于Queue实现生产者消费者模型
#!/usr/bin/env python
# -*- coding:utf-8 -*-
import Queue
import threadingmessage = Queue.Queue(10)def producer(i):while True:message.put(i)def consumer(i):while True:msg = message.get()for i in range(12):t = threading.Thread(target=producer, args=(i,))t.start()for i in range(10):t = threading.Thread(target=consumer, args=(i,))t.start()
对于RabbitMQ来说,生产和消费不再针对内存里的一个Queue对象,而是某台服务器上的RabbitMQ Server实现的消息队列。
| 1 2 3 4 5 6 7 8 9 10 11 12 13 14 15 16 |
|
| 1 2 3 4 5 6 7 8 9 10 11 12 13 14 15 16 17 18 19 20 |
|
1、acknowledgment 消息不丢失
no-ack = False,如果消费者遇到情况(its channel is closed, connection is closed, or TCP connection is lost)挂掉了,那么,RabbitMQ会重新将该任务添加到队列中。
import pikaconnection = pika.BlockingConnection(pika.ConnectionParameters(host='10.211.55.4'))
channel = connection.channel()channel.queue_declare(queue='hello')def callback(ch, method, properties, body):print(" [x] Received %r" % body)import timetime.sleep(10)print 'ok'ch.basic_ack(delivery_tag = method.delivery_tag)channel.basic_consume(callback,queue='hello',no_ack=False)print(' [*] Waiting for messages. To exit press CTRL+C')
channel.start_consuming()
2、durable 消息不丢失
#!/usr/bin/env python
import pikaconnection = pika.BlockingConnection(pika.ConnectionParameters(host='10.211.55.4'))
channel = connection.channel()# make message persistent
channel.queue_declare(queue='hello', durable=True)channel.basic_publish(exchange='',routing_key='hello',body='Hello World!',properties=pika.BasicProperties(delivery_mode=2, # make message persistent))
print(" [x] Sent 'Hello World!'")
connection.close()
#!/usr/bin/env python
# -*- coding:utf-8 -*-
import pikaconnection = pika.BlockingConnection(pika.ConnectionParameters(host='10.211.55.4'))
channel = connection.channel()# make message persistent
channel.queue_declare(queue='hello', durable=True)def callback(ch, method, properties, body):print(" [x] Received %r" % body)import timetime.sleep(10)print 'ok'ch.basic_ack(delivery_tag = method.delivery_tag)channel.basic_consume(callback,queue='hello',no_ack=False)print(' [*] Waiting for messages. To exit press CTRL+C')
channel.start_consuming()
3、消息获取顺序
默认消息队列里的数据是按照顺序被消费者拿走,例如:消费者1 去队列中获取 奇数 序列的任务,消费者1去队列中获取 偶数 序列的任务。
channel.basic_qos(prefetch_count=1) 表示谁来谁取,不再按照奇偶数排列
#!/usr/bin/env python
# -*- coding:utf-8 -*-
import pikaconnection = pika.BlockingConnection(pika.ConnectionParameters(host='10.211.55.4'))
channel = connection.channel()# make message persistent
channel.queue_declare(queue='hello')def callback(ch, method, properties, body):print(" [x] Received %r" % body)import timetime.sleep(10)print 'ok'ch.basic_ack(delivery_tag = method.delivery_tag)channel.basic_qos(prefetch_count=1)channel.basic_consume(callback,queue='hello',no_ack=False)print(' [*] Waiting for messages. To exit press CTRL+C')
channel.start_consuming()
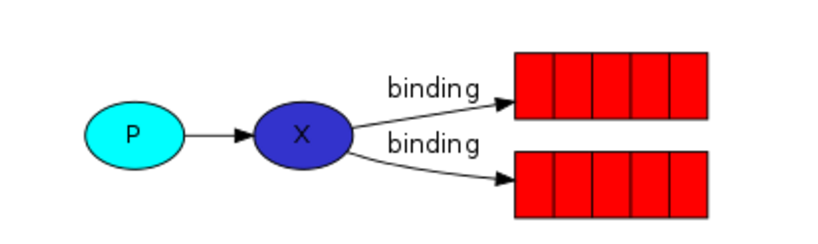
4、发布订阅
发布订阅和简单的消息队列区别在于,发布订阅会将消息发送给所有的订阅者,而消息队列中的数据被消费一次便消失。所以,RabbitMQ实现发布和订阅时,会为每一个订阅者创建一个队列,而发布者发布消息时,会将消息放置在所有相关队列中。
exchange type = fanout
#!/usr/bin/env python
import pika
import sysconnection = pika.BlockingConnection(pika.ConnectionParameters(host='localhost'))
channel = connection.channel()channel.exchange_declare(exchange='logs',type='fanout')message = ' '.join(sys.argv[1:]) or "info: Hello World!"
channel.basic_publish(exchange='logs',routing_key='',body=message)
print(" [x] Sent %r" % message)
connection.close()
#!/usr/bin/env python
import pikaconnection = pika.BlockingConnection(pika.ConnectionParameters(host='localhost'))
channel = connection.channel()channel.exchange_declare(exchange='logs',type='fanout')result = channel.queue_declare(exclusive=True)
queue_name = result.method.queuechannel.queue_bind(exchange='logs',queue=queue_name)print(' [*] Waiting for logs. To exit press CTRL+C')def callback(ch, method, properties, body):print(" [x] %r" % body)channel.basic_consume(callback,queue=queue_name,no_ack=True)channel.start_consuming()
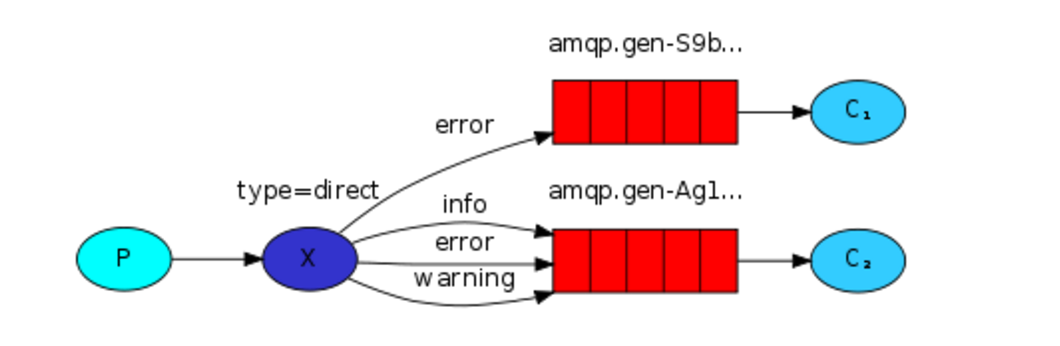
5、关键字发送
exchange type = direct
之前事例,发送消息时明确指定某个队列并向其中发送消息,RabbitMQ还支持根据关键字发送,即:队列绑定关键字,发送者将数据根据关键字发送到消息exchange,exchange根据 关键字 判定应该将数据发送至指定队列。
#!/usr/bin/env python
import pika
import sysconnection = pika.BlockingConnection(pika.ConnectionParameters(host='localhost'))
channel = connection.channel()channel.exchange_declare(exchange='direct_logs',type='direct')result = channel.queue_declare(exclusive=True)
queue_name = result.method.queueseverities = sys.argv[1:]
if not severities:sys.stderr.write("Usage: %s [info] [warning] [error]\n" % sys.argv[0])sys.exit(1)for severity in severities:channel.queue_bind(exchange='direct_logs',queue=queue_name,routing_key=severity)print(' [*] Waiting for logs. To exit press CTRL+C')def callback(ch, method, properties, body):print(" [x] %r:%r" % (method.routing_key, body))channel.basic_consume(callback,queue=queue_name,no_ack=True)channel.start_consuming()
#!/usr/bin/env python
import pika
import sysconnection = pika.BlockingConnection(pika.ConnectionParameters(host='localhost'))
channel = connection.channel()channel.exchange_declare(exchange='direct_logs',type='direct')severity = sys.argv[1] if len(sys.argv) > 1 else 'info'
message = ' '.join(sys.argv[2:]) or 'Hello World!'
channel.basic_publish(exchange='direct_logs',routing_key=severity,body=message)
print(" [x] Sent %r:%r" % (severity, message))
connection.close()
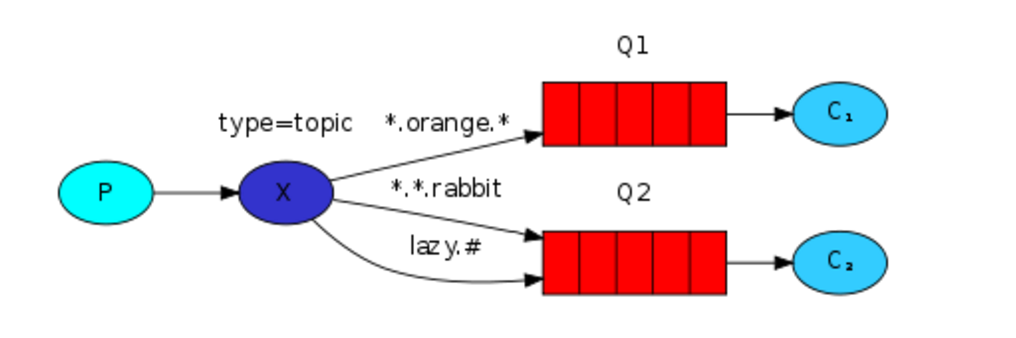
6、模糊匹配
exchange type = topic
在topic类型下,可以让队列绑定几个模糊的关键字,之后发送者将数据发送到exchange,exchange将传入”路由值“和 ”关键字“进行匹配,匹配成功,则将数据发送到指定队列。
| 1 2 3 |
|
#!/usr/bin/env python
import pika
import sysconnection = pika.BlockingConnection(pika.ConnectionParameters(host='localhost'))
channel = connection.channel()channel.exchange_declare(exchange='topic_logs',type='topic')result = channel.queue_declare(exclusive=True)
queue_name = result.method.queuebinding_keys = sys.argv[1:]
if not binding_keys:sys.stderr.write("Usage: %s [binding_key]...\n" % sys.argv[0])sys.exit(1)for binding_key in binding_keys:channel.queue_bind(exchange='topic_logs',queue=queue_name,routing_key=binding_key)print(' [*] Waiting for logs. To exit press CTRL+C')def callback(ch, method, properties, body):print(" [x] %r:%r" % (method.routing_key, body))channel.basic_consume(callback,queue=queue_name,no_ack=True)channel.start_consuming()
#!/usr/bin/env python
import pika
import sysconnection = pika.BlockingConnection(pika.ConnectionParameters(host='localhost'))
channel = connection.channel()channel.exchange_declare(exchange='topic_logs',type='topic')routing_key = sys.argv[1] if len(sys.argv) > 1 else 'anonymous.info'
message = ' '.join(sys.argv[2:]) or 'Hello World!'
channel.basic_publish(exchange='topic_logs',routing_key=routing_key,body=message)
print(" [x] Sent %r:%r" % (routing_key, message))
connection.close()
注意:
sudo rabbitmqctl add_user wupeiqi 123
# 设置用户为administrator角色
sudo rabbitmqctl set_user_tags wupeiqi administrator
# 设置权限
sudo rabbitmqctl set_permissions -p "/" root ".*" ".*" ".*"# 然后重启rabbiMQ服务
sudo /etc/init.d/rabbitmq-server restart# 然后可以使用刚才的用户远程连接rabbitmq server了。------------------------------
credentials = pika.PlainCredentials("wupeiqi","123")connection = pika.BlockingConnection(pika.ConnectionParameters('192.168.14.47',credentials=credentials))
#!/usr/bin/env python
# -*- coding:utf-8 -*-
import pika
from pika.adapters.blocking_connection import BlockingChannelcredentials = pika.PlainCredentials("root", "123")conn = pika.BlockingConnection(pika.ConnectionParameters(host='10.211.55.20', credentials=credentials))
# 超时时间
conn.add_timeout(5, lambda: channel.stop_consuming())channel = conn.channel()channel.queue_declare(queue='hello')def callback(ch, method, properties, body):print(" [x] Received %r" % body)channel.stop_consuming()channel.basic_consume(callback,queue='hello',no_ack=True)print(' [*] Waiting for messages. To exit press CTRL+C')
channel.start_consuming()
https://www.cnblogs.com/zhangxinqi/p/8460768.html


 京公网安备 11010802041100号 | 京ICP备19059560号-4 | PHP1.CN 第一PHP社区 版权所有