之前用 Ant Design 开发了一个项目,因此对 React 的特性有了一定的了解,React 使用封装组件的思想,组件各自维护自己的状态和 UI, 组件之间通过 props 传递数据和方法。当状态更新时自动重绘整个组件,从而达到局部刷新的效果,大大提高了 DOM 更新的效率,同时组件化十分有利于维护。在对 React 进行进一步的学习后,使用 Node.js + React 的方式实现了一个简单的 TodoList 单页应用,同时涉及简单的 MongoDB 数据库操作,总的来说,项目相对简单,十分适合 React 的入门学习。
Github地址: https://github.com/wx1993/Node-React-MongoDB-TodoList
应用功能
1、添加 todoList
2、删除 todoList
应用效果图
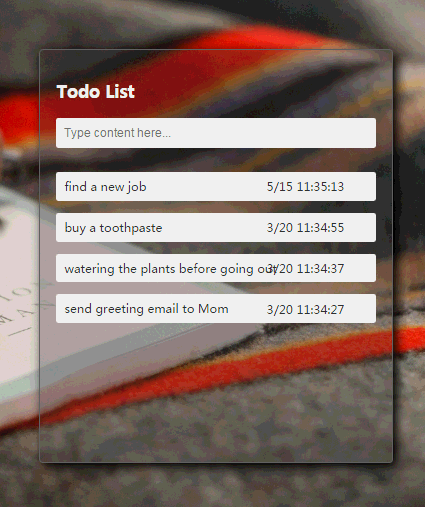
项目运行环境:
Windows/Mac
Node.js v6.9.4 or later
MongoDB
安装和配置 MongoDB:
Mac:http://www.cnblogs.com/wx1993/p/5187530.html
Windows: http://www.cnblogs.com/wx1993/p/5206587.html
http://www.cnblogs.com/wx1993/p/6518248.html
项目初始化
创建node项目(已经安装 Node.js, express,express-generator)
express -e demo
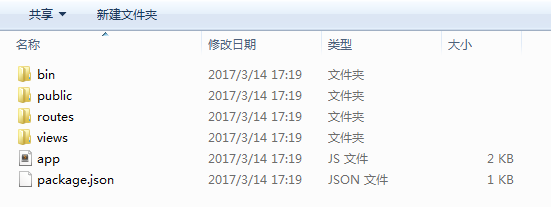
生成的文件目录结构如下:
配置 package.json
打开 package.json 文件,配置好项目需要安装的依赖如下:
 1 {
 2   "name": "demo",
 3   "version": "0.0.0",
 4   "private": true,
 5   "scripts": {
 6     "start": "node ./bin/www"
 7   },
 8   "dependencies": {
 9     "body-parser": "~1.16.0",
10     "COOKIE-parser": "~1.4.3",
11     "debug": "~2.6.0",
12     "ejs": "~2.5.5",
13     "express": "~4.14.1",
14     "jquery": "^3.1.1",
15     "mongoose": "^4.8.6",
16     "morgan": "~1.7.0",
17     "serve-favicon": "~2.3.2"
18   },
19   "devDependencies": {
20     "babel": "^6.23.0",
21     "babel-cli": "^6.23.0",
22     "babel-core": "^6.23.1",
23     "babel-loader": "^6.4.0",
24     "babel-preset-es2015": "^6.22.0",
25     "babel-preset-react": "^6.23.0",
26     "jquery": "^3.1.1",
27     "react": "^15.4.2",
28     "react-dom": "^15.4.2",
29     "webpack": "^2.2.1"
30   }
31 }
安装依赖:
npm install
安装 react、react-dom、webpack
npm install react react-dom webpack
Webpack 配置
在 node 项目下新建 webpack.config.js 文件,因为项目使用的技术方案为 webpack + react + es6,因此在 webpack 中配置如下:
 1 var path = require("path");
 2
 3 module.exports={
 4     // 项目入口
 5     entry:  "./src/pages/app.js",
 6     // 打包文件输出路径
 7     output: {
 8         path: path.join(__dirname,"./public/js"),
 9         filename: "bundle.js",
10     },
11     module: {
12         loaders: [{
13             test: /\.js$/,
14             loader: "babel-loader",
15             query: {
16                 presets: ['react','es2015']
17             }
18         },{
19             test: /\.jsx$/,
20             loader: 'babel-loader',
21             query: {
22                 presets: ['react', 'es2015']
23             }
24         },{
25             test: /\.css$/,
26             loader: "style!css"
27         },{
28             test: /\.(jpg|png|otf)$/,
29             loader: "url?limit=8192"
30         },{
31             test: /\.scss$/,
32             loader: "style!css!sass"
33         }]
34     }
35 };
修改 app.js,连接数据库
打开项目中的 app.js 文件,添加代码:
var mOngoose= require('mongoose')
mongoose.connect('mongodb://localhost:27017/todo')
使用 node.js 的 mongoose 库方法连接 MongoDB 数据库, 27017 是数据库默认端口号,todo是数据库名称,可自定义。
启动 MongoDB 服务
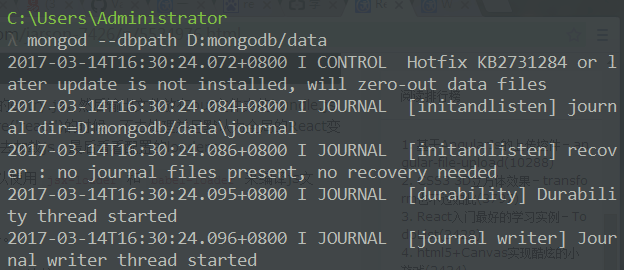
在命令行窗口输入命令
mongod --dbpath D:mongodb/data
dbpath 后面的是 MongoDB 下 data 文件夹所在目录,结果如下:
启动项目
npm start
打开浏览器窗口,效果如下:

那么到这里,项目基本上就跑起来了(暂时没有使用到webpack)
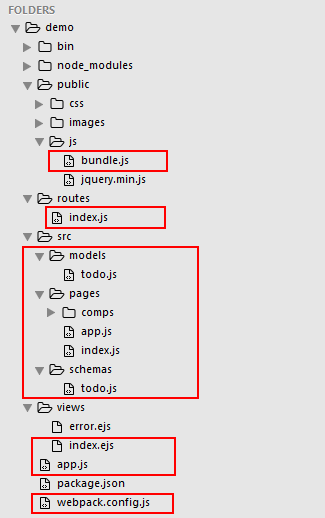
接下来看一下项目的目录结构:
首先看入口页面 index.ejs
 1 DOCTYPE html>
 2 <html>
 3 <head>
 4     <title><%= title %>title>
 5     <link rel='stylesheet' href='/css/style.css' />
 6 head>
 7 <body>
 8
 9     <div id="app">
10
11     div>
12
13     <script src="/js/bundle.js">script>
14 body>
15 html>
入口文件 src/pages/app.js
1 import React from 'react' 2 import ReactDOM from 'react-dom' 3 import Todo from './index.js' 4 5 ReactDOM.render( 6, 7 document.getElementById("app") 8 );
webpack会将入口文件进行合并和整理,最后输出一个bundle.js,所以所有的逻辑都在这个js文件中,因此在index.html中,只需要引入react框架和bundle.js就可以了。
数据库的定义和操作
src/schemas/todo.js
 1 var mOngoose= require('mongoose');
 2 var Schema = mongoose.Schema;
 3
 4 var Todo = new Schema({
 5     content: {
 6         type: String,
 7         required: true
 8     },
 9     date: {
10         type: String,
11         required: true
12     }
13 }, { collection: 'todo' });
14
15 module.exports = Todo;
数据集合十分简单,两个字段,内容和时间,并保存在 todo 表中,然后在 model 下的 todo.js 中定义数据库模型:
var mOngoose= require('mongoose');
var TodoSchema = require('../schemas/todo');
var TodoBox = mongoose.model('TodoBox', TodoSchema);

module.exports = TodoBox;
在路由中封装数据库操作接口,如下:
routes/index.js
 1 var express = require('express');
 2 var router = express.Router();
 3 var Todo = require('../src/models/todo')
 4
 5 router.get('/', (req, res, next) => {
 6     res.render('index', {
 7         title: 'React TodoList'
 8     });
 9 });
10
11 // 获取全部的todo
12 router.get('/getAllItems', (req, res, next) => {
13     Todo.find({}).sort({'date': -1}).exec((err, todoList) => {
14         if (err) {
15             console.log(err);
16         }else {
17             res.json(todoList);
18         }
19     })
20 });
21
22 // 添加todo
23 router.post('/addItem', (req, res, next) => {
24     let newItem = req.body;
25     Todo.create(newItem, (err) => {
26         if (err) {
27             console.log(err);
28         }else {
29             Todo.find({}, (err, todoList) => {
30                 if (err) {
31                     console.log(err);
32                 }else {
33                     res.json(todoList);
34                 }
35             });
36         }
37     })
38 })
39
40 // 删除todo
41 router.post('/deleteItem', (req, res, next) => {
42     console.log(req.body);
43     let delete_date = req.body.date
44     Todo.remove({date: delete_date}, (err, result) => {
45         if (err) {
46             console.log(err)
47         }else {
48             res.json(result);
49         }
50     });
51 });
52
53 module.exports = router;
代码也相对简单,主要是数据的增删改查。封装好接口之后,在组件中就可以通过 ajax 进行请求来完成数据的操作。
组件分析
根据项目的功能分成了三个组件,分别是父组件 index,todo列表子组件 todo-list, todo列表子组件 todo-item。
父组件 index.js
1 import React, { Component, PropTypes } from 'react' 2 import ReactDOM from 'react-dom' 3 import $ from 'jquery' 4 import TodoList from './comps/todo-list' 5 6 class Todo extends React.Component { 7 8 constructor(props) { 9 super(props); 10 this.state = { 11 todoList: [], 12 showTooltip: false // 控制 tooltip 的显示隐藏 13 } 14 } 15 16 componentDidMount () { 17 // 获取所有的 todolist 18 this._getTodoList(); 19 } 20 21 // 获取 todolist 22 _getTodoList () { 23 const that = this; 24 $.ajax({ 25 url: '/getAllItems', 26 type: 'get', 27 dataType: 'json', 28 success: data => { 29 const todoList = that.todoSort(data) 30 that.setState({ 31 todoList 32 }); 33 }, 34 error: err => { 35 console.log(err); 36 } 37 }); 38 } 39 40 // 添加 todo 41 _onNewItem (newItem) { 42 const that = this; 43 $.ajax({ 44 url: '/addItem', 45 type: 'post', 46 dataType: 'json', 47 data: newItem, 48 success: data => { 49 const todoList = that.todoSort(data); 50 that.setState({ 51 todoList 52 }); 53 }, 54 error: err => { 55 console.log(err); 56 } 57 }) 58 } 59 60 // 删除 todo 61 _onDeleteItem (date) { 62 const that = this; 63 const postData = { 64 date: date 65 }; 66 $.ajax({ 67 url: '/deleteItem', 68 type: 'post', 69 dataType: 'json', 70 data: postData, 71 success: data => { 72 this._getTodoList(); 73 }, 74 error: err => { 75 console.log(err); 76 } 77 }) 78 } 79 80 // 对 todolist 进行逆向排序(使新录入的项目显示在列表上面) 81 todoSort (todoList) { 82 todoList.reverse(); 83 return todoList; 84 } 85 86 // 提交表单操作 87 handleSubmit(event){ 88 89 event.preventDefault(); 90 // 表单输入为空验证 91 if(this.refs.content.value == "") { 92 this.refs.content.focus(); 93 this.setState({ 94 showTooltip: true 95 }); 96 return ; 97 } 98 // 生成参数 99 var newItem={ 100 content: this.refs.content.value, 101 date: (new Date().getMonth() +1 ) + "/" 102 + new Date().getDate() + " " 103 + new Date().getHours() + ":" 104 + new Date().getMinutes() + ":" 105 + new Date().getSeconds() 106 }; 107 // 添加 todo 108 this._onNewItem(newItem) 109 // 重置表单 110 this.refs.todoForm.reset(); 111 // 隐藏提示信息 112 this.setState({ 113 showTooltip: false, 114 }); 115 } 116 117 render() { 118 return ( 119120129 ) 130 } 131 } 132 133 export default Todo;Todo List
121 this.handleSubmit.bind(this) }> 122 123 { this.state.showTooltip && 124 Content is required ! 125 } 126 127this.state.todoList} OnDeleteItem={this._onDeleteItem.bind(this)} /> 128
父组件的功能:
1、在组件 DidMounted 时通过 ajax 请求所有的数据与 state 绑定实现首次渲染;
2、将数据,相应的方法分发给个子组件;
3 、实现添加、删除方法并传递给子组件。添加笔记的方法被触发的时候,发送ajax请求实现数据库数据的更新,再更新组件的state使之数据与后台数据保持一致,state一更新视图也会被重新渲染实现无刷新更新。
子组件 todo-list
1 import React from 'react'; 2 import TodoItem from './todo-item'; 3 4 class TodoList extends React.Component { 5 6 render() { 7 // 获取从父组件传递过来的 todolist 8 const todoList = this.props.todoList; 9 // 循环生成每一条 todoItem,并将 delete 方法传递给子组件 10 const todoItems = todoList.map((item,index) => { 11 return ( 12 <TodoItem 13 key={index} 14 cOntent={item.content} 15 date={item.date} 16 OnDeleteItem={this.props.onDeleteItem} 17 /> 18 ) 19 }); 20 21 return ( 2223 { todoItems } 2425 ) 26 } 27 } 28 29 export default TodoList;
子组件 todo-item
1 import React from 'react'; 2 3 class TodoItem extends React.Component { 4 5 constructor(props) { 6 super(props); 7 this.state = { 8 showDel: false // 控制删除 icon 的显示隐藏 9 } 10 } 11 12 handleDelete () { 13 // 获取父组件传递过来的 date 14 const date = this.props.date; 15 // 执行父组件的 delete 方法 16 this.props.onDeleteItem(date); 17 } 18 19 render() { 20 return ( 212230 ) 31 } 32 } 33 34 export default TodoItem;23 { this.props.content } 24 { this.props.date } 25 28
29
所以整个项目的组件之间的关系可以用下图表示:
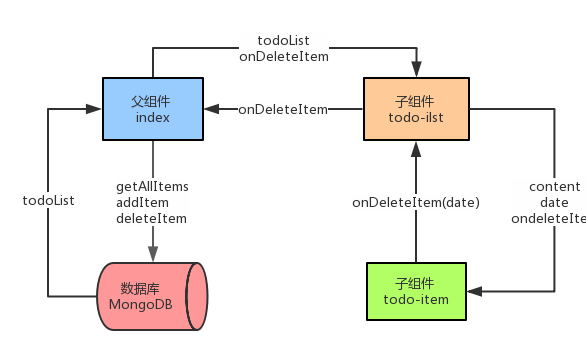
可以看到,父组件中定义了所有的方法,并连同获取到得数据分发给子组件,子组件中将从父组件中获取到的数据进行处理,同时触发父组件中的方法,完成数据的操作。根据功能划分组件,逻辑是十分清晰的,这也是 React 的一大优点。
最后是相关样式文件的编写,比较简单,这里贴上代码,具体的就不分析了。
style.css
 1 body {
 2       padding: 50px;
 3       font-size: 14px;
 4       font-family: 'comic sans';
 5       color: #fff;
 6       background-image: url(../images/bg2.jpg);
 7       background-size: cover;
 8 }
 9
10 button {
11     outline: none;
12     cursor: pointer;
13 }
14
15 .container {
16     position: absolute;
17     top: 15%;
18     right: 15%;
19     width: 400px;
20     height: 475px;
21     overflow-x: hidden;
22     overflow-y: auto;
23     padding: 20px;
24     border: 1px solid #666;
25     border-radius: 5px;
26     box-shadow: 5px 5px 20px #000;
27     background: rgba(60,60,60,0.3);
28 }
29
30 .header h2 {
31     padding: 0;
32     margin: 0;
33     font-size: 25px;
34     text-align: center;
35     letter-spacing: 1px;
36 }
37
38 .todoForm {
39     margin: 20px 0 30px 0;
40 }
41
42 .todoContent {
43     display: block;
44     width: 380px;
45     padding: 10px;
46     margin-bottom: 20px;
47     border: none;
48     border-radius: 3px;
49 }
50
51 .tooltip {
52     display: inline-b lock;
53     font-size: 14px;
54     font-weight: bold;
55     color: #FF4A60;
56 }
57
58 .todoItem {
59     margin-bottom: 10px;
60     color: #333;
61     background: #fff;
62     border-radius: 3px;
63 }
64
65 .todoItem p {
66     position: relative;
67     padding: 8px 10px;
68     font-size: 12px;
69 }
70
71 .itemTime {
72     position: absolute;
73     right: 40px;
74 }
75
76 .delBtn {
77     display: none;
78     position: absolute;
79     right: 3px;
80     bottom: 2px;
81     background: #fff;
82     border: none;
83     cursor: pointer;
84 }
85
86 .todoItem p:hover .delBtn {
87     display: block;
88 }
89
90 .delBtn img {
91     height: 20px;
92 }
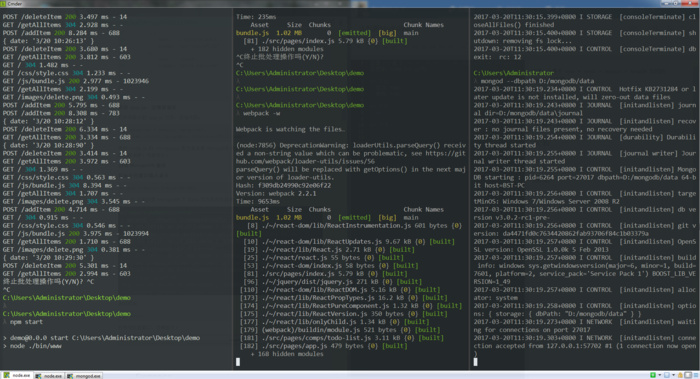
最后使用 webpack 进行打包,启动项目,就可以在浏览器中看到效果了。最后附上一张控制台的图片。

 京公网安备 11010802041100号 | 京ICP备19059560号-4 | PHP1.CN 第一PHP社区 版权所有