(
下载地址:http://mysql-mmm.org/downloads
版本:mysql-mmm-2.2.1.tar.gz
安装说明: http://mysql-mmm.org/mmm2:guide
安装说明很详细。
环境: 虚拟机,3台服务器,mysql-5.0.77
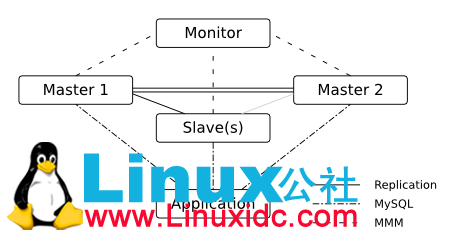
部署架构:
hostname IPAddress MMM Role VIP(R)
sdw_1 192.168.204.128 mysql-mmm-agent Master 192.168.204.202(Reader)
sdw_2 192.168.204.129 mysql-mmm-agent Master 192.168.204.203(Reader)
master 192.168.204.134 mysql-mmm-monitor None None
VIP:192.168.204.201 (Writer)
说明:1)在sdw_1和sdw_2服务器上,分别部署mysql服务,并配置成MM结构,即互为主从。
注意配置文件设置auto-increment-increment 和 auto_increment_offset 参数
2)VIP(Reader) 和VIP (Writer)不需要提前配置,由MMM软件根据配置文件的策略自动设置
(二) 安装过程。
1.# tar zxf mysql-mmm-2.2.1.tar.gz
# cd mysql-mmm-2.2.1
# make install
2.mmm软件是基于perl的。所以,需要安装许多perl的模块。
由于虚拟机环境无法连接到外网,所以这里只能手工安装。
第一次,我根据pdf说明文件,http://mysql-mmm.org/_media/:mmm2:mysql-mmm-2.2.1.pdf
根据需要的perl模块的名称,到http://www.cpan.org/ 搜索,然后安装,
结果,依赖关系超复杂,好容易装完,启动 mysql-mmm-agent 和 mysql-mmm-monitor ,
mmm软件日志,异常报错,无法正常启动,估计perl模块相关的程序运行不正常。
无奈,根据说明文档http://mysql-mmm.org/mmm2:guide,严格按照版本号,查找rpm包进行安装。
我下载的网址为:http://pkgs.repoforge.org/,具体过程不说了,就是下载,安装。
3.配置mysql 互为主从及添加权限;
mysql> show master status;
mysql>CHANGE MASTER TO master_host='192.168.204.128',
master_port=3306, master_user='replication',
master_password='replication_password',
master_log_file='mysql-bin.000001', master_log_pos=711;
mysql>GRANT REPLICATION CLIENT ON *.* TO 'mmm_monitor'@'192.168.204.%'
IDENTIFIED BY 'monitor_password';
mysql>GRANT SUPER, REPLICATION CLIENT, PROCESS ON *.* TO 'mmm_agent'@'192.168.204.%'
IDENTIFIED BY 'agent_password';
mysql>GRANT REPLICATION SLAVE ON *.* TO 'replication'@'192.168.204.%'
IDENTIFIED BY 'replication_password';
完成后,启动数据库,查看同步情况是否正常。
4.修改mmm配置文件:
mmm_common.conf: 在所有的服务器上,保持一致。
# vi /etc/mysql-mmm/mmm_common.conf
******************************************************************************************************************
active_master_role writer
cluster_interface eth0
pid_path /var/run/mmm_agentd.pid
bin_path /usr/lib/mysql-mmm/
replication_user replication
replication_password replication_password
agent_user mmm_agent
agent_password agent_password
ip 192.168.204.128
mode master
peer sdw_2
ip 192.168.204.129
mode master
peer sdw_1
hosts sdw_1, sdw_2
ips 192.168.204.201
mode exclusive
hosts sdw_1, sdw_2
ips 192.168.204.202, 192.168.204.203
mode balanced
******************************************************************************************************************
mmm_agent.conf: agent服务器,配置文件
# vi /etc/mysql-mmm/mmm_agent.conf
******************************************************************************************************************
include mmm_common.conf
this sdw_2
******************************************************************************************************************
# vi /etc/mysql-mmm/mmm_agent.conf
******************************************************************************************************************
include mmm_common.conf
this sdw_1
******************************************************************************************************************
mmm_mon.conf:monitor服务器,配置文件
# vi /etc/mysql-mmm/mmm_mon.conf
******************************************************************************************************************
include mmm_common.conf
ip 127.0.0.1
pid_path /var/run/mmm_mond.pid
bin_path /usr/lib/mysql-mmm/
status_path /var/lib/misc/mmm_mond.status
ping_ips 192.168.204.128, 192.168.204.129
monitor_user mmm_monitor
monitor_password monitor_password
debug 0
******************************************************************************************************************
5.启动服务:
sdw_1: # /etc/init.d/mysql-mmm-agent start //在sdw_1上启动agent服务
sdw_2: # /etc/init.d/mysql-mmm-agent start //在sdw_2上启动agent服务
master: # /etc/init.d/mysql-mmm-monitor start //在master服务器上启动monitor服务
master: # mmm_control show //查看服务器启动情况
master: # mmm_control help //查看 mmm_control 的帮助信息
master: # mmm_control set_online sdw_1 //使sdw_1上线,此时会配置sdw_1的VIP
master: # mmm_control set_online sdw_2 //使sdw_1上线,此时会配置sdw_2的VIP
master: # mmm_control show
*********************************************************************************************************************************
sdw_1(192.168.204.128) master/ONLINE. Roles: reader(192.168.204.202), writer(192.168.204.201)
sdw_2(192.168.204.129) master/ONLINE. Roles: reader(192.168.204.203)
*********************************************************************************************************************************
查看agent服务器上的虚拟IP:
sdw_1
# ip -f inet addr
*********************************************************************************************************************************
1: lo:
inet 127.0.0.1/8 scope host lo
2: eth0:
inet 192.168.204.128/24 brd 192.168.204.255 scope global eth0
inet 192.168.204.202/32 scope global eth0
inet 192.168.204.201/32 scope global eth0
*********************************************************************************************************************************
sdw_2
# ip -f inet addr
*********************************************************************************************************************************
1: lo:
inet 127.0.0.1/8 scope host lo
2: eth0:
inet 192.168.204.129/24 brd 192.168.204.255 scope global eth0
inet 192.168.204.203/32 scope global eth0
*********************************************************************************************************************************
6.上拓扑架构图:
Two Node:
#
Two master+One/Many slave:
#
7.补充信息:
mmm_mon在每台服务器上执行四种不同的检查,以确定相关服务是否OK:
1)ping host is pingable
2)mysql MySQL server on the host is alive
3)rep_threads replication threads are running
4)rep_backlog replication backlog is not too big
Modes:
1)Active Mode :
The monitor will remove roles from failed hosts and assign them to other hosts automatically.
2)Manual Mode:
The monitor will only distribute balanced roles across the hosts,
but will not remove roles from failed hosts automatically.
You can remove roles from failed hosts manually with move_role.
3)Wait mode :
Like MANUAL mode, but mode will be changed into ACTIVE mode
when both master hosts are ONLINE or after wait_for_other_master seconds have elapsed.
4)Passive mode:
In passive mode the monitor doesn't change roles, update the status file nor send anything to agents.
In passive mode you can modify roles (unclean) with set_ip - the changes won't be applied
until the monitor is switched to ACTIVE or MANUAL mode with set_active or set_manual.
Passive mode will be entered if conflicting roles are detected during startup.
You should then analyze the situation, fix the role information (if needed) and switch into ACTIVE
or MANUAL mode. It also can be entered manually with set_passive.
(四)相关测试性试验:
以下每次的测试均基于环境:
sdw_1 : VIP(Reader)192.168.204.202 VIP(Write):192.168.204.201
sdw_2: VIP(Reader)192.168.204.203
1.动作: sdw_2上, 停止mysql服务, # mysqladmin -u xxx -pxxxx shutdown
结果: sdw_2上的VIP(192.168.204.203)会自动迁移到 sdw_1上
2.动作: sdw_1上,停止MySQL服务, # mysqladmin -u xxx -pxxxx shutdown
结果: sdw_1上,负责读的VIP(192.168.204.202) 以及负责写的VIP(192.168.204.201)
会自动迁移到 sdw_2上。
动作: 此时,将sdw_1再重新启动 , # mysqld_safe &
结果: 则负责读的VIP (192.168.204.202)会切换到sdw_1上,但是 负责写的VIP,仍在sdw_2上。
3.动作:sdw_2上,手动停止同步服务, # slave stop;
结果: sdw_2上的VIP(192.168.204.203)会自动迁移到 sdw_1上
# mmm_control show
sdw_1(192.168.204.128) master/ONLINE. Roles: reader(192.168.204.202), writer(192.168.204.201)
sdw_2(192.168.204.129) master/REPLICATION_FAIL. Roles:
4.动作: 停止master服务器上的monitor服务, # /etc/init.d/mysql-mmm-monitor stop
结果: 对sdw_1 和sdw_2 的服务无影响
动作: 再次启动monitor服务, # /etc/init.d/mysql-mmm-monitor stop
结果: # mmm_control show
sdw_1(192.168.204.128) master/ONLINE. Roles: reader(192.168.204.202), writer(192.168.204.201)
sdw_2(192.168.204.129) master/ONLINE. Roles: reader(192.168.204.203)
对sdw_1 和 sdw_2 上的相关服务无影响。
5.动作: 停止sdw_1 上的slave服务, # slave stop;
结果: 无任何变化
理论上也应该是对现有的环境无任何影响。mmm这样设计是正确的。
总结:MMM设计的很合理,应该说是管理大规模MySQL主从关系很好的一个工具,也是一个很好的HA方案
不需要在系统层架构HA方案,例如:keepalive,以及RHEL的cluster等。
对MySQL的针对性也很强。
肯定还有很多其他的功能没有发掘出来,。。。。期待。。。。

 京公网安备 11010802041100号 | 京ICP备19059560号-4 | PHP1.CN 第一PHP社区 版权所有