作者:xc15212 | 来源:互联网 | 2023-09-24 11:07
一、实验目的:使用路由重分布达到全网互通的效果
二、拓扑图:

三、具体步骤配置:
1、先给各台主机配置ip地址及网关,以PC1为例:

2、路由器配置:
(1)R1路由器配置
Router>enable --进入特权模式
Router#configure terminal --进入全局配置模式
Enter configuration commands, one per line. End with CNTL/Z.
Router(config)#hostnam R1 --修改路由器名为R1
R1(config)#interface s0/0/0 --进入端口
R1(config-if)#ip address 192.168.32.2 255.255.255.0 --为端口配置ip地址
R1(config-if)#clock rate 64000 --配置时钟速率
R1(config-if)#no shutdown --激活端口
%LINK-5-CHANGED: Interface Serial0/0/0, changed state to down
R1(config-if)#interface s0/1/0 --进入端口
R1(config-if)#ip address 192.168.12.1 255.255.255.0 --为端口配置ip地址
R1(config-if)#clock rate 64000 --配置时钟速率
This command applies only to DCE interfaces
R1(config-if)#no shutdown --激活端口
%LINK-5-CHANGED: Interface Serial0/1/0, changed state to down
R1(config-if)#interface s0/0/1 --进入端口
R1(config-if)#ip address 192.168.22.1 255.255.255.0 --为端口配置ip地址
R1(config-if)#clock rate 64000 --配置时钟速率
This command applies only to DCE interfaces
R1(config-if)#no shutdown --激活端口
%LINK-5-CHANGED: Interface Serial0/0/1, changed state to down
R1(config-if)#exit --返回上一级
R1(config)#ip route 192.168.42.0 255.255.255.0 192.168.32.1 --配置静态路由
R1(config)#router ospf 1 --将R1的静态路由重分布到OSPF中
R1(config-router)#network 192.168.12.0 0.0.0.255 area 0
R1(config-router)#network 192.168.22.0 0.0.0.255 area 0
R1(config-router)#redistribute static subnet --重分布静态路由
R1(config-router)#redistribute connected subnet --重分布直连路由
R1(config-router)#end --返回特权模式
(2)R2路由器配置
Router>enable --进入特权模式
Router#configure terminal --进入全局配置模式
Enter configuration commands, one per line. End with CNTL/Z.
Router(config)#hostname R2 --修改路由器名为R2
R2(config)#interface s0/1/0 --进入端口
R2(config-if)#ip address 192.168.12.2 255.255.255.0 --为端口配置ip地址
R2(config-if)#clock rate 64000 --配置时钟速率
R2(config-if)#no shutdown --激活端口
R2(config-if)#interface s0/0/1 --进入端口
R2(config-if)#ip address 192.168.23.2 255.255.255.0 --为端口配置ip地址
R2(config-if)#clock rate 64000 --配置时钟速率
This command applies only to DCE interfaces
R2(config-if)#no shutdown --激活端口
%LINK-5-CHANGED: Interface Serial0/0/1, changed state to down
R2(config-if)#interface s0/0/0 --进入端口
R2(config-if)#ip address 192.168.13.1 255.255.255.0 --为端口配置ip地址
R2(config-if)#clock rate 64000 --配置时钟速率
R2(config-if)#no shutdown --激活端口
%LINK-5-CHANGED: Interface Serial0/0/0, changed state to down
R2(config-if)#exit --返回上一级
R2(config)#router ospf 1 --将R2的rip的路由信息重分布到OSPF中
R2(config-router)#network 192.168.12.0 0.0.0.255 area 0
R2(config-router)#network 192.168.13.0 0.0.0.255 area 0
R2(config-router)#redistribute rip metric 1 --重分布rip路由,必须指定度量值
% Only classful networks will be redistributed
R2(config-router)#exit --返回上一级
R2(config)#router rip --开启rip协议
R2(config-router)#version 2 --版本2
R2(config-router)#network 192.168.23.0 --将直连网段添加到rip
R2(config-router)#redistribute ospf 1 metric 1 --重分布OSPF路由
R2(config-router)#end --返回特权模式
(3)R3路由器配置
Router>enable --进入特权模式
Router#configure terminal --进入全局配置模式
Enter configuration commands, one per line. End with CNTL/Z.
Router(config)#hostname R3 --修改路由器名为R3
R3(config)#interface s0/0/0 --进入端口
R3(config-if)#ip address 192.168.22.2 255.255.255.0 --为端口配置ip地址
R3(config-if)#clock rate 64000 --配置时钟速率
R3(config-if)#no shutdown --激活端口
R3(config-if)#interface s0/0/1 --进入端口
R3(config-if)#ip address 192.168.13.2 255.255.255.0 --为端口配置ip地址
R3(config-if)#clock rate 64000 --配置时钟速率
This command applies only to DCE interfaces
R3(config-if)#no shutdown --激活端口
R3(config-if)#interface s0/1/0 --进入端口
R3(config-if)#ip address 192.168.33.1 255.255.255.0 --为端口配置ip地址
R3(config-if)#clock rate 64000 --配置时钟速率
R3(config-if)#no shutdown --激活端口
%LINK-5-CHANGED: Interface Serial0/1/0, changed state to down
R3(config-if)#exit --返回上一级
R3(config)#router ospf 1 --将R3的EIGRP的路由信息重分布到OSPF中
R3(config-router)#network 192.168.12.0 0.0.0.255 area 0
R3(config-router)#network 192.168.13.0 0.0.0.255 area 0
R3(config-router)#redistribute eigrp 1 metric-type 1 subnet --重分布EIGRP路由
R3(config-router)#exit --返回上一级
R3(config)#router eigrp 1 --将OSPF的路由信息重分布到EIGRP中
R3(config-router)#network 192.168.33.0 0.0.0.255
R3(config-router)#redistribute ospf 1 metric 1000 100 255 1 1500 --重分布EIGRP路由
R3(config-router)#end --返回特权模式
(4)R4路由器配置
Router>enable --进入特权模式
Router#configure terminal --进入全局配置模式
Enter configuration commands, one per line. End with CNTL/Z.
Router(config)#hostname R4 --修改路由器名为R4
R4(config)#interface f0/0 --进入端口
R4(config-if)#ip address 192.168.42.254 255.255.255.0 --为端口配置ip地址
R4(config-if)#no shutdown --激活端口
R4(config-if)#interface s0/0/0 --进入端口
R4(config-if)#ip address 192.168.32.1 255.255.255.0 --为端口配置ip地址
R4(config-if)#clock rate 64000 --配置时钟速率
This command applies only to DCE interfaces
R4(config-if)#no shutdown --激活端口
R4(config-if)#exit --返回上一级
R4(config)#ip route 0.0.0.0 0.0.0.0 192.168.32.2 --配置静态路由
R4(config)#end --返回特权模式
(5)R5路由器配置
Router>enable --进入特权模式
Router#configure terminal --进入全局配置模式
Enter configuration commands, one per line. End with CNTL/Z.
Router(config)#hostname R5 --修改路由器名为R5
R5(config)#interface s0/0/0 --进入端口
R5(config-if)#ip address 192.168.23.1 255.255.255.0 --为端口配置ip地址
R5(config-if)#clock rate 64000 --配置时钟速率
This command applies only to DCE interfaces
R5(config-if)#no shutdown --激活端口
R5(config-if)#interface f0/0 --进入端口
R5(config-if)#ip address 192.168.43.254 255.255.255.0 --为端口配置ip地址
R5(config-if)#no shutdown --激活端口
R5(config-if)#exit --返回上一级
R5(config)#route rip --开启rip协议
R5(config-router)#version 2 --版本2
R5(config-router)#network 192.168.43.0 --添加直连网段到rip
R5(config-router)#network 192.168.23.0 --添加直连网段到rip
R5(config-router)#end --返回特权模式
(6)R6路由器配置
Router>enable --进入特权模式
Router#configure terminal --进入全局配模式
Enter configuration commands, one per line. End with CNTL/Z.
Router(config)#hostname R6 --修改路由器名为R6
R6(config)#interface s0/0/0 --进入端口
R6(config-if)#ip address 192.168.33.2 255.255.255.0 --为端口配置ip地址
R6(config-if)#clock rate 64000 --配置时钟速率
R6(config-if)#no shutdown --激活端口
R6(config-if)#interface f0/0 --进入端口
R6(config-if)#ip address 192.168.53.254 255.255.255.0 --为端口配置ip地址
R6(config-if)#no shutdown --激活端口
R6(config-if)#exit --返回上一级
R6(config)#route eigrp 1 --开启EIGRP协议
R6(config-router)#network 192.168.33.0
R6(config-router)#network 192.168.53.0
R6(config-router)#end --返回特权模式
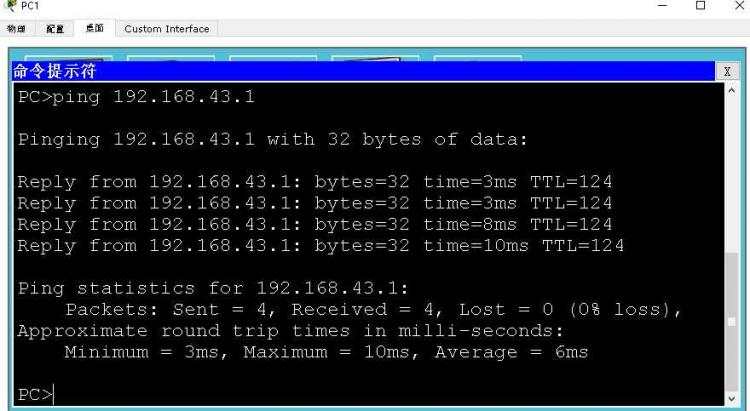
四、验证:三台主机相互ping,看是否全网互通
(1)PC1与PC2
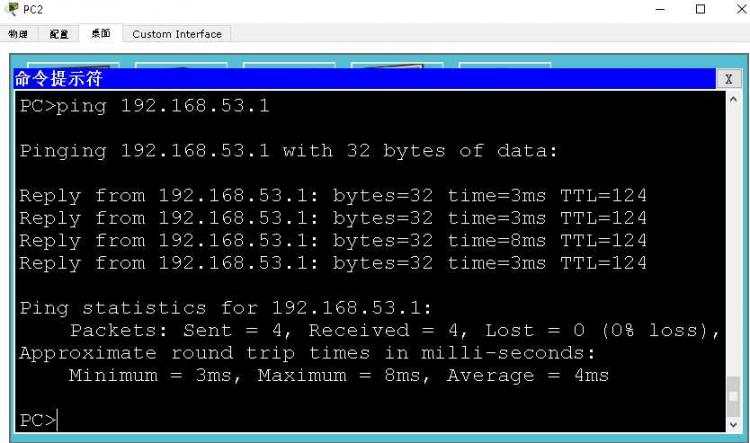
(2)PC2与PC3
(3)PC3与PC1


 京公网安备 11010802041100号