安装Pgpool-II
Pgpool-II 是一个位于 PostgreSQL服务器和 PostgreSQL数据库客户端之间的中间件,Pgpool-II提供了连接池(Connection Pooling)、复制(Replication)、负载均衡(Load Balancing)、缓存(In Memory Query Cache)、看门狗(Watchdog)、超出限制链接(Limiting Exceeding Connections)等功能,可以基于这些特性来搭建PostgreSQL高可用集群。
yum安装
官方参考地址
Yum Repository
Installation from RPM
安装CentOS7的yum源。
$ yum install http://www.pgpool.net/yum/rpms/4.0/redhat/rhel-7-x86_64/pgpool-II-release-4.0-1.noarch.rpm
安装支持PostgreSQL10版本的pgpool-II
$ yum install pgpool-II-pg10
$ yum install pgpool-II-pg10-debuginfo
$ yum install pgpool-II-pg10-devel
$ yum install pgpool-II-pg10-extensions
服务开机启动
$ systemctl enable pgpool.service
启动/停止服务
$ systemctl start pgpool.service
$ systemctl stop pgpool.service
配置Pgpool-II
参考文章
pgpool-II的安装及使用
PGPool-II+PG流复制实现HA主备切换
实例准备
role ip PostgreSQL Pgpool-II port
master 192.168.1.3 10.9 4.0.5 5432
slave 192.168.1.2 10.9 4.0.5 5432
vip 192.168.1.100 – – –
watchdog端口9000,pcp端口9898,psql服务连接端口9999
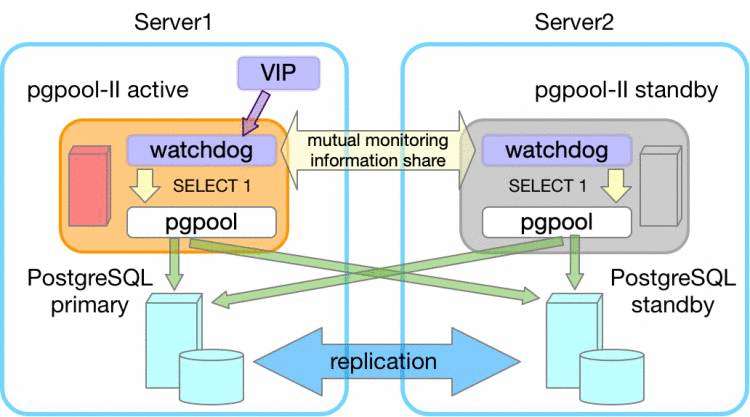
架构图
Pgpool-II集群
配置系统环境
配置程序运行的用户和组为 postgres
$ chown -R postgres.postgres /etc/pgpool-II
$ mkdir /var/run/pgpool/
$ chown postgres.postgres /var/run/pgpool/
$ vi /usr/lib/systemd/system/pgpool.service
User=postgres
Group=postgres
配置认证方式
配置pool_hba.conf,要么都是trust,要么都是md5验证方式,这里采用了md5验证方式如下设置
local all all md5
host all all 127.0.0.1/32 md5
host all all ::1/128 md5
host all all 0.0.0.0/0 md5
配置pg_hba.conf,认证方式保持一致
local all all md5
host all all 127.0.0.1/32 md5
host all all 0.0.0.0/0 md5
host all all ::1/128 md5
非必要可选步骤,为了集群可扩展性,可以将复制的认证条件放宽
local replication all md5
host replication all 127.0.0.1/32 md5
host replication all ::1/128 md5
host replication all 192.168.1.0/24 md5
配置pcp
pcp.conf 配置用于pgpool自己登陆管理使用的,一些操作pgpool的工具会要求提供密码等,配置如下
配置用户名密码
$ pg_md5 postgres
e8a48653851e28c69d0506508fb27fc5
$ vi pcp.conf
postgres:e8a48653851e28c69d0506508fb27fc5
添加pg数据库用户密码
在pgpool中添加pg数据库的用户名和密码,数据库登录用户是postgres,这里输入登录密码
$ pg_md5 -p -m -u postgres pool_passwd
password:
$ cat pool_passwd
postgres:md53175bce1d3201d16594cebf9d7eb3f9d
配置系统命令权限
$ chmod +s /sbin/ifconfig
$ chmod +s /sbin/ip
$ chmod +s /sbin/ifup
$ chmod +s /bin/ping
$ chmod +s /sbin/arping
配置 pgpool.conf
primary
$ cp pgpool.conf.sample-stream pgpool.conf
编辑内容如下
listen_addresses = ‘*’
port = 9999
pcp_listen_addresses = ‘*’
pcp_port = 9898
backend_hostname0 = ‘192.168.1.3’
backend_port0 = 5432
backend_weight0 = 1
backend_data_directory0 = ‘/var/lib/pgsql/10/data’
backend_flag0 = ‘ALLOW_TO_FAILOVER’
backend_hostname1 = ‘192.168.1.2’
backend_port1 = 5432
backend_weight1 = 1
backend_data_directory1 = ‘/var/lib/pgsql/10/data’
backend_flag1 = ‘ALLOW_TO_FAILOVER’
enable_pool_hba = on
pool_passwd = ‘pool_passwd’
authentication_timeout = 60
pid_file_name = ‘/var/run/pgpool/pgpool.pid’
connection_cache = on
replication_mode = off
load_balance_mode = on
master_slave_mode = on
master_slave_sub_mode = ‘stream’
sr_check_period = 5
sr_check_user = ‘repuser’
sr_check_password = ‘repuser’
sr_check_database = ‘postgres’
health_check_period = 10
health_check_timeout = 10
health_check_user = ‘postgres’
health_check_password = ‘postgres’
health_check_database = ‘postgres’
failover_command = ‘/var/lib/pgsql/10/failover_stream.sh %H’
use_watchdog = on
wd_hostname = ‘192.168.1.3’
wd_port = 9000
delegate_IP = ‘192.168.1.100’
if_cmd_path = ‘/sbin’
if_up_cmd = ‘ifconfig eth0:0 inet _IP_ netmask 255.255.255.0’
if_down_cmd = ‘ifconfig eth0:0 down’
heartbeat_destination0 = ‘192.168.1.2’
heartbeat_device0 = ‘eth0’
other_pgpool_hostname0 = ‘192.168.1.2’
other_pgpool_port0 = 9999
other_wd_port0 = 9000
standby
编辑内容如下
listen_addresses = ‘*’
port = 9999
pcp_listen_addresses = ‘*’
pcp_port = 9898
backend_hostname0 = ‘192.168.1.3’
backend_port0 = 5432
backend_weight0 = 1
backend_data_directory0 = ‘/var/lib/pgsql/10/data’
backend_flag0 = ‘ALLOW_TO_FAILOVER’
backend_hostname1 = ‘192.168.1.2’
backend_port1 = 5432
backend_weight1 = 1
backend_data_directory1 = ‘/var/lib/pgsql/10/data’
backend_flag1 = ‘ALLOW_TO_FAILOVER’
enable_pool_hba = on
pool_passwd = ‘pool_passwd’
authentication_timeout = 60
pid_file_name = ‘/var/run/pgpool/pgpool.pid’
connection_cache = on
replication_mode = off
load_balance_mode = on
master_slave_mode = on
master_slave_sub_mode = ‘stream’
sr_check_period = 5
sr_check_user = ‘repuser’
sr_check_password = ‘repuser’
sr_check_database = ‘postgres’
health_check_period = 10
health_check_timeout = 10
health_check_user = ‘postgres’
health_check_password = ‘postgres’
health_check_database = ‘postgres’
failover_command = ‘/var/lib/pgsql/10/failover_stream.sh %H’
use_watchdog = on
wd_hostname = ‘192.168.1.2’
wd_port = 9000
delegate_IP = ‘192.168.1.100’
if_cmd_path = ‘/sbin’
if_up_cmd = ‘ifconfig eth0:0 inet _IP_ netmask 255.255.255.0’
if_down_cmd = ‘ifconfig eth0:0 down’
heartbeat_destination0 = ‘192.168.1.3’
heartbeat_device0 = ‘eth0’
other_pgpool_hostname0 = ‘192.168.1.3’
other_pgpool_port0 = 9999
other_wd_port0 = 9000
failover_stream.sh
配置failover_stream.sh脚本,内容如下:
$ pwd
/var/lib/pgsql/10
$ touch failover_stream.sh
$ chmod u+x failover_stream.sh
$ cat failover_stream.sh
#! /bin/sh
new_master=$1
trigger_command="/usr/bin/pg_ctl promote -D /var/lib/pgsql/10/data"
/usr/bin/ssh -T $new_master $trigger_command
exit 0;
设置主机互信
配置ssh秘钥,分别在master、slave上生成ssh密钥对,并设置主机互信。
$ ssh-keygen -t rsa -b 1024
$ cd ~/.ssh
$ pwd
/var/lib/pgsql/.ssh
$ touch authorized_keys
$ chmod 600 authorized_keys
$ ssh postgres@192.168.1.3
$ ssh postgres@192.168.1.2
如果这个脚本的执行目标是本地,并且ssh本地登陆没有设置免秘钥,那么这个脚本会一直卡在输入密码的阶段,这时候主备自动切换过程就阻塞了。如果 pgpool和 postgresql在同一台机器部署,需要添加本地登陆免秘钥。
$ pwd
/var/lib/pgsql
$ cd .ssh/
$ ls
authorized_keys id_rsa id_rsa.pub
$ cat id_rsa.pub >> authorized_keys
启动集群
分别启动master、slave的PostgreSQL服务
$ systemctl start postgresql-10.service
分别启动各节点Pgpool-II服务
$ systemctl start pgpool.service
集群状态
用vip登录集群,查看状态
$ psql -p 9999 -h 192.168.1.100 -U postgres
Password for user postgres:
psql (10.9)
Type “help” for help.
postgres=# show pool_nodes;
node_id | hostname | port | status | lb_weight | role | select_cnt | load_balance_node | replication_delay | last_status_change
---------±--------------±-----±-------±----------±--------±-----------±------------------±------------------±--------------------
0 | 192.168.1.3 | 5432 | up | 0.500000 | primary | 5 | true | 0 | 2019-08-08 16:11:26
1 | 192.168.1.2 | 5432 | up | 0.500000 | standby | 3 | false | 0 | 2019-08-08 16:13:14
(2 rows)
至此,基于 Pgpool-II 中间件的 PostgreSQL 集群搭建完成。
PCP命令
获取节点数
$ pcp_node_count -h 192.168.1.3 -p 9898 -U postgres
Password:
2
$ pcp_node_count -h 192.168.1.2 -p 9898 -U postgres
Password:
2
获取节点信息
$ pcp_node_info -h 192.168.1.3 -p 9898 -U postgres 0
Password:
192.168.1.3 5432 2 0.500000 up primary 0 2019-08-08 16:11:26
$ pcp_node_info -h 192.168.1.3 -p 9898 -U postgres 1
Password:
192.168.1.2 5432 2 0.500000 up standby 0 2019-08-08 16:13:14
$
从pgpool-II中脱离一个节点
该命令将节点slave从pgpool-II中脱离。一般如果需要维护某个数据库节点、或不希望pgpool-II将连接分发到该节点时,需要将该节点从pgpool-II中用该命令脱离。
$ pcp_detach_node -h 192.168.1.100 -p 9898 -U postgres -n 1
为pgpool-II关联一个节点
该命令将节点slave关联到pgpool-II中。当维护结束,或新添加一个节点后,可以将节点添加到pgpool-II。
另外,如果该节点由于主机或数据库故障导致检测到数据库为启动时,即使后期服务器重新修复、数据库手工启动,也需要执行attach操作。同时需要注意从两个节点上观察是否节点都已经attach。
$ pcp_attach_node -h 192.168.1.100 -p 9898 -U postgres -n 1

 京公网安备 11010802041100号 | 京ICP备19059560号-4 | PHP1.CN 第一PHP社区 版权所有