2019独角兽企业重金招聘Python工程师标准>>> 
这本食谱包含演示如何在写Flutter应用程序时解决常见问题的食谱。 每个配方都是独立的,可以作为参考帮助您构建应用程序。
使用主题共享颜色和字体样式为了在整个应用中共享颜色和字体样式,我们可以利用主题。定义主题有两种方式:应用程序范围或使用Theme小部件来定义应用程序特定部分的颜色和字体样式。事实上,应用程序范围的主题只是由MaterialApp在应用程序根部创建的主题小部件!
在我们定义一个主题后,我们可以在自己的部件中使用它。另外,Flutter提供的Material Widgets将使用我们的主题为AppBars,Buttons,Checkboxes等设置背景颜色和字体样式。
创建应用主题
为了在整个应用程序中共享包含颜色和字体样式的主题,我们可以将ThemeData提供给MaterialApp构造函数。
如果没有提供Theme,Flutter将在后台创建一个后备主题。
new MaterialApp(title: title,theme: new ThemeData(brightness: Brightness.dark,primaryColor: Colors.lightBlue[800],accentColor: Colors.cyan[600],),
);
请参阅ThemeData文档以查看您可以定义的所有颜色和字体。
部分应用程序的主题
如果我们想在我们的应用程序的一部分中覆盖应用程序范围的主题,我们可以将我们的应用程序的一部分包装在Theme小部件中。
有两种方法可以解决这个问题:创建唯一的ThemeData,或者扩展父主题。
创建唯一的ThemeData
如果我们不想继承任何应用程序的颜色或字体样式,我们可以创建一个新的ThemeData()实例并将其传递给Theme部件。
new Theme(// Create a unique theme with "new ThemeData"data: new ThemeData(accentColor: Colors.yellow,),child: new FloatingActionButton(onPressed: () {},child: new Icon(Icons.add),),
);
扩展父主题
扩展父主题通常是有意义的,而不是覆盖所有。 我们可以通过使用copyWith方法来实现这一点。
new Theme(// Find and Extend the parent theme using "copyWith". Please see the next // section for more info on `Theme.of`.data: Theme.of(context).copyWith(accentColor: Colors.yellow),child: new FloatingActionButton(onPressed: null,child: new Icon(Icons.add),),
);
使用主题
现在我们已经定义了一个主题,我们可以使用Theme.of(context)函数在我们的部件build方法中使用它!
Theme.of(context)将查找部件树并返回树中最近的Theme。 如果我们的部件上方定义了独立的Theme,则返回该Theme。 如果不是,则返回应用程序范围Theme。
实际上,FloatingActionButton使用这种精确的技术来查找accentColor!
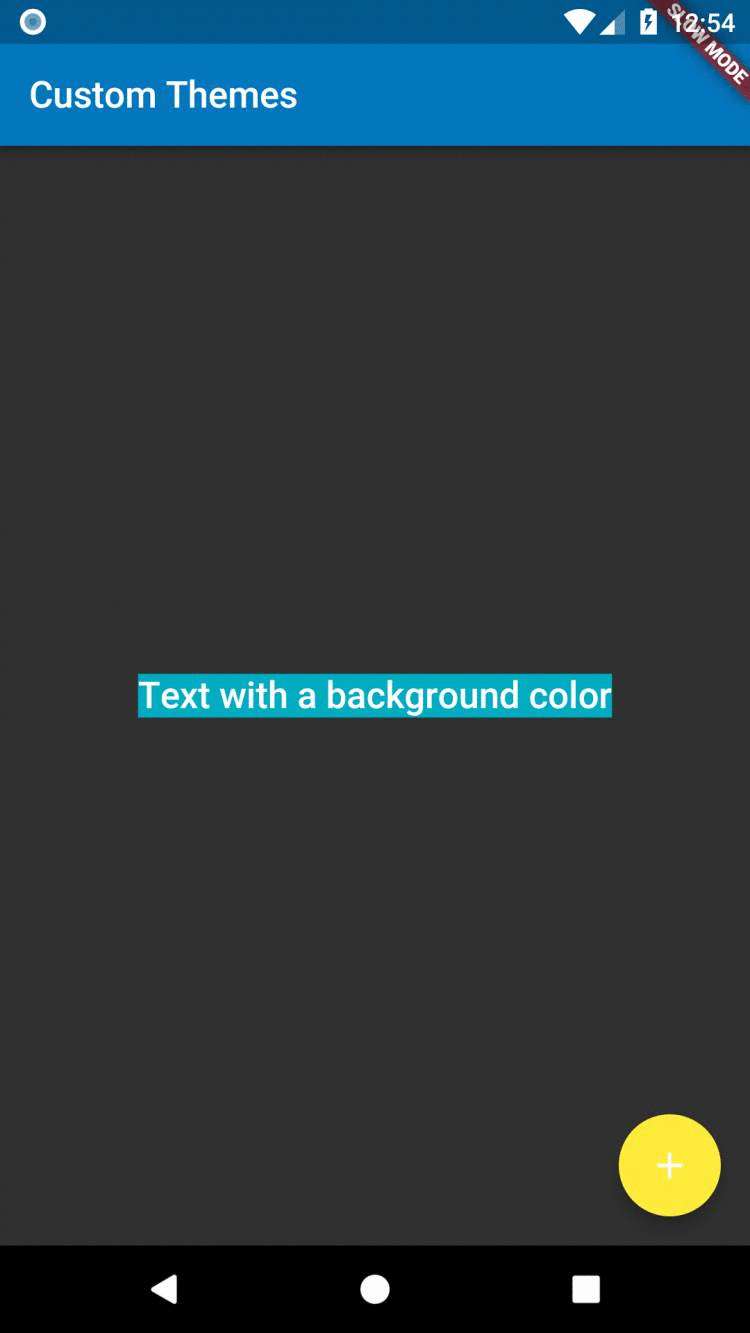
new Container(color: Theme.of(context).accentColor,child: new Text('Text with a background color',style: Theme.of(context).textTheme.title,),
);
完整的例子
import 'package:flutter/foundation.dart';
import 'package:flutter/material.dart';void main() {runApp(new MyApp());
}class MyApp extends StatelessWidget {@overrideWidget build(BuildContext context) {final appName = 'Custom Themes';return new MaterialApp(title: appName,theme: new ThemeData(brightness: Brightness.dark,primaryColor: Colors.lightBlue[800],accentColor: Colors.cyan[600],),home: new MyHomePage(title: appName,),);}
}class MyHomePage extends StatelessWidget {final String title;MyHomePage({Key key, @required this.title}) : super(key: key);@overrideWidget build(BuildContext context) {return new Scaffold(appBar: new AppBar(title: new Text(title),),body: new Center(child: new Container(color: Theme.of(context).accentColor,child: new Text('Text with a background color',style: Theme.of(context).textTheme.title,),),),floatingActionButton: new Theme(data: Theme.of(context).copyWith(accentColor: Colors.yellow),child: new FloatingActionButton(onPressed: null,child: new Icon(Icons.add),),),);}
}
在某些情况下,当发生某些操作时可以方便地向用户简单通知。 例如,当用户在列表中删除消息时,我们可能想通知他们消息已被删除。 我们甚至可能想给他们一个撤消行为的选择!
在Material Design中,这是SnackBar的工作。
路线
- 创建一个Scaffold
- 显示一个SnackBar
- 提供额外的操作
1.创建一个Scaffold
在创建遵循材质设计指南的应用程序时,我们希望为我们的应用程序提供一致的可视化结构。 在这种情况下,我们需要在屏幕底部显示SnackBar,而不会与其它重要的部件重叠,例如FloatingActionButton!
材料库中的Scaffold部件为我们创建了这个视觉结构,并确保重要的部件不会重叠!
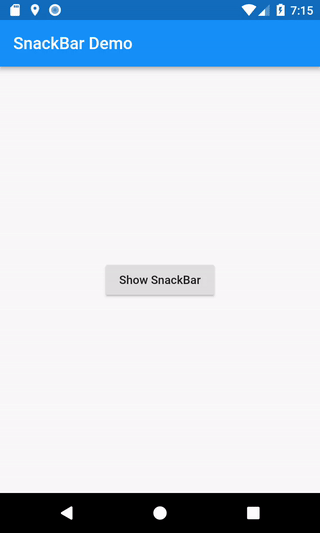
new Scaffold(appBar: new AppBar(title: new Text('SnackBar Demo'),),body: new SnackBarPage(), // We'll fill this in below!
);
2.显示一个SnackBar
使用Scaffold,我们可以展示SnackBar! 首先,我们需要创建一个SnackBar,然后使用Scaffold显示它。
final snackBar = new SnackBar(content: new Text('Yay! A SnackBar!'));// Find the Scaffold in the Widget tree and use it to show a SnackBar
Scaffold.of(context).showSnackBar(snackBar);
3.提供额外的操作
在某些情况下,我们可能希望在显示SnackBar时向用户提供额外的操作。 例如,如果他们意外删除了一条消息,我们可以提供撤消该更改的操作。
为了达到这个目的,我们可以为SnackBar部件提供额外的action。
final snackBar = new SnackBar(content: new Text('Yay! A SnackBar!'),action: new SnackBarAction(label: 'Undo',onPressed: () {// Some code to undo the change!},),
);
完整的例子
注意:在本例中,我们将在用户点击按钮时显示SnackBar。 有关处理用户输入的更多信息,请参阅食谱的处理手势部分。
import 'package:flutter/material.dart';void main() => runApp(new SnackBarDemo());class SnackBarDemo extends StatelessWidget {@overrideWidget build(BuildContext context) {return new MaterialApp(title: 'SnackBar Demo',home: new Scaffold(appBar: new AppBar(title: new Text('SnackBar Demo'),),body: new SnackBarPage(),),);}
}class SnackBarPage extends StatelessWidget {@overrideWidget build(BuildContext context) {return new Center(child: new RaisedButton(onPressed: () {final snackBar = new SnackBar(content: new Text('Yay! A SnackBar!'),action: new SnackBarAction(label: 'Undo',onPressed: () {// Some code to undo the change!},),);// Find the Scaffold in the Widget tree and use it to show a SnackBar!Scaffold.of(context).showSnackBar(snackBar);},child: new Text('Show SnackBar'),),);}
}
使用选项卡是遵循Material Design指南的应用程序中的常见模式。 Flutter包含创建选项卡布局作为材料库的一部分的便捷方式。
路线
-
创建一个TabController
-
创建选项卡
-
为每个选项卡创建内容
1.创建一个TabController
为了让选项卡工作,我们需要保持所选选项卡和内容部分的同步。 这是TabController的工作。
我们可以手动创建TabController或使用DefaultTabController部件。 使用DefaultTabController是最简单的选择,因为它会为我们创建一个TabController并使其可供所有后代控件使用。
new DefaultTabController(// The number of tabs / content sections we need to displaylength: 3,child: // See the next step!
);
2.创建选项卡
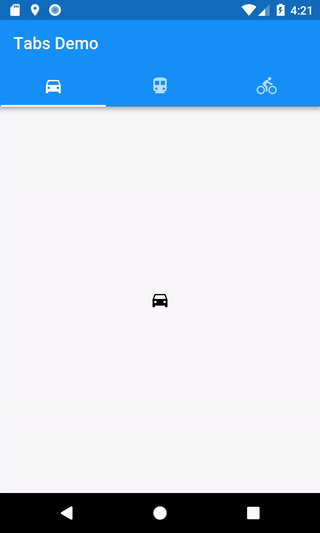
既然我们有一个TabController可以使用,我们可以使用TabBar部件创建我们的选项卡。 在这个例子中,我们将创建一个带有3个Tab小部件的TabBar,并将其放置在AppBar中。
new DefaultTabController(length: 3,child: new Scaffold(appBar: new AppBar(bottom: new TabBar(tabs: [new Tab(icon: new Icon(Icons.directions_car)),new Tab(icon: new Icon(Icons.directions_transit)),new Tab(icon: new Icon(Icons.directions_bike)),],),),),
);
默认情况下,TabBar查找最近的DefaultTabController的部件树。 如果你手动创建一个TabController,你需要将它传递给TabBar。
3.为每个选项卡创建内容
现在我们有了选项卡,我们希望在选择标签时显示内容。 为此,我们将使用TabBarView部件。
注意:顺序很重要,必须与TabBar中的选项卡顺序相对应!
new TabBarView(children: [new Icon(Icons.directions_car),new Icon(Icons.directions_transit),new Icon(Icons.directions_bike),],
);
完整实例
import 'package:flutter/material.dart';void main() {runApp(new TabBarDemo());
}class TabBarDemo extends StatelessWidget {@overrideWidget build(BuildContext context) {return new MaterialApp(home: new DefaultTabController(length: 3,child: new Scaffold(appBar: new AppBar(bottom: new TabBar(tabs: [new Tab(icon: new Icon(Icons.directions_car)),new Tab(icon: new Icon(Icons.directions_transit)),new Tab(icon: new Icon(Icons.directions_bike)),],),title: new Text('Tabs Demo'),),body: new TabBarView(children: [new Icon(Icons.directions_car),new Icon(Icons.directions_transit),new Icon(Icons.directions_bike),],),),),);}
}
虽然Android和iOS提供高质量的系统字体,但设计师最常见的要求之一是使用自定义字体! 例如,我们可能会从我们的设计人员那里获得一个定制的字体,或者从谷歌字体中下载一种字体。
Flutter使用自定义字体开箱即用。 我们可以将字体应用到整个应用程序或个别小部件。
路线
- 导入字体文件
- 在pubspec.yaml中声明该字体
- 将字体设置为默认值
- 在特定的部件中使用字体
1.导入字体文件
为了处理字体,我们需要将字体文件导入到项目中。 将字体文件放在Flutter项目的根目录下的fonts或assets文件夹中是很常见的做法。
例如,如果我们想将Raleway和Roboto Mono字体文件导入到我们的项目中,那么文件夹结构如下所示:
awesome_app/fonts/Raleway-Regular.ttfRaleway-Italic.ttfRobotoMono-Regular.ttfRobotoMono-Bold.ttf
2.在pubspec.yaml中声明该字体
现在我们有一个可以使用的字体,我们需要告诉Flutter在哪里找到它。 我们可以通过在pubspec.yaml中包含一个字体定义来实现。
flutter:fonts:- family: Ralewayfonts:- asset: fonts/Raleway-Regular.ttf- asset: fonts/Raleway-Italic.ttfstyle: italic- family: RobotoMonofonts:- asset: fonts/RobotoMono-Regular.ttf- asset: fonts/RobotoMono-Bold.ttfweight: 700
pubspec.yaml选项定义
family决定字体的名称,我们可以在TextStyle对象的fontFamily属性中使用它。
asset是相对于pubspec.yaml文件的字体文件的路径。 这些文件包含字体中字形的轮廓。 在构建我们的应用程序时,这些文件包含在我们应用程序的asset包中。
单个字体可以引用具有不同轮廓重量和样式的许多不同文件:
- weight属性指定文件中轮廓线的权重为100到900之间的整数倍。这些值对应于FontWeight,可用于TextStyle对象的fontWeight属性。
- style属性指定文件中的轮廓是italic还是normal。 这些值对应于FontStyle,可用于TextStyle对象的fontStyle属性。
3.将字体设置为默认值
对于如何将字体应用于文本,我们有两种选择:作为默认字体或仅在特定的小部件中。
要使用字体作为默认字体,我们可以将fontFamily属性设置为应用theme的一部分。 我们提供给fontFamily的值必须与pubspec.yaml中声明的family相匹配。
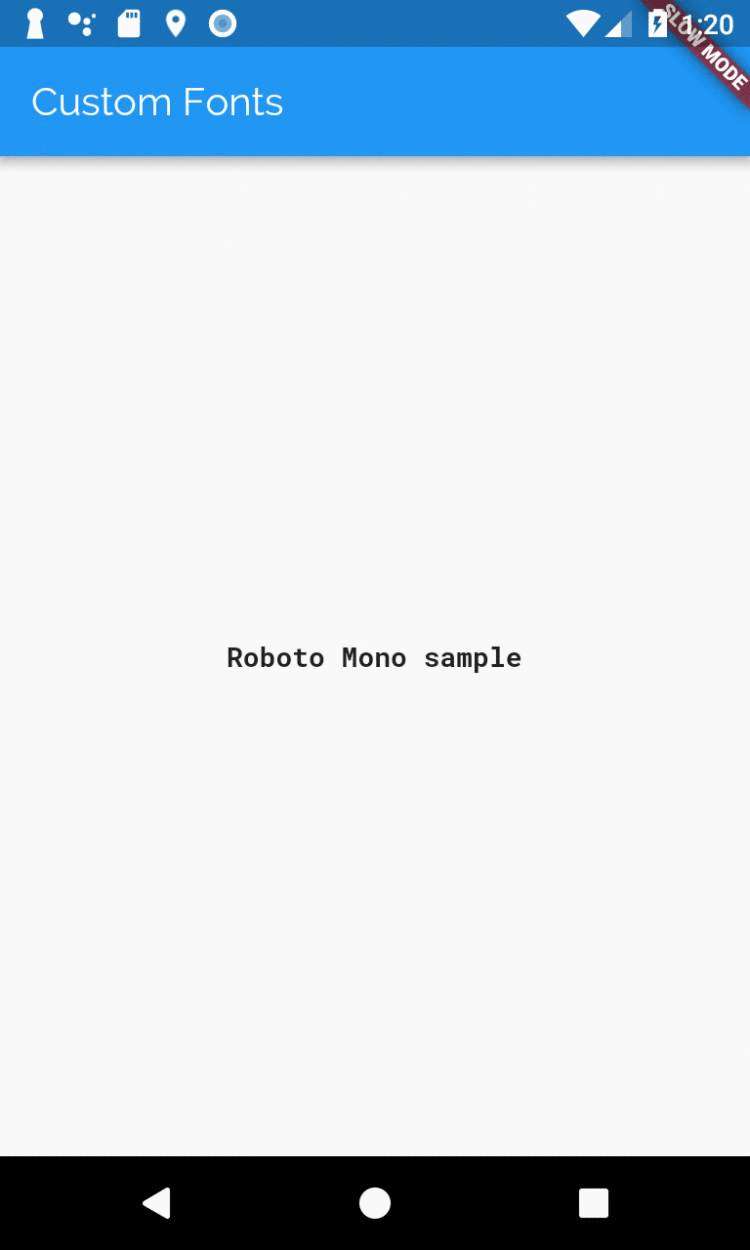
new MaterialApp(title: 'Custom Fonts',// Set Raleway as the default app fonttheme: new ThemeData(fontFamily: 'Raleway'),home: new MyHomePage(),
);
有关主题的更多信息,请查看“使用主题共享颜色和字体样式”配方。
4.在特定的部件中使用字体
如果我们想将字体应用于特定的部件,比如Text部件,我们可以向部件提供一个TextStyle。
在这个例子中,我们将RobotoMono字体应用于单个Text部件。fontFamily再一次必须与我们在pubspec.yaml中声明的family相匹配。
new Text('Roboto Mono sample',style: new TextStyle(fontFamily: 'RobotoMono'),
);
TextStyle
如果TextStyle对象指定没有确切字体文件的权重或样式,则该引擎使用该字体的更通用文件之一,并尝试针对所请求的权重和样式推断轮廓。
完整的例子
Fonts
Raleway和RobotoMono字体是从谷歌字体下载的。
pubspec.yaml
name: custom_fonts
description: An example of how to use custom fonts with Flutterdependencies:flutter:sdk: flutterdev_dependencies:flutter_test:sdk: flutterflutter:fonts:- family: Ralewayfonts:- asset: fonts/Raleway-Regular.ttf- asset: fonts/Raleway-Italic.ttfstyle: italic- family: RobotoMonofonts:- asset: fonts/RobotoMono-Regular.ttf- asset: fonts/RobotoMono-Bold.ttfweight: 700uses-material-design: true
main.dart
import 'package:flutter/material.dart';void main() => runApp(new MyApp());class MyApp extends StatelessWidget {@overrideWidget build(BuildContext context) {return new MaterialApp(title: 'Custom Fonts',// Set Raleway as the default app fonttheme: new ThemeData(fontFamily: 'Raleway'),home: new MyHomePage(),);}
}class MyHomePage extends StatelessWidget {@overrideWidget build(BuildContext context) {return new Scaffold(// The AppBar will use the app-default Raleway fontappBar: new AppBar(title: new Text('Custom Fonts')),body: new Center(// This Text Widget will use the RobotoMono font child: new Text('Roboto Mono sample',style: new TextStyle(fontFamily: 'RobotoMono'),),),);}
}
我们可以将字体声明为单独程序包的一部分,而不是将字体声明为我们的应用程序的一部分。 这是一种方便的方式,可以跨几个不同的项目共享相同的字体,也可以将包发布到 pub website。
路线
- 将字体添加到包中
- 将包和字体添加到我们的应用程序
- 使用字体
1.将字体添加到包中
要从包中导出字体,我们需要将字体文件导入到我们包项目的lib文件夹中。 我们可以将字体文件直接放在lib文件夹或子目录中,比如lib/fonts。
在这个例子中,我们假设我们有一个名为awesome_package的Flutter库,其中的字体位于lib/fonts文件夹中。
awesome_package/lib/awesome_package.dartfonts/Raleway-Regular.ttfRaleway-Italic.ttf
2.将包和字体添加到我们的应用程序
我们现在可以使用该包并使用它提供的字体。 这涉及到更新应用根目录中的pubspec.yaml。
将该包添加到项目中
dependencies:awesome_package:
声明字体assets
现在我们已经导入了包,我们需要告诉Flutter从awesome_package中找到哪些字体。
要声明包字体,我们必须用packages/awesome_package前缀到字体的路径。 这将告诉Flutter查看包的字体的lib文件夹。
flutter:fonts:- family: Ralewayfonts:- asset: packages/awesome_package/fonts/Raleway-Regular.ttf- asset: packages/awesome_package/fonts/Raleway-Italic.ttfstyle: italic
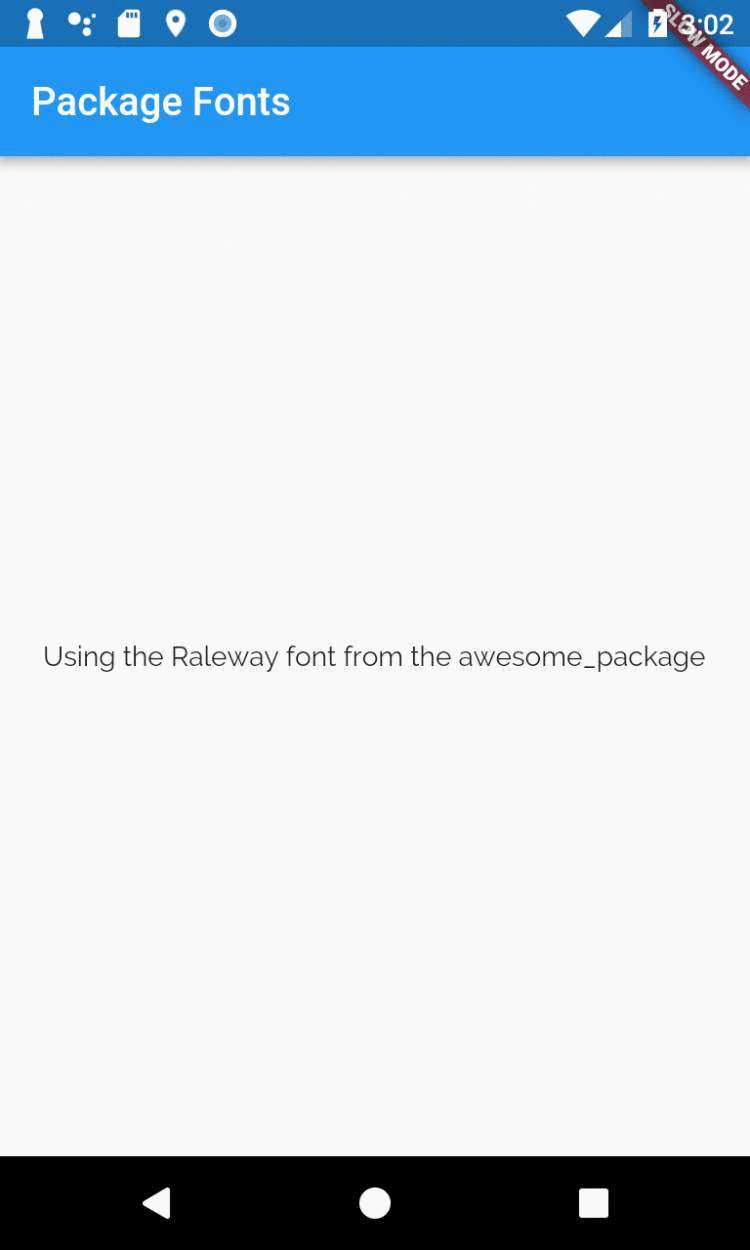
3.使用字体
我们可以使用TextStyle来改变文本的外观。 要使用包字体,我们不仅需要声明我们想要使用哪种字体,还需要声明字体所属的package。
new Text('Using the Raleway font from the awesome_package',style: new TextStyle(fontFamily: 'Raleway',package: 'awesome_package',),
);
完整的例子
Font
Raleway和RobotoMono字体是从谷歌字体下载的。
pubspec.yaml
name: package_fonts
description: An example of how to use package fonts with Flutterdependencies:awesome_package:flutter:sdk: flutterdev_dependencies:flutter_test:sdk: flutterflutter:fonts:- family: Ralewayfonts:- asset: packages/awesome_package/fonts/Raleway-Regular.ttf- asset: packages/awesome_package/fonts/Raleway-Italic.ttfstyle: italicuses-material-design: true
main.dart
import 'package:flutter/material.dart';void main() => runApp(new MyApp());class MyApp extends StatelessWidget {@overrideWidget build(BuildContext context) {return new MaterialApp(title: 'Package Fonts',home: new MyHomePage(),);}
}class MyHomePage extends StatelessWidget {@overrideWidget build(BuildContext context) {return new Scaffold(// The AppBar will use the app-default Raleway fontappBar: new AppBar(title: new Text('Package Fonts')),body: new Center(// This Text Widget will use the RobotoMono font child: new Text('Using the Raleway font from the awesome_package',style: new TextStyle(fontFamily: 'Raleway',package: 'awesome_package',),),),);}
}
在采用Material Design的应用中,导航有两个主要选项:选项卡和抽屉。 当没有足够的空间来支持标签时,抽屉提供了一个方便的选择。
在Flutter中,我们可以将Drawer小工具与Scaffold结合使用,以创建带有材质设计Drawer的布局!
路线
- 创建一个Scaffold
- 添加一个Drawer
- 用条目填充Drawer
- 以编程方式关闭Drawer
1.创建一个Scaffold
为了将Drawer添加到我们的应用程序中,我们需要将其包装在Scaffold部件中。 Scaffold部件为遵循Material Design Guidelines的应用程序提供了一致的可视化结构。 它还支持特殊的Material Design组件,例如Drawers,AppBars和SnackBars。
在这种情况下,我们需要创建一个带Drawer的Scaffold:
new Scaffold(drawer: // We'll add our Drawer here in the next step!
);
2.添加一个Drawer
我们现在可以为我们的Scaffold增加一个Drawer。 Drawer可以是任何部件,但通常最好使用材质库中的Drawer部件,该材质库遵守材质设计规范。
new Scaffold(drawer: new Drawer(child: // We'll populate the Drawer in the next step!)
);
3.用条目填充Drawer
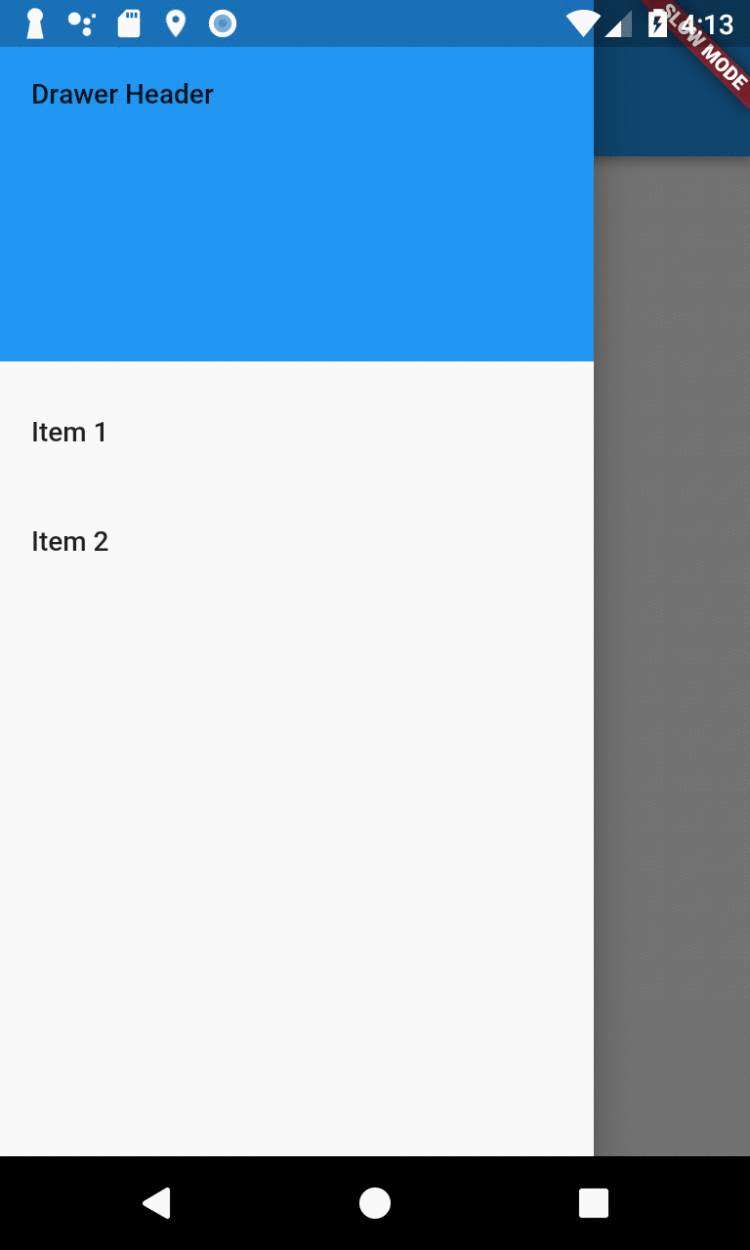
现在我们有了一个Drawer,我们可以添加内容! 在这个例子中,我们将使用一个ListView。 尽管我们可以使用Column部件,但ListView在这种情况下很方便,因为如果内容占用的空间比屏幕支持的更多,它将允许用户滚动抽屉。
我们将用一个DrawerHeader和两个ListTile部件填充ListView。 有关使用列表的更多信息,请参阅列表配方。
new Drawer(// Add a ListView to the drawer. This ensures the user can scroll// through the options in the Drawer if there isn't enough vertical// space to fit everything.child: new ListView(// Important: Remove any padding from the ListView.padding: EdgeInsets.zero,children:
);
4.以编程方式关闭Drawer
用户点击物品后,我们经常想要关闭抽屉。 我们怎样才能做到这一点? 使用Navigator!
当用户打开抽屉时,Flutter会将抽屉添加到引擎盖下的导航堆栈中。 因此,要关闭抽屉,我们可以调用Navigator.pop(context)。
new ListTile(title: new Text('Item 1'),onTap: () {// Update the state of the app// ...// Then close the drawer Navigator.pop(context);},
),
完整的例子
import 'package:flutter/material.dart';void main() => runApp(new MyApp());class MyApp extends StatelessWidget {final appTitle = 'Drawer Demo';@overrideWidget build(BuildContext context) {return new MaterialApp(title: appTitle,home: new MyHomePage(title: appTitle),);}
}class MyHomePage extends StatelessWidget {final String title;MyHomePage({Key key, this.title}) : super(key: key);@overrideWidget build(BuildContext context) {return new Scaffold(appBar: new AppBar(title: new Text(title)),body: new Center(child: new Text('My Page!')),drawer: new Drawer(// Add a ListView to the drawer. This ensures the user can scroll// through the options in the Drawer if there isn't enough vertical// space to fit everything.child: new ListView(// Important: Remove any padding from the ListView.padding: EdgeInsets.zero,children:
}

![python的交互模式怎么输出名文汉字[python常见问题]](https://img1.php1.cn/3cd4a/24cea/978/9f39a0b333a15215.gif)


 京公网安备 11010802041100号