①积分图像的实现
首先在Integral.cpp里面找到Integral(),如下:
IplImage *Integral(IplImage *source)
{//转换成单通道图像 convert the image to single channel 32fIplImage *img = getGray(source);IplImage *int_img = cvCreateImage(cvGetSize(img), IPL_DEPTH_32F, 1);//给变量赋值 set up variables for data accessint height = img->height;int width = img->width;int step = img->widthStep/sizeof(float);float *data   = (float *) img->imageData;  float *i_data = (float *) int_img->imageData;  //仅限第一行 first row onlyfloat rs = 0.0f;for(int j=0; j}
1. 首先将原输入转化为灰度图像,并创建一个大小等于灰度图像gray-image的图像数组--积分图像int_img。
2. 获取图像的信息,比如大小(高height和宽width)以及gray-image和积分图像int_img的数据首地址data && i_data。(注意此时数据类型为float)
3. 首先计算第一行像素的积分值,相当于一维数据的累加。其他数据通过迭代计算获取,i_data[i*step+j] = rs + i_data[(i-1)*step+j],若当前点为(i,j),其中rs就为第 i 行第 j 列之前(包括第 i 行第 j 列)所有像素值和。 如下所示:
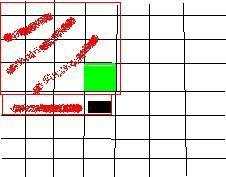
[其中黑色为当前点i_data[i*step+j],绿色为当前点同一列上一行的点i_data[(i-1)*step+j],而rs=横放着的和黑色点同行的那块矩形框对应的区域像素值之和]
4. 释放灰度图像,并返回积分图像。
integral.h中的相关函数: BoxIntegral().
inline float BoxIntegral(IplImage *img, int row, int col, int rows, int cols)
其中,几个参数意思分别为源图像,row,col为A点的坐标值,rows和cols分别为高和宽。
利用上面的积分图像计算 A B 这样的box区域里面所有像素点的灰度值之和。S=int_img(D)+int_img(A)-int_img(B)-int_img(C).
C D
②Hessian矩阵特征的计算
FastHessian,计算hessian矩阵的类,它的定义在fasthessian.h里,实现在fasthessian.cpp里。
class FastHessian {public://! Constructor without imageFastHessian(std::vector &ipts, const int octaves = OCTAVES, const int intervals = INTERVALS, const int init_sample = INIT_SAMPLE, const float thres = THRES);//! Constructor with imageFastHessian(IplImage *img, std::vector &ipts, const int octaves = OCTAVES, const int intervals = INTERVALS, const int init_sample = INIT_SAMPLE, const float thres = THRES);//! Destructor~FastHessian();//! Save the parametersvoid saveParameters(const int octaves, const int intervals,const int init_sample, const float thres);//!设置或重设源积分图像 Set or re-set the integral image sourcevoid setIntImage(IplImage *img);//!寻找图像特征并写入特征向量 Find the image features and write into vector of featuresvoid getIpoints();private://---------------- Private Functions -----------------////! Build map of DoH(Determinant of Hessian) responsesvoid buildResponseMap();//! Calculate DoH responses for supplied layervoid buildResponseLayer(ResponseLayer *r);//! 3x3x3 Extrema testint isExtremum(int r, int c, ResponseLayer *t, ResponseLayer *m, ResponseLayer *b);    //! 插值函数Interpolation functions - adapted from Lowe's SIFT implementationvoid interpolateExtremum(int r, int c, ResponseLayer *t, ResponseLayer *m, ResponseLayer *b);void interpolateStep(int r, int c, ResponseLayer *t, ResponseLayer *m, ResponseLayer *b,double* xi, double* xr, double* xc );CvMat* deriv3D(int r, int c, ResponseLayer *t, ResponseLayer *m, ResponseLayer *b);CvMat* hessian3D(int r, int c, ResponseLayer *t, ResponseLayer *m, ResponseLayer *b);//---------------- Private Variables -----------------////! Pointer to the integral Image, and its attributes IplImage *img;int i_width, i_height;//! Reference to vector of features passed from outside std::vector &ipts;//!海森矩阵行列式的响应栈 Response stack of determinant of hessian valuesstd::vector responseMap;//! 高斯金字塔的组数int octaves;//! 每组的层数int intervals;//! 特征点检测的初始抽样步骤 Initial sampling step for Ipoint detectionint init_sample;//! Threshold value for blob resonsesfloat thresh;
};
在public里面定义了两种构造函数分别对应有无源图像这一项参数,紧接着还定义了析构函数~FastHessian等函数。下面在fasthessian.cpp对这些函数的实现一一解释:
两个构造函数都是调用了saveParameters(octaves, intervals, init_sample, thresh)设置构造金字塔的参数,而带图像的构造函数另外多加了一句setIntImage(img)用来设置当前图像。
//! Save the parameters
void FastHessian::saveParameters(const int octaves, const int intervals, const int init_sample, const float thresh)
{// Initialise variables with bounds-checked valuesthis->octaves &#61; (octaves > 0 && octaves <&#61; 4 ? octaves : OCTAVES);this->intervals &#61; (intervals > 0 && intervals <&#61; 4 ? intervals : INTERVALS);this->init_sample &#61; (init_sample > 0 && init_sample <&#61; 6 ? init_sample : INIT_SAMPLE);this->thresh &#61; (thresh >&#61; 0 ? thresh : THRES);
}//! Set or re-set the integral image source
void FastHessian::setIntImage(IplImage *img)
{// Change the source imagethis->img &#61; img;i_height &#61; img->height;i_width &#61; img->width;
}
由于在h头文件中已设置
static const int OCTAVES &#61; 5;//组数
static const int INTERVALS &#61; 4;//每组层数
static const float THRES &#61; 0.0004f;//阈值
static const int INIT_SAMPLE &#61; 2;//初始采样因子
所以 saveParameters的作用就是调整参数&#xff0c;以防过大或过小。
FastHessian::getIpoints()提取兴趣点&#xff1a;
//! Find the image features and write into vector of features
void FastHessian::getIpoints()
{// filter index mapstatic const int filter_map [OCTAVES][INTERVALS] &#61; {{0,1,2,3}, {1,3,4,5}, {3,5,6,7}, {5,7,8,9}, {7,9,10,11}};// Clear the vector of exisiting iptsipts.clear();// Build the response mapbuildResponseMap();// Get the response layers...
...
}
首先初始化filter_map&#xff0c;清空标记特征点的ipts结构体。
创建高斯平滑层函数参数ResponseMap()&#xff0c;大小与论文所给完全一致&#xff0c;
// Oct1: 9, 15, 21, 27
// Oct2: 15, 27, 39, 51
// Oct3: 27, 51, 75, 99
// Oct4: 51, 99, 147,195
// Oct5: 99, 195,291,387
这些都是每组模板的大小&#xff0c;每组间隔递增&#xff0c;6,12,24,48,96 。ResponseMap这个结构体向量包含4个参数ResponseLayer(int width, int height, int step, int filter)定义在responsemap.h里面&#xff0c;其中width和height等于实际图像大小除以step(step初始值为2)&#xff0c;而filter则是滤波器半径。
然后使用buildResponseLayer(responseMap[i])对图像处理后将数据存放在responses和laplacian两个数组里面。
void FastHessian::buildResponseLayer(ResponseLayer *rl)
{float *responses &#61; rl->responses; // response storageunsigned char *laplacian &#61; rl->laplacian; // laplacian sign storageint step &#61; rl->step; // step size for this filter 滤波器尺度因子int b &#61; (rl->filter - 1) / 2; // border for this filter 滤波器边界int l &#61; rl->filter / 3; // lobe for this filter (filter size / 3)int w &#61; rl->filter; // filter size 滤波器大小float inverse_area &#61; 1.f/(w*w); // normalisation factor 标准化因子float Dxx, Dyy, Dxy;for(int r, c, ar &#61; 0, index &#61; 0; ar height; &#43;&#43;ar) {for(int ac &#61; 0; ac width; &#43;&#43;ac, index&#43;&#43;) {// get the image coordinatesr &#61; ar * step;c &#61; ac * step; // Compute response componentsDxx &#61; BoxIntegral(img, r - l &#43; 1, c - b, 2*l - 1, w)- BoxIntegral(img, r - l &#43; 1, c - l / 2, 2*l - 1, l)*3;Dyy &#61; BoxIntegral(img, r - b, c - l &#43; 1, w, 2*l - 1)- BoxIntegral(img, r - l / 2, c - l &#43; 1, l, 2*l - 1)*3;Dxy &#61; &#43; BoxIntegral(img, r - l, c &#43; 1, l, l)&#43; BoxIntegral(img, r &#43; 1, c - l, l, l)- BoxIntegral(img, r - l, c - l, l, l)- BoxIntegral(img, r &#43; 1, c &#43; 1, l, l);// Normalise the filter responses with respect to their sizeDxx *&#61; inverse_area;Dyy *&#61; inverse_area;Dxy *&#61; inverse_area;// Get the determinant of hessian response & laplacian signresponses[index] &#61; (Dxx * Dyy - 0.81f * Dxy * Dxy);laplacian[index] &#61; (Dxx &#43; Dyy >&#61; 0 ? 1 : 0);#ifdef RL_DEBUG// create list of the image coords for each responserl->coords.push_back(std::make_pair(r,c));
#endif}}
}
其中计算Dxy和Dyy的示意图如下&#xff0c;其他的Dxx(Dyy的转置)读者自己参考。【此时w&#61;9,l&#61;9/3&#61;3,对应于右图的总计算区域高度和宽度2*l-1】


圆点为当前点&#xff0c;将红色方形区域1内的积分值减去绿色方形2区域内的积分值&#61;Dxy*w2
绿色方形区域2内的积分值减去2*红色色方形区域1内的积分值&#61;Dyy*w2 (&#61;&#61;用一整块区域-3*红色区域&#xff09;
最后将计算后的结果存放到ResponseLayer里面的response和laplacian一维数组里&#xff0c;数组的大小即为ResponseLayer->width * ResponseLayer->width。
这样就计算出了每一层的所有像素点的det(Happrox)&#61;Dxx*Dyy-(0.9*Dxy)2,下面开始判断当前点是否是极值点。


 京公网安备 11010802041100号