大意是你需要一个更复杂的密码,比如说把短语的单词加在一起,或链接每个单词的首字母。大概是让你把字母加到密码里
。原意:需要一个更复杂的密码,这个可以通过很多方式实现,比如说,把短语的单词加在一起,或链接每个单词的首字母
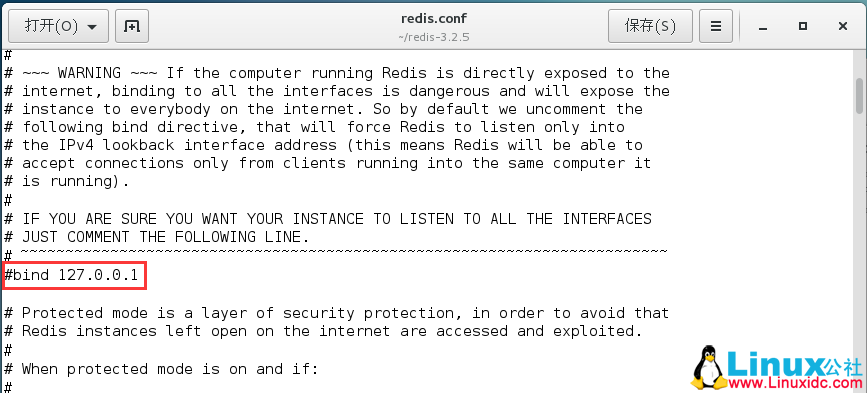
你的密码必须不超过三个连续相同的字符

方法一:
登录出现 vsftpd 530 login incorrect 报错。
解决方法:
cp Path/RedHat/vsftpd.pam /etc/pam.d/ftp
path为vsftp解压缩源文件目录
这是因为我们RHEL启用了PAM,所在用到vsftp时需要用到 /etc/pam.d/ftp这个文件(默认源码安装的不会有这个文件),因此除了匿名用户外本地用户无法登录。
方法二:
在测试Checkpoint的VPN1 R6x的时候,遇到了这个错误。这说明client端跟server端的连接性是没问题。但是就是想不出为什么,还以为是用户名和口令错误呢。后来才google了一下,发现是server端的配置有问题。
检查/etc/vsftpd/user_list和/etc/ftpusers,是这个文件/etc/vsftpd/vsftpd.conf少了一行:
代码如下:
pam_service_name=vsftpd
$ echo ‘pam_service_name=vsftpd’ /etc/vsftpd/vsftpd.conf
$ service vsftpd restart
530 error就消除了!
下面是更详细的方法:
[root@atr-3-server1 admin]# cat /etc/vsftpd/vsftpd.conf
# Example config file /etc/vsftpd.conf
#
# The default compiled in settings are fairly paranoid. This sample file
# loosens things up a bit, to make the ftp daemon more usable.
# Please see vsftpd.conf.5 for all compiled in defaults.
#
# READ THIS: This example file is NOT an exhaustive list of vsftpd options.
# Please read the vsftpd.conf.5 manual page to get a full idea of vsftpd's
# capabilities.
#
# Allow anonymous FTP? (Beware - allowed by default if you comment this out).
anonymous_enable=no
#
# Uncomment this to allow local users to log in.
local_enable=YES
#
# Uncomment this to enable any form of FTP write command.
write_enable=YES
#
# Default umask for local users is 077. You may wish to change this to 022,
# if your users expect that (022 is used by most other ftpd's)
local_umask=022
#
# Uncomment this to allow the anonymous FTP user to upload files. This only
# has an effect if the above global write enable is activated. Also, you will
# obviously need to create a directory writable by the FTP user.
#anon_upload_enable=YES
#
# Uncomment this if you want the anonymous FTP user to be able to create
# new directories.
#anon_mkdir_write_enable=YES
#
# Activate directory messages - messages given to remote users when they
# go into a certain directory.
dirmessage_enable=YES
#
# Activate logging of uploads/downloads.
xferlog_enable=YES
#
# Make sure PORT transfer connections originate from port 20 (ftp-data).
connect_from_port_20=YES
#
# If you want, you can arrange for uploaded anonymous files to be owned by
# a different user. Note! Using "root" for uploaded files is not
# recommended!
#chown_uploads=YES
#chown_username=whoever
#
# You may override where the log file goes if you like. The default is shown
# below.
#xferlog_file=/var/log/vsftpd.log
#
# If you want, you can have your log file in standard ftpd xferlog format
xferlog_std_format=YES
#
# You may change the default value for timing out an idle session.
#idle_session_timeout=600
#
# You may change the default value for timing out a data connection.
#data_connection_timeout=120
#
# It is recommended that you define on your system a unique user which the
# ftp server can use as a totally isolated and unprivileged user.
#nopriv_user=ftpsecure
#
# Enable this and the server will recognise asynchronous ABOR requests. Not
# recommended for security (the code is non-trivial). Not enabling it,
# however, may confuse older FTP clients.
#async_abor_enable=YES
#
# By default the server will pretend to allow ASCII mode but in fact ignore
# the request. Turn on the below options to have the server actually do ASCII
# mangling on files when in ASCII mode.
# Beware that turning on ascii_download_enable enables malicious remote parties
# to consume your I/O resources, by issuing the command "SIZE /big/file" in
# ASCII mode.
# These ASCII options are split into upload and download because you may wish
# to enable ASCII uploads (to prevent uploaded scripts etc. from breaking),
# without the DoS risk of SIZE and ASCII downloads. ASCII mangling should be
# on the client anyway..
#ascii_upload_enable=YES
#ascii_download_enable=YES
#
# You may fully customise the login banner string:
#ftpd_banner=Welcome to blah FTP service.
#
# You may specify a file of disallowed anonymous e-mail addresses. Apparently
# useful for combatting certain DoS attacks.
#deny_email_enable=YES
# (default follows)
#banned_email_file=/etc/vsftpd.banned_emails
#
# You may specify an explicit list of local users to chroot() to their home
# directory. If chroot_local_user is YES, then this list becomes a list of
# users to NOT chroot().
#chroot_list_enable=YES
# (default follows)
#chroot_list_file=/etc/vsftpd.chroot_list
#
# You may activate the "-R" option to the builtin ls. This is disabled by
# default to avoid remote users being able to cause excessive I/O on large
# sites. However, some broken FTP clients such as "ncftp" and "mirror" assume
# the presence of the "-R" option, so there is a strong case for enabling it.
#ls_recurse_enable=YES
pam_service_name=vsftpd
userlist_enable=YES
#enable for standalone mode
listen=YES
tcp_wrappers=YES
具体你也可以去看下这里有更详细的操作方法希望可以帮到你啊
一.vsftpd说明:
LINUX下实现FTP服务的软件很多,最常见的有vsftpd,Wu-ftpd和Proftp等.Red Hat Enterprise Linux中默认安装的是vsftpd.
访问FTP服务器时需要经过验证,只有经过了FTP服务器的相关验证,用户才能访问和传输文件.vsftpd提供了3种ftp登录形式:
(1)anonymous(匿名帐号)
使用anonymous是应用广泛的一种FTP服务器.如果用户在FTP服务器上没有帐号,那么用户可以以anonymous为用户名,以自己的电子邮件地址为密码进行登录.当匿名用户登录FTP服务器后,其登录目录为匿名FTP服务器的根目录/var/ftp.为了减轻FTP服务器的负载,一般情况下,应关闭匿名帐号的上传功能.
(2)real(真实帐号)
real也称为本地帐号,就是以真实的用户名和密码进行登录,但前提条件是用户在FTP服务器上拥有自己的帐号.用真实帐号登录后,其登录的目录为用户自己的目录,该目录在系统建立帐号时系统就自动创建.
(3)guest(虚拟帐号)
如果用户在FTP服务器上拥有帐号,但此帐号只能用于文件传输服务,那么该帐号就是guest,guest是真实帐号的一种形式,它们的不同之处在于,geust登录FTP服务器后,不能访问除宿主目录以外的内容.
二.FTP相关配置文件说明
其相关配置文件有/etc/vsftpd/vsftpd.conf, /etc/vsftpd.ftpusers, /etc/vsftpd.user_list,在配置FTP服务器时,主要是修改这些文件中的相关语句.
1.vsftpd.conf文件说明
# Example config file /etc/vsftpd/vsftpd.conf
#
# The default compiled in settings are fairly paranoid. This sample file
# loosens things up a bit, to make the ftp daemon more usable.
# Please see vsftpd.conf.5 for all compiled in defaults.
#
# READ THIS: This example file is NOT an exhaustive list of vsftpd options.
# Please read the vsftpd.conf.5 manual page to get a full idea of vsftpd's
# capabilities.
#
# Allow anonymous FTP? (Beware - allowed by default if you comment this out).
anonymous_enable=YES //是否允许anonymous登录FTP服务器,默认是允许的.
#
# Uncomment this to allow local users to log in.
local_enable=YES //是否允许本地用户登录FTP服务器,默认是允许
#
# Uncomment this to enable any form of FTP write command.
write_enable=YES //是否允许用户具有在FTP服务器文件中执行写的权限,默认是允许
#
# Default umask for local users is 077. You may wish to change this to 022,
# if your users expect that (022 is used by most other ftpd's)
local_umask=022 //设置本地用户的文件生成掩码为022,默认是077
#
# Uncomment this to allow the anonymous FTP user to upload files. This only
# has an effect if the above global write enable is activated. Also, you will
# obviously need to create a directory writable by the FTP user.
#anon_upload_enable=YES
#
# Uncomment this if you want the anonymous FTP user to be able to create
# new directories.
#anon_mkdir_write_enable=YES //是否允许匿名账户在FTP服务器中创建目录
#
# Activate directory messages - messages given to remote users when they
# go into a certain directory.
dirmessage_enable=YES //激活目录信息,当远程用户更改目录时,将出现提示信息
#
# Activate logging of uploads/downloads.
xferlog_enable=YES //启用上传和下载日志功能
#
# Make sure PORT transfer connections originate from port 20 (ftp-data).
connect_from_port_20=YES //启用FTP数据端口的连接请求
#
# If you want, you can arrange for uploaded anonymous files to be owned by
# a different user. Note! Using "root" for uploaded files is not
# recommended!
#chown_uploads=YES
#chown_username=whoever
#
# You may override where the log file goes if you like. The default is shown
# below.
#xferlog_file=/var/log/vsftpd.log //设置日志文件的文件名和存储路径,这是默认的
#
# If you want, you can have your log file in standard ftpd xferlog format
xferlog_std_format=YES//是否使用标准的ftpd xferlog日志文件格式
#
# You may change the default value for timing out an idle session.
#idle_session_timeout=600 //设置空闲的用户会话中断时间,默认是10分钟
#
# You may change the default value for timing out a data connection.
#data_connection_timeout=120//设置数据连接超时时间,默认是120秒.
#
# It is recommended that you define on your system a unique user which the
# ftp server can use as a totally isolated and unprivileged user.
#nopriv_user=ftpsecure
#
# Enable this and the server will recognise asynchronous ABOR requests. Not
# recommended for security (the code is non-trivial). Not enabling it,
# however, may confuse older FTP clients.
#async_abor_enable=YES
#
# By default the server will pretend to allow ASCII mode but in fact ignore
# the request. Turn on the below options to have the server actually do ASCII
# mangling on files when in ASCII mode.
# Beware that turning on ascii_download_enable enables malicious remote parties
# to consume your I/O resources, by issuing the command "SIZE /big/file" in
# ASCII mode.
# These ASCII options are split into upload and download because you may wish
# to enable ASCII uploads (to prevent uploaded scripts etc. from breaking),
# without the DoS risk of SIZE and ASCII downloads. ASCII mangling should be
# on the client anyway..
#ascii_upload_enable=YES
#ascii_download_enable=YES //是否允许使用ASCII格式来上传和下载文件
#
# You may fully customise the login banner string:
#ftpd_banner=Welcome to blah FTP service.//在FTP服务器中设置欢迎登录的信息.
#
# You may specify a file of disallowed anonymous e-mail addresses. Apparently
# useful for combatting certain DoS attacks.
#deny_email_enable=YES
# (default follows)
#banned_email_file=/etc/vsftpd.banned_emails
#
# You may specify an explicit list of local users to chroot() to their home
# directory. If chroot_local_user is YES, then this list becomes a list of
# users to NOT chroot().
#chroot_list_enable=YES //如果希望用户登录后不能切换到自己目录以外的其它目录,需要设置该项,如果设置chroot_list_enable=YES,那么只允许/etc/vsftpd.chroot_list中列出的用户具有该功能.如果希望所有的本地用户都执行者chroot,可以增加一行:chroot_local_user=YES
# (default follows)
#chroot_list_file=/etc/vsftpd.chroot_list
#
# You may activate the "-R" option to the builtin ls. This is disabled by
# default to avoid remote users being able to cause excessive I/O on large
# sites. However, some broken FTP clients such as "ncftp" and "mirror" assume
# the presence of the "-R" option, so there is a strong case for enabling it.
#ls_recurse_enable=YES
pam_service_name=vsftpd //设置PAM认证服务的配置文件名称,该文件存放在/etc/pam.d/目录下.
userlist_enable=YES //用户列表中的用户是否允许登录FTP服务器,默认是不允许
#enable for standalone mode
listen=YES //使vsftpd 处于独立启动模式
tcp_wrappers=YES //使用tcp_wrqppers作为主机访问控制方式
2.vsftpd.ftpusers文件说明
这个文件是用来记录"不允许"登录到FTP服务器的用户,通常是一些系统默认的用户.
下面是该文件中默认的不允许登录的名单:
# Users that are not allowed to login via ftp
root //默认情况下,root和它以下的用户是不允许登录FTP服务器的.可以将不允许登录的用户添加到这里来.但切记每个用户都要单独占用一行.
bin
daemon
adm
lp
sync
shutdown
halt
news
uucp
operator
games
nobody
3.vsftpd.user_list文件说明
其实它的内容跟上面那个文件内容一样,只是在系统对文件vsftpd.conf 进行检测时,会检测到"userlist_deny=YES",因此这个文件必须存在.下面是这个文件的内容.
# vsftpd userlist
# If userlist_deny=NO, only allow users in this file
# If userlist_deny=YES (default), never allow users in this file, and
# do not even prompt for a password.
# Note that the default vsftpd pam config also checks /etc/vsftpd.ftpusers
# for users that are denied.
root
bin
daemon
adm
lp
sync
shutdown
halt
news
uucp
operator
games
nobody
来自:51CTO(作者:superZS)
我在刚开始学习数据库的时候,没少走弯路。经常会遇到各种稀奇古怪的 error 信息,遇到报错会很慌张,急需一个解决问题的办法。跟无头苍蝇一样,会不加思索地把错误粘到百度上,希望赶紧查找一下有没有好的处理问题的方法。我想这个应该是刚从事数据库的小白,都会遇到窘境。
今天就给大家列举 MySQL 数据库中,最经典的十大错误案例,并附有处理问题的解决思路和方法,希望能给刚入行,或数据库爱好者一些帮助,今后再遇到任何报错,我们都可以很淡定地去处理。
学习任何一门技术的同时,其实就是自我修炼的过程。沉下心,尝试去拥抱数据的世界!
Top 1:
Too many connections(连接数过多,导致连接不上数据库,业务无法正常进行)
问题还原
解决问题的思路:
1、首先先要考虑在我们 MySQL 数据库参数文件里面,对应的 max_connections 这个参数值是不是设置的太小了,导致客户端连接数超过了数据库所承受的最大值。
● 该值默认大小是151,我们可以根据实际情况进行调整。
● 对应解决办法:set global max_cOnnections=500
但这样调整会有隐患,因为我们无法确认数据库是否可以承担这么大的连接压力,就好比原来一个人只能吃一个馒头,但现在却非要让他吃 10 个,他肯定接受不了。反应到服务器上面,就有可能会出现宕机的可能。
所以这又反应出了,我们在新上线一个业务系统的时候,要做好压力测试。保证后期对数据库进行优化调整。
2、其次可以限制 Innodb 的并发处理数量,如果 innodb_thread_cOncurrency= 0(这种代表不受限制) 可以先改成 16或是64 看服务器压力。如果非常大,可以先改的小一点让服务器的压力下来之后,然后再慢慢增大,根据自己的业务而定。个人建议可以先调整为 16 即可。
MySQL 随着连接数的增加性能是会下降的,可以让开发配合设置 thread pool,连接复用。在MySQL商业版中加入了thread pool这项功能
另外对于有的监控程序会读取 information_schema 下面的表,可以考虑关闭下面的参数
innodb_stats_on_metadata=0
set global innodb_stats_on_metadata=0
Top 2:(主从复制报错类型)
Last_SQL_Errno: 1062 (从库与主库数据冲突)
Last_Errno: 1062
Last_Error: Could not execute Write_rows event on table test.t;
Duplicate entry '4' for key 'PRIMARY',
Error_code: 1062; handler error HA_ERR_FOUND_DUPP_KEY;
the event's master log mysql-bin.000014, end_log_pos 1505
针对这个报错,我们首先要考虑是不是在从库中误操作导致的。结果发现,我们在从库中进行了一条针对有主键表的 sql 语句的插入,导致主库再插入相同 sql 的时候,主从状态出现异常。发生主键冲突的报错。
解决方法:
在确保主从数据一致性的前提下,可以在从库进行错误跳过。一般使用 percona-toolkit 中的 pt-slave-restart 进行。
在从库完成如下操作
[root@zs bin]# ./pt-slave-restart -uroot -proot123
2017-07-20T14:05:30 p=...,u=root node4-relay-bin.000002 1506 1062
之后最好在从库中开启 read_only 参数,禁止在从库进行写入操作
Last_IO_Errno: 1593(server-id冲突)
Last_IO_Error:
Fatal error: The slave I/O thread stops because master and slave have equal MySQL server ids;
these ids must be different for replication to work
(or the --replicate-same-server-id option must be used on slave but this
does not always make sense; please check the manual before using it)
这个报错出现之后,就看一目了然看到两台机器的 server-id 是一样的。
在搭建主从复制的过程中,我们要确保两台机器的 server-id 是唯一的。这里再强调一下 server-id 的命名规则(服务器 ip 地址的最后一位+本 MySQL 服务的端口号)
解决方法:
在主从两台机器上设置不同的 server-id。
Last_SQL_Errno: 1032(从库少数据,主库更新的时候,从库报错)
Last_SQL_Error:
Could not execute Update_rows event on table test.t; Can't find record
in 't', Error_code: 1032; handler error HA_ERR_KEY_NOT_FOUND; the
event's master log mysql-bin.000014, end_log_pos 1708
解决问题的办法:
根据报错信息,我们可以获取到报错日志和position号,然后就能找到主库执行的哪条sql,导致的主从报错。
在主库执行:
/usr/local/mysql/bin/mysqlbinlog --no-defaults -v -v --base64-output=decode-rows /data/mysql/mysql-bin.000014 |grep -A 10 1708 1.log
cat 1.log
#170720 14:20:15 server id 3 end_log_pos 1708 CRC32 0x97b6bdec Update_rows: table id 113 flags: STMT_END_F
### UPDATE `test`.`t`
### WHERE
### @1=4 /* INT meta=0 nullable=0 is_null=0 */
### @2='dd' /* VARSTRING(60) meta=60 nullable=1 is_null=0 */
### SET
### @1=4 /* INT meta=0 nullable=0 is_null=0 */
### @2='ddd' /* VARSTRING(60) meta=60 nullable=1 is_null=0 */
# at 1708
#170720 14:20:15 server id 3 end_log_pos 1739 CRC32 0xecaf1922 Xid = 654
COMMIT/*!*/;
DELIMITER ;
# End of log file
ROLLBACK /* added by mysqlbinlog */;
/*!50003 SET COMPLETION_TYPE=@OLD_COMPLETION_TYPE*/;
/*!50530 SET @@SESSION.PSEUDO_SLAVE_MODE=0*/;
获取到 sql 语句之后,就可以在从库反向执行 sql 语句。把从库缺少的 sql 语句补全,解决报错信息。
在从库依次执行:
mysql insert into t (b) values ('ddd');
Query OK, 1 row affected (0.01 sec)
mysql stop slave;
Query OK, 0 rows affected (0.00 sec)
mysql exit
Bye
[root@node4 bin]# ./pt-slave-restart -uroot -proot123
2017-07-20T14:31:37 p=...,u=root node4-relay-bin.000005 283 1032
Top 3:MySQL安装过程中的报错
[root@zs data]# /usr/local/mysql/bin/mysqld_safe --defaults-file=/etc/my.cnf [1] 3758
[root@zs data]# 170720 14:41:24 mysqld_safe Logging to '/data/mysql/error.log'.
170720 14:41:24 mysqld_safe Starting mysqld daemon with databases from /data/mysql170720
14:41:25 mysqld_safe mysqld from pid file /data/mysql/node4.pid ended
170720 14:41:24 mysqld_safe Starting mysqld daemon with databases from /data/mysql2017-07-20
14:41:25 0 [Warning] TIMESTAMP with implicit DEFAULT value is deprecated.
Please use --explicit_defaults_for_timestamp server option
(see documentation for more details)./usr/local/mysql/bin/mysqld:
File '/data/mysql/mysql-bin.index' not found (Errcode: 13 - Permission denied)
2017-07-20 14:41:25 4388 [ERROR] Aborting
解决思路:
遇到这样的报错信息,我们要学会时时去关注错误日志 error log 里面的内容。看见了关键的报错点 Permission denied。证明当前 MySQL 数据库的数据目录没有权限。
解决方法:
[root@zs data]# chown mysql:mysql -R mysql
[root@zs data]# /usr/local/mysql/bin/mysqld_safe --defaults-file=/etc/my.cnf
[1] 4402
[root@zs data]# 170720 14:45:56 mysqld_safe Logging to '/data/mysql/error.log'.
170720 14:45:56 mysqld_safe Starting mysqld daemon with databases from /data/mysql
启动成功。
如何避免这类问题,个人建议在安装 MySQL 初始化的时候,一定加上--user=mysql,这样就可以避免权限问题。
./mysql_install_db --basedir=/usr/local/mysql/ --datadir=/data/mysql/ --defaults-file=/etc/my.cnf --user=mysql
Top 4:数据库密码忘记的问题
[root@zs ~]# mysql -uroot -p
Enter password:
ERROR 1045 (28000): Access denied for user 'root'@'localhost' (using password: YES)
[root@zs ~]# mysql -uroot -p
Enter password:
ERROR 1045 (28000): Access denied for user 'root'@'localhost' (using password: YES)
我们有可能刚刚接手别人的 MySQL 数据库,而且没有完善的交接文档。root 密码可以丢失或者忘记了。
解决思路:
目前是进入不了数据库的情况,所以我们要考虑是不是可以跳过权限。因为在数据库中,mysql数据库中user表记录着我们用户的信息。
解决方法:
启动 MySQL 数据库的过程中,可以这样执行:
/usr/local/mysql/bin/mysqld_safe --defaults-file=/etc/my.cnf --skip-grant-tables
这样启动,就可以不用输入密码,直接进入 mysql 数据库了。然后在修改你自己想要改的root密码即可。
update mysql.user set password=password('root123') where user='root';
Top 5:truncate 删除数据,导致自动清空自增ID,前端返回报错 not found。
这个问题的出现,就要考虑下 truncate 和 delete 的区别了。
看下实验演练:
首先先创建一张表;
CREATE TABLE `t` (
`a` int(11) NOT NULL AUTO_INCREMENT,
`b` varchar(20) DEFAULT NULL,
PRIMARY KEY (`a`),
KEY `b` (`b`)
) ENGINE=InnoDB AUTO_INCREMENT=300 DEFAULT CHARSET=utf8
插入三条数据:
mysql insert into t (b) values ('aa');
Query OK, 1 row affected (0.00 sec)
mysql insert into t (b) values ('bb');
Query OK, 1 row affected (0.00 sec)
mysql insert into t (b) values ('cc');
Query OK, 1 row affected (0.00 sec)
mysql select * from t;
+-----+------+
| a | b |
+-----+------+
| 300 | aa |
| 301 | bb |
| 302 | cc |
+-----+------+
3 rows in set (0.00 sec)
先用 delete 进行删除全表信息,再插入新值。
结果发现 truncate 把自增初始值重置了,自增属性从1开始记录了。当前端用主键id进行查询时,就会报没有这条数据的错误。
个人建议不要使用 truncate 对表进行删除操作,虽然可以回收表空间,但是会涉及自增属性问题。这些坑,我们不要轻易钻进去。
Top 6:
阿里云 MySQL 的配置文件中,需要注意一个参数设置就是:
lower_case_table_names = 0;默认情况
lower_case_table_names = 1;是不区分大小写 . 如果报你小写的表名找不到, 那你就把远端数据库的表名改成小写 , 反之亦然 . 注意 Mybatis 的 Mapper 文件的所有表名也要相应修改
Top 7:
有同学经常会问张老师,为什么我的数据库总会出现中文乱码的情况。一堆????不知道怎么回事。当向数据库中写入创建表,并插入中文时,会出现这种问题。此报错会涉及数据库字符集的问题。
解决思路:
对于中文乱码的情况,记住老师告诉你的三个统一就可以。还要知道在目前的mysql数据库中字符集编码都是默认的UTF8
处理办法:
1、数据终端,也就是我们连接数据库的工具设置为 utf8
2、操作系统层面;可以通过 cat /etc/sysconfig/i18n 查看;也要设置为 utf8
3、数据库层面;在参数文件中的 mysqld 下,加入 character-set-server=utf8。
Emoji 表情符号录入 mysql 数据库中报错。
Caused by: java.sql.SQLException: Incorrect string value: '\xF0\x9F\x98\x97\xF0\x9F...' for column 'CONTENT' at row 1
at com.mysql.jdbc.SQLError.createSQLException(SQLError.java:1074)
at com.mysql.jdbc.MysqlIO.checkErrorPacket(MysqlIO.java:4096)
at com.mysql.jdbc.MysqlIO.checkErrorPacket(MysqlIO.java:4028)
at com.mysql.jdbc.MysqlIO.sendCommand(MysqlIO.java:2490)
at com.mysql.jdbc.MysqlIO.sqlQueryDirect(MysqlIO.java:2651)
at com.mysql.jdbc.ConnectionImpl.execSQL(ConnectionImpl.java:2734)
at com.mysql.jdbc.PreparedStatement.executeInternal(PreparedStatement.java:2155)
at com.mysql.jdbc.PreparedStatement.execute(PreparedStatement.java:1379)
解决思路:针对表情插入的问题,一定还是字符集的问题。
处理方法:我们可以直接在参数文件中,加入
vim /etc/my.cnf
[mysqld]
init-cOnnect='SET NAMES utf8mb4'
character-set-server=utf8mb4
注:utf8mb4 是 utf8 的超集。
Top 8:使用 binlog_format=statement 这种格式,跨库操作,导致从库丢失数据,用户访问导致出现错误数据信息。
当前数据库二进制日志的格式为:binlog_format=statement
在主库设置binlog-do-db=mydb1(只同步mydb1这一个库)
在主库执行use mydb2;
insert into mydb1.t1 values ('bb');这条语句不会同步到从库。
但是这样操作就可以;
use mydb1;
insert into mydb1.t1 values ('bb');因为这是在同一个库中完成的操作。
在生产环境中建议使用binlog的格式为row,而且慎用binlog-do-db参数。
Top 9:MySQL 数据库连接超时的报错 ;
org.hibernate.util.JDBCExceptionReporter - SQL Error:0, SQLState: 08S01
org.hibernate.util.JDBCExceptionReporter - The last packet successfully received from the server was43200 milliseconds ago.The last packet sent successfully to the server was 43200 milliseconds ago, which is longer than the server configured value of 'wait_timeout'. You should consider either expiring and/or testing connection validity before use in your application, increasing the server configured values for client timeouts, or using the Connector/J connection 'autoRecOnnect=true' to avoid this problem.
org.hibernate.event.def.AbstractFlushingEventListener - Could not synchronize database state with session
org.hibernate.exception.JDBCConnectionException: Could not execute JDBC batch update
com.mysql.jdbc.exceptions.jdbc4.MySQLNonTransientConnectionException: Connection.close() has already been called. Invalid operation in this state.
org.hibernate.util.JDBCExceptionReporter - SQL Error:0, SQLState: 08003
org.hibernate.util.JDBCExceptionReporter - No operations allowed after connection closed. Connection was implicitly closed due to underlying exception/error:
** BEGIN NESTED EXCEPTION **
大多数做 DBA 的同学,可能都会被开发人员告知,你们的数据库报了这个错误了。赶紧看看是哪里的问题。
这个问题是由两个参数影响的,wait_timeout 和 interactive_timeout。数据默认的配置时间是28800(8小时)意味着,超过这个时间之后,MySQL 数据库为了节省资源,就会在数据库端断开这个连接,Mysql服务器端将其断开了,但是我们的程序再次使用这个连接时没有做任何判断,所以就挂了。
解决思路:
先要了解这两个参数的特性;这两个参数必须同时设置,而且必须要保证值一致才可以。
我们可以适当加大这个值,8小时太长了,不适用于生产环境。因为一个连接长时间不工作,还占用我们的连接数,会消耗我们的系统资源。
解决方法:
可以适当在程序中做判断;强烈建议在操作结束时更改应用程序逻辑以正确关闭连接;然后设置一个比较合理的timeout的值(根据业务情况来判断)
Top 10 :can't open file (errno:24)
有的时候,数据库跑得好好的,突然报不能打开数据库文件的错误了。
解决思路:
首先我们要先查看数据库的 error log。然后判断是表损坏,还是权限问题。还有可能磁盘空间不足导致的不能正常访问表;操作系统的限制也要关注下;用 perror 工具查看具体错误!
linux:/usr/local/mysql/bin # ./perror 24
OS error code 24: Too many open files
超出最大打开文件数限制!ulimit -n查看系统的最大打开文件数是65535,不可能超出!那必然是数据库的最大打开文件数超出限制!
在 MySQL 里查看最大打开文件数限制命令:show variables like 'open_files_limit';
发现该数值过小,改为2048,重启 MySQL,应用正常
处理方法:
repair table ;
chown mysql权限
清理磁盘中的垃圾数据


 京公网安备 11010802041100号 | 京ICP备19059560号-4 | PHP1.CN 第一PHP社区 版权所有