作者:销魂苗苗若郗 | 来源:互联网 | 2023-10-12 19:19
Android自定义StepView仿外卖配送进度-本文实例为大家分享了Android自定义StepView配送进度展示的具体代码,供大家参考,具体内容如下效果图使用可在layou
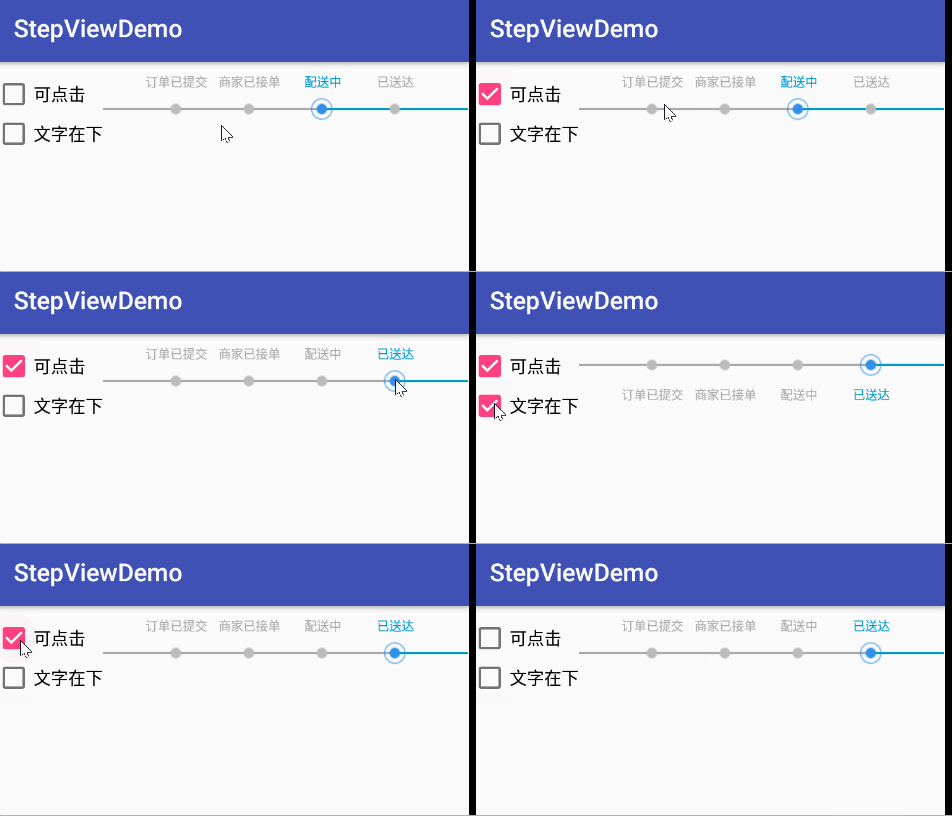
本文实例为大家分享了Android自定义StepView配送进度展示的具体代码,供大家参考,具体内容如下
效果图

使用
可在layout文件下设置以下属性。
CheckBox cbTouch = findViewById(R.id.cb_touch);
CheckBox cbIsDown = findViewById(R.id.cb_is_down);
final StepView stepView = findViewById(R.id.step_view);
String[] stepTexts = new String[]{"订单已提交", "商家已接单", "配送中", "已送达"};
stepView.setStepTexts(stepTexts);//传入每一进度的文字描述
stepView.setCurrentStep(2);//设置当前进度所在位置
stepView.setOnItemStepTouchListener(new StepView.OnItemStepTouchListener() {
 @Override
 public void onItemStepTouch(int postion) {
 Log.d(TAG, "当前点击位置: "+postion);
 }
});
cbTouch.setOnCheckedChangeListener(new CompoundButton.OnCheckedChangeListener() {
 @Override
 public void onCheckedChanged(CompoundButton buttonView, boolean isChecked) {
 stepView.setStepIsTouch(isChecked);
 }
});
cbIsDown.setOnCheckedChangeListener(new CompoundButton.OnCheckedChangeListener() {
 @Override
 public void onCheckedChanged(CompoundButton buttonView, boolean isChecked) {
 stepView.setTextUpLine(!isChecked);
 }
});
步骤
1、在构造函数中初始化文字、线、step图片的属性。
public StepView(Context context, @Nullable AttributeSet attrs, int defStyleAttr) {
 super(context, attrs, defStyleAttr);
 init(context, attrs);
 }

 private void init(Context context, AttributeSet attrs) {
 mLinePaint = new Paint();
 mLinePaint.setAntiAlias(true);
 mTextPaint = new Paint();
 mTextPaint.setAntiAlias(true);
 mPreLineLength = 0;
 //默认的step图片
 mNormalBitmap = BitmapFactory.decodeResource(getResources(), R.drawable.ic_normal);
 mPassedBitmap = BitmapFactory.decodeResource(getResources(), R.drawable.ic_passed);
 mTargetBitmap = BitmapFactory.decodeResource(getResources(), R.drawable.ic_target);

 TypedArray typedArray = context.obtainStyledAttributes(attrs, R.styleable.StepView);
 //获取xml文件中的线的颜色值、size
 mNormalLineColor = typedArray.getColor(R.styleable.StepView_normal_line_color, Color.BLUE);
 mPassedLineColor = typedArray.getColor(R.styleable.StepView_passed_line_color, Color.WHITE);
 int lineSize = (int) typedArray.getDimension(R.styleable.StepView_line_size, 2);
 //获取xml文件中的文本的颜色值、size
 mNormalTextColor = typedArray.getColor(R.styleable.StepView_normal_text_color, Color.BLACK);
 mTargetTextColor = typedArray.getColor(R.styleable.StepView_target_text_color, Color.BLACK);
 int textSize = (int) typedArray.getDimension(R.styleable.StepView_text_size, 10);
 //获取xml文件中的step的size,设置给step图片的高度
 int stepSize = (int) typedArray.getDimension(R.styleable.StepView_step_size, 0);
 //获取xml文件中的文本和线之间的间距
 mTextLineMargin = (int) typedArray.getDimension(R.styleable.StepView_text_line_margin, 3);
 //获取xml文件中的step总数
 mStepCount = typedArray.getInt(R.styleable.StepView_step_count, 2);

 //获取xml文件中的当前step位置
 mCurrentStep = typedArray.getInt(R.styleable.StepView_current_step, 0);
 //获取xml文件中step图片
 BitmapDrawable normalDrawable = (BitmapDrawable) typedArray.getDrawable(R.styleable.StepView_normal_step_iv);
 BitmapDrawable passedDrawable = (BitmapDrawable) typedArray.getDrawable(R.styleable.StepView_passed_step_iv);
 BitmapDrawable targetDrawable = (BitmapDrawable) typedArray.getDrawable(R.styleable.StepView_target_step_iv);
 //获取xml文件中step是否可点击TRUE可以,FALSE不可以,默认为FALSE
 mStepIsTouch = typedArray.getBoolean(R.styleable.StepView_step_is_touch, false);
 //获取xml文件中text是否在线上,TRUE在线上,FALSE不在线上,默认为FALSE
 mTextUpLine = typedArray.getBoolean(R.styleable.StepView_text_up_line, true);
 mTextPaint.setTextSize(textSize);
 mLinePaint.setStrokeWidth(lineSize);
 mNormalBitmap = normalDrawable.getBitmap();//将xml文件中指定的图片赋给对应的bitmap
 mPassedBitmap = passedDrawable.getBitmap();
 mTargetBitmap = targetDrawable.getBitmap();
 mNormalBitmapWH = getBitmapWH(stepSize, mNormalBitmap);
 mPassedBitmapWH = getBitmapWH(stepSize, mPassedBitmap);
 mTargetBitmapWH = getBitmapWH(stepSize, mTargetBitmap);
 if (stepSize != 0) {//如果stepSize不为0,要对其进行压缩处理,使其高度等于stepSize
  mNormalBitmap = zoomImg(mNormalBitmap, mNormalBitmapWH);
  mPassedBitmap = zoomImg(mPassedBitmap, mPassedBitmapWH);
  mTargetBitmap = zoomImg(mTargetBitmap, mPassedBitmapWH);
 }
 mStepRectFs = new RectF[mStepCount];//初始化step所对应的矩阵数组,点击step时会用到,用于确定点击的是哪个step
 typedArray.recycle();
}
2、在onMeasure中对StepView的宽高进行设置,并根据StepView的宽高计算每条直线的长度。
@Override
protected void onMeasure(int widthMeasureSpec, int heightMeasureSpec) {
 int widthMode = MeasureSpec.getMode(widthMeasureSpec);
 int widthSize = MeasureSpec.getSize(widthMeasureSpec);
 int heightMode = MeasureSpec.getMode(heightMeasureSpec);
 int heightSize = MeasureSpec.getSize(heightMeasureSpec);
 int width = widthSize - getPaddingLeft() - getPaddingRight();//任何模式下with都是父容器给定的with-padding值
 int height = 0;
 if (heightMode == MeasureSpec.EXACTLY) {
 height = heightSize - getPaddingTop() - getPaddingBottom();
 } else {
 height = dp2px(getContext(), 80);
 }
 setMeasuredDimension(width, height);
 mPreLineLength = width / (mStepCount + 1);//计算每条线的长度,由于线比step多一个所以加1
}
3、开始绘制,先画线,再画step和文字。
@Override
protected void onDraw(Canvas canvas) {
 if (mStepCount != 0) {
 drawLine(canvas);//drawLine和drawStep分两次循环是为了防止部分线覆盖step
 drawStep(canvas);
 }
}
4、画线,前一条线的stopX坐标是下一条线的startX坐标,并根据当前step所在的位置对lineColor进行设置。
private void drawLine(Canvas canvas) {
 float lineStartX = getPaddingLeft();
 float lineStartY = getLineStartY();
 float lineStopX = 0;
 float lineStopY = lineStartY;
 for (int i = 0; i
5、画step和文字。
private void drawStep(Canvas canvas) {
 float lineStartX = getPaddingLeft();
 float lineStartY = getLineStartY();
 Bitmap currentBitmap;
 int[] currentBitmapWH;
 float lineStopX;
 float bitmapLeft;
 float bitmapTop;
 for (int i = 0; i
6、对触摸事件进行处理。
@Override
public boolean onTouchEvent(MotionEvent event) {
 if (!mStepIsTouch) {//不能点击返回FALSE不处理
 return false;
 }
 switch (event.getAction()) {
 case MotionEvent.ACTION_DOWN:
  float x = event.getX();
  float y = event.getY();
  int touchStep = getTouchStep(new PointF(x, y));//获取被点击的点的位置
  if (touchStep != -1) {
  mCurrentStep = touchStep + 1;
  invalidate();
  }
  break;
 }
 return true;
}
7、step的触摸监听。
private OnItemStepTouchListener mOnItemStepTouchListener;

public void setOnItemStepTouchListener(OnItemStepTouchListener onItemStepTouchListener) {
 mOnItemStepTouchListener= onItemStepTouchListener;
}

//每一个step的触摸监听
public interface OnItemStepTouchListener {
 void onItemStepTouch(int postion);
}
8、设置当前进度所在位置,也可在layout文件中通过current_step属性进行设置。
//设置当前step
public void setCurrentStep(int currentStep) {
 mCurrentStep = currentStep;
 invalidate();
}
9、设置step对应的文字,不传入不会显示文字。
//设置step对应的texts
public void setStepTexts(String[] stepTexts) {
 mStepTexts = stepTexts;
 mStepCount = mStepTexts.length;
 mStepRectFs = new RectF[mStepCount];//初始化step所对应的矩阵数组,点击step时会用到,用于确定点击的是哪个step
}
10、设置step是否可点击,不出入默认为false不可点击,也可在layout文件中通过step_is_touch属性进行设置。
public void setStepIsTouch(boolean stepIsTouch) {
 mStepIsTouch = stepIsTouch;
}
11、设置文字是否在线上,不传入默认为true在线上,也可在layout文件中通过text_up_line属性进行设置。
public void setTextUpLine(boolean textUpLine) {
 mTextUpLine = textUpLine;
 invalidate();
}
源码地址:StepViewDemo