前言
本文面向自定义view新手,但是希望你最好有一定的理论知识,或基础概念,有的地方可能会一笔带过并不会细讲,细讲篇幅就太长了。
本文仿写自鸿洋的自定义View (一),尽管过去了将近快7年之久,我觉得依然有学习价值。
效果

自定义View分类
简单介绍一下自定义View分类:
- 组合控件,继承自已有的
layout,比如LinearLayout,然后通过LayoutInflater引入布局,然后处理相关事件,这种方式的好处在于,不需要过度关注view内部的绘制机制,而且扩展性也很强。 - 继承自现有的系统控件,修改或扩展某些属性或方法即可,比如
AppCompatTextView - 继承自
view或viewgroup,这种相对要复杂一些,因为我们要自己控制绘制流程,但是相对的,也有更大的想象空间。
步骤
先分析一下上图中的效果:
比较简单,老手稍微想一下就已经有思路了:
- 1.自定义属性
- 2.添加构造方法
- 3.在构造里获取自定义样式
- 4.重写
onDraw计算坐标绘制 - 5.重写
onMeasure测量宽高 - 6.设置点击事件
先分析效果图,然后构思,随后不断的调整优化。
1.自定义属性
这一步也不一定非要写在前面,可能有些人觉得不一定就能事先知道会用到哪些属性,由于例子比较简单,暂且放在前面吧,看个人习惯。
- 在
res/values/ 下建立一个attrs.xml文件 , 在里面定义我们的属性和声明我们的整个样式
<?xml version&#61;"1.0" encoding&#61;"utf-8"?>
<resources><attr name&#61;"randomText" format&#61;"string"/><attr name&#61;"randomTextColor" format&#61;"color"/><attr name&#61;"randomTextSize" format&#61;"dimension"/><declare-styleable name&#61;"RandomTextView" ><attr name&#61;"randomText"/><attr name&#61;"randomTextColor"/><attr name&#61;"randomTextSize"/></declare-styleable></resources>
format是值该属性的取值类型:
一共有&#xff1a;string&#xff0c;color&#xff0c;demension&#xff0c;integer&#xff0c;enum&#xff0c;reference&#xff0c;float&#xff0c;boolean&#xff0c;fraction&#xff0c;flag
<com.yechaoa.customviews.randomtext.RandomTextViewandroid:layout_width&#61;"wrap_content"android:layout_height&#61;"wrap_content"android:padding&#61;"20dp"app:randomText&#61;"1234"app:randomTextColor&#61;"&#64;color/colorAccent"app:randomTextSize&#61;"50sp" />
注意引入命名空间&#xff1a;
xmlns:app&#61;"http://schemas.android.com/apk/res-auto"
2.添加构造方法
新建一个RandomTextView类&#xff0c;继承View&#xff0c;并添加3个构造方法
class RandomTextView : View {private var mRandomText: Stringprivate var mRandomTextColor: Int &#61; 0private var mRandomTextSize: Int &#61; 0private var paint &#61; Paint()private var bounds &#61; Rect()constructor(context: Context) : this(context, null)constructor(context: Context, attributeSet: AttributeSet?) : this(context, attributeSet, 0)constructor(context: Context, attributeSet: AttributeSet?, defStyle: Int) : super(context, attributeSet, defStyle) {...}...
}
这里要注意的是&#xff0c;所有的构造方法&#xff0c;都指向的是第三个构造方法&#xff0c;前两个构造的继承是this&#xff0c;而不是super。
第一个构造比如我们可以是new创建的&#xff0c;第二个是xml中默认调用的&#xff0c;我们在第三个构造中去获取自定义属性。
3.在构造里获取自定义样式
constructor(context: Context, attributeSet: AttributeSet?, defStyle: Int) : super(context, attributeSet, defStyle) {val typedArray &#61; context.theme.obtainStyledAttributes(attributeSet,R.styleable.RandomTextView,defStyle,0)mRandomText &#61; typedArray.getString(R.styleable.RandomTextView_randomText).toString()mRandomTextColor &#61; typedArray.getColor(R.styleable.RandomTextView_randomTextColor, Color.BLACK)mRandomTextSize &#61; typedArray.getDimensionPixelSize(R.styleable.RandomTextView_randomTextSize,TypedValue.applyDimension( TypedValue.COMPLEX_UNIT_SP, 16F, resources.displayMetrics ).toInt())typedArray.recycle()paint.textSize &#61; mRandomTextSize.toFloat()paint.getTextBounds(mRandomText, 0, mRandomText.length, bounds)}
通过obtainStyledAttributes获取自定义属性&#xff0c;返回一个TypedArray&#xff0c;这里用到了我们在attrs.xml文件中声明的样式&#xff08;R.styleable.RandomTextView&#xff09;&#xff0c;返回的TypedArray即包含了这里面的属性。
拿到自定义view属性集合&#xff0c;然后赋值&#xff0c;赋值之后就可以用paint去画了。
然后用到了paint的getTextBounds方法&#xff1a;
paint.getTextBounds(mRandomText, 0, mRandomText.length, bounds)
简单理解就是&#xff0c;把文字放在一个矩形里&#xff0c;通过矩形的宽高即可知道文字的宽高&#xff0c;所以宽高会保存在bounds里&#xff0c;bounds是一个矩形Rect&#xff0c;为什么要这么做呢&#xff0c;因为后面我们要计算文字居中的时候会用到。
ok&#xff0c;接下来开始画布局。
4.重写onDraw计算坐标绘制
&#64;SuppressLint("DrawAllocation")override fun onDraw(canvas: Canvas?) {super.onDraw(canvas)paint.color &#61; Color.YELLOWcanvas?.drawRect((0 - paddingLeft).toFloat(),(0 - paddingTop).toFloat(),(measuredWidth &#43; paddingRight).toFloat(),(measuredHeight &#43; paddingBottom).toFloat(),paint)paint.color &#61; mRandomTextColorcanvas?.drawText(mRandomText,(width / 2 - bounds.width() / 2).toFloat(),(height / 2 &#43; bounds.height() / 2).toFloat(),paint)}
上面的代码就是在onDraw里面显示绘制了一个YELLOW颜色的矩形背景&#xff0c;然后绘制了一个自定义属性颜色的居中的文本。
这里要注意我们计算位置时的坐标&#xff0c;在自定义view中&#xff0c;原点是view的左上角&#xff0c;而在数学坐标系中&#xff0c;原点&#xff08;0,0&#xff09;是在中间的&#xff0c;二者是有区别的。
其次&#xff0c;假如xml布局中有padding&#xff0c;或者预判会使用到padding&#xff0c;在重写onDraw的时候也要把padding的数据加上&#xff0c;否则padding是不生效的。如果是继承ViewGroup时&#xff0c;子view的padding放在onMeasure中处理。
来看此时的效果&#xff1a;
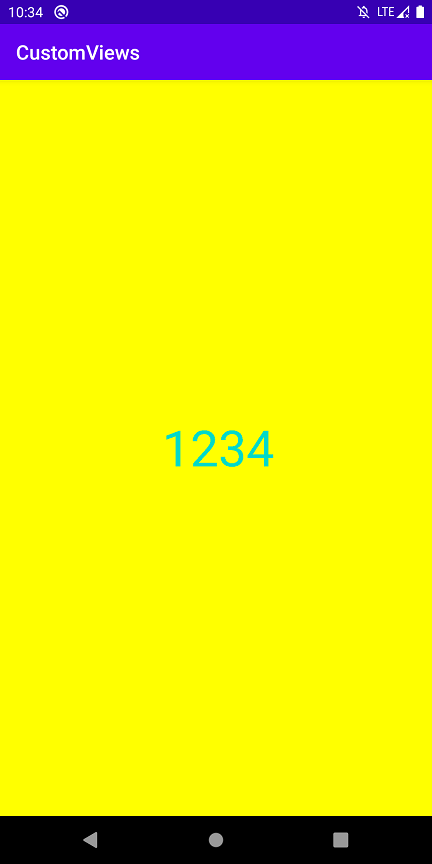
此时是不是有疑惑&#xff0c;xml里面的宽高明明是wrap_content&#xff0c;为什么会充满父布局呢&#xff1f;
这就涉及到onMeasure的知识点了&#xff0c;往下看。
5.重写onMeasure测量宽高
我们在xml设置view宽高有3种方式&#xff1a;
- match_parent
- wrap_content
- 具体数据&#xff0c;比如100dp
onMeasure中MeasureSpec 的 mode也有3种模式&#xff1a;
- EXACTLY&#xff1a;一般是设置了明确的值或者是MATCH_PARENT
- AT_MOST&#xff1a;表示子布局限制在一个最大值内&#xff0c;一般为WARP_CONTENT
- UNSPECIFIED&#xff1a;表示子布局想要多大就多大&#xff0c;很少使用
由于我们xml用的是wrap_content&#xff0c;也就是对应AT_MOST&#xff0c;所以效果就是会占满父布局中的可用空间&#xff0c;而父布局是填充屏幕&#xff0c;所以我们自定义的view也会占满全屏。
而我们实际想要的效果是view包裹自己&#xff0c;而不是铺满全屏&#xff0c;所以我们需要在onMeasure中进行处理
override fun onMeasure(widthMeasureSpec: Int, heightMeasureSpec: Int) {super.onMeasure(widthMeasureSpec, heightMeasureSpec)val widthMode &#61; MeasureSpec.getMode(widthMeasureSpec)val widthSize &#61; MeasureSpec.getSize(widthMeasureSpec)val heightMode &#61; MeasureSpec.getMode(heightMeasureSpec)val heightSize &#61; MeasureSpec.getSize(heightMeasureSpec)var width &#61; 0var height &#61; 0when (widthMode) {MeasureSpec.UNSPECIFIED,MeasureSpec.EXACTLY -> {width &#61; widthSize &#43; paddingLeft &#43; paddingRight}MeasureSpec.AT_MOST -> {width &#61; bounds.width() &#43; paddingLeft &#43; paddingRight}}when (heightMode) {MeasureSpec.UNSPECIFIED,MeasureSpec.EXACTLY -> {height &#61; heightSize &#43; paddingTop &#43; paddingBottom}MeasureSpec.AT_MOST -> {height &#61; bounds.height() &#43; paddingTop &#43; paddingBottom}}setMeasuredDimension(width, height)}
上面的代码呢&#xff0c;主要做了两件事&#xff1a;
- 获取view宽高的模式
- 针对不同的模式&#xff0c;对宽高进行重新测量
最后别忘记调用setMeasuredDimension保存新测量的宽高&#xff0c;否则没用哦。
此时再看效果就是效果图中的样子了。
6.设置点击事件
ok&#xff0c;到这&#xff0c;view已经绘制完成了&#xff0c;但是还没有事件&#xff0c;我们在构造中加一个点击事件
constructor(context: Context, attributeSet: AttributeSet?, defStyle: Int) : super(context, attributeSet, defStyle) {...this.setOnClickListener {mRandomText &#61; randomText()postInvalidate()}}
randomText方法&#xff1a;
private fun randomText(): String {val list &#61; mutableListOf<Int>()for (index in mRandomText.indices) {list.add(Random.nextInt(10))}val stringBuffer &#61; StringBuffer()for (i in list) {stringBuffer.append("" &#43; i)}return stringBuffer.toString()}
触发事件之后&#xff0c;文字更新&#xff0c;然后view重绘更新页面即可。
关于数据获取&#xff0c;也就是变化后的数字&#xff0c;可以写个onTextChanged接口&#xff0c;也可以写个开放方法获取。
总结
其实看效果的话&#xff0c;还不如TextView来的简单&#xff0c;而且TextView也可以轻松的实现效果图中的效果。
所以本文的重点并不是实现效果&#xff0c;而是学习理解自定义View以及其绘制流程。
理论看的再多也需要实践才行&#xff0c;不如跟着敲两遍&#xff0c;理解消化一下。
注释还是非常详细的&#xff0c;甚至有点啰嗦。。
如果对你有一点帮助&#xff0c;点个赞呗 ^ _ ^
Github
https://github.com/yechaoa/CustomViews
参考
- Android 自定义View (一)
- 自定义 View 1-1 绘制基础


 京公网安备 11010802041100号