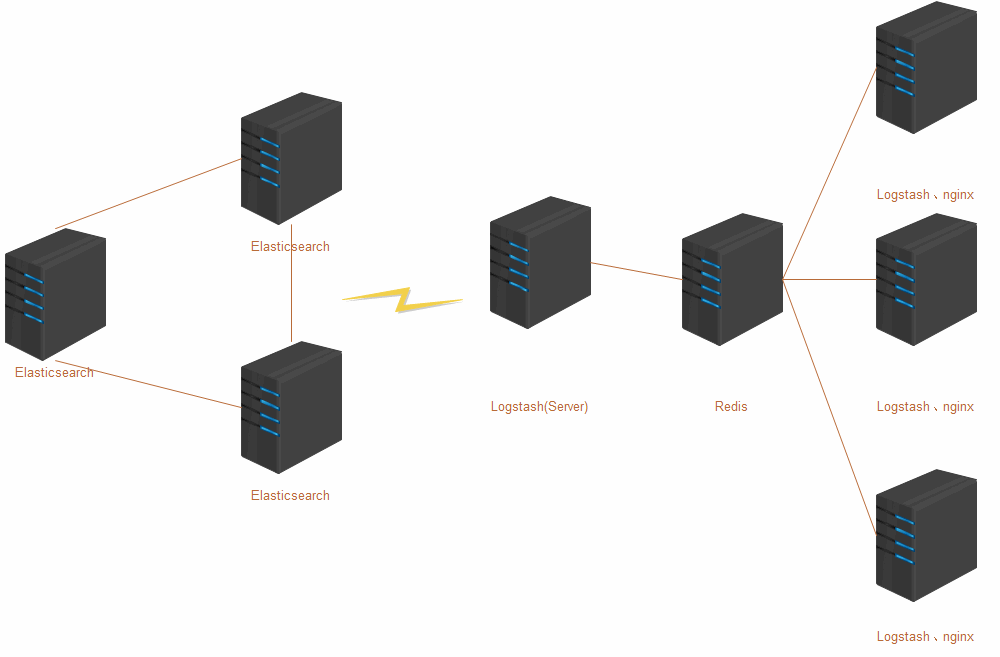
拓扑图:

| 主机名 | 主机地址 | 角色 |
|---|---|---|
| node1 | 192.168.31.201 | Elasticsearch、jdk1.8、Kibana |
| node2 | 192.168.31.202 | Elasticsearch、jdk1.8 |
| node3 | 192.168.31.203 | Elasticsearch、jdk1.8 |
| node4 | 192.168.31.204 | logstash、jdk1.8 |
| node5 | 192.168.31.205 | redis |
| node6 | 192.168.31.206 | logstash、nginx、jdk1.8 |
一、安装Logstash
#编辑repo文件,这里配置一个清华的yum源。
[root@bc ~]# vim /etc/yum.repos.d/logstash24.repo
  [logstash2.4-tsinghua]
  name=logstash24
  baseurl=https://mirrors.tuna.tsinghua.edu.cn/ELK/yum/logstash-2.4/
  enabled=1
  gpgcheck=0
#安装logstash
[root@bc ~]# yum install logstash-2.4.1 -y
#输出执行路径
[root@bc ~]# export PATH=/opt/logstash/bin/:$PATH[root@bc ~]# vim basic
input{
stdin{}
}
output{
stdout {
codec => rubydebug
}
}从标准输入读取(键盘),输出到标准输出(屏幕)
[root@bc ~]# logstash -f basic
Settings: Default pipeline workers: 1
Pipeline main started
hello world
{
       "message" => "hello world",
      "@version" => "1",
    "@timestamp" => "2017-03-03T02:16:51.538Z",
          "host" => "bc.com"
}
这里我们键盘输入的是hello world
二、Elasticsearch
#编辑repo文件,这里配置一个清华的yum源。
[root@bc ~]# vim /etc/yum.repos.d/elasticsearch24.repo
  [elasticsearch2.4-tsinghua]
  name=logstash24
  baseurl=https://mirrors.tuna.tsinghua.edu.cn/ELK/yum/elasticsearch-2.x/
  enabled=1
  gpgcheck=0

#安装elasticsearch
[root@bc ~]# yum install elasticsearch-2.4.4 -y
#启动
[root@bc ~]# service elasticsearch start
Starting elasticsearch (via systemctl): [ OK ][root@bc ~]# curl -i -XGET 'localhost:9200/'
HTTP/1.1 200 OK
Content-Type: application/json; charset=UTF-8
Content-Length: 367
{
"name" : "Jericho Drumm",
"cluster_name" : "elasticsearch",
"cluster_uuid" : "vLUapCyRRK6YH2ilwdPMkQ",
"version" : {
"number" : "2.4.4",
"build_hash" : "fcbb46dfd45562a9cf00c604b30849a6dec6b017",
"build_timestamp" : "2017-01-03T11:33:16Z",
"build_snapshot" : false,
"lucene_version" : "5.5.2"
},
"tagline" : "You Know, for Search"
}[root@node3 ~]# vim /etc/elasticsearch/elasticsearch.yml
cluster.name: "elasticsearch"
#集群名字
node.name: "node3.bc.com"
#节点名字,三个节点都需要不同的名字以示区分
network.host: 0.0.0.0
#监听地址
http.port: 9200
#浏览器访问地址
discovery.zen.ping.unicast.hosts: ["node2.bc.com", "node3.bc.com", "node1.bc.com"]
#node1,node2,node3三个节点的单播通信,告诉大家自己的存活状态。冒号后面,逗号后边少一个空格都会启动失败。
1.安装kopf插件
  [root@node2 ~]# /usr/share/elasticsearch/bin/plugin install lmenezes/elasticsearch-kopf/
2.安装head插件
  [root@node2 ~]# /usr/share/elasticsearch/bin/plugin install mobz/elasticsearch-head
3.查看已经安装的插件
  [root@node2 ~]# /usr/share/elasticsearch/bin/plugin list
  Installed plugins in /usr/share/elasticsearch/plugins:
      - head
      - license
- kopf1.三个节点的插件必须都安装,否则启动不了。systemctl status elasticsearch一般会报错: IllegalArgumentException[No custom metadata prototype registered for type
2.本地没有插件的话会自动从github下载比较坑的是,elaticsearch的不同版本plugin这个命令的使用方法可能会不同不过可以用-h来显示使用方法,命令不要复制就用。
浏览器输入elasticsearch节点之一的地址:
http://192.168.31.201:9200/_plugin/head/
使用logstash内置的匹配规则,匹配httpd的日志格式
1.这个不是必要的配置文件,我们在这里先探究一下默认的匹配规则有什么用。
#编写一个叫apachelog.conf的文件,用来写匹配httpd日志的规则。
[root@bc ~]# vim apachelog.conf
input {
        file {
                path    => ["/var/log/httpd/access_log"]
                type    => "apachelog"
                start_position => "beginning"
            }
}

filter {
    grok {
        match => { "message" => "%{COMBINEDAPACHELOG}" }
    }
}

output {
    stdout {
        codec   => rubydebug
    }
}需要注意的是,此处有三个插件。
input插件指的是logstash从哪里读数据;
filter插件指的是怎么对文本进行过滤;
output插件指的是需要把结果输出到哪里这三个插件的意思是: logstash从文件中读取数据(input), 经过内置的COMBINEDAPACHELOG规则匹配之后(filter), 把结果输出到屏幕(output)
[root@bc ~]# logstash -f apachelog.conf
{
        "message" => "192.168.31.242 - - [03/Mar/2017:14:00:41 +0800] \"GET /noindex/css/fonts/Bold/OpenSans-Bold.ttf HTTP/1.1\" 404 238 \"http://192.168.31.201/noindex/css/open-sans.css\" \"Mozilla/5.0 (Windows NT 6.1; Win64; x64) AppleWebKit/537.36 (KHTML, like Gecko) Chrome/56.0.2924.87 Safari/537.36\"",
       "@version" => "1",
     "@timestamp" => "2017-03-03T06:00:52.934Z",
           "path" => "/var/log/httpd/access_log",
           "host" => "bc.com",
           "type" => "apachelog",
       "clientip" => "192.168.31.242",
          "ident" => "-",
           "auth" => "-",
      "timestamp" => "03/Mar/2017:14:00:41 +0800",
           "verb" => "GET",
        "request" => "/noindex/css/fonts/Bold/OpenSans-Bold.ttf",
    "httpversion" => "1.1",
       "response" => "404",
          "bytes" => "238",
       "referrer" => "\"http://192.168.31.201/noindex/css/open-sans.css\"",
          "agent" => "\"Mozilla/5.0 (Windows NT 6.1; Win64; x64) AppleWebKit/537.36 (KHTML, like Gecko) Chrome/56.0.2924.87 Safari/537.36\""
}使用combinedlog匹配nginx规则
{
"message" => "192.168.31.242 - - [03/Mar/2017:14:11:01 +0800] \"GET / HTTP/1.1\" 304 0 \"-\" \"Mozilla/5.0 (Windows NT 6.1; Win64; x64) AppleWebKit/537.36 (KHTML, like Gecko) Chrome/56.0.2924.87 Safari/537.36\" \"-\"",
"@version" => "1",
"@timestamp" => "2017-03-03T06:11:49.150Z",
"path" => "/var/log/nginx/access.log",
"host" => "bc.com",
"type" => "nginx",
"clientip" => "192.168.31.242",
"ident" => "-",
"auth" => "-",
"timestamp" => "03/Mar/2017:14:11:01 +0800",
"verb" => "GET",
"request" => "/",
"httpversion" => "1.1",
"response" => "304",
"bytes" => "0",
"referrer" => "\"-\"",
"agent" => "\"Mozilla/5.0 (Windows NT 6.1; Win64; x64) AppleWebKit/537.36 (KHTML, like Gecko) Chrome/56.0.2924.87 Safari/537.36\""
}我们可以看出来,用COMBINEDAPACHELOG也可以匹配nginx日志,但是会漏掉一些东西信息。
从web服务器收集日志,并使用redis作为消息队列
[root@node6 ~]# vim /etc/logstash/conf.d/nginx-out.conf
input {
        file {
                path    => ["/var/log/nginx/access.log"]
                type    => "nginxlog"
                start_position => "beginning"
        }
}

filter {
        grok {
                match => { "message" => "%{COMBINEDAPACHELOG} %{QS:x_forwarded_for}" }
        }
}

output{
        redis {
                port    =>      "6379"
                host    =>      ["192.168.31.205"]
                data_type       =>      "list"
                key     =>      "logstash-%{type}"
}
这里的意思是,从nginx日志读入,使用规则匹配,并输出到redis服务器
[root@node5 ~]# redis-cli
127.0.0.1:6379> LLEN logstash-nginxlog
(integer) 19
127.0.0.1:6379> LLEN logstash-nginxlog
(integer) 27
127.0.0.1:6379> LINDEX logstash-nginxlog 1
"{\"message\":\"192.168.31.242 - - [03/Mar/2017:20:39:47 +0800] \\\"GET /nginx-logo.png HTTP/1.1\\\" 200 368 \\\"http://192.168.31.203/\\\" \\\"Mozilla/5.0 (Windows NT 6.1; Win64; x64) AppleWebKit/537.36 (KHTML, like Gecko) Chrome/56.0.2924.87 Safari/537.36\\\" \\\"-\\\"\",\"@version\":\"1\",\"@timestamp\":\"2017-03-03T12:41:38.315Z\",\"path\":\"/var/log/nginx/access.log\",\"host\":\"node3.bc.com\",\"type\":\"nginxlog\",\"clientip\":\"192.168.31.242\",\"ident\":\"-\",\"auth\":\"-\",\"timestamp\":\"03/Mar/2017:20:39:47 +0800\",\"verb\":\"GET\",\"request\":\"/nginx-logo.png\",\"httpversion\":\"1.1\",\"response\":\"200\",\"bytes\":\"368\",\"referrer\":\"\\\"http://192.168.31.203/\\\"\",\"agent\":\"\\\"Mozilla/5.0 (Windows NT 6.1; Win64; x64) AppleWebKit/537.36 (KHTML, like Gecko) Chrome/56.0.2924.87 Safari/537.36\\\"\",\"x_forwarded_for\":\"\\\"-\\\"\"}"[root@node4 ~]# vim /etc/logstash/conf.d/redis-in.conf
input {
redis {
batch_count => 1
data_type => "list"
key => "logstash-nginxlog"
host => "192.168.31.205"
port => 6379
threads => 5
}
}
output{
elasticsearch{
hosts => ["192.168.31.201", "192.168.31.202", "192.168.31.203"]
}
}#启动方式也可以使用nohup logstash -f nginxout.conf &来启动
#也可以通过启动脚本来启动。
#但使用启动脚本容易因为权限问题,而导致logstash无法正常运行。
#修改启动脚本的启动用户为root
[root@node4 ~]# vim /etc/init.d/logstash
LS_USER=root
LS_GROUP=root
#启动logstash
[root@node4 ~]# /etc/init.d/logstash start为什么要使用logstash => redis => logstash Server这种结构?
首先,我们要了解redis在此处的用处。
redis在此处,做为一个消息队列,可以用来整合多个ngxin那里收集而来的日志。
当elasticsearch发生故障或重启的时候,redis仍可接受来自web端的日志。
当elasticsearch重新启动的时候,则会从消息队列中重新读取数据。
这样就可以不会因为重启的这段时间而丢失那段时间的日志数据。
安装kibana
#配置kibana的清华镜像
[root@bc ~]# vim /etc/yum.repos.d/kibana.repo
[Kibana-4.5]
name=Kibana-Tsinghua
baseurl=https://mirrors.tuna.tsinghua.edu.cn/ELK/yum/kibana-4.5/
gpgcheck=0
enabled=1

[root@bc ~]# yum install kibana -y[root@bc ~]# vim /opt/kibana/config/kibana.yml
elasticsearch.url: "http://node1.bc.com:9200"#启动kibana
[root@bc ~]# nohup /opt/kibana/bin/kibana &
#浏览器输入,可以使用ip地址
http://node1.bc.com:5601
ELK stack的安全问题
(1).ELK安全相关:
由于ELK stack是日志信息,相对来说比较私密,不能任由谁都能访问。
a.在前端使用nginx做代理,并且启用basic认证。
b.nginx设置访问控制,来限制访问来源的ip。
c.把ELK stack在局域网内,不向外提供服务。
(2)redis的安全相关:
a.redis启动自带的认证功能
b.nginx设置访问控制,来限制访问来源的ip。
c.把redis在局域网内,不向外提供服务。
#实际上,由于NoSQL的产品兴起不久,最近都有一些安全相关的资讯。
#一定要在安全相关方面,引起注意。
  1.redis被提权之后,被恶意被执行flush_all导致被清库。
  2.mongodb低版本没有认证功能,被清库。
  3.elasticsearch被恶意勒索。(自身为开源免费,认证插件收费。)
总结:
(1).ELK安装起来看起来十分容易,但是实际操作起来,因为版本之间有差异,所以很容易出错。而这个时候,我们可以通过查看日志,或者到官方文档
(2).写出正确的grok规则是最花时间,也就是说ELK里面,最烧脑的是logstash。
但是elasticsearch的配置文件很严格,有时即使是少写一个空格也会启动失败。
(3).因为ELK stack需要启动java虚拟机,很占用内存。
同时elasticsearch、logstash都需要安装JVM虚拟机,一般不搭建在同一台服务器。
(4).redis很消耗内存,在redis内存占用达到总体70%以上的时候就需要引起注意。
同时,redis最好安装3或者以上的高版本,因为低版本的redis很容易和logstash不兼容,写不进去。
(5).由于权限的问题而导致启动失败
可修改/etc/sysconfig/logstash中启动用户为root。
(6)这个架构中的单点故障:Redis。
1.logstash Server故障的时候,消息储存在消息队列中
2.logstash Client故障的时候,日志仍然保存在nginx日志文件中。
但是重启的时候,只要配合sincedb依然可以继续上次断开的地方开始读取。
3.Elasticsearch故障的时候,集群中的其他节点会生效
4.Redis故障的时候,,logstash client的多个主机都无法向redis写入数据。
关于新版本的见解:
文章都是实际搭建之后而成,关于理论部分不过多阐述。
ELK stack2.4版本目前使用较多,新版ELK由于变动较大并追加了新功能。
在搭建或者使用期间时报错,可能较难搜索到结果。
如果求稳定使用而不是追求新功能的话,本文可以作为参考。

 京公网安备 11010802041100号 | 京ICP备19059560号-4 | PHP1.CN 第一PHP社区 版权所有