使用flask搭建,富文本编辑器采用neditor,neditor是基于ueditor开发的,markdown采用editor.md
一般需求有两种
完整实例


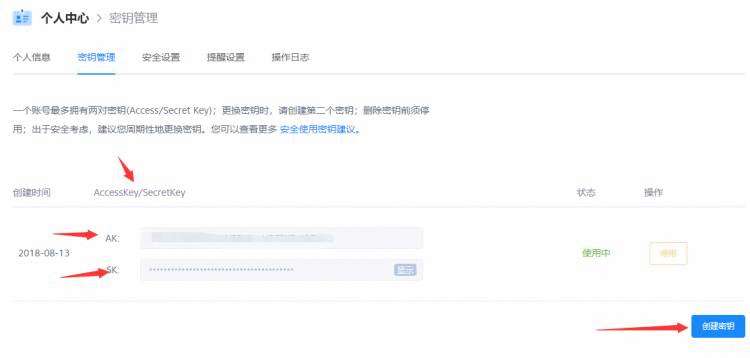
在后面会用到密钥

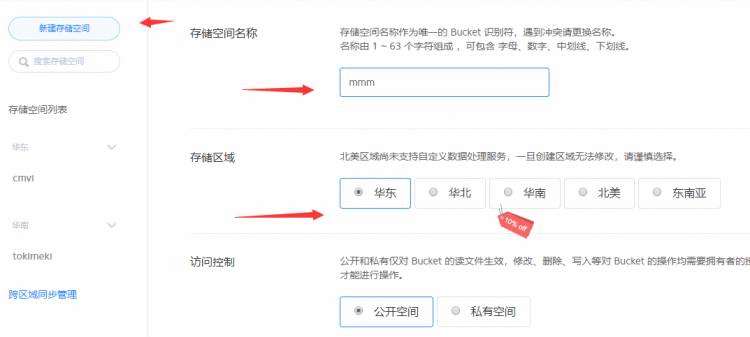

这是测试域名,后面会用到。
# 获取七牛云token
@app.route('/uptoken/')
def uptoken():# AKaccess_key = config.UEDITOR_QINIU_ACCESS_KEY# SKsecret_key = config.UEDITOR_QINIU_SECRET_KEY# 验证q = qiniu.Auth(access_key,secret_key)# 储存空间名字bucket = config.UEDITOR_QINIU_BUCKET_NAME# tokentoken = q.upload_token(bucket)return jsonify({"uptoken":token})
window.onload = function () {var img_kind = "?\t\n" +"imageMogr2/auto-orient/thumbnail/100000@/format/jpg/blur/1x0/quality/75|watermark/2/text/5aKo6Z-z/font/5qW35L2T/fontsize/600/fill/IzMxMjRDQQ==/dissolve/43/gravity/SouthEast/dx/10/dy/10|imageslim"zlqiniu.setUp({'domain': 'http://psodtyzhu.bkt.clouddn.com/',//这是你创建的域名'browse_btn': 'upload-btn',//这是按钮id'uptoken_url': '/uptoken/',//获取后台生成的token'success': function (up, file, info) {var domain = up.getOption('domain');var obj = JSON.parse(info);var image_url = domain + obj.keyconsole.log(image_url)var imageInput = document.getElementById("image-input");imageInput.value = image_url;var im = document.getElementById("img");im.setAttribute("src", image_url + img_kind);}});
}
#encoding: utf-8from flask import (Blueprint,request,jsonify,url_for,send_from_directory,current_app as app
)
import json
import re
import string
import time
import hashlib
import random
import base64
import sys
import os
import config
from urllib import parse
# 更改工作目录。这么做的目的是七牛qiniu的sdk
# 在设置缓存路径的时候默认会设置到C:/Windows/System32下面
# 会造成没有权限创建。
os.chdir(os.path.abspath(sys.path[0]))
try:import qiniu
except:pass
from io import BytesIObp = Blueprint('editor',__name__,url_prefix='/editor')UEDITOR_UPLOAD_PATH = ""
UEDITOR_UPLOAD_TO_QINIU = False
UEDITOR_QINIU_ACCESS_KEY = config.UEDITOR_QINIU_ACCESS_KEY
UEDITOR_QINIU_SECRET_KEY = config.UEDITOR_QINIU_SECRET_KEY
UEDITOR_QINIU_BUCKET_NAME = config.UEDITOR_QINIU_BUCKET_NAME
UEDITOR_QINIU_DOMAIN = config.UEDITOR_QINIU_DOMAIN
IMG_KIND = r"?imageMogr2/auto-orient/thumbnail/x175/blur/1x0/quality/75|imageslim"@bp.before_app_first_request
def before_first_request():global UEDITOR_UPLOAD_PATHglobal UEDITOR_UPLOAD_TO_QINIUglobal UEDITOR_QINIU_ACCESS_KEYglobal UEDITOR_QINIU_SECRET_KEYglobal UEDITOR_QINIU_BUCKET_NAMEglobal UEDITOR_QINIU_DOMAINglobal IMG_KINDUEDITOR_UPLOAD_PATH = app.config.get('UEDITOR_UPLOAD_PATH')if UEDITOR_UPLOAD_PATH and not os.path.exists(UEDITOR_UPLOAD_PATH):os.mkdir(UEDITOR_UPLOAD_PATH)UEDITOR_UPLOAD_TO_QINIU = app.config.get("UEDITOR_UPLOAD_TO_QINIU")if UEDITOR_UPLOAD_TO_QINIU:try:UEDITOR_QINIU_ACCESS_KEY = app.config["UEDITOR_QINIU_ACCESS_KEY"]UEDITOR_QINIU_SECRET_KEY = app.config["UEDITOR_QINIU_SECRET_KEY"]UEDITOR_QINIU_BUCKET_NAME = app.config["UEDITOR_QINIU_BUCKET_NAME"]UEDITOR_QINIU_DOMAIN = app.config["UEDITOR_QINIU_DOMAIN"]except Exception as e:option = e.args[0]raise RuntimeError('请在app.config中配置%s!'%option)csrf = app.extensions.get('csrf')if csrf:csrf.exempt(upload)def _random_filename(rawfilename):letters = string.ascii_lettersrandom_filename = str(time.time()) + "".join(random.sample(letters,5))filename = hashlib.md5(random_filename.encode('utf-8')).hexdigest()subffix = os.path.splitext(rawfilename)[-1]return filename + subffix@bp.route('/upload/',methods=['GET','POST'])
def upload():action = request.args.get('action')result = {}if action == 'config':config_path = os.path.join(bp.static_folder or app.static_folder,'ueditor','config.json')with open(config_path,'r',encoding='utf-8') as fp:result = json.loads(re.sub(r'\/\*.*\*\/','',fp.read()))elif action in ['uploadimage', 'uploadvideo', 'uploadfile']:image = request.files.get("file") # neditor的参数if not image:image = request.files.get("editormd-image-file") # editor.md的参数if not image:image = request.files.get("upfile") # ueditor的参数filename = image.filenamesave_filename = _random_filename(filename)result = {'state': '','url': '','title': '','original': ''}if UEDITOR_UPLOAD_TO_QINIU:if not sys.modules.get('qiniu'):raise RuntimeError('没有导入qiniu模块!')buffer = BytesIO()image.save(buffer)buffer.seek(0)q = qiniu.Auth(UEDITOR_QINIU_ACCESS_KEY, UEDITOR_QINIU_SECRET_KEY)token = q.upload_token(UEDITOR_QINIU_BUCKET_NAME)ret,info = qiniu.put_data(token,save_filename,buffer.read())if info.ok:result['state'] = "SUCCESS"result['url'] = parse.urljoin("http://"+config.UEDITOR_QINIU_DOMAIN,ret['key']+IMG_KIND)result['title'] = ret['key']result['original'] = ret['key']else:image.save(os.path.join(UEDITOR_UPLOAD_PATH, save_filename))result['state'] = "SUCCESS"result['url'] = url_for('ueditor.files',filename=save_filename)result['title'] = save_filename,result['original'] = image.filenameelif action == 'uploadscrawl':base64data = request.form.get("upfile")img = base64.b64decode(base64data)filename = _random_filename('xx.png')filepath = os.path.join(UEDITOR_UPLOAD_PATH,filename)with open(filepath,'wb') as fp:fp.write(img)result = {"state": "SUCCESS","url": url_for('files',filename=filename),"title": filename,"original": filename}# 这个是editor.md使用时,对应参数result.update({"code":200})result.update({"success":1})result.update({"message":"成功"})return jsonify(result)@bp.route('/files/
def files(filename):return send_from_directory(UEDITOR_UPLOAD_PATH,filename)
$(function () {var ue = UE.getEditor("editor", {'serverUrl': '/editor/upload/',//这个是前面定义的,为了上传图片toolbars: [['undo', //撤销'redo', //重做'bold', //加粗'italic', //斜体'blockquote', //引用'insertcode', //代码语言'fontfamily', //字体'fontsize', //字号'paragraph', //段落格式'justifyleft', //居左对齐'justifyright', //居右对齐'justifycenter', //居中对齐'justifyjustify', //两端对齐'forecolor', //字体颜色'backcolor', //背景色'inserttable', //插入表格'link', //超链接'insertorderedlist', //有序列表'insertunorderedlist', //无序列表'simpleupload', //单图上传'emotion', //表情'searchreplace', //查询替换'preview',//预览'fullscreen', //全屏'indent', //首行缩进'snapscreen', //截图'horizontal', //分隔线'italic', //斜体'underline', //下划线'subscript', //下标'superscript', //上标]],autoHeight: false});$("#submit-btn").click(function (event) {event.preventDefault();var content = ue.getContent();console.log(content)})
});

$(function () {var ue = UE.getEditor("editor", {'serverUrl': '/editor/upload/',toolbars: [['undo', //撤销'redo', //重做'bold', //加粗'italic', //斜体'blockquote', //引用'insertcode', //代码语言'fontfamily', //字体'fontsize', //字号'paragraph', //段落格式'justifyleft', //居左对齐'justifyright', //居右对齐'justifycenter', //居中对齐'justifyjustify', //两端对齐'forecolor', //字体颜色'backcolor', //背景色'inserttable', //插入表格'link', //超链接'insertorderedlist', //有序列表'insertunorderedlist', //无序列表'insertimage', //多图上传'simpleupload', //多图上传'emotion', //表情'searchreplace', //查询替换'preview',//预览'fullscreen', //全屏'indent', //首行缩进'snapscreen', //截图'horizontal', //分隔线'italic', //斜体'underline', //下划线'subscript', //下标'superscript', //上标]],autoHeight: false});$("#submit-btn").click(function (event) {event.preventDefault();var content = ue.getContent();console.log(content)})
});
和ueditor是没多大区别,这是不能单图上传了,要使用多图上传
注意事项:
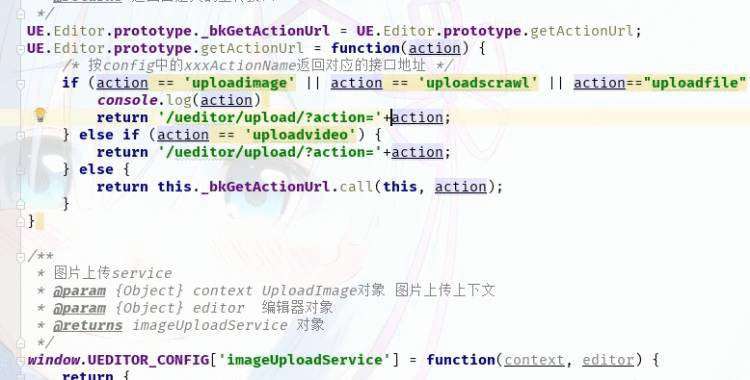
"file"是后台需要接收的参数,注意
action是为了后台便于判断文件类型,而设置的参数

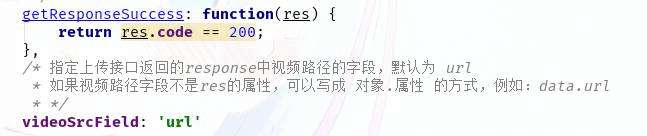
这里后台返回的json中需要与neditor定义的接口的参数相对应,不然会一直报错。
{# #}
var testEdiadtor;$(function () {testEditor = editormd("test-editormd", {width: "90%",height: 640,syncScrolling: "single",path: "../../static/editor.md/lib/",saveHTMLToTextarea: true,fullscreen: true,tex: true,                   // 开启科学公式TeX语言支持,默认关闭flowChart: true,             // 开启流程图支持,默认关闭sequenceDiagram: true,       // 开启时序/序列图支持,默认关闭,//dialogLockScreen : false,   // 设置弹出层对话框不锁屏,全局通用,默认为true//dialogShowMask : false,     // 设置弹出层对话框显示透明遮罩层,全局通用,默认为true//dialogDraggable : false,    // 设置弹出层对话框不可拖动,全局通用,默认为true//dialogMaskOpacity : 0.4,    // 设置透明遮罩层的透明度,全局通用,默认值为0.1//dialogMaskBgColor : "#000", // 设置透明遮罩层的背景颜色,全局通用,默认为#fff//dialogMaskBgColor : "#000", // 设置透明遮罩层的背景颜色,全局通用,默认为#fffimageUpload: true,imageFormats: ["jpg", "jpeg", "gif", "png", "bmp", "webp"],imageUploadURL: "/editor/upload/?action=" + "uploadimage",//这里上传的图片接口onload: function () {console.log('onload', this);this.watch().fullscreen();this.width("100%");this.height(640);this.resize("100%", 640);},toolbarIcons: function () {// Or return editormd.toolbarModes[name]; // full, simple, mini// Using "||" set icons align right.// return ["undo", "redo", "|", "bold", "hr", "|", "preview", "watch", "|", "fullscreen", "info", "testIcon", "editorIcon", "file", "faicon", "||", "watch", "fullscreen", "preview", "testIcon"]// return editormd.toolbarModes["full"]//完整工具栏//t.toolbarModes={full:["undo","redo","|","bold","del","italic","quote","ucwords","uppercase","lowercase","|","h1","h2","h3","h4","h5","h6","|","list-ul","list-ol","hr","|","link","reference-link","image","code","preformatted-text","code-block","table","datetime","emoji","html-entities","pagebreak","|","goto-line","watch","preview","fullscreen","clear","search","|","help","info"],simple:["undo","redo","|","bold","del","italic","quote","uppercase","lowercase","|","h1","h2","h3","h4","h5","h6","|","list-ul","list-ol","hr","|","watch","preview","fullscreen","|","help","info"],mini:["undo","redo","|","watch","preview","|","help","info"]}//需要将自定义图标放入进来return ["undo", "redo", "|", "bold", "del", "italic", "quote", "ucwords", "uppercase", "lowercase", "|", "h1", "h2", "h3", "h4", "h5", "h6", "|", "list-ul", "list-ol", "hr", "|", "link", "reference-link", "image", "code", "code-block", "table", "datetime", "emoji", "html-entities", "pagebreak", "|", "goto-line", "watch", "preview", "clear", "search", "||", "help", "info", "editorIcon", "returnIcon", "file", "faicon",]},//设置图标文本信息toolbarIconTexts: {editorIcon: "提交", // 如果没有图标,则可以这样直接插入内容,可以是字符串或HTML标签returnIcon: "返回"  // 如果没有图标,则可以这样直接插入内容,可以是字符串或HTML标签},// 用于增加自定义工具栏的功能,可以直接插入HTML标签,不使用默认的元素创建图标toolbarCustomIcons: {faicon: "'},// 自定义工具栏按钮的事件处理toolbarHandlers: {/*** @param {Object}      cm         CodeMirror对象* @param {Object}      icon       图标按钮jQuery元素对象* @param {Object}      cursor     CodeMirror的光标对象,可获取光标所在行和位置* @param {String}      selection  编辑器选中的文本*/editorIcon: function (cm, icon, cursor, selection) {alert(testEditor.getHTML())},returnIcon: function (cm, icon, cursor, selection) {window.location.href = "/"}},//提示信息lang: {toolbar: {editorIcon: "提交编辑内容",returnIcon: "返回主页",undo: "撤销 (Ctrl+Z)"}},});$("#submit-btn").click(function (event) {event.preventDefault();alert(testEditor.getHTML())testEditor.getMarkdown();       // 获取 Markdown 源码testEditor.getHTML();           // 获取 Textarea 保存的 HTML 源码testEditor.getPreviewedHTML();  // 获取预览窗口里的 HTML,在开启 watch 且没有开启 saveHTMLToTextarea 时使用})
});// testEditor.gotoLine(90);//转到第90行
//
// testEditor.show();//显示编辑器
//
// testEditor.hide();//隐藏编辑器
//
// alert(testEditor.getMarkdown());//获取编辑器内容(不含html)
//
// alert(testEditor.getHTML());//获取编辑器html内容
//
// testEditor.watch();//开启双窗口对比
//
// testEditor.unwatch();//取消双窗口对比
//
// testEditor.previewing();//预览效果
//
// testEditor.fullscreen();//全屏(按ESC取消)
//
// testEditor.showToolbar();//显示工具栏
//
// testEditor.hideToolbar();//隐藏工具栏
本文链接:https://www.ngui.cc/el/1199202.html


 京公网安备 11010802041100号 | 京ICP备19059560号-4 | PHP1.CN 第一PHP社区 版权所有