java.nio全称java non-blocking IO,是指jdk1.4 及以上版本里提供的新api(New IO) ,为所有的原始类型(boolean类型除外)提供缓存支持的数据容器,使用它可以提供非阻塞式的高伸缩性网络。
NIO三大组件:Channel、Buffer、Selector
1.Channel 和Buffer
Channel是一个对象,可以通过它读取和写入数据。拿 NIO 与原来的 I/O 做个比较,通道就像是流,而且他们面向缓冲区(Buffer)的。所有数据都通过Buffer对象来处理,永远不会将字节直接写入通道中,而是将数据写入包含一个或多个字节的缓冲区。也不会直接从通道中读取字节,而是将数据从通道读入缓冲区,再从缓冲区获取这个字节。
Channel是读写数据的双向通道,可以从Channel将数据读取Buffer,也可将Buffer的数据写入Channel,而之前的Stream要么是输入(InputStream)、要么是输出(OutputStream),只在一个方向上流通。 而通道(Channel)可以用于读、写或者同时用于读写
常见的Channel
1.FileChannel
2.DatagramChannel
3.SocketChannel
4.ServerSocketChannel
Buffer缓冲区用来读写数据,常见的Buffer
1.ByteBuffer
2.ShortBuffer
3.IntBuffer
4.LongBuffer
5.FloatBuffer
6.DoubleBuffer
7.CharBuffer
2.Selector
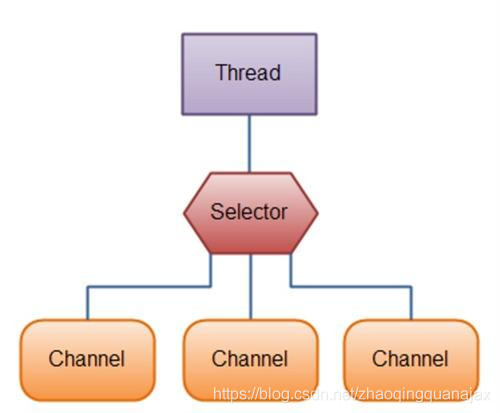
​ 在多线程模式下,阻塞IO时,一个线程只能处理一个请求,比如http请求,当请求响应式关闭连接,释放线程资源。Selector选择器的作用就是配合一个线程来管理多个Channel,获取这些Channel上发生的事件,这些Channel工作在非阻塞模式下,不会让线程一直在一个Channel上,适合连接数特别多,但流量低的场景。

调用Selector的select()方法会阻塞直到Channel发送了读写就绪事件,这些事件发生,select()方法就会
返回这些事件交给thread来处理。
属性:
Buffer的读写操作就是通过改变position,mark,limit的值来实现。注意他们之间的关系可以很轻松的读、写、覆盖。
方法:
Buffer的方法全是根据改变position的值进行操作的。
private static void buffer1() {
    String data = "abc";
    //byte[] bytes = new byte[1024];
    //创建一个字节缓冲区,1024byte
    ByteBuffer byteBuffer = ByteBuffer.allocate(15);
    System.out.println(byteBuffer.toString());
    // 标记当前下标position位置,mark = position ,返回当前对象
    System.out.println(byteBuffer.mark());
    //对于写入模式,表示当前可以写入的数组大小,默认为数组的最大长度,对于读取模式,表示当前最多可以读取的数据的位置下标
    System.out.println(byteBuffer.limit());
    // 对于写入模式,表示当前可写入数据的下标,对于读取模式,表示接下来可以读取的数据的下标
    System.out.println(byteBuffer.position());
    //capacity 表示当前数组的容量大小
    System.out.println(byteBuffer.capacity());
    //将字节数据写入 byteBuffer
    byteBuffer.put(data.getBytes());
    //保存了当前写入的数据
    for(Byte b : byteBuffer.array()){
        System.out.print(b + " ");
    }
    System.out.println();
    System.out.println(new String(byteBuffer.array()));
    //读写模式切换 改变 limit,position ,mark的值
    byteBuffer.flip();
    //切换为写模式,将第一个字节覆盖
    byteBuffer.put("n".getBytes()); // abc 改为 nbc
    System.out.println(new String(byteBuffer.array()));
    //让position为之前标记的值,调用mark()方法是将mark = position,这里将position = mark,mark为初始值抛出异常
    byteBuffer.mark();
    byteBuffer.reset();
    //将position 和 mark设为初始值,调用这个可以一直读取内容或者一直写入覆盖之前内容,从第一位开始读/写
    byteBuffer.rewind();
    for(Byte b : byteBuffer.array()){
        System.out.print(b + " ");
    }
    System.out.println();
    System.out.println(byteBuffer.toString());
    //找到可写入的开始位置,不覆盖之前的数据
    byteBuffer.compact();
    System.out.println(byteBuffer.toString());
}
写入读取完整操作
private static void buffer(){
    //写入的数据
    String data = "1234";
    //创建一个字节缓冲区,1024byte
    ByteBuffer byteBuffer = ByteBuffer.allocate(15);
    //写入数据
    byteBuffer.put(data.getBytes());
    //打输出 49 50 51 52 0 0 0 0 0 0 0 0 0 0 0
    println(byteBuffer.array());
    byteBuffer.put((byte) 5);
    //追加写入 输出: 49 50 51 52 5 0 0 0 0 0 0 0 0 0 0
    println(byteBuffer.array());
    //覆盖写入
    byteBuffer.flip(); //将写入下标的 position = 0
    byteBuffer.put((byte) 1);
    byteBuffer.put((byte) 2);
    byteBuffer.put((byte) 3);
    byteBuffer.put((byte) 4);
    byteBuffer.put((byte) 5);
    // 打印输出 : 1 2 3 4 5 0 0 0 0 0 0 0 0 0 0
    println(byteBuffer.array());
    //读取数据操作
    byteBuffer.flip();//从头开始读
    while (byteBuffer.position() != byteBuffer.limit()){
        System.out.println(byteBuffer.get());
    }
    //此时 position 和 数据数 limit相等
    System.out.println(byteBuffer.toString());

    //批量读取
    byteBuffer.flip(); //将 position 置位0,从头开始操作
    //创建一个byte数组,数组大小为可读取的大小
    byte[] bytes = new byte[byteBuffer.limit()];
    byteBuffer.get(bytes);
    //输出bytes 1 2 3 4 5
    println(bytes);
}

 private static void println(byte[] bytes){
     for(Byte b : bytes){
         System.out.print(b + " ");
     }
     System.out.println();
}
字符串跟ByteBuffer之间的转换
public static void main(String[] args) {

    /*======================字符串转buffer===========================*/
    //1.字符串 转为buytebuffer 需要转为读模式再进行读取操作
    ByteBuffer buffer = ByteBuffer.allocate(1024);
    buffer.put("nio".getBytes());

    //2.charset  自动转为读模式
    ByteBuffer buffer1 = StandardCharsets.UTF_8.encode("nio");

    //3, warp 自动转为读模式
    ByteBuffer buffer2 = ByteBuffer.wrap("nio".getBytes());

    /*======================buffer转字符串===========================*/
    String str = StandardCharsets.UTF_8.decode(buffer1).toString();
    System.out.println(str);
}
文件编程FileChannel
FileChannel只能工作在阻塞模式下,不能配合在Selector使用,Channel是双向通道,但是FileChannel根据获取源头判定可读或可写
**
 * 文件流对象打开Channel,FileChannel是阻塞的
 * @throws Exception
 */
private static void channel() throws Exception{
    FileInputStream in = new FileInputStream("C:\\Users\\zqq\\Desktop\\123.txt");
    FileOutputStream out = new FileOutputStream("C:\\Users\\zqq\\Desktop\\321.txt");
    //通过文件输入流创建通道channel
    FileChannel channel = in.getChannel();
    //获取FileChannel
    FileChannel outChannel = out.getChannel();
    //创建缓冲区byteBuffer
    ByteBuffer byteBuffer = ByteBuffer.allocate(1024);
    //将管道channel中数据读取缓存区byteBuffer中,channel只能与Buffer交互
    while (channel.read(byteBuffer) != -1){
        //position设置为0,从头开始读
        byteBuffer.flip();
        outChannel.write(byteBuffer);
        //byteBuffer 属性还原
        byteBuffer.clear();
    }
    //关闭各种资源
    channel.close();
    out.flush();
    out.close();
    in.close();
    out.close();
}
/**
 * 静态方法打开Channel
 * @throws Exception
 */
public static void channel1() throws Exception{
    // StandardOpenOption.READ :读取一个已存在的文件,如果不存在或被占用抛出异常
    // StandardOpenOption.WRITE :以追加到文件头部的方式,写入一个已存在的文件,如果不存在或被占用抛出异常
    // StandardOpenOption.APPEND:以追加到文件尾部的方式,写入一个已存在的文件,如果不存在或被占用抛出异常
    // StandardOpenOption.CREATE:创建一个空文件,如果文件存在则不创建
    // StandardOpenOption.CREATE_NEW:创建一个空文件,如果文件存在则报错
    // StandardOpenOption.DELETE_ON_CLOSE:管道关闭时删除文件
    //创建读通道
    FileChannel inChannel = FileChannel.open(Paths.get("C:\\Users\\zqq\\Desktop\\123.txt"), StandardOpenOption.READ);
    FileChannel outChannel = FileChannel.open(Paths.get("C:\\Users\\zqq\\Desktop\\321.txt"),
            StandardOpenOption.READ,StandardOpenOption.WRITE,StandardOpenOption.CREATE);

    //内存映射
    MappedByteBuffer inByteBuffer = inChannel.map(FileChannel.MapMode.READ_ONLY,0,inChannel.size());
    MappedByteBuffer outByteBuffer = outChannel.map(FileChannel.MapMode.READ_WRITE,0,inChannel.size());

    //直接对缓冲区数据读写
    byte[] bytes = new byte[inByteBuffer.limit()];
    inByteBuffer.get(bytes);//读取inByteBuffer内的数据,读到bytes数组中
    outByteBuffer.put(bytes);//写入到outByteBuffer
    inChannel.close();
    outChannel.close();
}
RandomAccessFile打开通道Channel
/**
 * 通过RandomAccessFile获取双向通道
 * @throws Exception
 */
private static void random() throws Exception{
    try (RandomAccessFile randomAccessFile = new RandomAccessFile("D:\\workspace\\Demo\\test.txt","rw")){
        //获取Channel
        FileChannel fileChannel = randomAccessFile.getChannel();
        //截取字节
        //fileChannel.truncate(10);
        //创建ByteBuffer,注意文件大小
        ByteBuffer byteBuffer = ByteBuffer.allocate(1024);
        fileChannel.read(byteBuffer);
        System.out.println(new String(byteBuffer.array(),"GBK"));
        byteBuffer.clear();
        String data = "this is data\r";
        byteBuffer.put(data.getBytes());
        byteBuffer.flip();//读写切换
        while (byteBuffer.hasRemaining()){
            fileChannel.write(byteBuffer);
        }
        //将通道数据强制写到磁盘
        fileChannel.force(true);
    }
}
FileChannel数据传输transferTo
/**
 * 一个文件向另一个文件传输(copy)
 */
private static void transferTo() {
    try (
            FileChannel inChannel = new FileInputStream("C:\\Users\\44141\\Desktop\\demo\\in.txt").getChannel();
            FileChannel outChannel = new FileOutputStream("C:\\Users\\44141\\Desktop\\demo\\out.txt").getChannel()
    ){
        //底层使用操作系统零拷贝进行优化,效率高。限制2g
        inChannel.transferTo(0,inChannel.size(),outChannel);
    }catch (Exception e){
        e.printStackTrace();
    }
}

/**
 * 大于2g数据
 */
private static void transferToGt2g() {
    try (
            FileChannel inChannel = new FileInputStream("C:\\Users\\44141\\Desktop\\demo\\in.txt").getChannel();
            FileChannel outChannel = new FileOutputStream("C:\\Users\\44141\\Desktop\\demo\\out1.txt").getChannel()
    ){
        //记录inChannel初始化大小
        long size = inChannel.size();
        //多次传输
        for(long rsize = size; rsize > 0;){
            //transferTo返回位移的字节数
            rsize -= inChannel.transferTo((size-rsize),rsize,outChannel);
        }
    }catch (Exception e){
        e.printStackTrace();
    }
}
阻塞模式
阻塞模式服务端每个方法都会阻塞等待客户端操作。比如accept()方法阻塞等待客户端连接,read()方法阻塞等待客户端传送数据,并发访问下没法高效的进行工作。
1.服务端代码
private static void server() throws Exception{

    //1.创建服务器
    ServerSocketChannel serverSocketChannel = ServerSocketChannel.open();

    //2.绑定监听端口
    serverSocketChannel.bind(new InetSocketAddress(8080));

    while (true){
        System.out.println("开始监听连接=============" );
        //4.accept 监听进来的连接 返回SocketChannel对象,accept默认阻塞
        SocketChannel socketChannel = serverSocketChannel.accept();
        System.out.println("有连接连入===============" );
        ByteBuffer byteBuffer = ByteBuffer.allocate(1024);
        // read()是阻塞方法,等客户端发送数据才会执行
        socketChannel.read(byteBuffer);
        byteBuffer.flip();
        String str = StandardCharsets.UTF_8.decode(byteBuffer).toString();
        System.out.println("接收到数据=============:" + str);
    }
}
2.客户端代码
private static void client() throws Exception {
    //1.创建客户端
    SocketChannel socketChannel = SocketChannel.open();
    //连接服务端
    socketChannel.connect(new InetSocketAddress("localhost",8080));
    //2 秒后写入数据
    Thread.sleep(2 * 1000);
    socketChannel.write(StandardCharsets.UTF_8.encode("nio"));
    System.out.println();
}
非阻塞模式
服务端设置成非阻塞模式。客户端不用动。
private static void server() throws Exception{

    ServerSocketChannel serverSocketChannel = ServerSocketChannel.open();

    //设置成非阻塞模式
    serverSocketChannel.configureBlocking(false);
    serverSocketChannel.bind(new InetSocketAddress(8080));
    while (true){
        SocketChannel socketChannel = serverSocketChannel.accept();
        //非阻塞模式下,SocketChannel会返回为null
        if(socketChannel != null){
            //非阻塞模式
            socketChannel.configureBlocking(false);
            ByteBuffer byteBuffer = ByteBuffer.allocate(1024);
            socketChannel.read(byteBuffer);
            byteBuffer.flip();
            String str = StandardCharsets.UTF_8.decode(byteBuffer).toString();
            System.out.println("接收到数据=============:" + str);
        }
    }
}
Selector选择器的作用就是配合一个线程来管理多个Channel,被Selector管理的Channel必须是非阻塞模式下的,所以Selector没法与FileChannel(FileChannel只有阻塞模式)一起使用。
创建Selector
创建Selector只需要调用一个静态方法
//创建Selector
Selector selector = Selector.open();
Selector可以用来监听Channel的事件,总共有四个事件:
Selector与Channel绑定
//设置成非阻塞模式
serverSocketChannel.configureBlocking(false);
SelectionKey selectiOnKey= serverSocketChannel.register(selector,0,null);
//绑定关注的事件
selectionKey.interestOps(SelectionKey.OP_ACCEPT);
1.客户端代码 SocketChannel
public static void main(String[] args) throws Exception {
    client();

}

private static void client() throws Exception {
    //1.创建客户端
    SocketChannel socketChannel = SocketChannel.open();
    //连接服务端
    socketChannel.connect(new InetSocketAddress("localhost",8080));
    //2 秒后写入数据
    Thread.sleep(2 * 1000);
    socketChannel.write(StandardCharsets.UTF_8.encode("nio"));
    //3.读取服务端返回数据
    ByteBuffer byteBuffer = ByteBuffer.allocate(1024);
    socketChannel.read(byteBuffer);
    byteBuffer.flip();
    System.out.println("服务端返回数据=======:" + StandardCharsets.UTF_8.decode(byteBuffer).toString());
    //断开连接
    socketChannel.close();
}
2.服务端代码
public static void main(String[] args) throws Exception{
    server();
}

private static void server() throws Exception{
    //创建Selector
    Selector selector = Selector.open();
    ServerSocketChannel serverSocketChannel = ServerSocketChannel.open();
    //设置成非阻塞模式
    serverSocketChannel.configureBlocking(false);
    //将Channel注册到selector上(绑定关系)
    //当事件发生后可以根据SelectionKey知道哪个事件和哪个Channel的事件
    SelectionKey selectiOnKey= serverSocketChannel.register(selector,0,null);
    //selectionKey 关注ACCEPT事件(也可以在上面注册时用第二个参数设置)
    selectionKey.interestOps(SelectionKey.OP_ACCEPT);
    serverSocketChannel.bind(new InetSocketAddress(8080));
    while (true){
        System.out.println("阻塞====================");
        // select方法没有事件发生时阻塞线程,有事件线程会恢复运行
        selector.select();
        System.out.println("开始处理事件=================");
        // 处理事件
        Iterator iterator = selector.selectedKeys().iterator();
        while (iterator.hasNext()){
            SelectionKey sk = iterator.next();
            //获取到SelectionKey对象之后,将集合内的引用删掉(Selecotr不会自动删除)
            iterator.remove();
            //取消事件,不操作(不处理或者不取消事件,selector.select()方法不会阻塞)
            //sk.cancel();
            //区分不同的事件做不同的动作
            if(sk.isAcceptable()){ //有连接请求事件
                //通过SelectionKey 获取对应的channel
                ServerSocketChannel channel = (ServerSocketChannel) sk.channel();
                SocketChannel socketChannel = channel.accept();
                socketChannel.configureBlocking(false);
                //读取数据内容,bytebuffer大小注意消息边界(一个字符串被分割读取多次出来结果不准确)
                ByteBuffer byteBuffer = ByteBuffer.allocate(1024);
                //将socketChannel绑定Selector
                SelectionKey socketKey = socketChannel.register(selector,0,byteBuffer);
                //关注可读事件
                socketKey.interestOps(SelectionKey.OP_READ);
            }else if(sk.isReadable()){//可读事件
                try {
                    //取到Channel
                    SocketChannel socketChannel = (SocketChannel) sk.channel();
                    //获取到绑定的ByteBuffer
                    ByteBuffer byteBuffer = (ByteBuffer) sk.attachment();
                    int read = socketChannel.read(byteBuffer);
                    //如果是正常断开 read = -1
                    if(read == -1){
                        //取消事件
                        sk.cancel();
                        continue;
                    }
                    byteBuffer.flip();
                    String str = StandardCharsets.UTF_8.decode(byteBuffer).toString();
                    System.out.println("服务端读取到数据===========:" + str);
                    //写数据回客户端
                    ByteBuffer writeBuffer = StandardCharsets.UTF_8.encode("this is result");
                    socketChannel.write(writeBuffer);
                    //如果数据一次没写完关注可写事件进行再次写入(大数据一次写不完的情况)
                    if(writeBuffer.hasRemaining()){
                        //关注可写事件,添加事件,用interestOps()方法获取到之前的事件加上可写事件(类似linux系统的赋权限 777)
                        sk.interestOps(sk.interestOps() + SelectionKey.OP_WRITE);
                        sk.attach(writeBuffer);
                        //位运算符也可以
                        //sk.interestOps(sk.interestOps() | SelectionKey.OP_WRITE);
                    }
                }catch (IOException e){
                    e.printStackTrace();
                    //客户端异常断开连接 ,取消事件
                    sk.cancel();
                }
            }else if(sk.isWritable()){
                //取到Channel
                SocketChannel socketChannel = (SocketChannel) sk.channel();
                //获取到绑定的ByteBuffer
                ByteBuffer writeBuffer = (ByteBuffer) sk.attachment();
                socketChannel.write(writeBuffer);
                //如果全部写完,取消可写事件绑定,解除writeBuffer绑定
                if(!writeBuffer.hasRemaining()){
                    sk.attach(null);
                    //取消可写事件
                    sk.interestOps(sk.interestOps() - SelectionKey.OP_WRITE);
                }
            }
        }
    }
}
到此这篇关于java基础之NIO介绍及使用的文章就介绍到这了,更多相关Java NIO详解内容请搜索以前的文章或继续浏览下面的相关文章希望大家以后多多支持!

 京公网安备 11010802041100号 | 京ICP备19059560号-4 | PHP1.CN 第一PHP社区 版权所有