https://learn.crunchydata.com/kube
Introduction to Using Crunchy PostgreSQL Operator
https://learn.crunchydata.com/
先上图:

VMware Fusion 专业版 12.1.2 (17964953)
| 机器 | IP |
|---|---|
| k8s-master | 192.168.92.155 |
| k8s-node1 | 192.168.92.156 |
| k8s-node2 | 192.168.92.157 |
| k8s-node3 | 192.168.92.158 |
# cat /proc/version
Linux version 5.11.0-40-generic (buildd@lgw01-amd64-010) (gcc (Ubuntu 9.3.0-17ubuntu1~20.04) 9.3.0, GNU ld (GNU Binutils for Ubuntu) 2.34) #44~20.04.2-Ubuntu SMP Tue Oct 26 18:07:44 UTC 2021
# uname -a
Linux k8s-master 5.11.0-40-generic #44~20.04.2-Ubuntu SMP Tue Oct 26 18:07:44 UTC 2021 x86_64 x86_64 x86_64 GNU/Linux
# lsb_release -a
No LSB modules are available.
Distributor ID: Ubuntu
Description:    Ubuntu 20.04.3 LTS
Release:        20.04
Codename:       focal
root@k8s-master:~# kubectl version
Client Version: version.Info{Major:"1", Minor:"22", GitVersion:"v1.22.2", GitCommit:"8b5a19147530eaac9476b0ab82980b4088bbc1b2", GitTreeState:"clean", BuildDate:"2021-09-15T21:38:50Z", GoVersion:"go1.16.8", Compiler:"gc", Platform:"linux/amd64"}
Server Version: version.Info{Major:"1", Minor:"22", GitVersion:"v1.22.3", GitCommit:"c92036820499fedefec0f847e2054d824aea6cd1", GitTreeState:"clean", BuildDate:"2021-10-27T18:35:25Z", GoVersion:"go1.16.9", Compiler:"gc", Platform:"linux/amd64"}
root@k8s-master:~#
# kubeadm init --image-repository registry.aliyuncs.com/google_containers --pod-network-cidr=10.244.0.0/16
Your Kubernetes control-plane has initialized successfully!To start using your cluster, you need to run the following as a regular user:mkdir -p $HOME/.kubesudo cp -i /etc/kubernetes/admin.conf $HOME/.kube/configsudo chown $(id -u):$(id -g) $HOME/.kube/configAlternatively, if you are the root user, you can run:export KUBECONFIG=/etc/kubernetes/admin.confYou should now deploy a pod network to the cluster.
Run "kubectl apply -f [podnetwork].yaml" with one of the options listed at:https://kubernetes.io/docs/concepts/cluster-administration/addons/Then you can join any number of worker nodes by running the following on each as root:kubeadm join 192.168.92.155:6443 --token a8c811.2ldvxygpwl1tqpaf \--discovery-token-ca-cert-hash sha256:9bdaf4f2e8a407ff3a3913b88aa2d655d1cc39c96d1a3f56c1806771a76c5c8c
在3个node分别执行上面提示的kubeadm join那一行命令加入集群
| 键 | 值 |
|---|---|
| yaml文件路径 | /home/yaocs/dashboard |
| 版本 | kubernetesui/dashboard:v2.4.0 |
安装使用可参考:Kubernetes- Dashboard安装、访问
$ ls
ClusterRoleBinding.yaml  dashboard-adminuser.yaml  recommended.yaml  #内容查看GitHub
kubectl apply -f recommended.yaml
kubectl apply -f dashboard-adminuser.yaml
kubectl apply -f ClusterRoleBinding.yaml
kubectl get pods -n kubernetes-dashboard
kubectl patch svc kubernetes-dashboard -p '{"spec":{"type":"NodePort"}}' -n kubernetes-dashboardkubectl get pods -n kubernetes-dashboard
kubectl get svc -n kubernetes-dashboard
查看k8s 的 dashboard 的token
# kubectl -n kube-system describe $(kubectl -n kube-system get secret -n kube-system -o name | grep namespace) | grep token
export KUBECOnFIG=/etc/kubernetes/admin.conf       #写入.bashrc更加方便
kubectl apply -f kube-flannel.yml
Custom Configuration
CrunchyData/crunchy-containers
crunchydata/postgres-operator
Using the Crunchy PostgreSQL Operator with PostGIS
基于Operator方式部署 PostgreSQL Operator 集群
路径:/root/CrunchyData
installation (V5版本,最新版,安装按照这个来)
克隆代码
cd postgres-operator-examples
# kubectl apply -k kustomize/install
# kubectl apply -k kustomize/postgres
kubernetes:Dynamic Volume
# kubectl get sc
# kubectl patch storageclass xxxxxx -p '{"metadata": {"annotations":{"storageclass.kubernetes.io/is-default-class":"true"}}}' # kubectl get pvc -n postgres-operator
Ubuntu20.04搭建 NFS 服务
sudo mount -t nfs 192.168.92.155:/nfs /mnt -o nolock
由于集群没有默认存储类,所以需要安装一个默认存储类。这里选择nfs。
参考 Oracle Linux and Cloud Native Notes
工作目录:
root@k8s-master:~/helmNfs# pwd
/root/helmNfs
root@k8s-master:~/helmNfs# ls
values-nfs-client.yaml
root@k8s-master:~/helmNfs# cat values-nfs-client.yaml
replicaCount: 2                                                                                                                                                                                                                      nfs:                                                                                                                                                                                                                                 server: 192.168.92.155                                                                                                                                                                                                             path: /nfs                                                                                                                                                                                                                         mountOptions:                                                                                                                                                                                                                      storageClass:                                                                                                                                                                                                                        archiveOnDelete: false
root@k8s-master:~/helmNfs#
root@k8s-master:~/helmNfs# helm template --generate-name  -f values-nfs-client.yaml stable/nfs-client-provisioner
root@k8s-master:~/helmNfs# helm install --generate-name  -f values-nfs-client.yaml stable/nfs-client-provisioner
执行完上面的命令后pod即可绑定pvc。

root@k8s-master:~/DefaultStorageClass/useTest# ls /nfs/
hello.txt
root@k8s-master:~/DefaultStorageClass/useTest# ls /mnt/
root@k8s-master:~/DefaultStorageClass/useTest#
wc,居然没绑定上。
原来是nfs服务停掉了?
sudo mount -t nfs 192.168.92.155:/nfs /mnt -o nolock
root@k8s-master:~/DefaultStorageClass/useTest# showmount -e 192.168.92.155
Export list for 192.168.92.155:
/nfs *
Helm初始化操作chaoskube
轻松完爆Helm公共仓库
root@k8s-master:~# helm repo list
NAME            URL
stable          http://mirror.azure.cn/kubernetes/charts
aliyun          https://kubernetes.oss-cn-hangzhou.aliyuncs.com/charts
jetstack        https://charts.jetstack.io
root@k8s-master:~#
Components and Compatibility
配置了两个
root@k8s-master:~# kubectl get pods -n postgres-operator
NAME                         READY   STATUS      RESTARTS   AGE
hippo-backup-hhs4--1-txbss   0/1     Completed   0          3h46m
hippo-instance1-dpzp-0       3/3     Running     0          142m
hippo-instance1-sgvj-0       3/3     Running     0          3h46m
hippo-repo-host-0            1/1     Running     0          3h46m
pgo-b95d7bbd-pn6m2           1/1     Running     0          3h47m
kubectl get pod --all-namespaces
kubectl -n postgres-operator get pods
kubectl -n postgres-operator get svc
kubectl -n postgres-operator get deploymentskubectl -n postgres-operator port-forward svc/hippo-primary 5432:5432
kubectl -n postgres-operator get pods port-forward svc/postgres-operator 8443:8443
kubectl explain PostgresCluster.spec
kubectl explain postgresclusters
kubectl edit configmap -n postgres-operator
kubectl edit configmap -n postgres-operator hippo-instance1-t7qw-config
kubectl get pvc --selector=pg-cluster=hippo -n postgres-operator
kubectl -n postgres-operator get secrets hippo-pguser-postgres -o go-template='{{.data.uri | base64decode}}'
psql $(kubectl -n postgres-operator get secrets hippo-pguser-postgres -o go-template='{{.data.uri | base64decode}}')
kubectl explain PostgresCluster.spec
kubectl get all
kubectl -n kubernetes-dashboard describe secret $(kubectl -n kubernetes-dashboard get secret | grep admin-user | awk '{print $1}')
https://access.crunchydata.com/documentation/postgres-operator/5.0.3/references/crd/ 所有的yaml文件Filed的定义
User / Database Management
spec:users:- name: postgres
https://access.crunchydata.com/documentation/postgres-operator/5.0.3/tutorial/create-cluster/
https://access.crunchydata.com/documentation/postgres-operator/5.0.3/architecture/user-management/
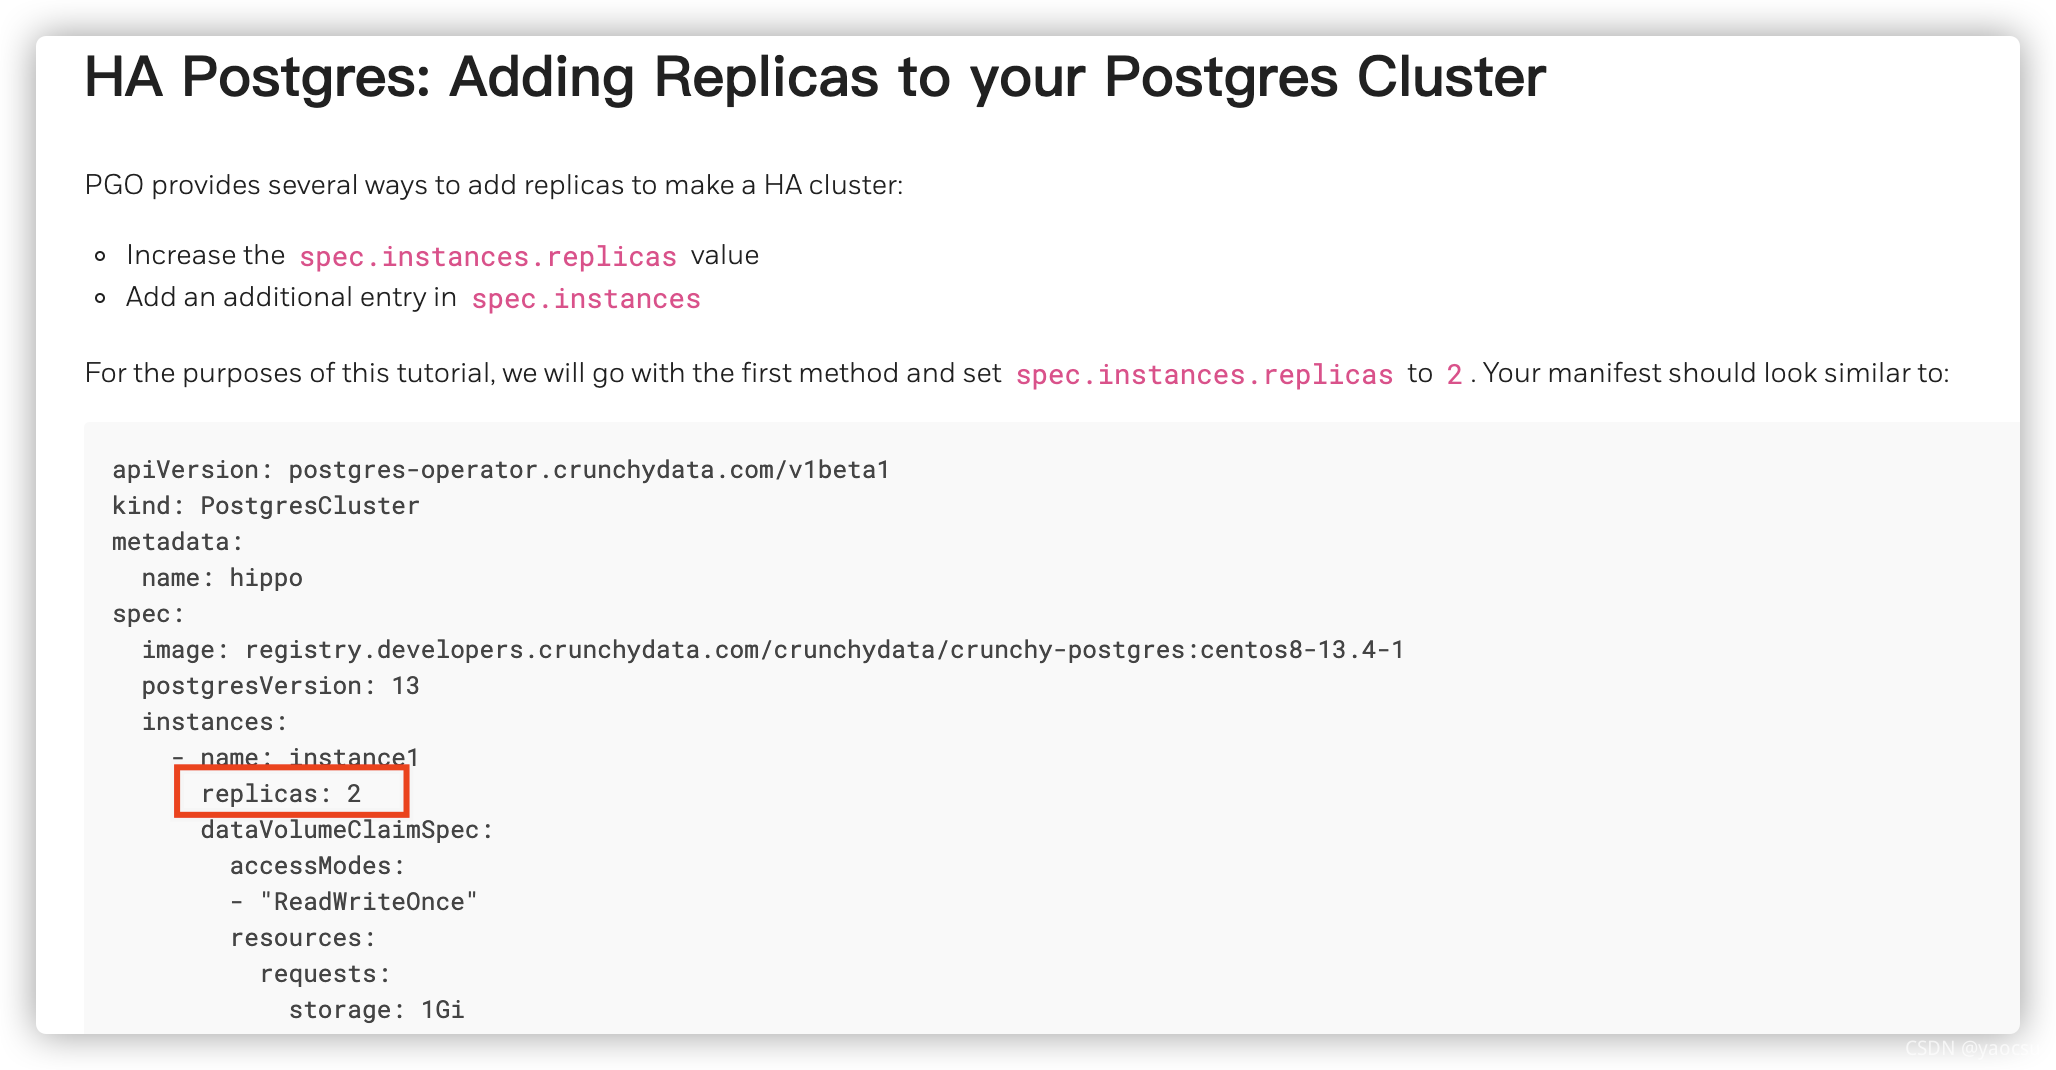
https://access.crunchydata.com/documentation/postgres-operator/v5/tutorial/high-availability/
https://learn.crunchydata.com/postgis
https://info.crunchydata.com/en/postgis-day-2020-crunchy-data
PostGIS Container
psql -h postgres-gis -U testuser userdb -c "SELECT postgis_full_version();"
crunchy-postgres-gis
SELECT postgis_full_version();
Container Images
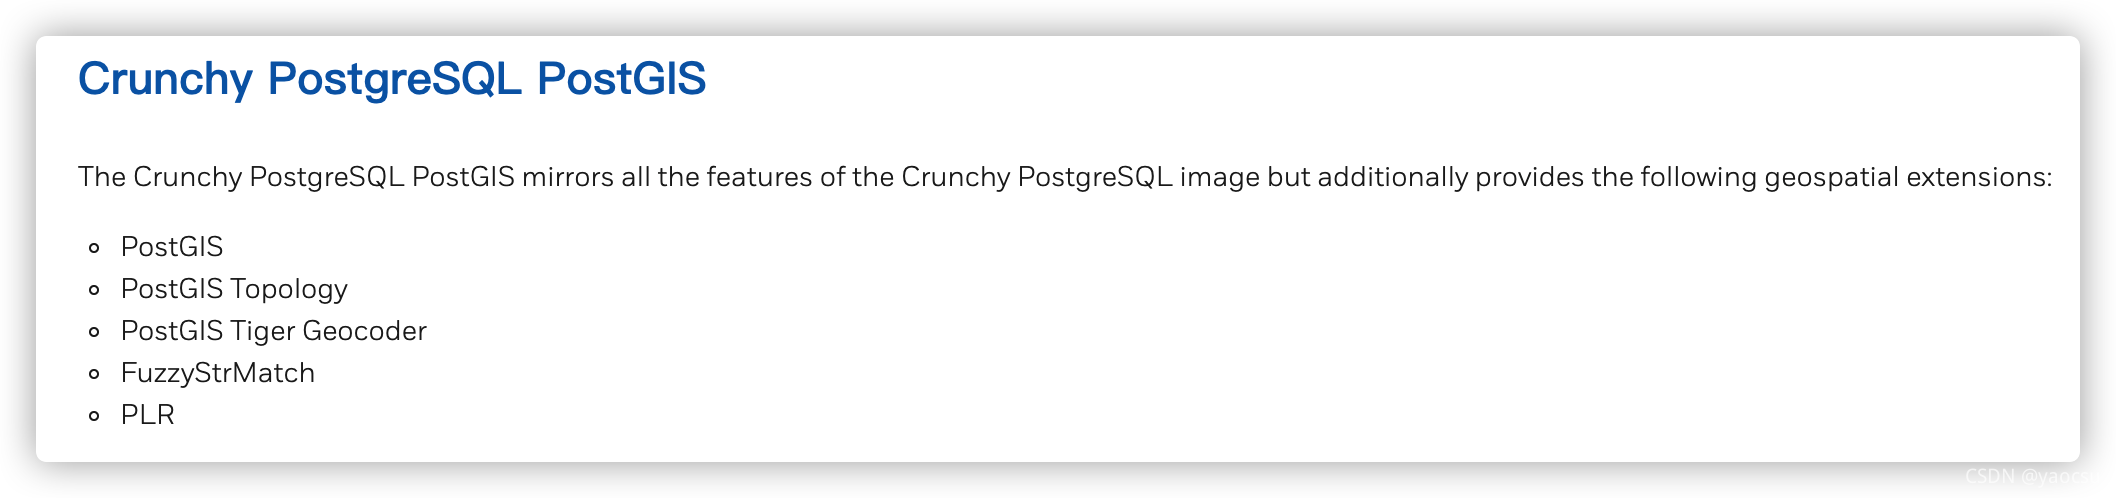
Chapter 2. PostGIS Installation PostGIS安装,可以自己升级
crunchydata/crunchy-postgres-gis
https://www.crunchydata.com/developers/download-postgres/containers/postgis
docker pull registry.developers.crunchydata.com/crunchydata/crunchy-postgres-gis:centos8-14.0-3.1-0
docker pull registry.developers.crunchydata.com/crunchydata/crunchy-postgres-gis:centos8-13.4-3.1-1
https://blog.crunchydata.com/blog/topic/postgis
为数据库添加PostGIS扩展
CREATE EXTENSION postgis;
CREATE EXTENSION postgis_raster;
CREATE EXTENSION postgis_topology;
CREATE EXTENSION postgis_sfcgal;
CREATE EXTENSION fuzzystrmatch;
CREATE EXTENSION address_standardizer;
CREATE EXTENSION address_standardizer_data_us;
CREATE EXTENSION postgis_tiger_geocoder;
https://www.runoob.com/postgresql/postgresql-syntax.html
20.1. The pg_hba.conf File
# netstat -tunlp
# netstat -ntlp | grep 5432
# telnet 192.168.92.155 5432
显示的是127.0.0.1:5432,肯定不行
Linux的netstat查看端口是否开放见解(0.0.0.0与127.0.0.1的区别)
In a new terminal, create a port forward:
PG_CLUSTER_PRIMARY_POD=$(kubectl get pod -n postgres-operator -o name \-l postgres-operator.crunchydata.com/cluster=hippo,postgres-operator.crunchydata.com/role=master)
kubectl -n postgres-operator port-forward "${PG_CLUSTER_PRIMARY_POD}" 5432:5432
#上面的方式只能本机连接PG_CLUSTER_PRIMARY_POD=$(kubectl get pod -n postgres-operator -o name \-l postgres-operator.crunchydata.com/cluster=hippo,postgres-operator.crunchydata.com/role=master)
kubectl -n postgres-operator port-forward --address 0.0.0.0 "${PG_CLUSTER_PRIMARY_POD}" 5432:5432
#上面的方式可以远程连接
Establish a connection to the PostgreSQL cluster.
PGPASSWORD="1bf]}:
https://access.crunchydata.com/documentation/postgres-operator/v5/
可以下载PDF版本方便全文搜索
https://github.com/CrunchyData/postgres-operator/issues/2534
spec:patroni:dynamicConfiguration:postgresql:pg_hba:- "hostnossl all all all md5"
If you edit your ConfigMap and your changes aren’t showing up, you may be waiting for PGO to reconcile your cluster. After some time, PGO will automatically reconcile the cluster or you can trigger reconciliation by applying any change to your cluster (e.g. with kubectl apply -k kustomize/postgres).
How do i connect to the postgres cluster from outside the k8s cluster? #2835
The most common occurrence of this is due to PVCs not being bound. Ensure that you have set up your storage options correctly in any volumeClaimSpec. You can always update your settings and reapply your changes with kubectl apply.
Also ensure that you have enough persistent volumes available: your Kubernetes administrator may need to provision more.
解决办法:
查看上面的命令需要用到的镜像,然后分别在所有的节点下载这些镜像。
docker pull registry.developers.crunchydata.com/crunchydata/crunchy-postgres:centos8-13.4-1
docker pull registry.developers.crunchydata.com/crunchydata/crunchy-pgbackrest:centos8-2.35-0
重新执行kubectl apply -k kustomize/postgres,搞定!
删除namespace失败(强制删除也是出现报错),状态Terminating
kubectl get namespace postgres-operator -o json > tmp.jsoncurl -k -H "Content-Type: application/json" -X PUT --data-binary @tmp.json http://127.0.0.1:8001/api/v1/namespaces/postgres-operator/finalize
每次的tmp.json要另外生成,因为数据可能已经改变了
报错信息:TroubleShooting-- error execution phase preflight: couldn’t validate the identity of the API
参考TroubleShooting-- error execution phase preflight: couldn’t validate the identity of the API
原因:集群注册的token有效时间为24H;超时需要重新生成token,用新的join即可。
yaocs@k8s-master:~$ kubeadm token create --print-join-command --ttl=0
kubeadm join 192.168.92.155:6443 --token bihmdc.l25nzm8ph18zw885 --discovery-token-ca-cert-hash sha256:9bdaf4f2e8a407ff3a3913b88aa2d655d1cc39c96d1a3f56c1806771a76c5c8c
yaocs@k8s-master:~$
这是由于kubernetes版本过高导致的,解决办法:
Using Kubernetes v1.20.0, getting “unexpected error getting claim reference: selfLink was empty, can’t make reference” #25
root@k8s-master:~# kubectl logs  nfs-client-provisioner-7c998b57c7-wvz8h
I1116 08:34:12.842117       1 leaderelection.go:185] attempting to acquire leader lease  default/fuseim.pri-ifs...
E1116 08:34:30.266863       1 event.go:259] Could not construct reference to: '&v1.Endpoints{TypeMeta:v1.TypeMeta{Kind:"", APIVersion:""}, ObjectMeta:v1.ObjectMeta{Name:"fuseim.pri-ifs", GenerateName:"", Namespace:"default", SelfLink:"", UID:"4d6c8c75-c4a7-4890-a2c7-b770381982df", ResourceVersion:"792307", Generation:0, CreationTimestamp:v1.Time{Time:time.Time{wall:0x0, ext:63772644043, loc:(*time.Location)(0x1956800)}}, DeletionTimestamp:(*v1.Time)(nil), DeletionGracePeriodSeconds:(*int64)(nil), Labels:map[string]string(nil), Annotations:map[string]string{"control-plane.alpha.kubernetes.io/leader":"{\"holderIdentity\":\"nfs-client-provisioner-7c998b57c7-wvz8h_f9f88e79-46b7-11ec-a6dc-82b59d56d221\",\"leaseDurationSeconds\":15,\"acquireTime\":\"2021-11-16T08:34:30Z\",\"renewTime\":\"2021-11-16T08:34:30Z\",\"leaderTransitions\":2}"}, OwnerReferences:[]v1.OwnerReference(nil), Initializers:(*v1.Initializers)(nil), Finalizers:[]string(nil), ClusterName:""}, Subsets:[]v1.EndpointSubset(nil)}' due to: 'selfLink was empty, can't make reference'. Will not report event: 'Normal' 'LeaderElection' 'nfs-client-provisioner-7c998b57c7-wvz8h_f9f88e79-46b7-11ec-a6dc-82b59d56d221 became leader'
I1116 08:34:30.266938       1 leaderelection.go:194] successfully acquired lease default/fuseim.pri-ifs
I1116 08:34:30.267034       1 controller.go:631] Starting provisioner controller fuseim.pri/ifs_nfs-client-provisioner-7c998b57c7-wvz8h_f9f88e79-46b7-11ec-a6dc-82b59d56d221!
I1116 08:34:30.367345       1 controller.go:680] Started provisioner controller fuseim.pri/ifs_nfs-client-provisioner-7c998b57c7-wvz8h_f9f88e79-46b7-11ec-a6dc-82b59d56d221!
I1116 08:35:48.601547       1 controller.go:987] provision "default/test-pvc" class "course-nfs-storage": started
E1116 08:35:48.606127       1 controller.go:1004] provision "default/test-pvc" class "course-nfs-storage": unexpected error getting claim reference: selfLink was empty, can't make reference
I1116 08:39:33.171317       1 controller.go:987] provision "default/test-pvc" class "course-nfs-storage": started
E1116 08:39:33.175621       1 controller.go:1004] provision "default/test-pvc" class "course-nfs-storage": unexpected error getting claim reference: selfLink was empty, can't make reference
I1116 08:49:30.270669       1 controller.go:987] provision "default/test-pvc" class "course-nfs-storage": started
E1116 08:49:30.274820       1 controller.go:1004] provision "default/test-pvc" class "course-nfs-storage": unexpected error getting claim reference: selfLink was empty, can't make reference
I1116 08:57:05.555401       1 controller.go:987] provision "default/test-pvc" class "course-nfs-storage": started
E1116 08:57:05.559756       1 controller.go:1004] provision "default/test-pvc" class "course-nfs-storage": unexpected error getting claim reference: selfLink was empty, can't make reference
I1116 08:57:05.572375       1 controller.go:987] provision "default/test-pvc" class "course-nfs-storage": started
E1116 08:57:05.575103       1 controller.go:1004] provision "default/test-pvc" class "course-nfs-storage": unexpected error getting claim reference: selfLink was empty, can't make reference
I1116 08:57:35.260504       1 controller.go:987] provision "default/test-pvc" class "course-nfs-storage": started
E1116 08:57:35.263856       1 controller.go:1004] provision "default/test-pvc" class "course-nfs-storage": unexpected error getting claim reference: selfLink was empty, can't make reference
root@k8s-master:~/DefaultStorageClass/useTest#
due to: ‘selfLink was empty, can’t make reference’.
kubernetes1.20版本 nfs-provisioner报错问题:“selfLink was empty”
原来是版本原因,记得看版本的changelog
感谢上面的这篇链接,然后根据关键字百度“kubenetes 1.2 nfs挂载”
Kubernetes1.20使用NFS作为动态存储
kubectl apply -f /etc/kubernetes/manifests/kube-apiserver.yaml
Using Kubernetes v1.20.0, getting “unexpected error getting claim reference: selfLink was empty, can’t make reference” #25

亲自操作才明白为什么要执行两次,如下所示:
root@k8s-master:~/DefaultStorageClass/useTest# vim /etc/kubernetes/manifests/kube-apiserver.yaml
root@k8s-master:~/DefaultStorageClass/useTest# kubectl apply -f /etc/kubernetes/manifests/kube-apiserver.yaml
The connection to the server 192.168.92.155:6443 was refused - did you specify the right host or port?
root@k8s-master:~/DefaultStorageClass/useTest# kubectl apply -f /etc/kubernetes/manifests/kube-apiserver.yaml
pod/kube-apiserver created
root@k8s-master:~/DefaultStorageClass/useTest#
报错信息:
Resource temporarily unavailable\n HINT: is another pgBackRest process running?\nERROR: [056]: unable to find primary cluster - cannot proceed\n]"

解决方法:删掉重启拉起来就好了。
CrunchyData/postgres-operator-examples
使用kubernetes 官网工具kubeadm部署kubernetes(使用阿里云镜像)
kubeadm join-集群中加入新的master与worker节点
搭建k8s集群(ubuntu18.04,一个master和两个worker)
Specify remote host for kubectl port-forward #72597
K8S中pod在挂载volume时出现FailedMount错误(exit status 32)
k8s 1.20.x版本NFS动态存储配置
Introduction to Kubernetes Storage
Kubernetes : NFS and Dynamic NFS provisioning
Dynamic Volume Provisioning
https://oracle.github.io/linux-labs/OLCNE-Gluster/ 有戏
Chapter 1 Introduction to Gluster Storage for Oracle Linux
https://github.com/kubernetes/examples/tree/master/staging/volumes/nfs 官方指导
k8s添加nfs动态绑定存储(dynamic provisioning)nfs-server-provisioner
Dynamic Volume Provisioning
https://github.com/kubernetes/examples/tree/master/staging/persistent-volume-provisioning/glusterfs 官方都是推荐glusterfs


 京公网安备 11010802041100号 | 京ICP备19059560号-4 | PHP1.CN 第一PHP社区 版权所有
