热门标签 | HotTags
当前位置:  开发笔记 > 编程语言 > 正文

Spring集成RabbitMq

Spring集成RabbitMq一、基本配置1、pom添加以下jarcom.fasterxml.jackson.core

Spring 集成RabbitMq 

一、基本配置

1、pom添加以下jar

     com.fasterxml.jackson.corejackson-databind2.7.5org.springframework.amqpspring-rabbit2.1.7.RELEASE

2、spring配置文件springContext.xml添加以下配置


xmlns:xsi&#61;"http://www.w3.org/2001/XMLSchema-instance" xmlns:tx&#61;"http://www.springframework.org/schema/tx"xmlns:task&#61;"http://www.springframework.org/schema/task" xmlns:context&#61;"http://www.springframework.org/schema/context"xmlns:aop&#61;"http://www.springframework.org/schema/aop"xsi:schemaLocation&#61;"http://www.springframework.org/schema/beans http://www.springframework.org/schema/beans/spring-beans-3.0.xsd http://www.springframework.org/schema/context http://www.springframework.org/schema/context/spring-context-3.0.xsd http://www.springframework.org/schema/tx http://www.springframework.org/schema/tx/spring-tx-3.0.xsd http://www.springframework.org/schema/aop http://www.springframework.org/schema/aop/spring-aop-3.0.xsd http://www.springframework.org/schema/task http://www.springframework.org/schema/task/spring-task-3.0.xsd">package&#61;"com.pinghengxing..*"><import resource&#61;"classpath*:com/config/rabbitmq_producer.xml" /><import resource&#61;"classpath*:com/config/rabbitmq_consumer.xml" />


3、rabbitmq_producer.xml生产者配置如下&#xff08;其中配置了exchange的三种类型&#xff1a;fanout&#xff0c;direct&#xff0c;topic&#xff09;


xmlns:xsi&#61;"http://www.w3.org/2001/XMLSchema-instance" xmlns:context&#61;"http://www.springframework.org/schema/context"xmlns:rabbit&#61;"http://www.springframework.org/schema/rabbit"xsi:schemaLocation&#61;"http://www.springframework.org/schema/beanshttp://www.springframework.org/schema/beans/spring-beans.xsdhttp://www.springframework.org/schema/contexthttp://www.springframework.org/schema/context/spring-context-4.3.xsdhttp://www.springframework.org/schema/rabbithttp://www.springframework.org/schema/rabbit/spring-rabbit.xsd">host&#61;"140.143.xx.xx" username&#61;"ww" password&#61;"ww" port&#61;"5672"virtual-host&#61;"ww" channel-cache-size&#61;"25" cache-mode&#61;"CHANNEL"publisher-confirms&#61;"true" publisher-returns&#61;"true" connection-timeout&#61;"200" />class&#61;"org.springframework.retry.support.RetryTemplate">class&#61;"org.springframework.retry.backoff.ExponentialBackOffPolicy">class&#61;"org.springframework.retry.policy.SimpleRetryPolicy"> message-converter&#61;"jsonMessageConverter" confirm-callback&#61;"confirmCallback" return-callback&#61;"returnCallback" mandatory&#61;"true" />

class&#61;"org.springframework.amqp.support.converter.Jackson2JsonMessageConverter">


3、rabbitmq_consumer.xml消费者配置如下&#xff1a;&#xff08;其中定义了三种exchange类型对应队列的消费者 &#xff0c;&#xff09;


xmlns:xsi&#61;"http://www.w3.org/2001/XMLSchema-instance" xmlns:context&#61;"http://www.springframework.org/schema/context"xmlns:rabbit&#61;"http://www.springframework.org/schema/rabbit"xsi:schemaLocation&#61;"http://www.springframework.org/schema/beanshttp://www.springframework.org/schema/beans/spring-beans.xsdhttp://www.springframework.org/schema/contexthttp://www.springframework.org/schema/context/spring-context-4.3.xsdhttp://www.springframework.org/schema/rabbithttp://www.springframework.org/schema/rabbit/spring-rabbit.xsd">host&#61;"140.143.xx.xx" username&#61;"ww" password&#61;"ww" port&#61;"5672"virtual-host&#61;"ww" channel-cache-size&#61;"25" cache-mode&#61;"CHANNEL"connection-timeout&#61;"200" />prefetch&#61;"1" concurrency&#61;"1" >


二、编写测试代码&#xff08;在此只进行Direct类型 交换机测试代码的表写&#xff0c;其他类型仿照此示例即可&#xff09;

1、定义消息生产者&#xff08;DirectProducer&#xff09;

package com.pinghengxing.direct;import org.springframework.amqp.rabbit.core.RabbitTemplate;
import org.springframework.context.ApplicationContext;
import org.springframework.context.support.ClassPathXmlApplicationContext;/** * &#64;author ww*/public class DirectProducer {private static ApplicationContext ac;public static void sendMessage(String exchange,String routingKey,Object message){ac &#61; new ClassPathXmlApplicationContext("classpath:com/config/springContext.xml");RabbitTemplate rt &#61; ac.getBean(RabbitTemplate.class);for(int i&#61;0;i<10;i&#43;&#43;){rt.convertAndSend(exchange, routingKey, message&#43;""&#43;i);}}public static void main(String[] args) {DirectProducer.sendMessage("myDirectExchange","direct","路由模式");}}

2、定义消息消费者&#xff08;DirectReceiver1&#xff0c;DirectReceiver1  &#xff09;-多个消费者

消费者1

package com.pinghengxing.direct;import org.springframework.amqp.core.Message;
import org.springframework.amqp.rabbit.listener.api.ChannelAwareMessageListener;
import org.springframework.stereotype.Component;import com.rabbitmq.client.Channel;
&#64;Component(
"directReceiver")
public class DirectReceiver implements ChannelAwareMessageListener{&#64;Overridepublic void onMessage(Message message, Channel channel) throws Exception {System.out.println("************************direct111********************************");System.out.println("路由模式direct111 接收信息&#xff1a;"&#43;new String(message.getBody()));System.out.println("********************************************************");//设置手工应答
// if(true){
// throw new Exception();
// }channel.basicAck(message.getMessageProperties().getDeliveryTag(),false);}}

消费者2

package com.pinghengxing.direct;import org.springframework.amqp.core.Message;
import org.springframework.amqp.rabbit.listener.api.ChannelAwareMessageListener;
import org.springframework.stereotype.Component;import com.rabbitmq.client.Channel;
&#64;Component(
"directReceiver2")
public class DirectReceiver2 implements ChannelAwareMessageListener{&#64;Overridepublic void onMessage(Message message, Channel channel) throws Exception {System.out.println("************************direct222********************************");System.out.println("路由模式direct222 接收信息&#xff1a;"&#43;new String(message.getBody()));System.out.println("********************************************************");//设置手工应答
// if(true){
// throw new Exception();
// }channel.basicAck(message.getMessageProperties().getDeliveryTag(),false);}}


三、测试

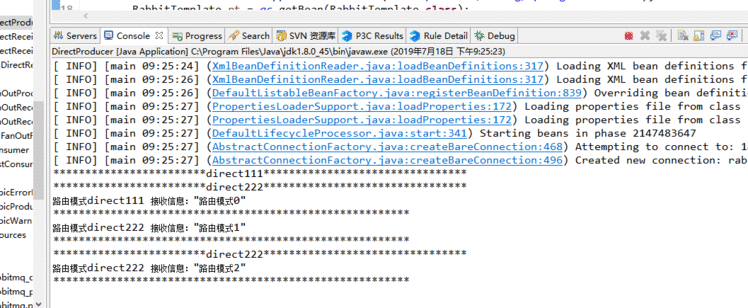
1、进行测试&#xff0c;结果如下&#xff1a;&#xff08;两个消费者都可以从队列中取到数据&#xff0c;且数据不重复&#xff09;


四、confirm-callback监听&#xff08;用于监听exchange是否接收成功&#xff09;

1、在配置工厂连接的时候&#xff0c;设置publisher-confirms&#61;"true"

host&#61;"140.143.xx.xx" username&#61;"ww" password&#61;"ww" port&#61;"5672"virtual-host&#61;"ww" channel-cache-size&#61;"25" cache-mode&#61;"CHANNEL"publisher-confirms&#61;"true" publisher-returns&#61;"true" connection-timeout&#61;"200" />

2、在定义rabbitmq模板时&#xff0c;指定confirm-callback的实现类

message-converter&#61;"jsonMessageConverter" confirm-callback&#61;"confirmCallback" return-callback&#61;"returnCallback" mandatory&#61;"true" />

3、创建实现类ConfirmCallback&#xff0c;实现RabbitTemplate.ConfirmCallback接口


package com.pinghengxing.callback;import org.springframework.amqp.rabbit.connection.CorrelationData;
import org.springframework.amqp.rabbit.core.RabbitTemplate;
import org.springframework.stereotype.Component;/*** confirm-callback监听&#xff08;用于监听exchange是否接收成功&#xff09;* &#64;author ww**/
&#64;Component(
"confirmCallback")
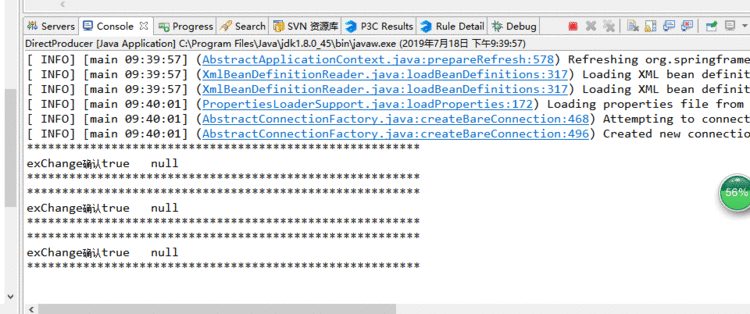
public class ConfirmCallBack implements RabbitTemplate.ConfirmCallback{/*** CorrelationData 是在发送消息时传入回调方法的参数&#xff0c;可以用于区分消息对象。 CorrelationData对象中只有一个属性 String id。* 通过这个参数&#xff0c;我们可以区分当前是发送哪一条消息时的回调&#xff0c;并通过ack参数来进行失败重发功能* &#64;param correlationData 回调的相关数据.* &#64;param ack true for ack, false for nack* &#64;param cause 专门给NACK准备的一个可选的原因&#xff0c;其他情况为null。*/public void confirm(CorrelationData correlationData, boolean ack,String cause) {System.out.println("********************************************************");System.out.println("exChange确认" &#43; ack &#43; "   " &#43; cause);System.out.println("********************************************************");}}

4、测试

五、returnCallback监听&#xff08;basicpublish推送消息到queue失败时回调&#xff09;

1、在配置工厂连接的时候&#xff0c;设置publisher-returns&#61;"true"

host&#61;"140.143.xx.xx" username&#61;"ww" password&#61;"ww" port&#61;"5672"
virtual-host&#61;"ww" channel-cache-size&#61;"25" cache-mode&#61;"CHANNEL"
publisher-confirms&#61;"true" publisher-returns&#61;"true" connection-timeout&#61;"200" />

2、在定义rabbitmq模板时&#xff0c;指定return-callback的实现类&#xff0c;并且设置mandatory&#61;"true"

message-converter&#61;"jsonMessageConverter" confirm-callback&#61;"confirmCallback" return-callback&#61;"returnCallback" mandatory&#61;"true" />

3、创建实现类ReturnCallBack&#xff0c;实现RabbitTemplate.ReturnCallback接口

package com.pinghengxing.callback;import org.springframework.amqp.core.Message;
import org.springframework.amqp.rabbit.core.RabbitTemplate;
import org.springframework.stereotype.Component;/*** 推送消息到queue失败时回调* &#64;author ww**/
&#64;Component(
"returnCallback")
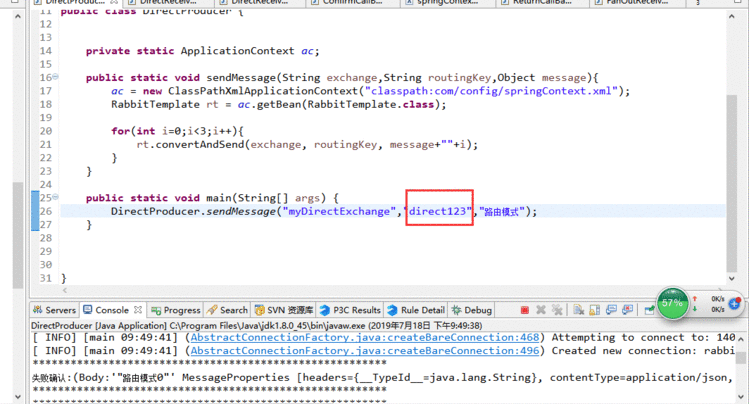
public class ReturnCallBack implements RabbitTemplate.ReturnCallback {&#64;Overridepublic void returnedMessage(Message message, int replyCode, String replyText, String exchange, String routingKey) {System.out.println("********************************************************");System.out.println("失败确认:"&#43;message&#43;" | "&#43;replyCode&#43;" | "&#43;replyText&#43;" | "&#43;exchange&#43;" | "&#43;routingKey);System.out.println("********************************************************");}}

 4、测试&#xff08;更改routing_key的值为direct123&#xff0c;由于找不到对应的队列&#xff0c;报以下错误&#xff09;

六、json转换&#xff08;可以将map等自动转换成json格式&#xff09;

1、pom.xml添加以下maven依赖

     com.fasterxml.jackson.corejackson-databind2.7.5

 2、定义消息转换器&#xff0c;转成json格式

class&#61;"org.springframework.amqp.support.converter.Jackson2JsonMessageConverter">


3、在定义rabbitmq模板时&#xff0c;指定转换器message-converter&#61;"jsonMessageConverter"

message-converter&#61;"jsonMessageConverter" confirm-callback&#61;"confirmCallback" return-callback&#61;"returnCallback" mandatory&#61;"true" />


 4、测试&#xff0c;创建map&#xff0c;进行生产&#xff0c;消费者接收到的信息如下&#xff1a;为json格式


友情链接&#xff1a;

完整的项目配置下载地址如下&#xff1a;可下载参考

https://files.cnblogs.com/files/pinghengxing/spring_rabbitmq_test.zip


转:https://www.cnblogs.com/pinghengxing/p/11210295.html


推荐阅读
  • Eclipse 中 Maven 的基础配置指南
    本文详细介绍了如何在 Eclipse 环境中配置 Maven,包括环境变量的设置、Maven 插件的安装与配置等关键步骤,旨在帮助开发者顺利搭建开发环境。 ... [详细]
  • 本文介绍了如何通过 Maven 依赖引入 SQLiteJDBC 和 HikariCP 包,从而在 Java 应用中高效地连接和操作 SQLite 数据库。文章提供了详细的代码示例,并解释了每个步骤的实现细节。 ... [详细]
  • 本文介绍如何使用布局文件在Android应用中排列多行TextView和Button,使其占据屏幕的特定比例,并提供示例代码以帮助理解和实现。 ... [详细]
  • Struts与Spring框架的集成指南
    本文详细介绍了如何将Struts和Spring两个流行的Java Web开发框架进行整合,涵盖从环境配置到代码实现的具体步骤。 ... [详细]
  • 本文介绍了Kettle资源库的基本概念、类型及其管理方法,同时探讨了Kettle的不同运行方式,包括图形界面、命令行以及API调用,并详细说明了日志记录的相关配置。 ... [详细]
  • Navicat Premium 15 安装指南及数据库连接配置
    本文详细介绍 Navicat Premium 15 的安装步骤及其对多种数据库(如 MySQL 和 Oracle)的支持,帮助用户顺利完成软件的安装与激活。 ... [详细]
  • 本文将介绍如何编写一些有趣的VBScript脚本,这些脚本可以在朋友之间进行无害的恶作剧。通过简单的代码示例,帮助您了解VBScript的基本语法和功能。 ... [详细]
  • 本文详细介绍了如何在Linux系统上安装和配置Smokeping,以实现对网络链路质量的实时监控。通过详细的步骤和必要的依赖包安装,确保用户能够顺利完成部署并优化其网络性能监控。 ... [详细]
  • RecyclerView初步学习(一)
    RecyclerView初步学习(一)ReCyclerView提供了一种插件式的编程模式,除了提供ViewHolder缓存模式,还可以自定义动画,分割符,布局样式,相比于传统的ListVi ... [详细]
  • 使用Python在SAE上开发新浪微博应用的初步探索
    最近重新审视了新浪云平台(SAE)提供的服务,发现其已支持Python开发。本文将详细介绍如何利用Django框架构建一个简单的新浪微博应用,并分享开发过程中的关键步骤。 ... [详细]
  • 基于KVM的SRIOV直通配置及性能测试
    SRIOV介绍、VF直通配置,以及包转发率性能测试小慢哥的原创文章,欢迎转载目录?1.SRIOV介绍?2.环境说明?3.开启SRIOV?4.生成VF?5.VF ... [详细]
  • 本文探讨了在Windows Server 2008环境下配置Tomcat使用80端口时遇到的问题,包括端口被占用、多项目访问失败等,并提供详细的解决方法和配置建议。 ... [详细]
  • 本文介绍如何将自定义项目设置为Tomcat的默认访问项目,使得通过IP地址访问时直接展示该自定义项目。提供了三种配置方法:修改项目路径、调整配置文件以及使用WAR包部署。 ... [详细]
  • 本文介绍了如何通过设置背景形状来轻松地为 Android 的 TextView 添加圆形边框。我们将详细讲解 XML 代码的配置,包括圆角、描边和填充等属性。 ... [详细]
  • 了解如何快速搭建属于自己的个人博客,无需编程基础,适合Mac和Windows用户。通过本文,您将学会使用GitHub Pages和Hexo构建一个完全自主的在线空间。 ... [详细]
author-avatar
PHP1.CN | 中国最专业的PHP中文社区 | DevBox开发工具箱 | json解析格式化 |PHP资讯 | PHP教程 | 数据库技术 | 服务器技术 | 前端开发技术 | PHP框架 | 开发工具 | 在线工具
Copyright © 1998 - 2020 PHP1.CN. All Rights Reserved | 京公网安备 11010802041100号 | 京ICP备19059560号-4 | PHP1.CN 第一PHP社区 版权所有