篇首语:本文由编程笔记#小编为大家整理,主要介绍了Tensorflow_datasets中batch(batch_size)和shuffle(buffer_size)理解相关的知识,希望对你有一
篇首语:本文由编程笔记#小编为大家整理,主要介绍了Tensorflow_datasets中batch(batch_size)和shuffle(buffer_size)理解相关的知识,希望对你有一定的参考价值。
相关内容引用:https://zhuanlan.zhihu.com/p/42417456
1.shuffle(buffer_size)
tensorflow中的数据集类Dataset有一个shuffle方法,用来打乱数据集中数据顺序,训练时非常常用。其中shuffle方法有一个参数buffer_size,文档的解释如下:
dataset.shuffle(buffer_size, seed=None, reshuffle_each_iteration=None)
Randomly shuffles the elements of this dataset.
This dataset fills a buffer with `buffer_size` elements, then randomly
samples elements from this buffer, replacing the selected elements with new
elements. For perfect shuffling, a buffer size greater than or equal to the
full size of the dataset is required.
For instance, if your dataset contains 10,000 elements but `buffer_size` is
set to 1,000, then `shuffle` will initially select a random element from
only the first 1,000 elements in the buffer. Once an element is selected,
its space in the buffer is replaced by the next (i.e. 1,001-st) element,
maintaining the 1,000 element buffer.
`reshuffle_each_iteration` controls whether the shuffle order should be
different for each epoch.
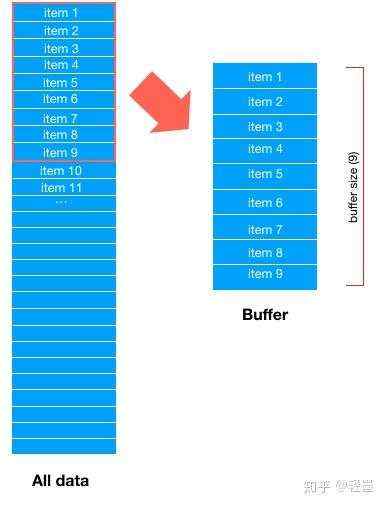
首先,Dataset会取所有数据的前buffer_size数据项,填充 buffer,如下图

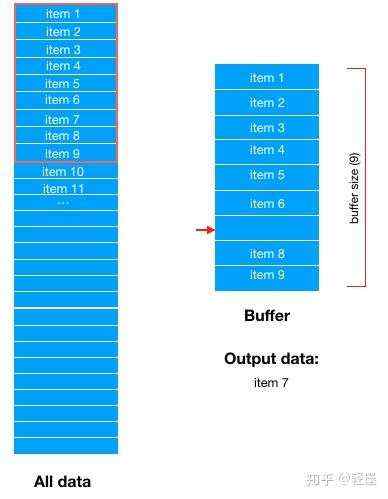
然后,从buffer中随机选择一条数据输出。假设随机选中了,item 7,那么buffer中item 7对应的位置就空出来了 。

然后,从Dataset中顺序选择最新的一条数据填充到buffer中。这里顺序选择到的是item 10。
然后在从Buffer中随机选择下一条数据输出。
用一个实际的例子来说明:
import tensorflow as tf
import numpy as np
buffer_size=4
data = np.array([0.1, 0.2, 0.3, 0.4, 0.5, 0.6, 0.7, 0.8, 0.9, 1.0])
label = np.array([0, 0, 1, 0, 1, 1, 0, 1, 0, 0])
dataset = tf.data.Dataset.from_tensor_slices((data, label))
dataset = dataset.shuffle(buffer_size)
it = dataset.__iter__()
for i in range(10):
    x, y = it.next()
    print(x, y)
输出:
tf.Tensor(0.1, shape=(), dtype=float64) tf.Tensor(0, shape=(), dtype=int32)
tf.Tensor(0.2, shape=(), dtype=float64) tf.Tensor(0, shape=(), dtype=int32)
tf.Tensor(0.6, shape=(), dtype=float64) tf.Tensor(1, shape=(), dtype=int32)
tf.Tensor(0.5, shape=(), dtype=float64) tf.Tensor(1, shape=(), dtype=int32)
tf.Tensor(0.8, shape=(), dtype=float64) tf.Tensor(1, shape=(), dtype=int32)
tf.Tensor(0.7, shape=(), dtype=float64) tf.Tensor(0, shape=(), dtype=int32)
tf.Tensor(0.4, shape=(), dtype=float64) tf.Tensor(0, shape=(), dtype=int32)
tf.Tensor(0.3, shape=(), dtype=float64) tf.Tensor(1, shape=(), dtype=int32)
tf.Tensor(0.9, shape=(), dtype=float64) tf.Tensor(0, shape=(), dtype=int32)
tf.Tensor(1.0, shape=(), dtype=float64) tf.Tensor(0, shape=(), dtype=int32)
| 0.1, 0.2, 0.3, 0.4 | 0.1(随机选中) | 0.1, 0.2, 0.3, 0.4 |
| 0.5, 0.2, 0.3, 0.4 | 0.2(随机选中) | 0.5, 0.2, 0.3, 0.4 |
| 0.5, 0.6, 0.3, 0.4 | 0.6(随机选中) | 0.5, 0.6, 0.3, 0.4 |
| 0.5, 0.7, 0.3, 0.4 | 0.5(随机选中) | 0.5, 0.7, 0.3, 0.4 |
| 0.8, 0.7, 0.3, 0.4 | 0.8(随机选中) | 0.8, 0.7, 0.3, 0.4 |
| 0.9, 0.7, 0.3, 0.4 | 0.7(随机选中) | 0.9, 0.7, 0.3, 0.4 |
| 0.9, 1.0, 0.3, 0.4 | 0.4(随机选中) | 0.9, 1.0, 0.3, 0.4 |
| 0.9, 1.0, 0.3 | 0.3(随机选中) | 0.9, 1.0, 0.3 |
| 0.9, 1.0 | 0.9(随机选中) | 0.9, 1.0 |
| 1.0 | 1.0(随机选中) | 1.0 |
如此,shuffle 后的dataset序列为上述output中的序列。
2.batch(batch_size)
import tensorflow as tf
import numpy as np
dataset = tf.data.Dataset.from_tensor_slices(np.array([1, 2, 3, 4, 5, 6,
                                                       7,8,9,10,11,12,13,14,15,16]))
#有序的
batch_dataset=dataset.batch(4)
for ele in batch_dataset:
    print(ele)
output:
tf.Tensor([1 2 3 4], shape=(4,), dtype=int32)
tf.Tensor([5 6 7 8], shape=(4,), dtype=int32)
tf.Tensor([ 9 10 11 12], shape=(4,), dtype=int32)
tf.Tensor([13 14 15 16], shape=(4,), dtype=int32)
这里batch就是从dataset中按顺序分成4个批次,仔细看可以知道上面所有输出结果都是有序的,这在机器学习中用来训练模型是浪费资源且没有意义的,所以我们需要将数据打乱,这样每批次训练的时候所用到的数据集是不一样的,这样啊可以提高模型训练效果。
因此需要和shuffle结合起来使用。
3.shuffle(buffer_size)+ batch(batch_size)
import tensorflow as tf
import numpy as np
dataset = tf.data.Dataset.from_tensor_slices(np.array([1, 2, 3, 4, 5, 6,
                                                       7,8,9,10,11,12,13,14,15,16]))
dataset1=dataset.shuffle(16)
dataset2=dataset1.batch(2)
for i in dataset1:
    print(i)
print("separate")
for j in dataset2:
    print(j)
output:
tf.Tensor(3, shape=(), dtype=int32)
tf.Tensor(1, shape=(), dtype=int32)
tf.Tensor(16, shape=(), dtype=int32)
tf.Tensor(15, shape=(), dtype=int32)
tf.Tensor(13, shape=(), dtype=int32)
tf.Tensor(12, shape=(), dtype=int32)
tf.Tensor(6, shape=(), dtype=int32)
tf.Tensor(5, shape=(), dtype=int32)
tf.Tensor(11, shape=(), dtype=int32)
tf.Tensor(4, shape=(), dtype=int32)
tf.Tensor(10, shape=(), dtype=int32)
tf.Tensor(7, shape=(), dtype=int32)
tf.Tensor(8, shape=(), dtype=int32)
tf.Tensor(14, shape=(), dtype=int32)
tf.Tensor(2, shape=(), dtype=int32)
tf.Tensor(9, shape=(), dtype=int32)
separate
tf.Tensor([8 2], shape=(2,), dtype=int32)
tf.Tensor([4 7], shape=(2,), dtype=int32)
tf.Tensor([ 3 12], shape=(2,), dtype=int32)
tf.Tensor([ 9 16], shape=(2,), dtype=int32)
tf.Tensor([10  5], shape=(2,), dtype=int32)
tf.Tensor([15 14], shape=(2,), dtype=int32)
tf.Tensor([ 1 13], shape=(2,), dtype=int32)
tf.Tensor([ 6 11], shape=(2,), dtype=int32)
在这里buffer_size:该函数的作用就是先构建buffer,大小为buffer_size,然后从dataset中提取数据将它填满。batch操作,从buffer中提取。如果buffer_size小于Dataset的大小,每次提取buffer中的数据,会再次从Dataset中抽取数据将它填满(当然是之前没有抽过的)。所以一般最好的方式是buffer_size=Dataset_size
交换shuffle 和 batch的前后会有什么不同呢?
t1 = t.shuffle(int).batch(int)
#这个是先打乱t的顺序,然后batch
t2 = t.batch(int).shuffle(int)
#这个是打乱batch的顺序
dataset3=dataset.shuffle(2)
dataset4=dataset3.batch(16)
for i in dataset3:
    print(i)
print("separate")
for j in dataset4:
    print(j)
输出:
tf.Tensor([1 2], shape=(2,), dtype=int32)
tf.Tensor([3 4], shape=(2,), dtype=int32)
tf.Tensor([5 6], shape=(2,), dtype=int32)
tf.Tensor([7 8], shape=(2,), dtype=int32)
tf.Tensor([ 9 10], shape=(2,), dtype=int32)
tf.Tensor([11 12], shape=(2,), dtype=int32)
tf.Tensor([13 14], shape=(2,), dtype=int32)
tf.Tensor([15 16], shape=(2,), dtype=int32)
separate
tf.Tensor([11 12], shape=(2,), dtype=int32)
tf.Tensor([13 14], shape=(2,), dtype=int32)
tf.Tensor([15 16], shape=(2,), dtype=int32)
tf.Tensor([5 6], shape=(2,), dtype=int32)
tf.Tensor([1 2], shape=(2,), dtype=int32)
tf.Tensor([3 4], shape=(2,), dtype=int32)
tf.Tensor([7 8], shape=(2,), dtype=int32)
tf.Tensor([ 9 10], shape=(2,), dtype=int32)