导包:
implementation "com.squareup.okhttp3:okhttp:4.9.0"
添加网络权限:
简单实现一个网络请求:
OkHttpClient client = new OkHttpClient(); //1.创建client
Request request = new Request.Builder() //2.创建request
        .url("https:www.baidu.com")
        .build();
Call call = client.newCall(request); //3.封装call
//4.发起请求
//4.1发起同步请求
new Thread(() -> {//同步请求不能在主线程发起
    try {
        Response respOnse= call.execute();
        android.util.Log.d("test", "onResponse : " + response.message());//5.拿到返回值并处理
    } catch (IOException e) {
        e.printStackTrace();
    }
}).start();
//4.2异步请求
call.enqueue(new Callback() {
    @Override
    public void onFailure(@NonNull Call call1, @NonNull IOException e) {
        android.util.Log.d("test", "onFailure");
    }
    @Override
    public void onResponse(@NonNull Call call1, @NonNull Response response) throws IOException {
        android.util.Log.d("test", "onResponse : " + response.message());//5.拿到返回值并处理
    }
});
OkHttp的调用过程可以简单总结为以下几步:
1.创建client
2.通过建造者模式封装url等到request实体类
3.将request封装到call实体类
4.通过调用call的execute或者enqueue方法发起同步或者异步请求
5.处理返回值
在分析之前,我们先思考一下如果自己实现一个异步请求该如何实现,就是实现一个异步请求会遇到哪些问题。
第一 如何实现一个异步请求,异步嘛那肯定是通过子线程来处理,那么子线程的实现方式有哪些,线程池和new Thread().start(),这里OkHttp使用的是线程池,那么线程池相对于Thread有哪些好处呢,值得思索。
第二 异步请求该如何处理返回值,因为是在子线程里面处理请求,那么处理完毕后如何拿到处理结果,首先想到的是回调方法。其次就是回调方法应该放到哪里去,OkHttp是通过重写Runnable,将回调方法当做一个参数封装到Runnable里面,这种做法值得思索。
第三 既然是异步请求,通过子线程来处理请求,那么我一个请求结束后怎么保证下一个请求能被执行呢,答案是可以通过队列来保证请求的先后顺序,即一个请求完毕后去判断队列里面是否还有其他请求存在,如果有那就执行,没有就说明没有需要执行的请求。
第四 请求的个数怎么控制,包括对一个host地址的请求次数怎么限制,如果疯狂请求会有什么问题。OkHttp采用两个缓存队列,一个ready一个running解决了这问题,首先一个请求过来先加到ready队列里面,执行的时候从ready转到running队列里,转之前会判断当前running队列的请求个数是否大于64,以及对同个host地址的请求个数是否大于5个,如果大于64就不执行会阻塞在ready队列里面,等待下次调用,下次调用是什么时候呢,就是第三步里面讨论的一个请求结束后再去拿另外的请求。
第五 前面都是请求前的准备工作,具体请求逻辑该如何实现呢,一个http请求包括哪些步骤呢,建立连接,缓存处理,重定向这些,okhttp采用责任链模式来处理实际的网络请求,这种处理方式的优缺点是什么,值得思索。
1.将callback封装成一个Runnable即AsyncCall
  override fun enqueue(responseCallback: Callback) {
	check(executed.compareAndSet(false, true)) { "Already Executed" }
	callStart()
	client.dispatcher.enqueue(AsyncCall(responseCallback))
  }
2.通过dispatcher的enqueue方法,将AsyncCall添加到缓存readyAsyncCalls里面,readyAsyncCalls是一个队列,用来做缓存
3.查找缓存即findExistingCallWithHost,有的话就复用
  internal fun enqueue(call: AsyncCall) {
	synchronized(this) {
	  readyAsyncCalls.add(call)
	  // Mutate the AsyncCall so that it shares the AtomicInteger of an existing running call to
	  // the same host.
	  if (!call.call.forWebSocket) {
		val existingCall = findExistingCallWithHost(call.host)
		if (existingCall != null) call.reuseCallsPerHostFrom(existingCall)
	  }
	}
	promoteAndExecute()
  }
4.简单说就是缓存转移,即从readyAsyncCalls转移到runningAsyncCalls,并且中间插入一些判断条件,比如正在运行的最大容量,还有同一个host的请求个数不要超过5个等等。
5.缓存转移完毕之后调用AsyncCall的executeOn方法,同时传一个线程池过去
这个线程池,核心线程数为0,最大线程数是Integer的最大值,存活时间是60s
  private fun promoteAndExecute(): Boolean {
	this.assertThreadDoesntHoldLock()
	val executableCalls = mutableListOf()
	val isRunning: Boolean
	synchronized(this) {
	  val i = readyAsyncCalls.iterator()
	  while (i.hasNext()) {
		val asyncCall = i.next()
		if (runningAsyncCalls.size >= this.maxRequests) break // Max capacity.
		if (asyncCall.callsPerHost.get() >= this.maxRequestsPerHost) continue // Host max capacity.
		i.remove()
		asyncCall.callsPerHost.incrementAndGet()
		executableCalls.add(asyncCall)
		runningAsyncCalls.add(asyncCall)
	  }
	  isRunning = runningCallsCount() > 0
	}
	for (i in 0 until executableCalls.size) {
	  val asyncCall = executableCalls[i]
	  asyncCall.executeOn(executorService)
	}
	return isRunning
  }
线程池的实现,此处的线程池的配置是没有核心线程,总的线程个数是没有限制的,也就是说都是非核心线程,并且个数没有限制,非核心线程等待的时间是60秒,并且使用的任务队列是SynchronousQueue,它是一个没有容量的阻塞队列,只会当里面没有任务的时候,才能往里面放任务,当放完之后,只能等它的任务被取走才能放,这不就是jdk里面提供的Executors.newCachedThreadPool线程池吗,可能是okhttp想自己定义线程工厂的参数吧,定义线程的名字。
  @get:Synchronized
  @get:JvmName("executorService") val executorService: ExecutorService
	get() {
	  if (executorServiceOrNull == null) {
		executorServiceOrNull = ThreadPoolExecutor(0, Int.MAX_VALUE, 60, TimeUnit.SECONDS,
			SynchronousQueue(), threadFactory("$okHttpName Dispatcher", false))
	  }
	  return executorServiceOrNull!!
	}
6.AsyncCall的executeOn方法里面简单说就是一个线程池的执行过程,因为AsyncCall实际是一个Runnable,所以线程池运行后要看run方法
fun executeOn(executorService: ExecutorService) {
  client.dispatcher.assertThreadDoesntHoldLock()
  var success = false
  try {
    executorService.execute(this)
    success = true
  } catch (e: RejectedExecutionException) {
    val ioException = InterruptedIOException("executor rejected")
    ioException.initCause(e)
    noMoreExchanges(ioException)
    responseCallback.onFailure(this@RealCall, ioException)
  } finally {
    if (!success) {
      client.dispatcher.finished(this) // This call is no longer running!
    }
  }
}
override fun run() {
  threadName("OkHttp ${redactedUrl()}") {
    var signalledCallback = false
    timeout.enter()
    try {
      val respOnse= getResponseWithInterceptorChain()
      signalledCallback = true
      responseCallback.onResponse(this@RealCall, response)
    } catch (e: IOException) {
      if (signalledCallback) {
        // Do not signal the callback twice!
        Platform.get().log("Callback failure for ${toLoggableString()}", Platform.INFO, e)
      } else {
        responseCallback.onFailure(this@RealCall, e)
      }
    } catch (t: Throwable) {
      cancel()
      if (!signalledCallback) {
        val canceledException = IOException("canceled due to $t")
        canceledException.addSuppressed(t)
        responseCallback.onFailure(this@RealCall, canceledException)
      }
      throw t
    } finally {
      client.dispatcher.finished(this)
    }
  }
}
7.run方法里面主要是通过getResponseWithInterceptorChain(),通过责任链模式拿到response,然后调用封装的responseCallback实现异步请求的onResponse和onFailure方法调用
8.最后通过dispatcher的finished方法,清除runningAsyncCalls里的缓存数据
internal fun finished(call: AsyncCall) {
call.callsPerHost.decrementAndGet()
finished(runningAsyncCalls, call)
}
/** Used by [Call.execute] to signal completion. */
internal fun finished(call: RealCall) {
finished(runningSyncCalls, call)
}
private fun
val idleCallback: Runnable?
synchronized(this) {
if (!calls.remove(call)) throw AssertionError("Call wasn't in-flight!")
idleCallback = this.idleCallback
}
val isRunning = promoteAndExecute()
if (!isRunning && idleCallback != null) {
idleCallback.run()
}
}
在getResponseWithInterceptorChain()方法里,创建一个list集合,然后将拦截器依次添加到集合中,通过RealInterceptorChain的proceed发起调用,依次返回reponse,最终给到AsyncCall的run方法里回调函数去操作reponse。
@Throws(IOException::class)
internal fun getResponseWithInterceptorChain(): Response {
// Build a full stack of interceptors.
val interceptors = mutableListOf
interceptors += client.interceptors
interceptors += RetryAndFollowUpInterceptor(client)
interceptors += BridgeInterceptor(client.COOKIEJar)
interceptors += CacheInterceptor(client.cache)
interceptors += ConnectInterceptor
if (!forWebSocket) {
interceptors += client.networkInterceptors
}
interceptors += CallServerInterceptor(forWebSocket)
val chain = RealInterceptorChain(
call = this,
interceptors = interceptors,
index = 0,
exchange = null,
request = originalRequest,
cOnnectTimeoutMillis= client.connectTimeoutMillis,
readTimeoutMillis = client.readTimeoutMillis,
writeTimeoutMillis = client.writeTimeoutMillis
)
var calledNoMoreExchanges = false
try {
val respOnse= chain.proceed(originalRequest)
if (isCanceled()) {
response.closeQuietly()
throw IOException("Canceled")
}
return response
} catch (e: IOException) {
calledNoMoreExchanges = true
throw noMoreExchanges(e) as Throwable
} finally {
if (!calledNoMoreExchanges) {
noMoreExchanges(null)
}
}
}
根据源码可知,一共七个拦截器:
addInterceptor(Interceptor),这是由开发者设置的,会按照开发者的要求,在所有的拦截器处理之前进行最早的拦截处理,比如一些公共参数,Header都可以在这里添加。
RetryAndFollowUpInterceptor,这里会对连接做一些初始化工作,以及请求失败的充实工作,重定向的后续请求工作。跟他的名字一样,就是做重试工作还有一些连接跟踪工作。
BridgeInterceptor,这里会为用户构建一个能够进行网络访问的请求,同时后续工作将网络请求回来的响应Response转化为用户可用的Response,比如添加文件类型,content-length计算添加,gzip解包。
CacheInterceptor,这里主要是处理cache相关处理,会根据OkHttpClient对象的配置以及缓存策略对请求值进行缓存,而且如果本地有了可⽤的Cache,就可以在没有网络交互的情况下就返回缓存结果。
ConnectInterceptor,这里主要就是负责建立连接了,会建立TCP连接或者TLS连接,以及负责编码解码的HttpCodec
networkInterceptors,这里也是开发者自己设置的,所以本质上和第一个拦截器差不多,但是由于位置不同,所以用处也不同。这个位置添加的拦截器可以看到请求和响应的数据了,所以可以做一些网络调试。
CallServerInterceptor,这里就是进行网络数据的请求和响应了,也就是实际的网络I/O操作,通过socket读写数据。
现在让我们来debug跑一遍请求的拦截过程。
RealInterceptorChain创建完毕,可以看到里面有五个拦截器,以及request信息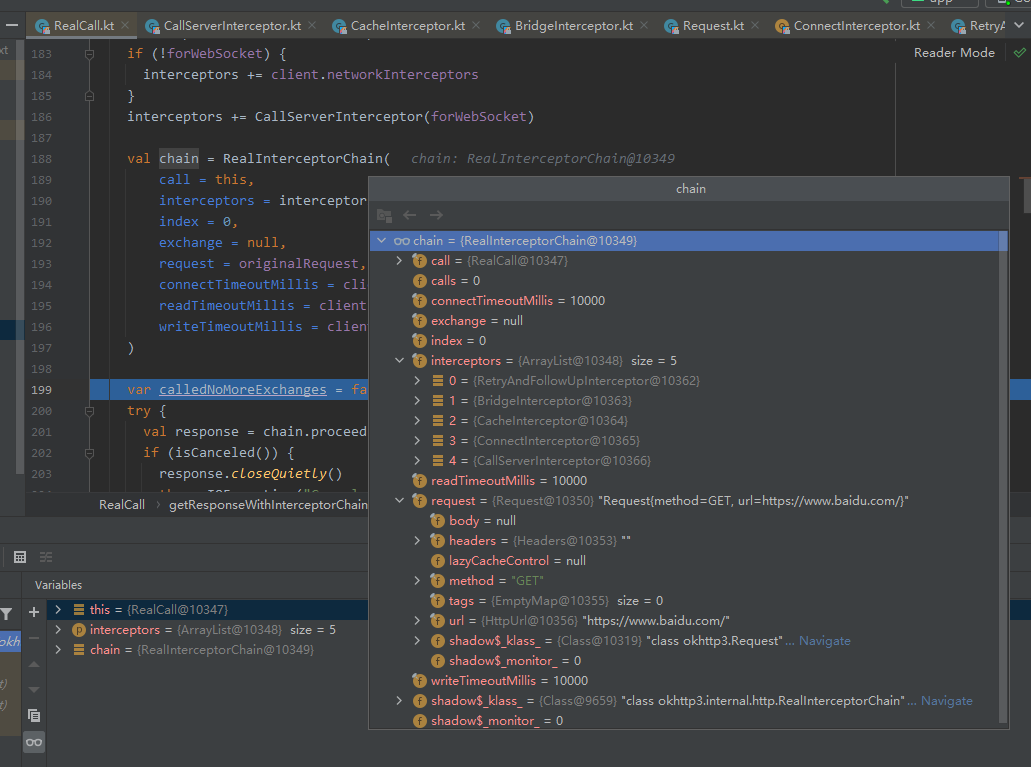
RetryAndFollowUpInterceptor执行到proceed时的request
BridgeInterceptor执行到proceed时的request,可以看到请求头多了很多东西,也就是BridgeInterceptor会添加一些请求头信息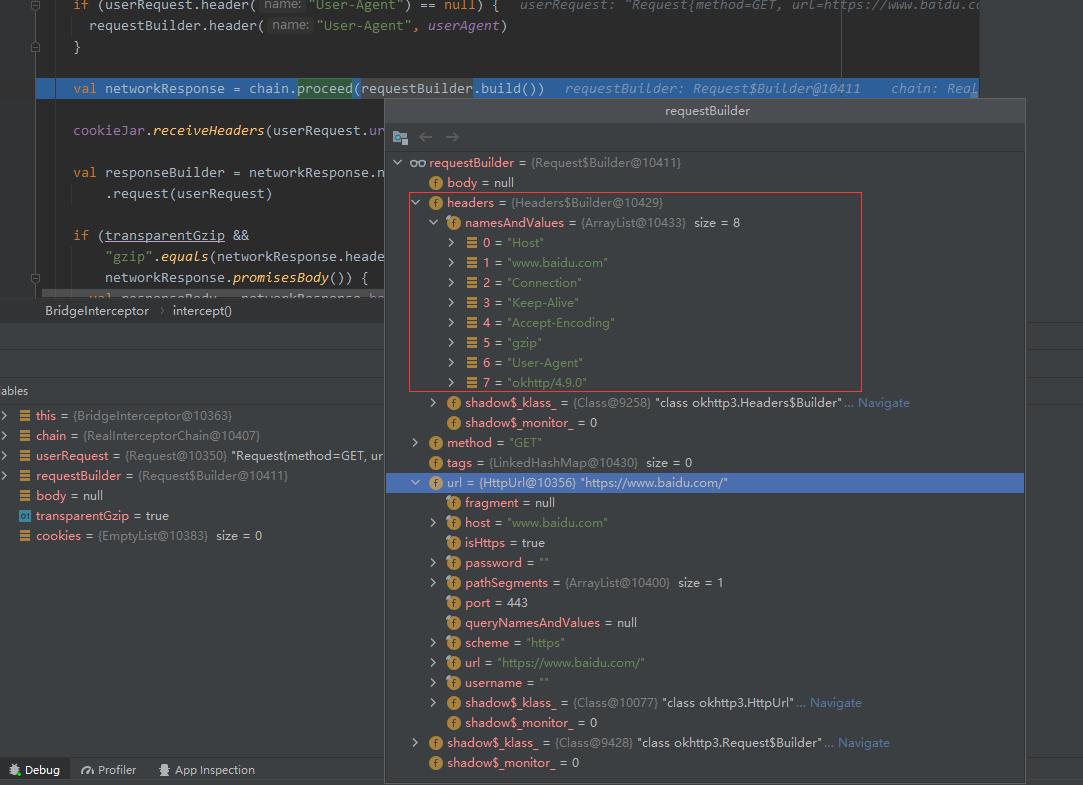
CacheInterceptor执行到proceed时的request,可以看到多了一个lazyCacheControl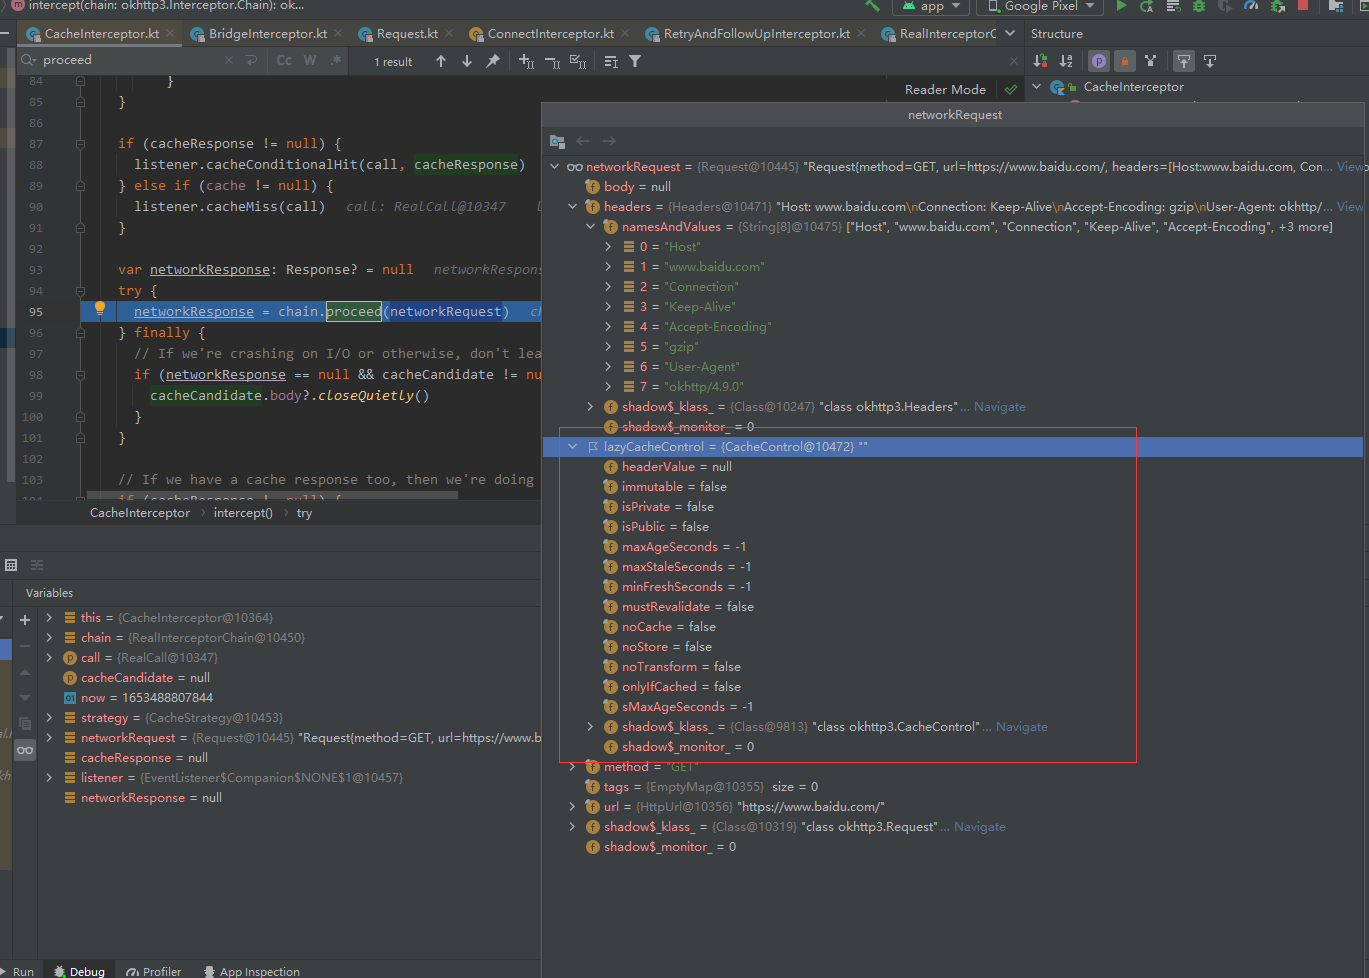
ConnectInterceptor执行到proceed时的request,这个request没有什么变化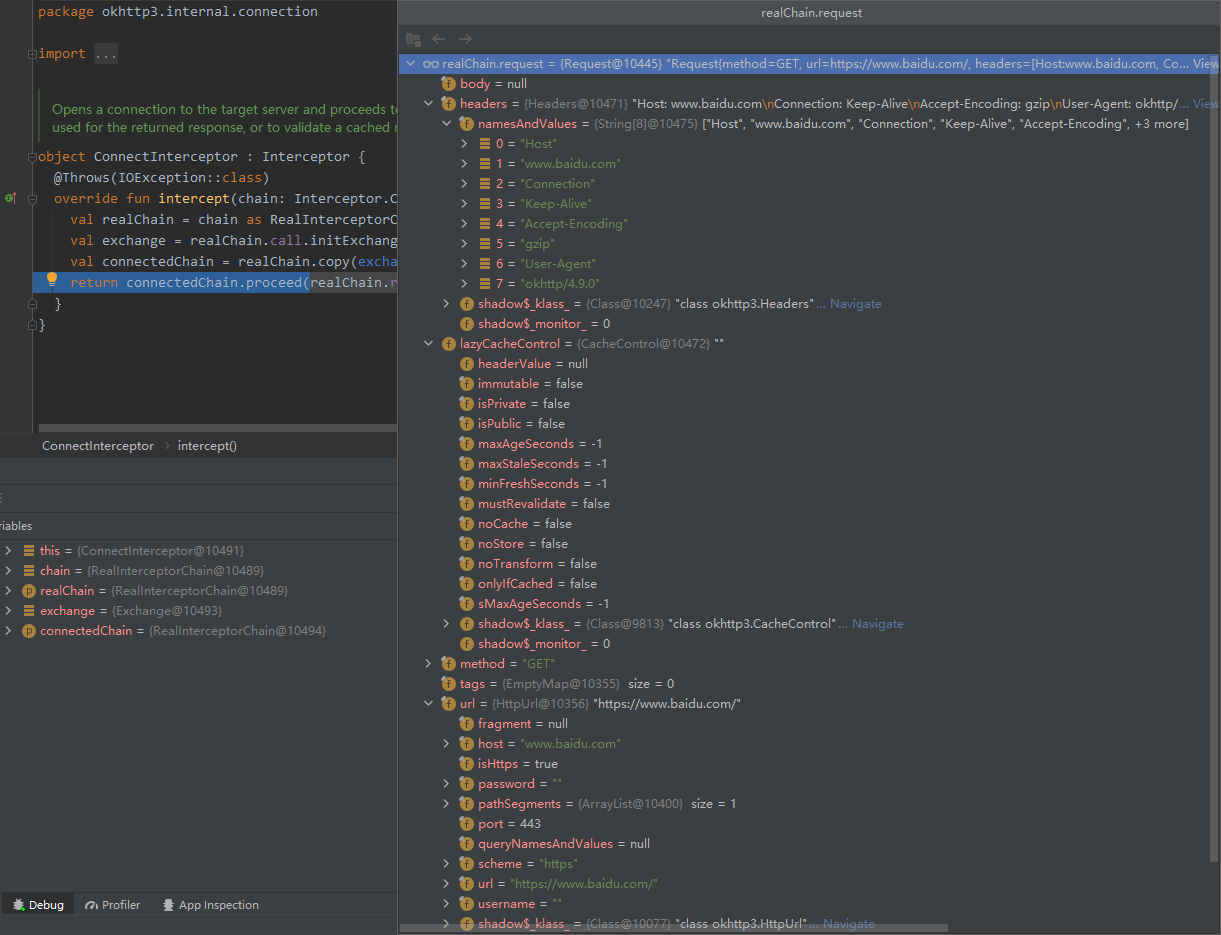
CallServerInterceptor就没有proceed方法了,而是直接进行网络数据请求和响应了,最终会依次向上传递response,可以看到CallSercaerInterceptor返回的reponse为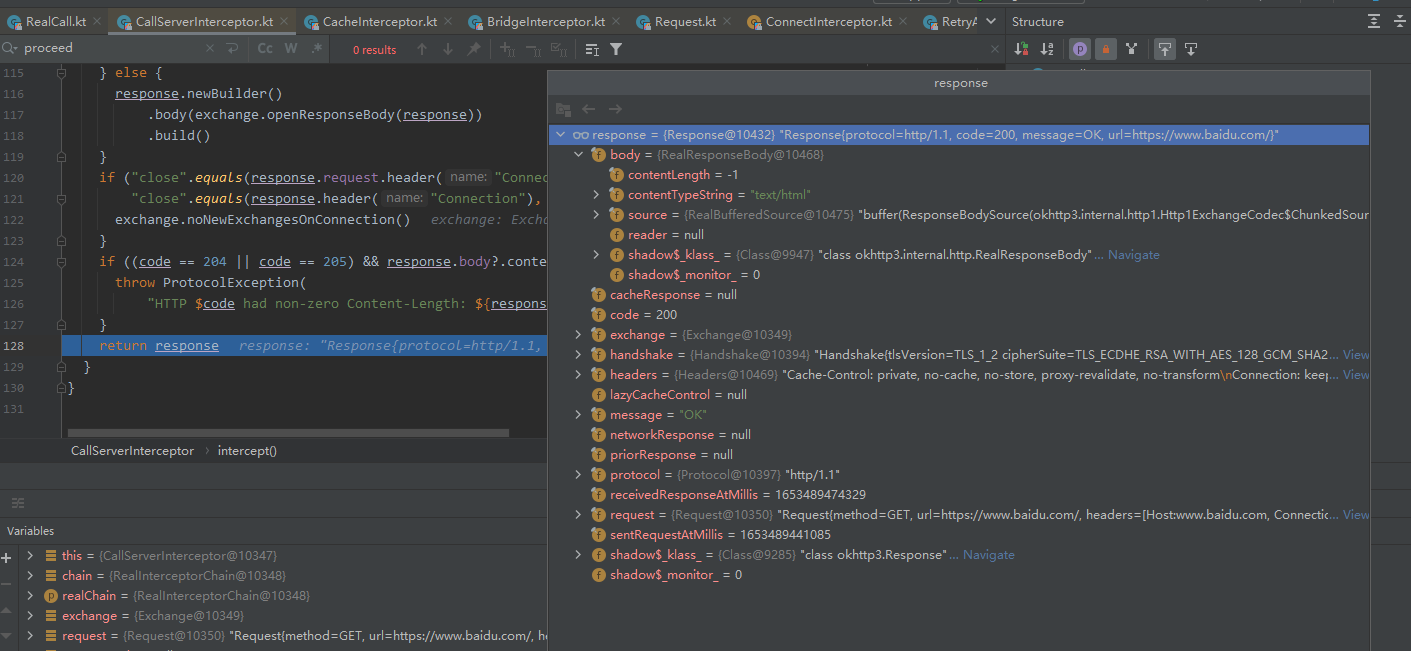
CallServerInterceptor之后回调到ConnectInterceptor,ConnectInterceptor的reponse也没加什么新东西。
ConnectInterceptor之后回调到CacheInterceptor,CacheInterceptor又加了两个缓存,一个是cacheResponse为null,一个是networkResponse.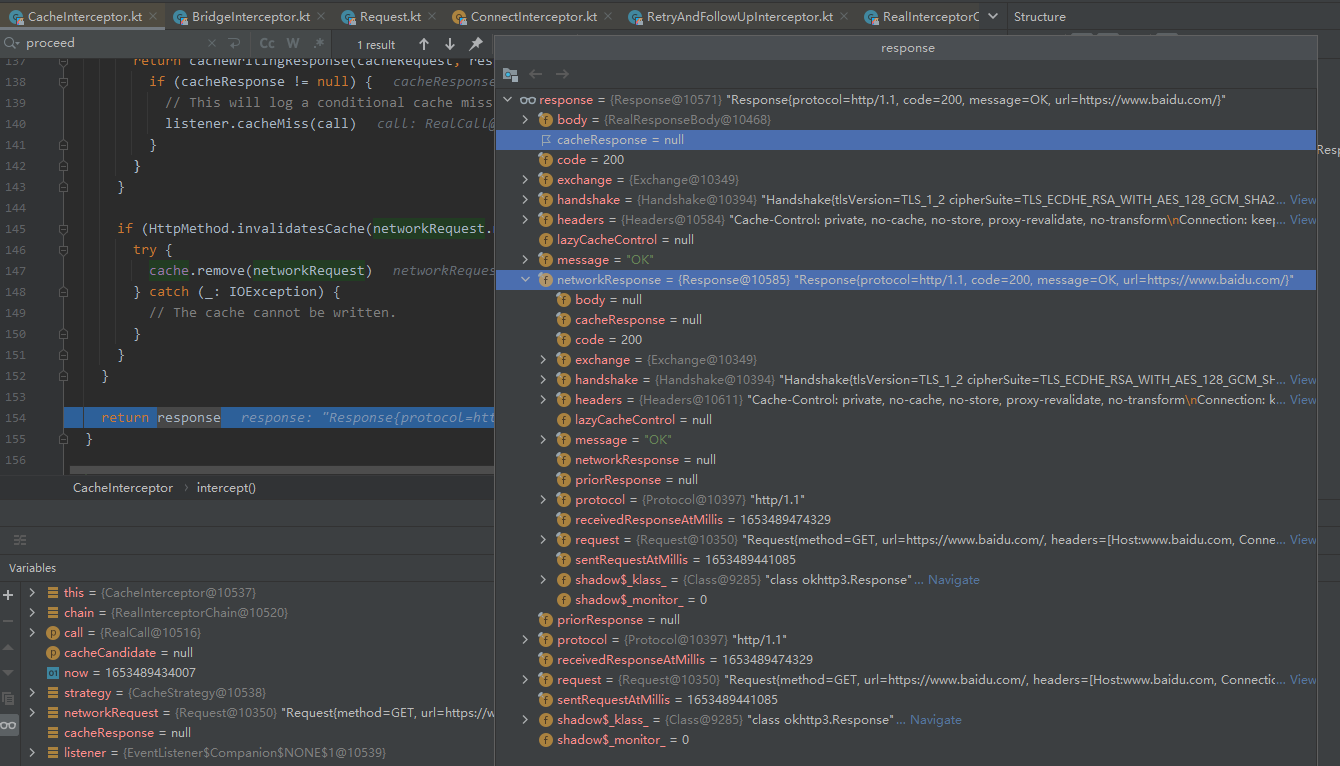
CacheInterceptor之后回调到BridgeInterceptor,BridgeInterceptor有一个gzip的解压操作,在这里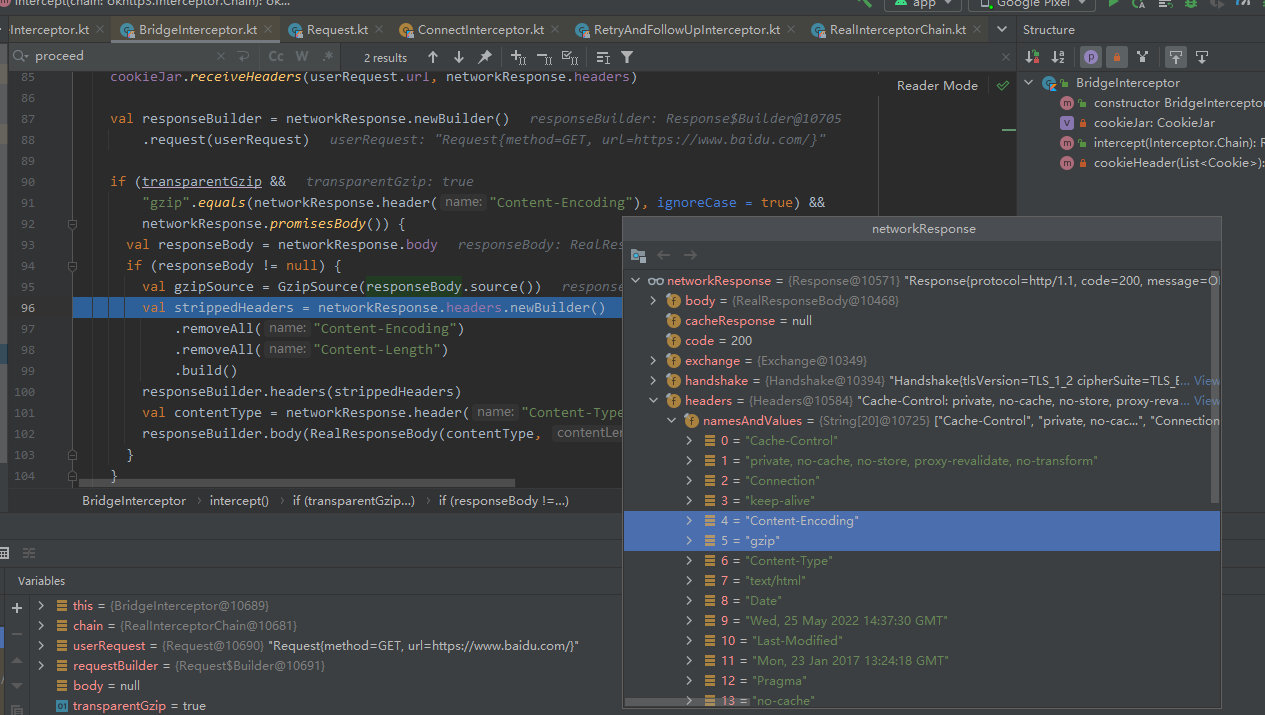
然后就是body的GZipSource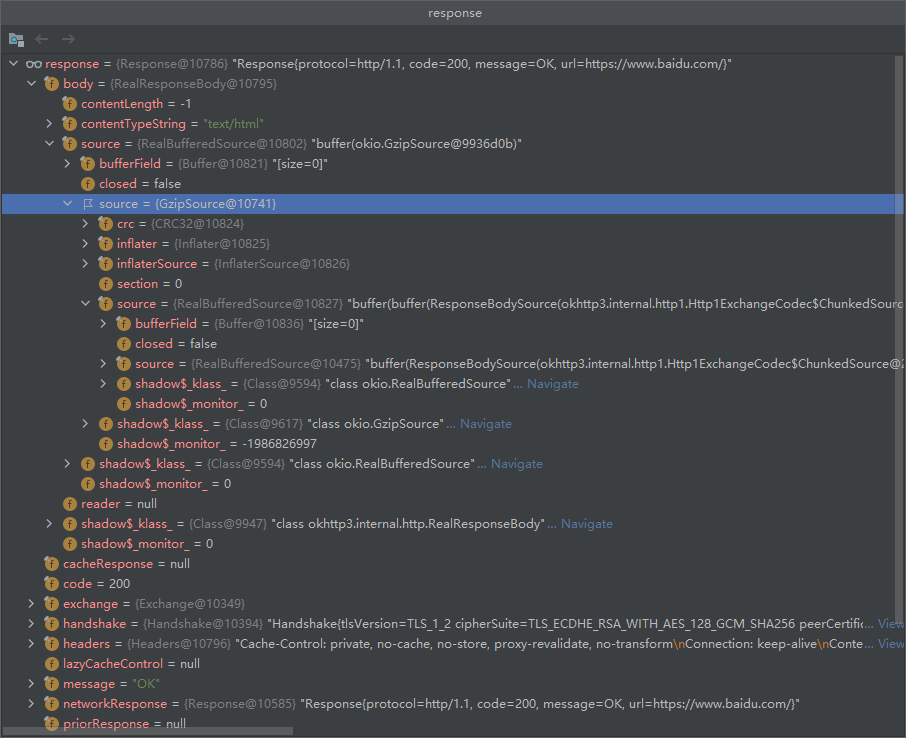
BridgeInterceptor之后回调到RetryAndFollowUpInterceptor,这个倒是没有什么操作了,然后就返回到getResponseWithInterceptorChain()方法里,交给callback处理了。
可以看到在RealCall的getResponseWithInterceptorChain()方法里,最终拿到的reponse如图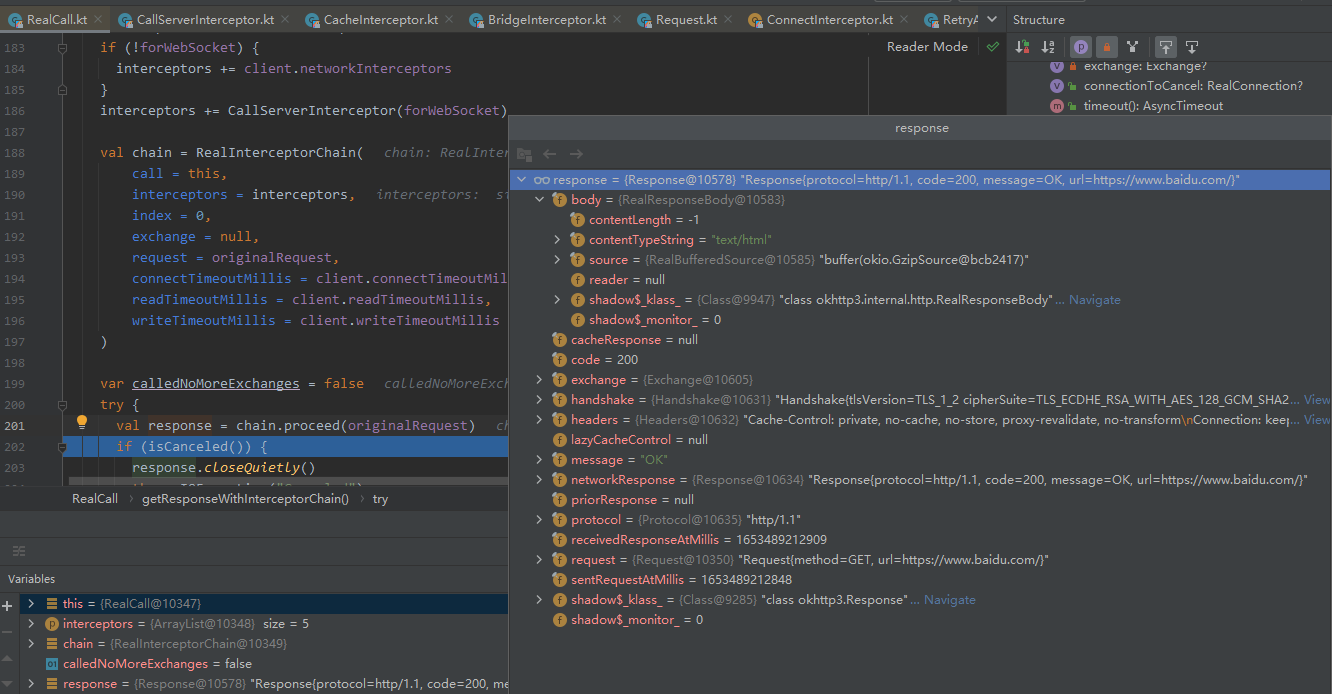
分析连接池之前让我们先思考一下几个问题:
第一点:如何实现一个http请求,okhttp通过socket实现http请求。TCP报文包括请求头和TCP数据,只需要将http的报文填充到TCP数据中。这一步谁来实现,答案是BridgeInterceptor
第二点:如何建立socket连接,这一步谁来实现,答案是ConnectInterceptor,socket连接就是TCP连接,需要三次握手,因此建立连接是一个耗时过程。
那么优化点就是建立连接池,复用socket连接,怎么去复用socket连接,okhttp4.9版本使用的是ConcurrentLinkedQueue,老版本用的是ArrayDeque一个双端队列,
ConcurrentLinkedQueue是基于链接节点的、线程安全的队列。并发访问不需要同步。因为它在队列的尾部添加元素并从头部删除它们,所以只要不需要知道队列的大小, ConcurrentLinkedQueue 对公共集合的共享访问就可以工作得很好。
第三点:如何去复用一个socket连接,每次建立socket连接之前要去队列里面查看有没有可用连接,有的话就复用,没有的话就创建一个新链接。那么问题来了,怎么判断一个连接是不是可以被复用的链接呢。okhttp是怎么做的,可以看下面的注释,8个判断条件。
()
internal fun isEligible(address: Address, routes: List
assertThreadHoldsLock()
// If this connection is not accepting new exchanges, we're done.
if (calls.size >= allocationLimit || noNewExchanges) return false
// If the non-host fields of the address don't overlap, we're done.
if (!this.route.address.equalsNonHost(address)) return false
// If the host exactly matches, we're done: this connection can carry the address.
if (address.url.host == this.route().address.url.host) {
return true // This connection is a perfect match.
}
// At this point we don't have a hostname match. But we still be able to carry the request if
// our connection coalescing requirements are met. See also:
// https://hpbn.co/optimizing-application-delivery/#eliminate-domain-sharding
// https://daniel.haxx.se/blog/2016/08/18/http2-connection-coalescing/
// 1. This connection must be HTTP/2.
if (http2COnnection== null) return false
// 2. The routes must share an IP address.
if (routes == null || !routeMatchesAny(routes)) return false
// 3. This connection's server certificate's must cover the new host.
if (address.hostnameVerifier !== OkHostnameVerifier) return false
if (!supportsUrl(address.url)) return false
// 4. Certificate pinning must match the host.
try {
address.certificatePinner!!.check(address.url.host, handshake()!!.peerCertificates)
} catch (_: SSLPeerUnverifiedException) {
return false
}
return true // The caller's address can be carried by this connection.
}
第四点:无用的连接如何清理掉,什么时候触发清理操作,采用什么策略清理,如何判定一个连接是无用连接。
到这里整个okhttp的请求,以及连接复用可能出现的问题已经清楚了。具体再来分析一下代码实现:
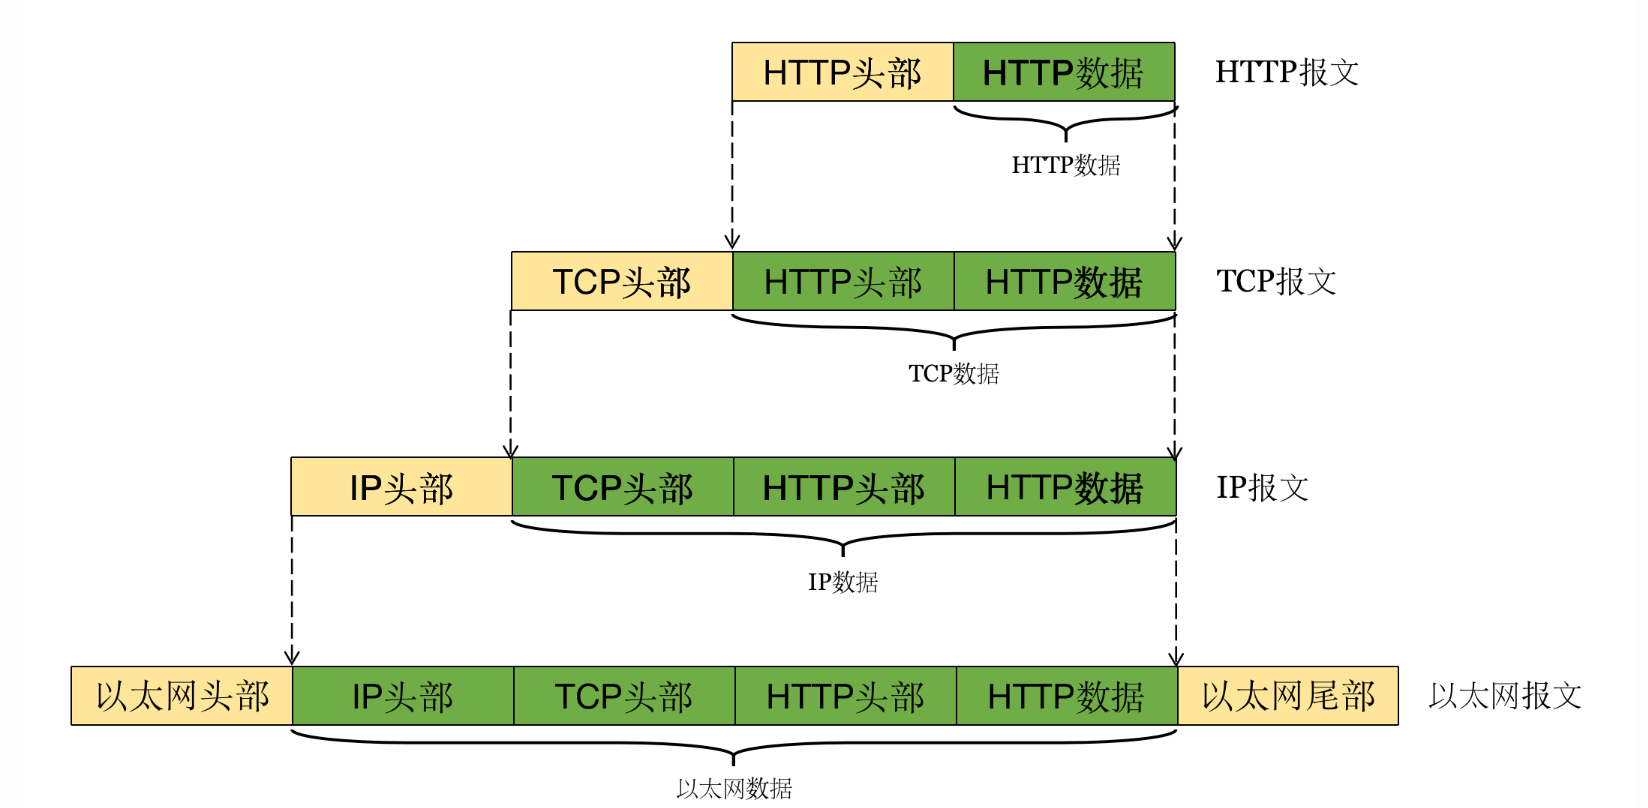
http是应用层的协议,socket是TCP的协议,TCP协议通过什么样的组装可以组成Http协议
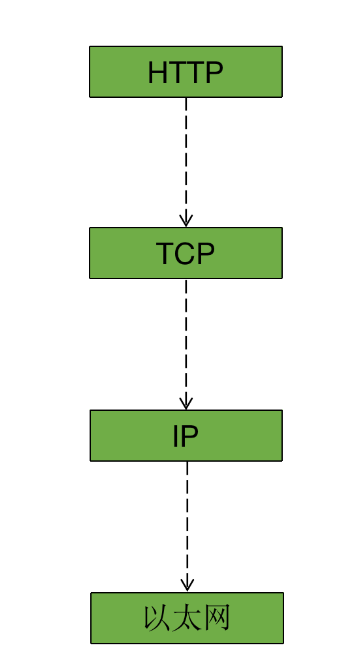
IP 作为以太网的直接底层,IP 的头部和数据合起来作为以太网的数据,同样的 TCP/UDP 的头部和数据合起来作为 IP 的数据,HTTP 的头部和数据合起来作为 TCP/UDP 的数据。
我们来看OkHttp如何通过Interceptor添加请求头部的。要看这个BridgeInterceptor
@Throws(IOException::class)
override fun intercept(chain: Interceptor.Chain): Response {
    val userRequest = chain.request()
    val requestBuilder = userRequest.newBuilder()
    val body = userRequest.body
    if (body != null) {
      val cOntentType= body.contentType()
      if (contentType != null) {
        requestBuilder.header("Content-Type", contentType.toString())
      }
      val cOntentLength= body.contentLength()
      if (contentLength != -1L) {
        requestBuilder.header("Content-Length", contentLength.toString())
        requestBuilder.removeHeader("Transfer-Encoding")
      } else {
        requestBuilder.header("Transfer-Encoding", "chunked")
        requestBuilder.removeHeader("Content-Length")
      }
    }
    if (userRequest.header("Host") == null) {
      requestBuilder.header("Host", userRequest.url.toHostHeader())
    }
    if (userRequest.header("Connection") == null) {
      requestBuilder.header("Connection", "Keep-Alive")
    }
    // If we add an "Accept-Encoding: gzip" header field we're responsible for also decompressing
    // the transfer stream.
    var transparentGzip = false
    if (userRequest.header("Accept-Encoding") == null && userRequest.header("Range") == null) {
      transparentGzip = true
      requestBuilder.header("Accept-Encoding", "gzip")
    }
    val COOKIEs = COOKIEJar.loadForRequest(userRequest.url)
    if (COOKIEs.isNotEmpty()) {
      requestBuilder.header("COOKIE", COOKIEHeader(COOKIEs))
    }
    if (userRequest.header("User-Agent") == null) {
      requestBuilder.header("User-Agent", userAgent)
    }
    val networkRespOnse= chain.proceed(requestBuilder.build())
    COOKIEJar.receiveHeaders(userRequest.url, networkResponse.headers)
    val respOnseBuilder= networkResponse.newBuilder()
        .request(userRequest)
    if (transparentGzip &&
        "gzip".equals(networkResponse.header("Content-Encoding"), ignoreCase = true) &&
        networkResponse.promisesBody()) {
      val respOnseBody= networkResponse.body
      if (responseBody != null) {
        val gzipSource = GzipSource(responseBody.source())
        val strippedHeaders = networkResponse.headers.newBuilder()
            .removeAll("Content-Encoding")
            .removeAll("Content-Length")
            .build()
        responseBuilder.headers(strippedHeaders)
        val cOntentType= networkResponse.header("Content-Type")
        responseBuilder.body(RealResponseBody(contentType, -1L, gzipSource.buffer()))
      }
    }
    return responseBuilder.build()
}
object ConnectInterceptor : Interceptor {
  @Throws(IOException::class)
  override fun intercept(chain: Interceptor.Chain): Response {
    val realChain = chain as RealInterceptorChain
    val exchange = realChain.call.initExchange(chain) //1.ConnectInterceptor创建exchange
    val cOnnectedChain= realChain.copy(exchange = exchange)
    return connectedChain.proceed(realChain.request)
  }
}
  /** Finds a new or pooled connection to carry a forthcoming request and response. */
  internal fun initExchange(chain: RealInterceptorChain): Exchange {
    synchronized(this) {
      check(expectMoreExchanges) { "released" }
      check(!responseBodyOpen)
      check(!requestBodyOpen)
    }
    val exchangeFinder = this.exchangeFinder!!
    val codec = exchangeFinder.find(client, chain)//2.RealCall#initExchange()方法通过exchangeFinder.find()方法创建codec
    val result = Exchange(this, eventListener, exchangeFinder, codec)
    this.interceptorScopedExchange = result
    this.exchange = result
    synchronized(this) {
      this.requestBodyOpen = true
      this.respOnseBodyOpen= true
    }
    if (canceled) throw IOException("Canceled")
    return result
  }
  fun find(
    client: OkHttpClient,
    chain: RealInterceptorChain
  ): ExchangeCodec {
    try {
      val resultCOnnection= findHealthyConnection(//3.ExchangeFinder#find()方法通过findHealthyConnection方法创建resultConnection
          cOnnectTimeout= chain.connectTimeoutMillis,
          readTimeout = chain.readTimeoutMillis,
          writeTimeout = chain.writeTimeoutMillis,
          pingIntervalMillis = client.pingIntervalMillis,
          cOnnectionRetryEnabled= client.retryOnConnectionFailure,
          doExtensiveHealthChecks = chain.request.method != "GET"
      )
      return resultConnection.newCodec(client, chain)
    } catch (e: RouteException) {
      trackFailure(e.lastConnectException)
      throw e
    } catch (e: IOException) {
      trackFailure(e)
      throw RouteException(e)
    }
  }
  @Throws(IOException::class)
  private fun findHealthyConnection(
    connectTimeout: Int,
    readTimeout: Int,
    writeTimeout: Int,
    pingIntervalMillis: Int,
    connectionRetryEnabled: Boolean,
    doExtensiveHealthChecks: Boolean
  ): RealConnection {
    while (true) {
      val candidate = findConnection(//4.ExchangeFinder#find()方法通过findConnection拿到一个可用的connection
          cOnnectTimeout= connectTimeout,
          readTimeout = readTimeout,
          writeTimeout = writeTimeout,
          pingIntervalMillis = pingIntervalMillis,
          cOnnectionRetryEnabled= connectionRetryEnabled
      )
      // Confirm that the connection is good.
      if (candidate.isHealthy(doExtensiveHealthChecks)) {
        return candidate
      }
      // If it isn't, take it out of the pool.
      candidate.noNewExchanges()
      // Make sure we have some routes left to try. One example where we may exhaust all the routes
      // would happen if we made a new connection and it immediately is detected as unhealthy.
      if (nextRouteToTry != null) continue
      val routesLeft = routeSelection?.hasNext() ?: true
      if (routesLeft) continue
      val routesSelectiOnLeft= routeSelector?.hasNext() ?: true
      if (routesSelectionLeft) continue
      throw IOException("exhausted all routes")
    }
}
@Throws(IOException::class)
private fun findConnection(
connectTimeout: Int,
readTimeout: Int,
writeTimeout: Int,
pingIntervalMillis: Int,
connectionRetryEnabled: Boolean
): RealConnection {
if (call.isCanceled()) throw IOException("Canceled")
// Attempt to reuse the connection from the call.
val callCOnnection= call.connection // This may be mutated by releaseConnectionNoEvents()!
if (callConnection != null) {
var toClose: Socket? = null
synchronized(callConnection) {
if (callConnection.noNewExchanges || !sameHostAndPort(callConnection.route().address.url)) {
toClose = call.releaseConnectionNoEvents()
}
}
// If the call's connection wasn't released, reuse it. We don't call connectionAcquired() here
// because we already acquired it.
if (call.connection != null) {
check(toClose == null)
return callConnection
}
// The call's connection was released.
toClose?.closeQuietly()
eventListener.connectionReleased(call, callConnection)
}
// We need a new connection. Give it fresh stats.
refusedStreamCount = 0
cOnnectionShutdownCount= 0
otherFailureCount = 0
// Attempt to get a connection from the pool.
if (connectionPool.callAcquirePooledConnection(address, call, null, false)) {//5.通过RealConnectionPool#callAcquirePooledConnection()方法callAcquirePooledConnection复用连接池
val result = call.connection!!
eventListener.connectionAcquired(call, result)
return result
}
// Nothing in the pool. Figure out what route we'll try next.
val routes: List
val route: Route
if (nextRouteToTry != null) {
// Use a route from a preceding coalesced connection.
routes = null
route = nextRouteToTry!!
nextRouteToTry = null
} else if (routeSelection != null && routeSelection!!.hasNext()) {
// Use a route from an existing route selection.
routes = null
route = routeSelection!!.next()
} else {
// Compute a new route selection. This is a blocking operation!
var localRouteSelector = routeSelector
if (localRouteSelector == null) {
localRouteSelector = RouteSelector(address, call.client.routeDatabase, call, eventListener)
this.routeSelector = localRouteSelector
}
val localRouteSelection = localRouteSelector.next()
routeSelection = localRouteSelection
routes = localRouteSelection.routes
if (call.isCanceled()) throw IOException("Canceled")
// Now that we have a set of IP addresses, make another attempt at getting a connection from
// the pool. We have a better chance of matching thanks to connection coalescing.
if (connectionPool.callAcquirePooledConnection(address, call, routes, false)) {
val result = call.connection!!
eventListener.connectionAcquired(call, result)
return result
}
route = localRouteSelection.next()
}
// Connect. Tell the call about the connecting call so async cancels work.
val newCOnnection= RealConnection(connectionPool, route)
call.cOnnectionToCancel= newConnection
try {
newConnection.connect(//6.连接池里没有可用连接,新建一个连接
connectTimeout,
readTimeout,
writeTimeout,
pingIntervalMillis,
connectionRetryEnabled,
call,
eventListener
)
} finally {
call.cOnnectionToCancel= null
}
call.client.routeDatabase.connected(newConnection.route())
// If we raced another call connecting to this host, coalesce the connections. This makes for 3
// different lookups in the connection pool!
if (connectionPool.callAcquirePooledConnection(address, call, routes, true)) {
val result = call.connection!!
nextRouteToTry = route
newConnection.socket().closeQuietly()
eventListener.connectionAcquired(call, result)
return result
}
synchronized(newConnection) {
connectionPool.put(newConnection) //7.将连接添加到连接池
call.acquireConnectionNoEvents(newConnection)
}
eventListener.connectionAcquired(call, newConnection)
return newConnection //8.返回可用连接
}
通过RealConnectionPool#callAcquirePooledConnection()方法,判断一个连接是否可以被复用
/**
* Attempts to acquire a recycled connection to [address] for [call]. Returns true if a connection
* was acquired.
*
* If [routes] is non-null these are the resolved routes (ie. IP addresses) for the connection.
* This is used to coalesce related domains to the same HTTP/2 connection, such as `square.com`
* and `square.ca`.
*/
fun callAcquirePooledConnection(
address: Address,
call: RealCall,
routes: List
requireMultiplexed: Boolean
): Boolean {
for (connection in connections) {
synchronized(connection) {
if (requireMultiplexed && !connection.isMultiplexed) return@synchronized
if (!connection.isEligible(address, routes)) return@synchronized
call.acquireConnectionNoEvents(connection)
return true
}
}
return false
}
触发时机:
RealConnectionPool#put()方法,添加新的连接到连接池中,同时触发清理空闲连接操作
  fun put(connection: RealConnection) {
    connection.assertThreadHoldsLock()
    connections.add(connection)
    cleanupQueue.schedule(cleanupTask) //添加新connection时触发清理操作
  }
判定一个connection是否要被清理:
RealConnectionPool#cleanup()方法,先通过pruneAndGetAllocationCount()方法拿到当前连接是工作连接还是空闲连接,然后针对空闲连接结合空闲时间以及最大空闲连接数,判断是否要被清理。
fun cleanup(now: Long): Long {
var inUseCOnnectionCount= 0
var idleCOnnectionCount= 0
var longestIdleConnection: RealConnection? = null
var lOngestIdleDurationNs= Long.MIN_VALUE
// Find either a connection to evict, or the time that the next eviction is due.
for (connection in connections) {
synchronized(connection) {
// If the connection is in use, keep searching.
if (pruneAndGetAllocationCount(connection, now) > 0) {
inUseConnectionCount++
} else {
idleConnectionCount++
// If the connection is ready to be evicted, we're done.
val idleDuratiOnNs= now - connection.idleAtNs
if (idleDurationNs > longestIdleDurationNs) {
lOngestIdleDurationNs= idleDurationNs
lOngestIdleConnection= connection
} else {
Unit
}
}
}
}
when {
longestIdleDurationNs >= this.keepAliveDurationNs
|| idleConnectionCount > this.maxIdleConnections -> {
// We've chosen a connection to evict. Confirm it's still okay to be evict, then close it.
val cOnnection= longestIdleConnection!!
synchronized(connection) {
if (connection.calls.isNotEmpty()) return 0L // No longer idle.
if (connection.idleAtNs + longestIdleDurationNs != now) return 0L // No longer oldest.
connection.nOnewExchanges= true
connections.remove(longestIdleConnection)
}
connection.socket().closeQuietly()
if (connections.isEmpty()) cleanupQueue.cancelAll()
// Clean up again immediately.
return 0L
}
idleConnectionCount > 0 -> {
// A connection will be ready to evict soon.
return keepAliveDurationNs - longestIdleDurationNs
}
inUseConnectionCount > 0 -> {
// All connections are in use. It'll be at least the keep alive duration 'til we run
// again.
return keepAliveDurationNs
}
else -> {
// No connections, idle or in use.
return -1
}
}
}
/**
* Prunes any leaked calls and then returns the number of remaining live calls on [connection].
* Calls are leaked if the connection is tracking them but the application code has abandoned
* them. Leak detection is imprecise and relies on garbage collection.
*/
private fun pruneAndGetAllocationCount(connection: RealConnection, now: Long): Int {
connection.assertThreadHoldsLock()
val references = connection.calls
var i = 0
while (i
if (reference.get() != null) {
i++
continue
}
// We've discovered a leaked call. This is an application bug.
val callReference = reference as CallReference
val message = "A connection to ${connection.route().address.url} was leaked. " +
"Did you forget to close a response body?"
Platform.get().logCloseableLeak(message, callReference.callStackTrace)
references.removeAt(i)
connection.nOnewExchanges= true
// If this was the last allocation, the connection is eligible for immediate eviction.
if (references.isEmpty()) {
connection.idleAtNs = now - keepAliveDurationNs
return 0
}
}
return references.size
}
面试官:Okhttp连接池是咋实现的?
OkHttp中的Socket连接
Java并发编程之ConcurrentLinkedQueue详解


 京公网安备 11010802041100号 | 京ICP备19059560号-4 | PHP1.CN 第一PHP社区 版权所有
