在开始我们的blog之前,我们要先安装ngx-bootstrap-modal
npm install ngx-bootstrap-modal --save
不然我们的模态框效果会难看到你想吐
一、弹出方式一(此方法来自https://github.com/cipchk/ngx-bootstrap-modal)
1.alert弹框
(1)demo目录
--------app.component.ts
--------app.component.html
--------app.module.ts
--------detail(文件夹)
------------detail.component.ts
------------detail.component.html
(2)demo代码
app.module.ts导入必要的BootstrapModalModule 和ModalModule ,再注册它们
//app.module.ts
import { BrowserModule } from '@angular/platform-browser';
import { NgModule } from '@angular/core';
//这种模态框只需要导入下面这两个
import { BootstrapModalModule } from 'ngx-bootstrap-modal';
import { ModalModule } from 'ngx-bootstrap/modal';
import { AppComponent } from './app.component';
import { DetailComponent } from './detail/detail.component';
@NgModule({
 declarations: [
 AppComponent,
 DetailComponent
 ],
 imports: [
 BrowserModule,
 BootstrapModalModule
 ],
 providers: [],
 entryComponents: [
 DetailComponent
 ],
 bootstrap: [AppComponent]
})
export class AppModule { }
app.component.html创建一个可以弹出模态框的按钮
app.component.ts编写这个按钮的动作showAlert()
import { Component } from '@angular/core';
import { DialogService } from "ngx-bootstrap-modal";
import { DetailComponent } from './detail/detail.component'
@Component({
 selector: 'app-root',
 templateUrl: './app.component.html',
 styleUrls: ['./app.component.css']
})
export class AppComponent {
 title = 'app';
 constructor(public dialogService: DialogService) {
 }
 showAlert() {
  this.dialogService.addDialog(DetailComponent, { title: 'Alert title!', message: 'Alert message!!!' });
 }
}
detail.component.html编写alert弹框的布局
{{title}}
这是alert弹框
detail.component.ts创建模态框组件,我们需要创建一个组件,然后由 ngx-bootstrap-model 帮忙引导启动
对于这个组件需要继承 DialogComponent
T 外部传参给模态框的类型。
T1 模态框返回值类型。
因此,DialogService应该是DialogComponent的一个构造函数的参数。
import { Component } from '@angular/core';
import { DialogComponent, DialogService } from 'ngx-bootstrap-modal';
export interface AlertModel {
 title: string;
 message: string;
}
@Component({
 selector: 'alert',
 templateUrl: './detail.component.html',
 styleUrls: ['./detail.component.css']
})
export class DetailComponent extends DialogComponent implements AlertModel {
 title: string;
 message: string;
 constructor(dialogService: DialogService) {
 super(dialogService);
 }
}
2.confirm弹框
(1)demo目录
--------app.component.ts
--------app.component.html
--------app.module.ts
--------confirm(文件夹)
------------confirm.component.ts
------------confirm.component.html
(2)demo代码
app.module.ts导入必要的BootstrapModalModule 和ModalModule ,再注册它们,这些都跟alert弹框一样,因为这些都是方法一的弹出方式
//app.module.ts
import { BrowserModule } from '@angular/platform-browser';
import { NgModule } from '@angular/core';
//这种模态框只需要导入下面这两个
import { BootstrapModalModule } from 'ngx-bootstrap-modal';
import { ModalModule } from 'ngx-bootstrap/modal';
import { AppComponent } from './app.component';
import { DetailComponent } from './detail/detail.component';
@NgModule({
 declarations: [
 AppComponent,
 DetailComponent
 ],
 imports: [
 BrowserModule,
 BootstrapModalModule
 ],
 providers: [],
 entryComponents: [
 DetailComponent
 ],
 bootstrap: [AppComponent]
})
export class AppModule { }
app.component.html创建一个可以弹出模态框的按钮
app.component.ts编写这个按钮的动作showConfirm()
import { Component } from '@angular/core';
import { DialogService } from "ngx-bootstrap-modal";
import { ConfirmComponent } from './confirm/confirm.component'
@Component({
 selector: 'app-root',
 templateUrl: './app.component.html',
 styleUrls: ['./app.component.css']
})
export class AppComponent {
 title = 'app';
 constructor(public dialogService: DialogService,private modalService: BsModalService) {
 }
 showConfirm() {
  this.dialogService.addDialog(ConfirmComponent, {
   title: 'Confirmation',
   message: 'bla bla'
  })
   .subscribe((isConfirmed) => {
   });
 }
}
confirm.component.html编写confirm弹框的布局
{{title}}
这是confirm弹框
confirm.component.ts创建模态框组件
import { Component } from '@angular/core';
import { DialogComponent, DialogService } from 'ngx-bootstrap-modal';
export interface ConfirmModel {
 title:string;
 message:any;
}
@Component({
 selector: 'confirm',
 templateUrl: './confirm.component.html',
 styleUrls: ['./confirm.component.css']
})
export class ConfirmComponent extends DialogComponent implements ConfirmModel {
 title: string;
 message: any;
 constructor(dialogService: DialogService) {
 super(dialogService);
 }
 confirm() {
 // on click on confirm button we set dialog result as true,
 // ten we can get dialog result from caller code
 this.close(true);
 }
 cancel() {
 this.close(false);
 }
}
3.内置弹框
(1)demo目录
--------app.component.ts
--------app.component.html
--------app.module.ts
(2)demo代码
内置弹框也包括 alert confirm prompt 三种形态,都有一些内置的样式
app.module.ts
import { BrowserModule } from '@angular/platform-browser';
import { NgModule } from '@angular/core';
import { BootstrapModalModule } from 'ngx-bootstrap-modal';
import { ModalModule } from 'ngx-bootstrap/modal';
import { AppComponent } from './app.component';
@NgModule({
 declarations: [
 AppComponent
 ],
 imports: [
 BrowserModule,
 BootstrapModalModule,
 ModalModule.forRoot()
 ],
 providers: [],
 bootstrap: [AppComponent]
})
export class AppModule { }
app.component.html很简单,就一个按钮
app.component.ts很简单,连组件的布局都不用写,传入一些参数比如图标icon,大小size等
import { Component } from '@angular/core';
import { DialogService, BuiltInOptions } from "ngx-bootstrap-modal";
@Component({
 selector: 'app-root',
 templateUrl: './app.component.html',
 styleUrls: ['./app.component.css']
})
export class AppComponent {
 title = 'app';
 constructor(public dialogService: DialogService) {
 }
 show(){
  this.dialogService.show({
   content: '保存成功',
   icon: 'success',
   size: 'sm',
   showCancelButton: false
  })
 }
}
二、弹出方式二(此方法来自https://valor-software.com/ngx-bootstrap/#/modals)
还是跟上一种方法一样,先安装ngx-bootstrap-modal,然后导入bootstrap样式表
1.demo目录
--------app.component.ts
--------app.component.html
--------app.module.ts
2.demo代码
app.module.ts导入相应模块,并且注册它们
//app.module.ts
import { BrowserModule } from '@angular/platform-browser';
import { NgModule } from '@angular/core';
import { ModalModule } from 'ngx-bootstrap/modal';
import { AppComponent } from './app.component';
@NgModule({
 declarations: [
 AppComponent
 ],
 imports: [
 BrowserModule,
 ModalModule.forRoot()
 ],
 providers: [],
 entryComponents: [
 ],
 bootstrap: [AppComponent]
})
export class AppModule { }
app.component.ts
import { Component,TemplateRef } from '@angular/core';
import { BsModalService } from 'ngx-bootstrap/modal';
import { BsModalRef } from 'ngx-bootstrap/modal/modal-options.class';
@Component({
 selector: 'app-root',
 templateUrl: './app.component.html',
 styleUrls: ['./app.component.css']
})
export class AppComponent {
 title = 'app';
 public modalRef: BsModalRef;
 constructor(private modalService: BsModalService) {
 }
 showSecond(template: TemplateRef){//传入的是一个组件
  this.modalRef = this.modalService.show(template,{class: 'modal-lg'});//在这里通过BsModalService里面的show方法把它显示出来
 };
}
app.component.html
第二种模态框
第二种模态框弹出方式
三、最终效果
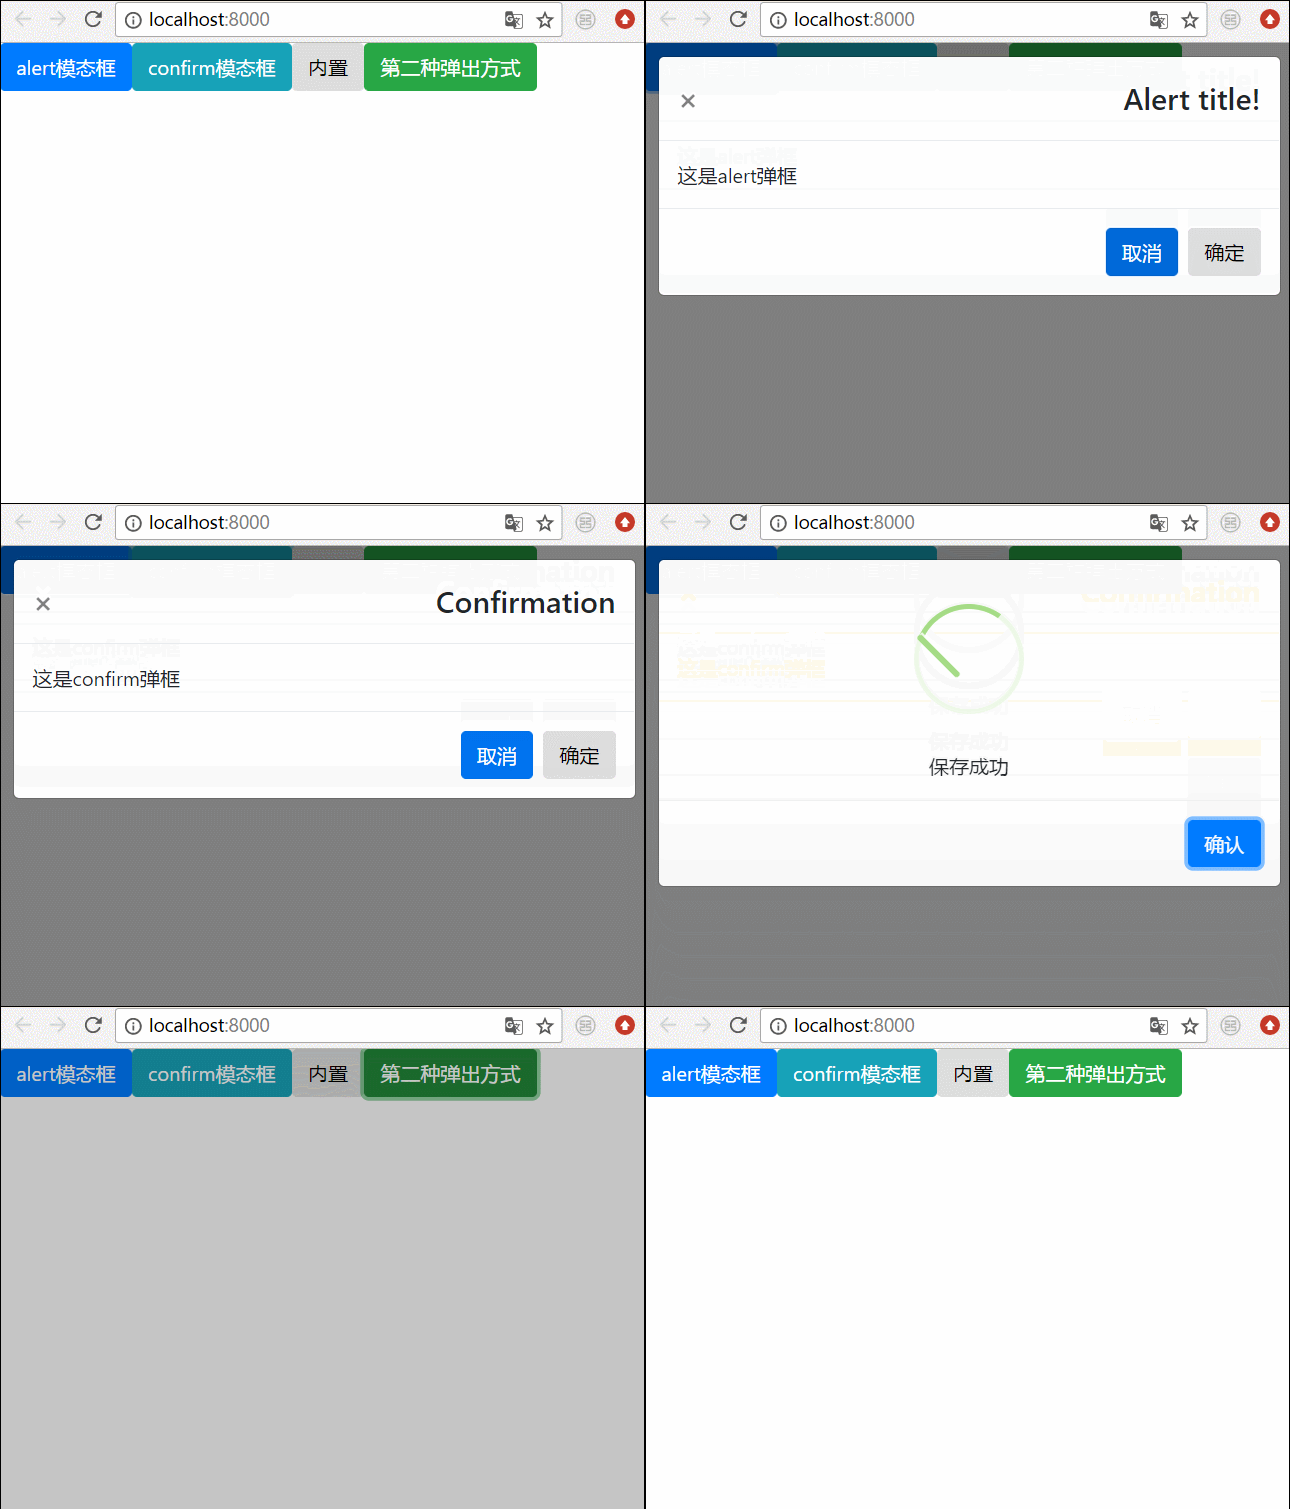
我们将上面所有的弹框全部写在一起,然后效果就是这样的

总结
以上所述是小编给大家介绍的Angular弹出模态框的两种方式,希望对大家有所帮助,如果大家有任何疑问请给我留言,小编会及时回复大家的。在此也非常感谢大家对网站的支持!

 京公网安备 11010802041100号 | 京ICP备19059560号-4 | PHP1.CN 第一PHP社区 版权所有