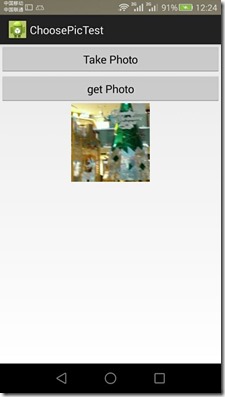
下面是效果图,看看是不是亲想要的效果图,如果是,这段代码你就可以参考下了,但是要灵活运用,根据需求做相应的改动。

package com.example.choosepictest;
import java.io.File;
import java.io.IOException;
import android.app.Activity;
import android.content.Intent;
import android.graphics.Bitmap;
import android.net.Uri;
import android.os.Bundle;
import android.os.Environment;
import android.provider.MediaStore;
import android.view.View;
import android.view.View.OnClickListener;
import android.widget.Button;
import android.widget.ImageView;
public class MainActivity extends Activity implements OnClickListener {
 public static final int TAKE_PHOTO = 1;
 public static final int CROP_PHOTO = 2;
 public static final int GET_PHOTO = 3;
 private Button takePhoto;
 private Button getPhoto;
 private ImageView picture;
 private Uri headImgUri;
 @Override
 protected void onCreate(Bundle savedInstanceState) {
  super.onCreate(savedInstanceState);
  setContentView(R.layout.activity_main);
  takePhoto = (Button) findViewById(R.id.take_photo);
  getPhoto = (Button) findViewById(R.id.get_photo);
  picture = (ImageView) findViewById(R.id.picture);
  takePhoto.setOnClickListener(this);
  getPhoto.setOnClickListener(this);
 }
 @Override
 public void onClick(View v) {
  switch (v.getId()) {
  case R.id.take_photo:
   takePhoto();
   break;
  case R.id.get_photo:
   getPhoto();
   break;
  default:
   break;
  }
 }
 // 拍照
 private void takePhoto() {
  File appDir = new File(Environment.getExternalStorageDirectory(),
    "/etoury/picCache");
  if (!appDir.exists()) {
   appDir.mkdir();
  }
  String fileName = "user_head" + ".jpg";
  File outputImage = new File(appDir, fileName);
  try {
   if (outputImage.exists()) {
    outputImage.delete();
   }
   outputImage.createNewFile();
  } catch (IOException e) {
   e.printStackTrace();
  }
  headImgUri = Uri.fromFile(outputImage);
  Intent intent = new Intent("android.media.action.IMAGE_CAPTURE");
  intent.putExtra(MediaStore.EXTRA_OUTPUT, headImgUri);
  startActivityForResult(intent, TAKE_PHOTO);
 }
 // 定向到图片库
 private void getPhoto() {
  Intent intent = new Intent(Intent.ACTION_PICK,
    android.provider.MediaStore.Images.Media.EXTERNAL_CONTENT_URI);
  startActivityForResult(intent, GET_PHOTO);
 }
 /**
  * 裁剪
  */
 private void crop(Uri uri) {
  // 裁剪图片意图
  Intent intent = new Intent("com.android.camera.action.CROP");
  intent.setDataAndType(uri, "image/*");
  // 下面这个crop=true是设置在开启的Intent中设置显示的VIEW可裁剪
  intent.putExtra("crop", "true");
  intent.putExtra("scale", true);// 去黑边
  // 裁剪框的比例,1:1
  intent.putExtra("aspectX", 1);// 输出是X方向的比例
  intent.putExtra("aspectY", 1);
  // 裁剪后输出图片的尺寸大小,不能太大500程序崩溃
  intent.putExtra("outputX", 256);
  intent.putExtra("outputY", 256);
  // 图片格式
  /* intent.putExtra("outputFormat", "JPEG"); */
  intent.putExtra("outputFormat", Bitmap.CompressFormat.JPEG.toString());
  // intent.putExtra("noFaceDetection", true);// 取消人脸识别
  intent.putExtra("return-data", true);// true:返回uri,false:不返回uri
  // 同一个地址下 裁剪的图片覆盖拍照的图片
  intent.putExtra(MediaStore.EXTRA_OUTPUT, headImgUri);
  startActivityForResult(intent, CROP_PHOTO);
 }
 @Override
 protected void onActivityResult(int requestCode, int resultCode, Intent data) {
  switch (requestCode) {
  case GET_PHOTO:
   if (resultCode == RESULT_OK) {
    crop(data.getData());
   }
   break;
  case TAKE_PHOTO:
   if (resultCode == RESULT_OK) {
    crop(headImgUri);
   }
   break;
  case CROP_PHOTO:
   if (resultCode == RESULT_OK) {
    Bitmap cropbitmap = data.getParcelableExtra("data");
    picture.setImageBitmap(cropbitmap);
   }
   break;
  default:
   break;
  }
 }
}
总结:
1. 拍照返回一张图片,可以是全尺寸的图片
2. 拍照返回图片的地址问题,一个目录下的一个文件
3. 裁剪的图片的地址, 覆盖了全尺寸图片的地址
4. 相册intent 返回的是一个uir , 不是string
5. 裁剪的图片,不能覆盖相册返回的uri(一定注意)

 京公网安备 11010802041100号 | 京ICP备19059560号-4 | PHP1.CN 第一PHP社区 版权所有