原标题:Linux内存初始化(汇编部分)
之前有几篇博客详细介绍了Xen的内存初始化,确实感觉这部分内容蛮复杂的。这两天在看Linux内核启动中内存的初始化,也是看的云里雾里的,想尝试下边看边写,在写博客的过程中慢慢思考,最后也能把自己的思考分享给其它人。
这个系列主要分为两个部分,汇编部分和C语言部分。
这篇博文主要介绍的是汇编部分。
内核解压缩过程
这个过程就不详述了,整个Linux内核是作为一个压缩过的镜像提供的,在执行内核代码之前,首先需要bootloader对其进行一个解压缩,对这部分有兴趣可以参看这篇博客。
最初的页表什么样?
解压结束后,会进行一个对elf格式的parse,然后对内核进行加载,最后进入arch/x86/kernel/head_64.S中的startup_64。
startup_64主要完成分页功能启用,最后跳入C代码x86_64_start_kernel。在开始分析代码之前,我们要先来看看在内核的数据段中,初始化页表是长怎么样的?
1
2
3
4
5
6
7
8
9
10
11
12
13
14
15
16
17
18
19
20
21
22
23
24
25
26
27
28
29
30
31
__INITDATA
NEXT_PAGE(early_level4_pgt)
.fill 511,8,0
.quad level3_kernel_pgt - __START_KERNEL_map + _PAGE_TABLE
NEXT_PAGE(early_dynamic_pgts)
.fill 512*EARLY_DYNAMIC_PAGE_TABLES,8,0
.data
NEXT_PAGE(init_level4_pgt)
.fill 512,8,0
NEXT_PAGE(level3_kernel_pgt)
.fill L3_START_KERNEL,8,0
/* (2^48-(2*1024*1024*1024)-((2^39)511))/(2^30) = 510 /
.quad level2_kernel_pgt - __START_KERNEL_map + _KERNPG_TABLE
.quad level2_fixmap_pgt - __START_KERNEL_map + _PAGE_TABLE
NEXT_PAGE(level2_kernel_pgt)
PMDS(0, __PAGE_KERNEL_LARGE_EXEC,
KERNEL_IMAGE_SIZE/PMD_SIZE)
NEXT_PAGE(level2_fixmap_pgt)
.fill 506,8,0
.quad level1_fixmap_pgt - __START_KERNEL_map + _PAGE_TABLE
/* 8MB reserved for vsyscalls + a 2MB hole = 4 + 1 entries */
.fill 5,8,0
NEXT_PAGE(level1_fixmap_pgt)
.fill 512,8,0
这段数据结构还是比较清楚的,你把下面这两个宏NEXT_PAGE和PMDS代入上面的数据结构:
1
2
3
4
5
6
7
8
9
10
11
define NEXT_PAGE(name) \
.balign PAGE_SIZE; \
GLOBAL(name)
/* Automate the creation of 1 to 1 mapping pmd entries */
define PMDS(START, PERM, COUNT) \
i = 0 ; \
.rept (COUNT) ; \
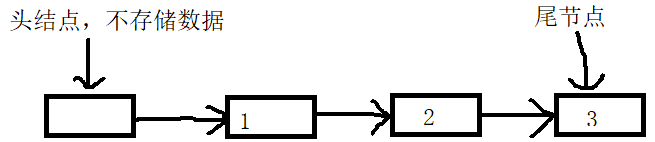
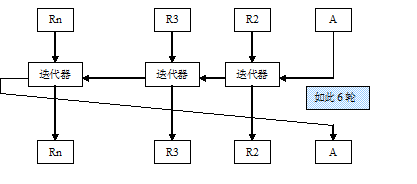
.quad (START) &#43; (i < i &#61; i &#43; 1 ; \ .endr 我们就可以很轻易地画出下面这张图&#xff1a; early page table 后面的初始化过程&#xff0c;就是建立在这个早期的页表结构中的。 正式进入startup_64 我们一段段来分析&#xff1a; 1 2 3 4 5 6 7 8 9 10 11 12 13 14 15 16 17 18 19 20 startup_64: /* * Compute the delta between the address I am compiled to run at and the * address I am actually running at. */ leaq _text(%rip), %rbp subq $_text - __START_KERNEL_map, %rbp /* Is the address not 2M aligned? */ movq %rbp, %rax andl $~PMD_PAGE_MASK, %eax testl %eax, %eax jnz bad_address /* * Is the address too large? */ leaq _text(%rip), %rax shrq $MAX_PHYSMEM_BITS, %rax jnz bad_address 这里的这段代码非常奇怪&#xff1a; 1 2 leaq _text(%rip), %rbp subq $_text - __START_KERNEL_map, %rbp 我想了好久&#xff0c;现在终于在Liangpig的指导下有了点眉目。(不确定的)解释如下&#xff1a; 首先leaq _text(%rip), %rbp是一个相对寻址的指令&#xff0c;其并不是直接将_text的地址和当前%rip的值相加&#xff0c;而是%rip加上一个_text和它的相对地址&#xff0c;其实就是$-7(因为该地址的长度为7&#xff0c;而当前的%rip就是_text地址加上7)&#xff0c;这个相对值是在link的时候计算出来的&#xff0c;可以参看这个问题和这个问题。 这里另外需要注意的一点是&#xff0c;在当前这个时候&#xff0c;计算机还是通过实模式进行寻址的&#xff0c;所以内核的代码应该是被load到了一个低地址(而不是大于0xffffffff8000000的地址)&#xff0c;因此&#xff0c;%rbp存储的也是一个低地址&#xff0c;表示的是内核的代码段被实际装载到内存到的地址&#xff0c;让我们假设是0x3000000。 那么$_text - __START_KERNEL_map是什么呢&#xff1f;我们来看下面的定义&#xff1a; 1 2 3 4 5 6 7 8 9 10 11 12 13 14 15 16 define __START_KERNEL_map _AC(0xffffffff80000000, UL) define __PHYSICAL_START ALIGN(CONFIG_PHYSICAL_START, \ CONFIG_PHYSICAL_ALIGN) define __START_KERNEL (__START_KERNEL_map &#43; __PHYSICAL_START) SECTIONS { . &#61; __START_KERNEL; .text : AT(ADDR(.text) - LOAD_OFFSET) { _text &#61; .; } } define 首先&#xff0c;__START_KERNEL_map是0xffffffff80000000&#xff0c;即内核代码和数据段在64位的虚拟地址空间中的最低地址段(0xffffffff80000000到0xffffffffa0000000这512MB的虚拟机之空间映射了内核段)。而_text表示的是__START_KERNEL_map加上了一段编译过程中指定的地址&#xff0c;在我机器内核的.config文件中为0x1000000。也就是说&#xff0c;如果__START_KERNEL_map映射的是物理地址为0的内存的话&#xff0c;那么在编译中我们期望的真正的物理地址就为0x1000000&#xff0c;也就是说&#xff0c;_text - __START_KERNEL_map表示的是我们在编译过程中期望的内核段被装载到内存的起始地址&#xff0c;因此subq_text - __START_KERNEL_map, %rbp表示将当前内核段真实被装载到内存中的地址和编译过程中期望被装载到内存中的地址的差值赋值给%rbx&#xff0c;在我们的例子中即为0x2000000(0x3000000 - 0x1000000)。 之后我们就对这个真实被装载到内存中的地址做一些检查&#xff0c;包括是否2M对齐&#xff0c;以及有没有超过最大大小等等&#xff0c;这里就不详述了。 然后做的一件事就是调整初始化页表中的物理地址映射&#xff1a; 1 2 3 4 5 6 7 8 9 /* * Fixup the physical addresses in the page table */ addq %rbp, early_level4_pgt &#43; (L4_START_KERNEL*8)(%rip) addq %rbp, level3_kernel_pgt &#43; (510*8)(%rip) addq %rbp, level3_kernel_pgt &#43; (511*8)(%rip) addq %rbp, level2_fixmap_pgt &#43; (506*8)(%rip) 这又是一段相对寻址&#xff0c;由于页表处于数据段&#xff0c;所以需要根据其和%rip中的相对地址来定位到页表&#xff0c;然后将页表中的表项加上之前计算的相对偏移量。当然这里只处理了early_level4_pgt、level3_kernel_pgt和level2_fixmap_pgt&#xff0c;而真正映射内核段的level2_kernel_pgt会在之后进行fixup。 之后又进入了一段诡异的代码&#xff0c;来建立identity mapping for the switchover&#xff0c;我也不懂这里的switchover是什么&#xff0c;我们先来看下这段代码做了什么吧&#xff1a; 1 2 3 4 5 6 7 8 9 10 11 12 13 14 15 16 17 18 19 20 21 22 23 24 25 26 27 28 29 30 31 32 33 34 35 36 37 38 39 40 41 /* * Set up the identity mapping for the switchover. These * entries should NOThave the global bit set! This also * creates a bunch of nonsense entries but that is fine – * it avoids problems around wraparound. */ leaq _text(%rip), %rdi leaq early_level4_pgt(%rip), %rbx movq %rdi, %rax shrq $PGDIR_SHIFT, %rax leaq (4096 &#43; _KERNPG_TABLE)(%rbx), %rdx movq %rdx, 0(%rbx,%rax,8) movq %rdx, 8(%rbx,%rax,8) addq 4096,movqshrqPUD_SHIFT, %rax andl (PTRSPERPUD−1),movqinclandl(PTRS_PER_PUD-1), %eax movq %rdx, 4096(%rbx,%rax,8) addq 8192,movqshrqPMD_SHIFT, %rdi addq (__PAGE_KERNEL_LARGE_EXEC & ~_PAGE_GLOBAL), %rax leaq (_end - 1)(%rip), %rcx shrqPMD_SHIFT, %rcx subq %rdi, %rcx incl %ecx 1: andq (PTRSPERPMD−1),movqincqaddqPMD_SIZE, %rax decl %ecx jnz 1b 我们可以稍微进行一个计算&#xff0c;首先%rdi保存了当前内核代码段的首地址&#xff0c;%rbx保存了early_level4_pgt的地址&#xff0c;%rax是内核代码首地址对于level4页表的index&#xff0c;在当前即为0。所以leaq (4096 &#43; _KERNPG_TABLE)(%rbx), %rdx表示的是将early_level4_pgt所在的地址加上一个页的地址&#xff0c;作为第3级页表页&#xff0c;再加上相应的权限位&#xff0c;保存在%rdx中&#xff0c;然后通过movq %rdx, 0(%rbx,%rax,8)和movq %rdx, 8(%rbx,%rax,8)指令把%rdx作为一个表项&#xff0c;存在early_level4_pgt的第0和第1项中。 然后将%rdx再加上一个页的大小&#xff0c;作为第2级页表页&#xff0c;找到内核代码段对于level3页表的index&#xff0c;然后将第2级页表页加上对应的权限作为一个页表项存在刚刚建立的level3页表的第0项和第1项。 然后将%rbx加上两个页的大小&#xff0c;即第2级页表的位置&#xff0c;找到从_text到_end所有内核代码段对于level2页表的索引&#xff0c;然后将对应的地址&#43;权限作为页表项逐个填到这个第2级页表中。 我们可以在arch/x86/kernel/head_64.S文件中找到这几个新添加的页表页的定义&#xff1a; 1 2 3 4 5 6 7 __INITDATA NEXT_PAGE(early_level4_pgt) .fill 511,8,0 .quad level3_kernel_pgt - __START_KERNEL_map &#43; _PAGE_TABLE NEXT_PAGE(early_dynamic_pgts) .fill 512*EARLY_DYNAMIC_PAGE_TABLES,8,0 即紧接着early_level4_pgt&#xff0c;被称为early_dynamic_pgts。这个就是所谓的identity mapping for the switchover&#xff0c;表示在之后的一小段页表转换过程中会被用到的identity mapping。因为在页表中虚拟地址从低地址到高地址转换的过程中不可避免的会通过低位的虚拟地址进行索引&#xff0c;所以需要预先做个identity mapping的准备。 至此&#xff0c;页表变成了这个样子。 early page table 2 startup_64最后一步就是fixup内核段真正的物理页对应的页表项了&#xff0c;代码如下所示&#xff1a; 1 2 3 4 5 6 7 8 9 10 11 12 13 14 15 16 17 18 19 20 21 22 /* * Fixup the kernel text&#43;data virtual addresses. Note that * we might write invalid pmds, when the kernel is relocated * cleanup_highmap() fixes this up along with the mappings * beyond _end. */ leaq level2_kernel_pgt(%rip), %rdi leaq 4096(%rdi), %r8 /* See if it is a valid page table entry */ 1: testq 1,0(jz2faddq/∗Gotothenextpage∗/2:addq8, %rdi cmp %r8, %rdi jne 1b /* Fixup phys_base */ addq %rbp, phys_base(%rip) movq $(early_level4_pgt - __START_KERNEL_map), %rax jmp 1f 这个过程的前半部分就是将level2_kernel_pgt中的表项进行一个个的检查&#xff0c;如果不是0(即为一个可能存在的页表项)&#xff0c;则将其加上之前计算的真实地址和被期待地址的偏移量(%rbp)。 当这个fixup结束之后&#xff0c;将%rbp保存在phys_base这个地址中&#xff0c;然后再将early_level4_pgt - __START_KERNEL_map保存在%rax中。 接下来就进入secondary_startup_64。 secondary_startup_64 这部分代码的主要功能是一些模式的开启&#xff0c;以及相关数据结构的加载&#xff0c;我们同样逐段进行分析&#xff1a; 1 2 3 4 5 6 7 8 ENTRY(secondary_startup_64) /* Enable PAE mode and PGE */ movl $(X86_CR4_PAE | X86_CR4_PGE), %ecx movq %rcx, %cr4 /* Setup early boot stage 4 level pagetables. */ addq phys_base(%rip), %rax movq %rax, %cr3 这里开启了PAE和PGE模式&#xff0c;并将其写到%cr4中&#xff0c;同时将初始页表的第四级页表地址写入了%cr3。至此&#xff0c;分页模式开启&#xff01; 1 2 3 4 5 6 7 8 9 10 11 12 13 14 15 16 17 18 19 20 21 22 23 24 25 26 27 28 29 30 31 32 33 34 /* Ensure I am executing from virtual addresses */ movq $1f, %rax jmp *%rax 1: /* Check if nx is implemented */ movl $0x80000001, %eax cpuid movl %edx,%edi /* Setup EFER (Extended Feature Enable Register) */ movl MSREFER,rdmsrbtsl_EFER_SCE, %eax /* Enable System Call */ btl 20,jnc1fbtsl_EFER_NX, %eax btsq $_PAGE_BIT_NX,early_pmd_flags(%rip) 1: wrmsr /* Make changes effective */ /* Setup cr0 */ define CR0_STATE (X86_CR0_PE | X86_CR0_MP | X86_CR0_ET | \ X86_CR0_NE | X86_CR0_WP | X86_CR0_AM | \ X86_CR0_PG) movl $CR0_STATE, %eax /* Make changes effective */ movq %rax, %cr0 /* Setup a boot time stack */ movq stack_start(%rip), %rsp /* zero EFLAGS after setting rsp */ pushq $0 popfq 上面的代码进行了一系列的初始化&#xff0c;包括检查nx(non-execution)是否开启&#xff0c;创建EFER&#xff0c;创建cr0&#xff0c;以及设置一个启动时会用到的栈&#xff0c;并且将所有eflags清零。这里就不细讲了。 然后是加载早期的GDT&#xff1a; 1 2 3 4 5 6 7 /* * We must switch to a new deor in kernel space for the GDT * because soon the kernel won’t have access anymore to the userspace * addresses where we’re currently running on. We have to do that here * because in 32bit we couldn’t load a 64bit linear address. */ lgdt early_gdt_descr(%rip) 初始化段寄存器&#xff1a; 1 2 3 4 5 6 7 8 9 10 11 12 13 14 15 16 17 18 19 20 /* set up data segments */ xorl %eax,%eax movl %eax,%ds movl %eax,%ss movl %eax,%es movl %eax,%fs movl %eax,%gs /* Set up %gs. * * The base of %gs always points to the bottom of the irqstack * union. If the stack protector canary is enabled, it is * located at %gs:40. Note that, on SMP, the boot cpu uses * init data section till per cpu areas are set up. */ movl $MSR_GS_BASE,%ecx movl initial_gs(%rip),%eax movl initial_gs&#43;4(%rip),%edx wrmsr 这里需要注意的是%gs的建立&#xff0c;它和per cpu变量相关&#xff0c;是一个比较关键的段寄存器。不过由于这个系列主要是和内存相关&#xff0c;所以这里就不详述了。 最后就是一个通过far jump的跳转&#xff1a; 1 2 3 4 5 6 7 8 9 10 11 /* Finally jump to run C code and to be on real kernel address * Since we are running on identity-mapped space we have to jump * to the full 64bit address, this is only possible as indirect * jump. In addition we need to ensure %cs is set so we make this * a far return. */ movq initial_code(%rip),%rax pushq 0 # fake return address to stop unwinder pushq__KERNEL_CS # set correct cs pushq %rax # target address in negative space lretq 其中initial_code定义为&#xff1a; 1 2 GLOBAL(initial_code) .quad x86_64_start_kernel 因此&#xff0c;最后进入了x86_64_start_kernel函数&#xff0c;这是一个C语言写的函数&#xff0c;所以&#xff0c;会在下一篇博客中进行介绍。返回搜狐&#xff0c;查看更多 责任编辑&#xff1a;


 京公网安备 11010802041100号 | 京ICP备19059560号-4 | PHP1.CN 第一PHP社区 版权所有