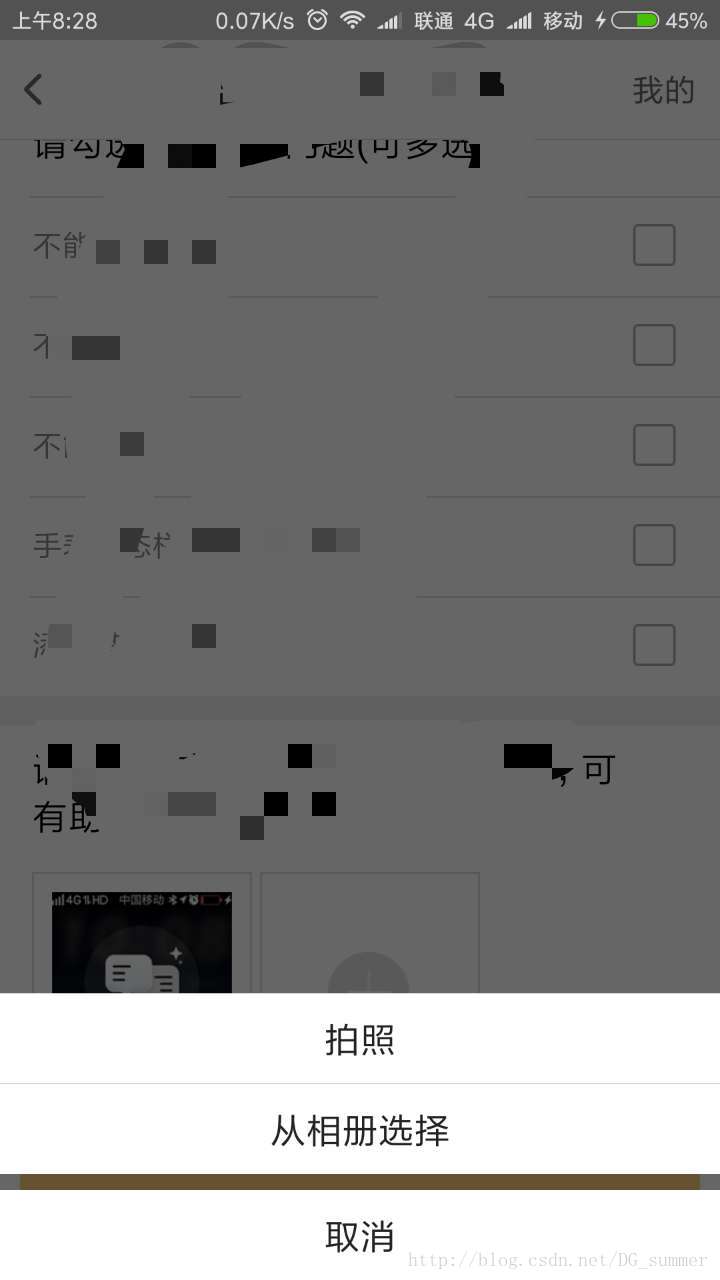
1.效果图如下
点击选择照相后,弹出如下选择对话框:

2. Dialog实现
布局
上面的高度和颜色,文字:
 #ffffff
 #dfdfdf
 #222222
 #cccccc
 45dp
 8dp
 18sp
 拍照
 从相册选择
 取消
控件selector
<&#63;xml version="1.0" encoding="utf-8"&#63;>
Dialog 创建
在style文件里面添加主题及dialog弹出动画
dialog创建
private TextView cancel;
private TextView takePhoto;
private TextView choosePhoto;
private Dialog dialog;
public void chosePhotoDialog() {
 dialog = new Dialog(this, R.style.ActionSheetDialogStyle);
 inflate = LayoutInflater.from(this).inflate(R.layout.view_abroad_choosephoto_dialog, null);
 choosePhoto = (TextView) inflate.findViewById(R.id.abroad_choosephoto);
 takePhoto = (TextView) inflate.findViewById(R.id.abroad_takephoto);
 cancel = (TextView) inflate.findViewById(R.id.abroad_choose_cancel);
 choosePhoto.setOnClickListener(this);
 takePhoto.setOnClickListener(this);
 cancel.setOnClickListener(this);
 dialog.setContentView(inflate);
 Window window = dialog.getWindow();
 if (dialog != null && window != null) {
  window.getDecorView().setPadding(0, 0, 0, 0);
  WindowManager.LayoutParams attr = window.getAttributes();
  if (attr != null) {
   attr.height = ViewGroup.LayoutParams.WRAP_CONTENT;
   attr.width = ViewGroup.LayoutParams.MATCH_PARENT;
   attr.gravity = Gravity.BOTTOM;//设置dialog 在布局中的位置
   window.setAttributes(attr);
  }
 }
 dialog.show();
}
Dialig 点击事件
@Override
public void onClick(View view) {
switch (view.getId()) {
case R.id.abroad_choosephoto:
pickAlbum();
break;
case R.id.abroad_takephoto:
takePhotos();
break;
case R.id.abroad_choose_cancel:
dialog.dismiss();
}
dialog.dismiss();
}
3. 选择图片
定义事件类型
 private static final int PHOTO_REQUEST_CAREMA = 1;// 拍照
 private static final int PHOTO_REQUEST_GALLERY = 2;// 从相册中选择
 private static final int PHOTO_REQUEST_CUT = 3;// 结果
从相册选取图片
 /***
  * 进入系统相册界面
  */
 private void pickAlbum() {
 Intent intent = new Intent(Intent.ACTION_PICK, null);
    intent.setDataAndType(MediaStore.Images.Media.EXTERNAL_CONTENT_URI, "image/*");
 startActivityForResult(intent, PHOTO_REQUEST_GALLERY);
 }
手机拍照后选取图片
 protected void takePhotos() {
  Intent intent = new Intent(MediaStore.ACTION_IMAGE_CAPTURE);
  startActivityForResult(intent, PHOTO_REQUEST_CAREMA);
 }
图片选择后,最终都会把数据返回到onActivityResult()方法里面,所以我们需要在activity里面重写此方法
@Override
 protected void onActivityResult(int requestCode, int resultCode, Intent data) {
  switch (requestCode) {
   case PHOTO_REQUEST_GALLERY:
    if (data != null) {
     Uri uri = handleImage(data);
     cropPhoto(uri);
    }
    break;
   case PHOTO_REQUEST_CAREMA:
    if (resultCode == RESULT_CANCELED) {
     return;
    }
    if (data != null) {
     Bitmap photo = data.getParcelableExtra("data");
     //将Bitmap转化为uri
     Uri uri = saveBitmap(photo, "temp");
     //启动图像裁剪
     cropPhoto(uri);
    }
    break;
   case PHOTO_REQUEST_CUT:
    LogUtil.d("abroadUseActivity2", "裁剪");
    // 从剪切图片返回的数据
    if (data == null) {
     return;
    }
    bitmap = data.getParcelableExtra("data");
    if (bitmap == null) {//
     return;
    }
    // TODO 此处我们便获得了bitmap对象,做其他操作
    bitmap.recycle();
    break;
   default:
    break;
  }
  super.onActivityResult(requestCode, resultCode, data);
 }
裁剪的方法
 private void cropPhoto(Uri uri) {
  // 裁剪图片意图
  Intent intent = new Intent("com.android.camera.action.CROP");
  intent.setDataAndType(uri, "image/*");
  intent.putExtra("crop", "true");
  // 裁剪框的比例,1:1
  intent.putExtra("aspectX", 1);
  intent.putExtra("aspectY", 1);
  // 裁剪后输出图片的尺寸大小
  intent.putExtra("outputX", 250);
  intent.putExtra("outputY", 250);
  intent.putExtra("outputFormat", "JPEG");// 图片格式
  intent.putExtra("noFaceDetection", true);// 取消人脸识别
  intent.putExtra("return-data", true);
  // 开启一个带有返回值的Activity,请求码为PHOTO_REQUEST_CUT
  startActivityForResult(intent, PHOTO_REQUEST_CUT);
 }
拍照后需要先把数据保存一个临时的文件,然后再获取文件,才能裁剪
/**
  * 把bitmap保存到本地
  *
  * @param bm  bitmap
  * @param dirPath 路径
  * @return 文件的uri
  */
 private Uri saveBitmap(Bitmap bm, String dirPath) {
  //新建文件夹用于存放裁剪后的图片
  File tmpDir = new File(Environment.getExternalStorageDirectory() + "/" + dirPath);
  if (!tmpDir.exists()) {
   tmpDir.mkdir();
  }
  //新建文件存储裁剪后的图片
  File img = new File(tmpDir.getAbsolutePath() + "/feedback.png");
  try {
   //打开文件输出流
   FileOutputStream fos = new FileOutputStream(img);
   //将bitmap压缩后写入输出流(参数依次为图片格式、图片质量和输出流)
   bm.compress(Bitmap.CompressFormat.JPEG, 100, fos);
   fos.flush();
   fos.close();
   //返回File类型的Uri
   return Uri.fromFile(img);
  } catch (FileNotFoundException e) {
   e.printStackTrace();
   return null;
  } catch (IOException e) {
   e.printStackTrace();
   return null;
  }
 }
4.注意事项
本来选择后不打算裁剪,但是在小米6等手机上,不裁剪容易崩溃,而裁剪的另一个好处就是压缩图片
在我们获取bitmap后,可以在那里做一些业务操作,但是一定要记得把bitmap文件回收,不然容易导致内存泄漏
总结
以上所述是小编给大家介绍的Andoroid实现底部图片选择Dialog效果,希望对大家有所帮助,如果大家有任何疑问请给我留言,小编会及时回复大家的。在此也非常感谢大家对网站的支持!

 京公网安备 11010802041100号 | 京ICP备19059560号-4 | PHP1.CN 第一PHP社区 版权所有